Home>Articles>Wood Paneling Is Back: How To Incorporate The Retro Look In Your Home
Articles
Wood Paneling Is Back: How To Incorporate The Retro Look In Your Home
Modified: October 27, 2024
Discover how to bring the retro charm of wood paneling back to your home with these helpful articles on incorporating the trendy look in your living spaces.
(Many of the links in this article redirect to a specific reviewed product. Your purchase of these products through affiliate links helps to generate commission for Storables.com, at no extra cost. Learn more)
Introduction
Wood paneling, a design trend from the past, is making a comeback in modern interior design. Once considered outdated and old-fashioned, wood paneling is now celebrated for its timeless appeal and ability to add character to any space. Whether you want to create a cozy and rustic atmosphere or add a touch of retro charm, incorporating wood paneling into your home can be a game-changer.
Wood paneling offers a unique aesthetic that can instantly transform a room. It adds warmth, texture, and depth to walls, creating a focal point that draws the eye. With a wide range of styles, finishes, and installation techniques available, you can customize your wood paneling to suit your personal taste and interior design concept.
But why has wood paneling made a comeback after years of being dismissed? There are a few reasons contributing to its resurgence in popularity. First, nostalgia plays a significant role. There is a certain romanticism associated with bygone eras, and incorporating wood paneling into your home allows you to relive those cherished memories.
Furthermore, the natural element of wood brings a sense of warmth and authenticity to modern spaces. In an age dominated by synthetic materials and mass-produced furnishings, wood paneling offers a refreshing contrast. It creates a connection to nature and evokes a sense of comfort and coziness.
Another factor contributing to the revival of wood paneling is its versatility. It can be used in a variety of ways and in different rooms, making it a versatile choice for homeowners and designers alike. Whether you want to cover an entire wall or create an accent wall, wood paneling offers endless possibilities for creative expression.
Moreover, the advancements in wood paneling technology have made it more accessible and easier to install than ever before. With a wide variety of prefinished panels and innovative installation methods, you can achieve a professional-looking result without the need for extensive carpentry skills.
In the following sections, we will explore how to choose the right type of wood paneling, how to prepare the walls for installation, and step-by-step instructions for installing wood paneling. We will also discuss ways to add texture, distress, stain, or paint the panels to create a unique look. Additionally, we will provide insights on how to incorporate wood paneling in different rooms, how to pair it with modern décor, and how to properly maintain and care for it.
Get ready to embrace the retro charm of wood paneling and transform your living spaces into cozy retreats that are both stylish and inviting.
Key Takeaways:
- Embrace the timeless charm of wood paneling to transform your living spaces into cozy retreats, pairing warmth and character with modern design elements for a visually striking and harmonious balance.
- Incorporate wood paneling into various rooms to evoke different moods and aesthetics, from creating a warm and inviting living room to a serene and luxurious bathroom retreat, ensuring proper maintenance and care to preserve its natural beauty for years to come.
Why Wood Paneling Is Making a Comeback
Wood paneling is experiencing a resurgence in popularity for several compelling reasons. Let’s explore why this retro design trend is making a comeback and why more and more homeowners are embracing the charm of wood paneling.
First and foremost, wood paneling adds a unique and timeless aesthetic to any space. With its natural warmth and texture, wood paneling brings a sense of depth and character to walls, instantly elevating the overall ambiance of a room. The natural grain patterns and variations in wood create a visually appealing backdrop that can complement various design styles, from rustic to contemporary.
Another reason behind the resurgence of wood paneling is its ability to evoke a sense of nostalgia. Many people grew up in homes or spaces with wood paneling, and it holds a sentimental value for them. By incorporating wood paneling into their own homes, they can recreate the cozy and comforting atmosphere they remember from their childhood. It’s a way to pay homage to the past while still embracing modern design trends.
Furthermore, wood paneling offers a level of versatility that is hard to match. There are countless styles and finishes available, allowing homeowners to find the perfect fit for their desired aesthetic. From traditional tongue-and-groove panels to sleek and contemporary designs, the options are endless. This versatility extends beyond just the appearance of the panels. Wood paneling can be used in different ways, such as covering an entire wall, creating an accent wall, or even as wainscoting. This flexibility allows homeowners to unleash their creativity and personalize their spaces.
When it comes to ease of installation, modern wood paneling systems have made significant advancements. With interlocking panels, adhesive systems, and improved finishes, installing wood paneling has become more accessible even for those without extensive carpentry skills. This means that homeowners can achieve professional-looking results without the need for costly contractors or time-consuming DIY projects.
Another reason behind the renewed popularity of wood paneling is its sustainability. With increasing awareness of environmental issues, many homeowners are looking for eco-friendly alternatives for their interior design choices. Wood paneling, when sourced from responsibly managed forests and manufactured using efficient processes, can be a sustainable option. It is a renewable resource and, with proper care, can last for generations.
Lastly, wood paneling offers a sense of comfort and coziness that is often lacking in modern interiors. In today’s fast-paced and technology-driven world, there is a growing desire for spaces that provide a respite from the chaos. Wood paneling brings a touch of nature inside, creating a soothing environment that promotes relaxation. Whether it’s in a living room, bedroom, or even a home office, the warmth and organic feel of wood paneling can make any space feel more inviting.
With its timeless appeal, versatility, and ability to evoke nostalgia, wood paneling is making a comeback in the world of interior design. Whether used sparingly as an accent or covering entire walls, wood paneling adds a unique and captivating charm to any space. So, if you’re looking to infuse some character and warmth into your home, consider embracing the retro elegance of wood paneling.
Choosing the Right Type of Wood Paneling
When it comes to choosing the right type of wood paneling for your home, there are several factors to consider. The type of wood, style, finish, and installation method all play a role in determining the overall look and feel of your space. Let’s explore these factors to help you make an informed decision.
Type of Wood: The type of wood you choose for your paneling will greatly impact the overall aesthetic. Common wood options include pine, oak, cedar, and walnut. Pine is a popular choice for its affordability and rustic appeal. Oak offers a timeless elegance and durability, while cedar provides a natural aroma and insect resistance. Walnut, with its rich color and grain, adds a touch of luxury to any space. Consider the characteristics of each type of wood and choose the one that best aligns with your desired look.
Style: Wood paneling comes in various styles, each offering a different visual effect. Tongue-and-groove paneling is the most traditional and versatile choice, with interlocking boards that create a seamless look. Beadboard paneling adds a touch of architectural interest with vertical grooves. Raised paneling features embossed designs and offers a more formal and elegant look. Shiplap paneling provides a rustic and farmhouse vibe with its overlapping horizontal boards. Consider the style that best suits your design concept and desired atmosphere.
Finish: Wood paneling can be left natural or finished to enhance its appearance. Natural finishes showcase the beauty of the wood’s grain and color. Clear coatings, such as varnish or polyurethane, protect the wood while maintaining its natural look. Stained finishes add color and depth to the wood, allowing you to match or complement your existing décor. Painted finishes offer versatility, as you can choose any color to suit your style. Consider the desired level of wood grain visibility and the overall color scheme of your space when selecting the finish.
Installation Method: The installation method you choose will depend on your DIY skills and the desired outcome. Traditional wood paneling requires nailing or gluing each board to the wall, which can be time-consuming and may require professional assistance. However, there are now innovative alternatives available, such as adhesive systems or interlocking panels, that make installation easier and more efficient. These systems often require minimal tools and can be a great DIY project for homeowners with limited carpentry experience.
Budget: Of course, your budget will also play a role in your decision-making process. Wood paneling comes in a wide range of price points, depending on the type of wood, style, and finish. Pine, for example, is typically more affordable compared to oak or walnut. Consider your budget and explore different options to find the best combination of quality and affordability.
Ultimately, choosing the right type of wood paneling involves considering the type of wood, style, finish, installation method, and budget. Take your time to explore different options, visualize how they will look in your space, and consider the overall aesthetic you want to achieve. By making an informed decision, you can ensure that your wood paneling enhances the beauty and atmosphere of your home.
Selecting the Perfect Space for Wood Paneling
Wood paneling can add a touch of warmth and character to any room in your home. However, not all spaces are equally suitable for this design feature. When selecting the perfect space for wood paneling, there are a few factors to consider. Let’s explore these factors to help you make an informed decision.
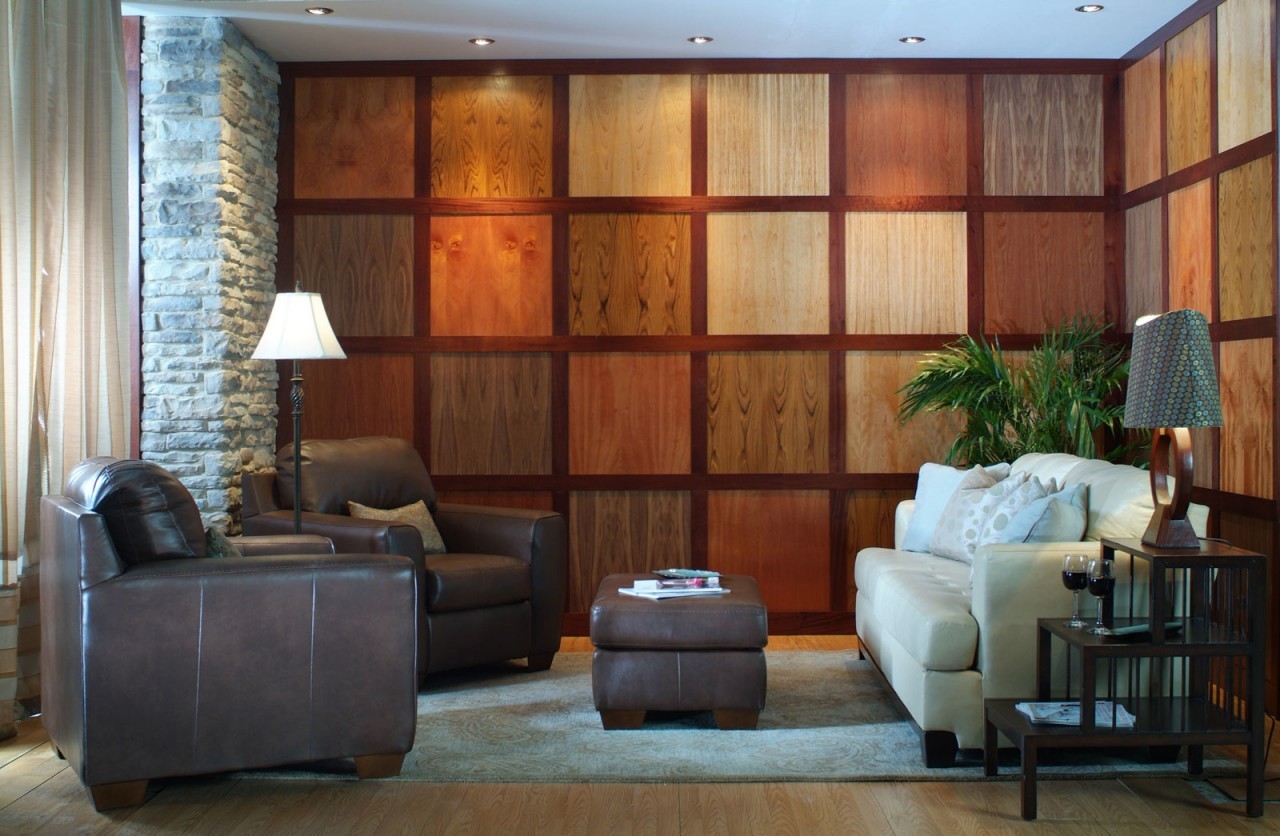
Style and Atmosphere: Consider the overall style and atmosphere you want to create in the space. Wood paneling works well in areas where you want to evoke a cozy, rustic, or vintage vibe. It can be a great addition to living rooms, bedrooms, dining rooms, or even home offices. On the other hand, spaces that require a more sleek and contemporary look, such as minimalist or modern designs, may not be the best fit for wood paneling. Consider the existing décor and architectural elements of the room and choose a space where wood paneling can enhance the overall aesthetic.
Focal Point: Wood paneling can serve as a focal point in a room, drawing attention and adding visual interest. Consider which walls or areas in your space could benefit from a striking design feature. A prominent wall behind a sofa, bed, or dining table can be an ideal spot for wood paneling. By choosing a wall that naturally attracts attention, you can highlight the beauty of the paneling and create a stunning focal point in the room.
Size and Proportion: Consider the size and proportion of the space when selecting a location for wood paneling. In smaller rooms, covering all the walls with paneling can make the space feel cramped. Instead, consider using wood paneling as an accent wall to create visual interest without overwhelming the room. In larger rooms, you have more flexibility to use wood paneling on multiple walls, as long as it is balanced with other design elements. Pay attention to the scale of the room and ensure that the wood paneling does not overpower the space.
Functional Considerations: Think about the functional aspects of the space before installing wood paneling. Spaces with high humidity or moisture, such as bathrooms or kitchens, may not be the best fit for wood paneling. Wood is prone to warping or rotting in moist environments, so it’s important to choose spaces where the paneling is less likely to be exposed to excessive moisture. Additionally, consider the maintenance and cleaning requirements of wood paneling. In high-traffic areas or spaces prone to stains or damage, it may be more challenging to keep the paneling in pristine condition.
Design Cohesion: Finally, consider how wood paneling will integrate with the rest of your home’s design. If you already have wood elements or a cohesive design theme throughout your home, incorporating wood paneling in a new space can help create a sense of continuity and harmony. On the other hand, if your home has a mix of design styles or materials, consider how wood paneling will fit into the overall design narrative. It’s essential to choose a space where wood paneling will complement and enhance the existing design rather than clash with it.
By considering the style and atmosphere of the space, identifying a focal point, assessing the size and proportion, taking functional considerations into account, and ensuring design cohesion, you can select the perfect space in your home for wood paneling. With careful planning and thoughtful decision-making, you can create a visually appealing and harmonious environment that showcases the beauty and charm of wood paneling.
Preparing the Walls for Installation
Before installing wood paneling, it’s crucial to prepare the walls properly to ensure a smooth and durable installation. Proper preparation will help the paneling adhere securely, prevent any moisture-related issues, and ensure a professional-looking result. Here are the essential steps to follow when preparing the walls for wood paneling installation.
Clean the Walls: Begin by thoroughly cleaning the walls to remove any dirt, dust, or grime. Use a mild detergent and water solution to scrub the walls gently. Pay extra attention to areas near windows, doors, and high-touch surfaces to remove any residue or grease. Allow the walls to dry completely before proceeding.
Inspect for Damage: Carefully inspect the walls for any signs of damage, such as cracks, holes, or loose paint. Patch any holes or cracks with wall filler, and use sandpaper to smooth out the surface. If there are areas with flaking or loose paint, it’s essential to scrape or sand it away to create a clean and even surface. This step will ensure that the wood paneling adheres firmly to the walls.
Check for Moisture: Moisture can be detrimental to wood paneling, causing warping or mold growth. Before installing the panels, check the walls for any signs of moisture. Use a moisture meter to measure the moisture content of the walls. If the moisture level is too high, it’s crucial to address the underlying issue before proceeding with the installation. Consult a professional if you suspect any water infiltration or moisture-related problems.
Apply a Vapor Barrier: In areas with potential moisture issues or high humidity, it’s advisable to install a vapor barrier before attaching the wood paneling. A vapor barrier helps protect the paneling from excess moisture and prevents moisture from seeping through the walls. Use a plastic or foil-backed moisture barrier and follow the manufacturer’s instructions for proper installation.
Prime the Walls: Applying a primer to the walls before installing wood paneling helps ensure better adhesion and a more professional finish. Use a high-quality primer specifically designed for the type of wall surface you have, whether it’s drywall, plaster, or another material. Apply the primer evenly using a roller or brush, and allow it to dry completely according to the manufacturer’s instructions.
Mark Studs and Outlets: Before attaching the wood paneling, locate and mark the positions of wall studs using a stud finder. This step is crucial for ensuring that the panels are securely fastened to the wall. Additionally, mark the locations of electrical outlets and switches on the walls, as they will need to be cut out in the paneling to provide access.
Plan Panel Layout: Take time to plan the panel layout before you begin installation. Measure the height and width of the walls, and calculate the number of panels needed. Determine the desired spacing between panels and plan any cuts or adjustments that may be required. This step will help you achieve a visually pleasing layout and minimize the need for on-the-spot adjustments during installation.
By following these preparation steps, you can ensure that your walls are ready for wood paneling installation. Proper wall preparation not only ensures a successful installation but also contributes to the longevity and appearance of the paneling. Take your time and pay attention to detail, and you’ll be rewarded with a professional-looking result that enhances the beauty of your space.
Installing Wood Paneling: Step-by-Step Guide
Installing wood paneling can be a satisfying and transformative DIY project that adds character and charm to your space. Follow this step-by-step guide to ensure a successful installation of your wood paneling.
Step 1: Gather the Tools and Materials: Before you begin, gather all the necessary tools and materials. You will need a tape measure, level, saw, drill, panel adhesive or nails, adhesive spreader or hammer, sandpaper, and a finishing nail set or nail punch. Additionally, have your wood paneling, trim pieces, and any necessary fasteners or adhesives ready.
Step 2: Start with a Straight and Level Base: It is essential to start with a straight and level base. Use a level and a pencil to mark a level line along the base of the wall. This line will act as a guide for installing the first row of panels. If the floor is uneven, you may need to use shims to level the bottom row.
Step 3: Cut and Fit the Panels: Measure the height of the wall and cut the panels to the appropriate size using a saw. It’s crucial to make accurate cuts to ensure a seamless look. Test fit each panel before applying adhesive or fasteners to ensure a proper fit. If necessary, use sandpaper to smooth any rough edges.
Step 4: Apply Adhesive or Nails: Depending on the type of wood paneling you are using, apply adhesive or nails to secure the panels to the wall. If using adhesive, apply it evenly to the back of the panel using an adhesive spreader. Press the panel firmly against the wall, making sure it aligns with the level line. If using nails, pre-drill holes into the paneling and then attach it to the wall using a nail gun or hammer.
Step 5: Continue Installing Panels: Repeat the process for the remaining panels, ensuring a tight fit between each one. Use a level to ensure that the panels are straight both vertically and horizontally. Trim any panels as needed to fit around doors, windows, or other obstacles. Take your time and double-check your work at each step to ensure a professional-looking installation.
Step 6: Install Trim Pieces: Once all the panels are in place, install trim pieces to provide a finished look. Measure and cut the trim pieces to the appropriate lengths, and attach them to the edges of the paneling using nails or adhesive. This step helps conceal any gaps and adds a polished touch to the overall installation.
Step 7: Finishing Touches: After you have installed the panels and trim pieces, inspect the installation for any gaps, loose panels, or visible fasteners. Make any necessary adjustments before proceeding to the next step. If desired, use a finishing nail set or nail punch to sink any exposed nails slightly below the surface of the wood. This will allow for a smooth, seamless look.
Step 8: Sand and Finish: Once the installation is complete, lightly sand the surface of the paneling to remove any rough areas or imperfections. Then, apply a finish or stain to enhance the natural beauty of the wood. Follow the manufacturer’s instructions for the chosen finish and allow it to dry completely before moving furniture back into place or decorating the space.
By following these step-by-step instructions, you can successfully install wood paneling in your space. Remember to take your time, measure accurately, and double-check your work throughout the process. With proper installation, your wood paneling will become a stunning focal point and an enduring feature of your home’s interior design.
When incorporating wood paneling into your home, consider using it as an accent wall rather than covering the entire room. This can add a retro touch without overwhelming the space.
Adding Texture and Distressing the Panels
If you’re looking to add a touch of character and vintage charm to your wood paneling, adding texture and distressing the panels can create a unique and rustic look. Whether you prefer a subtle weathered appearance or a more pronounced distressed effect, here are some techniques to help you achieve the desired textured and aged look for your wood paneling.
1. Wire Brushing: Wire brushing is a simple but effective technique to add texture to your wood panels. Using a wire brush, carefully brush the surface of the panels along the grain, creating subtle grooves and removing some of the softer wood. This technique highlights the natural grain patterns and gives the panels a rustic and weathered appearance.
2. Sanding: Sanding is another method to add texture to wood paneling. Use sandpaper or a sanding block to sand the panels, focusing on the edges and surface. Vary the pressure and direction of your sanding to create a distressed and aged look. Pay attention to corners and high-traffic areas, as these are typically the first areas to show signs of wear.
3. Hammer Dents: For a more pronounced distressed effect, you can create hammer dents on the wood panels. Use a hammer and gently tap the surface of the panels, focusing on random areas. Vary the intensity and placement of the dents to mimic natural wear and tear. This technique adds depth and character to the panels, giving them an authentic aged appearance.
4. Circular Sander: A circular sander can be used to add a distressed texture to wood panels. Randomly move the sander across the surface of the panels, creating circular patterns and unevenness. This technique mimics the effect of years of use and gives the panels a beautifully weathered look.
5. Burnishing: Burnishing is a technique that involves applying heat to the surface of the wood panels to darken the grain and create an aged patina. Use a heat gun or a blowtorch at a safe distance to lightly scorch the surface of the panels. Be cautious and test the technique on a small area first to ensure you achieve the desired effect without damaging the panels.
6. Whitewashing or Staining: Another way to add texture and depth to wood paneling is through whitewashing or staining. Whitewashing involves applying a diluted white paint or whitewash solution to the panels and then wiping off the excess, allowing the wood grain to show through. Staining involves applying a wood stain that is slightly darker than the natural color of the wood, enhancing the grain and adding dimension. Both techniques can create a beautiful aged effect while preserving the natural beauty of the wood.
7. Combination Techniques: Feel free to experiment with a combination of different distressing techniques to achieve a unique and personalized look. For example, you can start by wire brushing the panels, followed by sanding and hammer dents to create a more pronounced distressed effect. Be creative and try different methods to achieve the desired texture and level of distressing.
Remember, before distressing your wood panels, it’s a good practice to test your chosen technique on a small, inconspicuous area to ensure you achieve the desired look. Protect yourself by wearing appropriate safety gear, such as goggles and gloves, and work in a well-ventilated area. Take your time, have patience, and enjoy the process of transforming your wood paneling into a unique piece of art that tells a story of age and character.
Staining or Painting Wood Paneling
Staining or painting wood paneling is an excellent way to transform the look of your space and add a personal touch to your interior design. Whether you want to highlight the natural beauty of the wood or introduce a pop of color, staining or painting can bring new life to your wood paneling. Here’s a guide to help you decide between staining or painting and how to achieve the desired results.
Staining Wood Paneling:
Staining enhances the natural beauty and grain of the wood while adding depth and color. Here’s how to stain your wood paneling:
Step 1: Prepare the Wood: Before staining, ensure that the wood paneling is clean and free of any dirt, oils, or previous finishes. Sand the surface lightly to create a smooth and even surface for staining. Remove any dust or debris by wiping the paneling with a tack cloth or damp cloth.
Step 2: Choose the Right Stain: Select a wood stain that complements your overall design scheme and desired aesthetic. Consider the color, transparency, and sheen of the stain. Conduct a test spot on an inconspicuous area of the paneling to ensure you achieve the desired result.
Step 3: Apply the Stain: Use a brush, cloth, or sponge to apply the stain to the wood paneling, following the manufacturer’s instructions. Work in small sections, applying the stain evenly along the grain. Wipe off any excess stain with a clean cloth to create a consistent finish.
Step 4: Allow the Stain to Dry: Allow the stain to dry fully according to the manufacturer’s instructions. This usually takes several hours or overnight. Ensure proper ventilation during the drying process.
Step 5: Seal the Stained Wood: After the stain has dried, apply a clear topcoat or sealer to protect the stained wood and enhance its durability. Select a polyurethane or varnish that matches your desired level of sheen, such as satin, semi-gloss, or gloss. Apply the topcoat according to the manufacturer’s instructions and allow it to dry completely.
Painting Wood Paneling:
Painting wood paneling allows for greater flexibility in color choices and can completely transform the look of your space. Here’s how to paint your wood paneling:
Step 1: Prepare the Wood: Just like with staining, ensure that the wood paneling is clean and free of any dust, dirt, or previous finishes. Sand the surface lightly to create a smooth and even surface for painting. Remove any dust or debris by wiping the paneling with a tack cloth or damp cloth.
Step 2: Prime the Wood: To create a smooth and uniform surface, apply a coat of primer to the wood paneling. Choose a high-quality primer specifically formulated for wood surfaces. Allow the primer to dry completely according to the manufacturer’s instructions.
Step 3: Choose the Right Paint: Consider the desired color, finish, and sheen for your painted wood paneling. Select a paint that is suitable for wood surfaces and your desired design aesthetic. Generally, a latex or acrylic paint is recommended for interior wood paneling. Conduct a test spot on an inconspicuous area to ensure that the paint adheres well and achieves the desired coverage.
Step 4: Apply the Paint: Use a brush, roller, or paint sprayer to apply the paint to the wood paneling, following the manufacturer’s instructions. Work in small sections, painting along the grain for a more even finish. Apply additional coats as needed to achieve the desired color and coverage. Allow each coat to dry fully before applying the next coat.
Step 5: Seal the Painted Wood: Depending on the type of paint used, you may or may not need to apply a clear topcoat or sealer. If using a latex or acrylic paint, you can often skip the topcoat. However, if you prefer added protection or if you want to achieve a higher gloss finish, consider applying a clear topcoat according to the manufacturer’s instructions.
Whether you choose to stain or paint your wood paneling, the result can be a stunning and personalized transformation. Consider your design preferences, overall aesthetic, and desired level of maintenance when making your decision. With proper preparation and technique, you can achieve a beautiful and long-lasting finish that elevates the style and ambiance of your space.
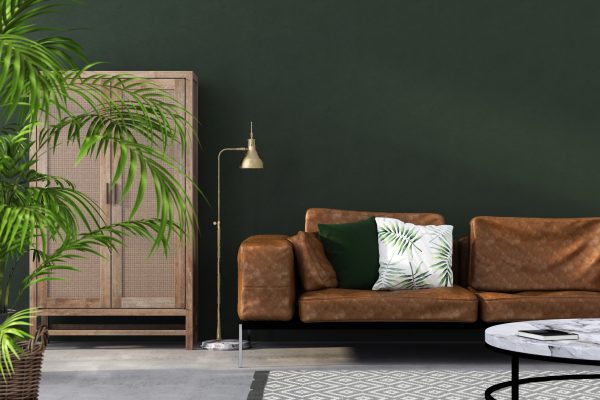
Pairing Wood Paneling with Modern Décor
Wood paneling is often associated with traditional or rustic design styles, but it can also be successfully paired with modern décor to create a unique and visually interesting space. Combining the warmth and character of wood paneling with modern elements can result in a dynamic and eclectic interior design. Here are some tips for pairing wood paneling with modern décor:
1. Contrast with Minimalism: Embrace the juxtaposition of the natural textures and patterns of wood paneling with clean lines and simplicity. Choose sleek and minimalist furniture pieces with sharp edges and simple forms. The minimalistic approach will create a striking contrast between the warmth of the wood paneling and the clean, contemporary lines of modern furniture.
2. Play with Colors: Experiment with color combinations to bring a modern twist to your wood-paneled space. Consider using bold and vibrant colors on the walls, furniture, or accessories to create a pop of contrast against the wood paneling. Alternatively, you can choose a monochromatic color scheme using neutral shades that complement the warm tones of the wood, allowing the paneling to stand out as a focal point.
3. Incorporate Textiles and Patterns: Add vibrancy and texture to your wood-paneled room by incorporating modern textiles and patterns. Choose bold and geometric patterns for upholstery, curtains, or rugs to create visual interest. Textiles with a mix of different materials, such as velvet or faux fur, can also add a sense of luxury and modernity to the space.
4. Integrate Modern Lighting: Modern lighting fixtures can enhance the contemporary feel of the space while accentuating the wood paneling. Consider installing sleek and minimalist pendant lights, track lighting, or recessed lighting to highlight specific areas of the room. The right lighting can create a captivating interplay of light and shadows on the wood paneling, adding depth and dimension to the space.
5. Incorporate Metallic Accents: Metallic elements can add a touch of sophistication and glamour to the space. Choose modern furniture or accessories with metallic finishes, such as chrome, gold, or brass. The reflective surfaces will create a striking contrast against the natural texture of the wood paneling and complement the modern aesthetic.
6. Balance Textures: Mix different textures to create a visually balanced and interesting space. Incorporate smooth and sleek materials, such as glass or polished metal, to contrast with the rough texture of the wood paneling. Consider adding texture through decorative pillows, throws, or wall art to create a layered and dynamic environment.
7. Emphasize Open Space: Keep the space open and free from clutter to maintain a modern and minimalist feel. Avoid overcrowding the room with too much furniture or accessories. Allow the natural beauty of the wood paneling to take center stage by keeping the surrounding space clean and uncluttered.
By pairing wood paneling with modern décor elements, you can create a space that blends warmth and character with contemporary style. Embrace the contrast between the natural textures of the wood and the sleekness of modern design. Through careful selection of furniture, colors, lighting, and textures, you can achieve a harmonious and visually striking balance that elevates both the wood paneling and the overall modern aesthetic of your space.
Incorporating Wood Paneling in Different Rooms
Wood paneling is a versatile design element that can be incorporated into various rooms throughout your home. Whether you want to create a cozy and rustic atmosphere or add a touch of elegance and sophistication, here are some ideas for incorporating wood paneling in different rooms:
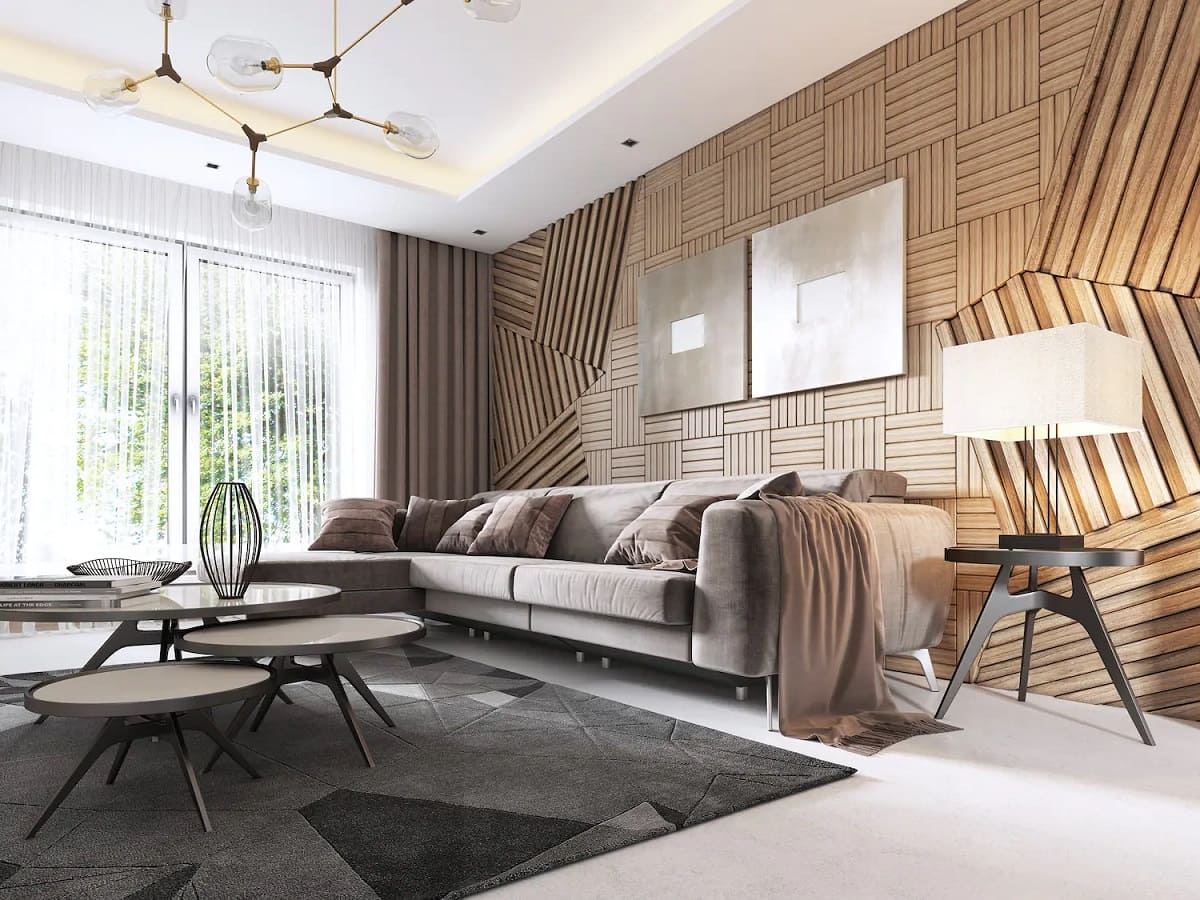
Living Room: Wood paneling can create a warm and inviting atmosphere in the living room. Consider installing wood paneling as an accent wall behind the sofa or as a backdrop for your entertainment center. Complement the paneling with comfortable seating, plush textiles, and a mix of textures to achieve a cozy and sophisticated living room.
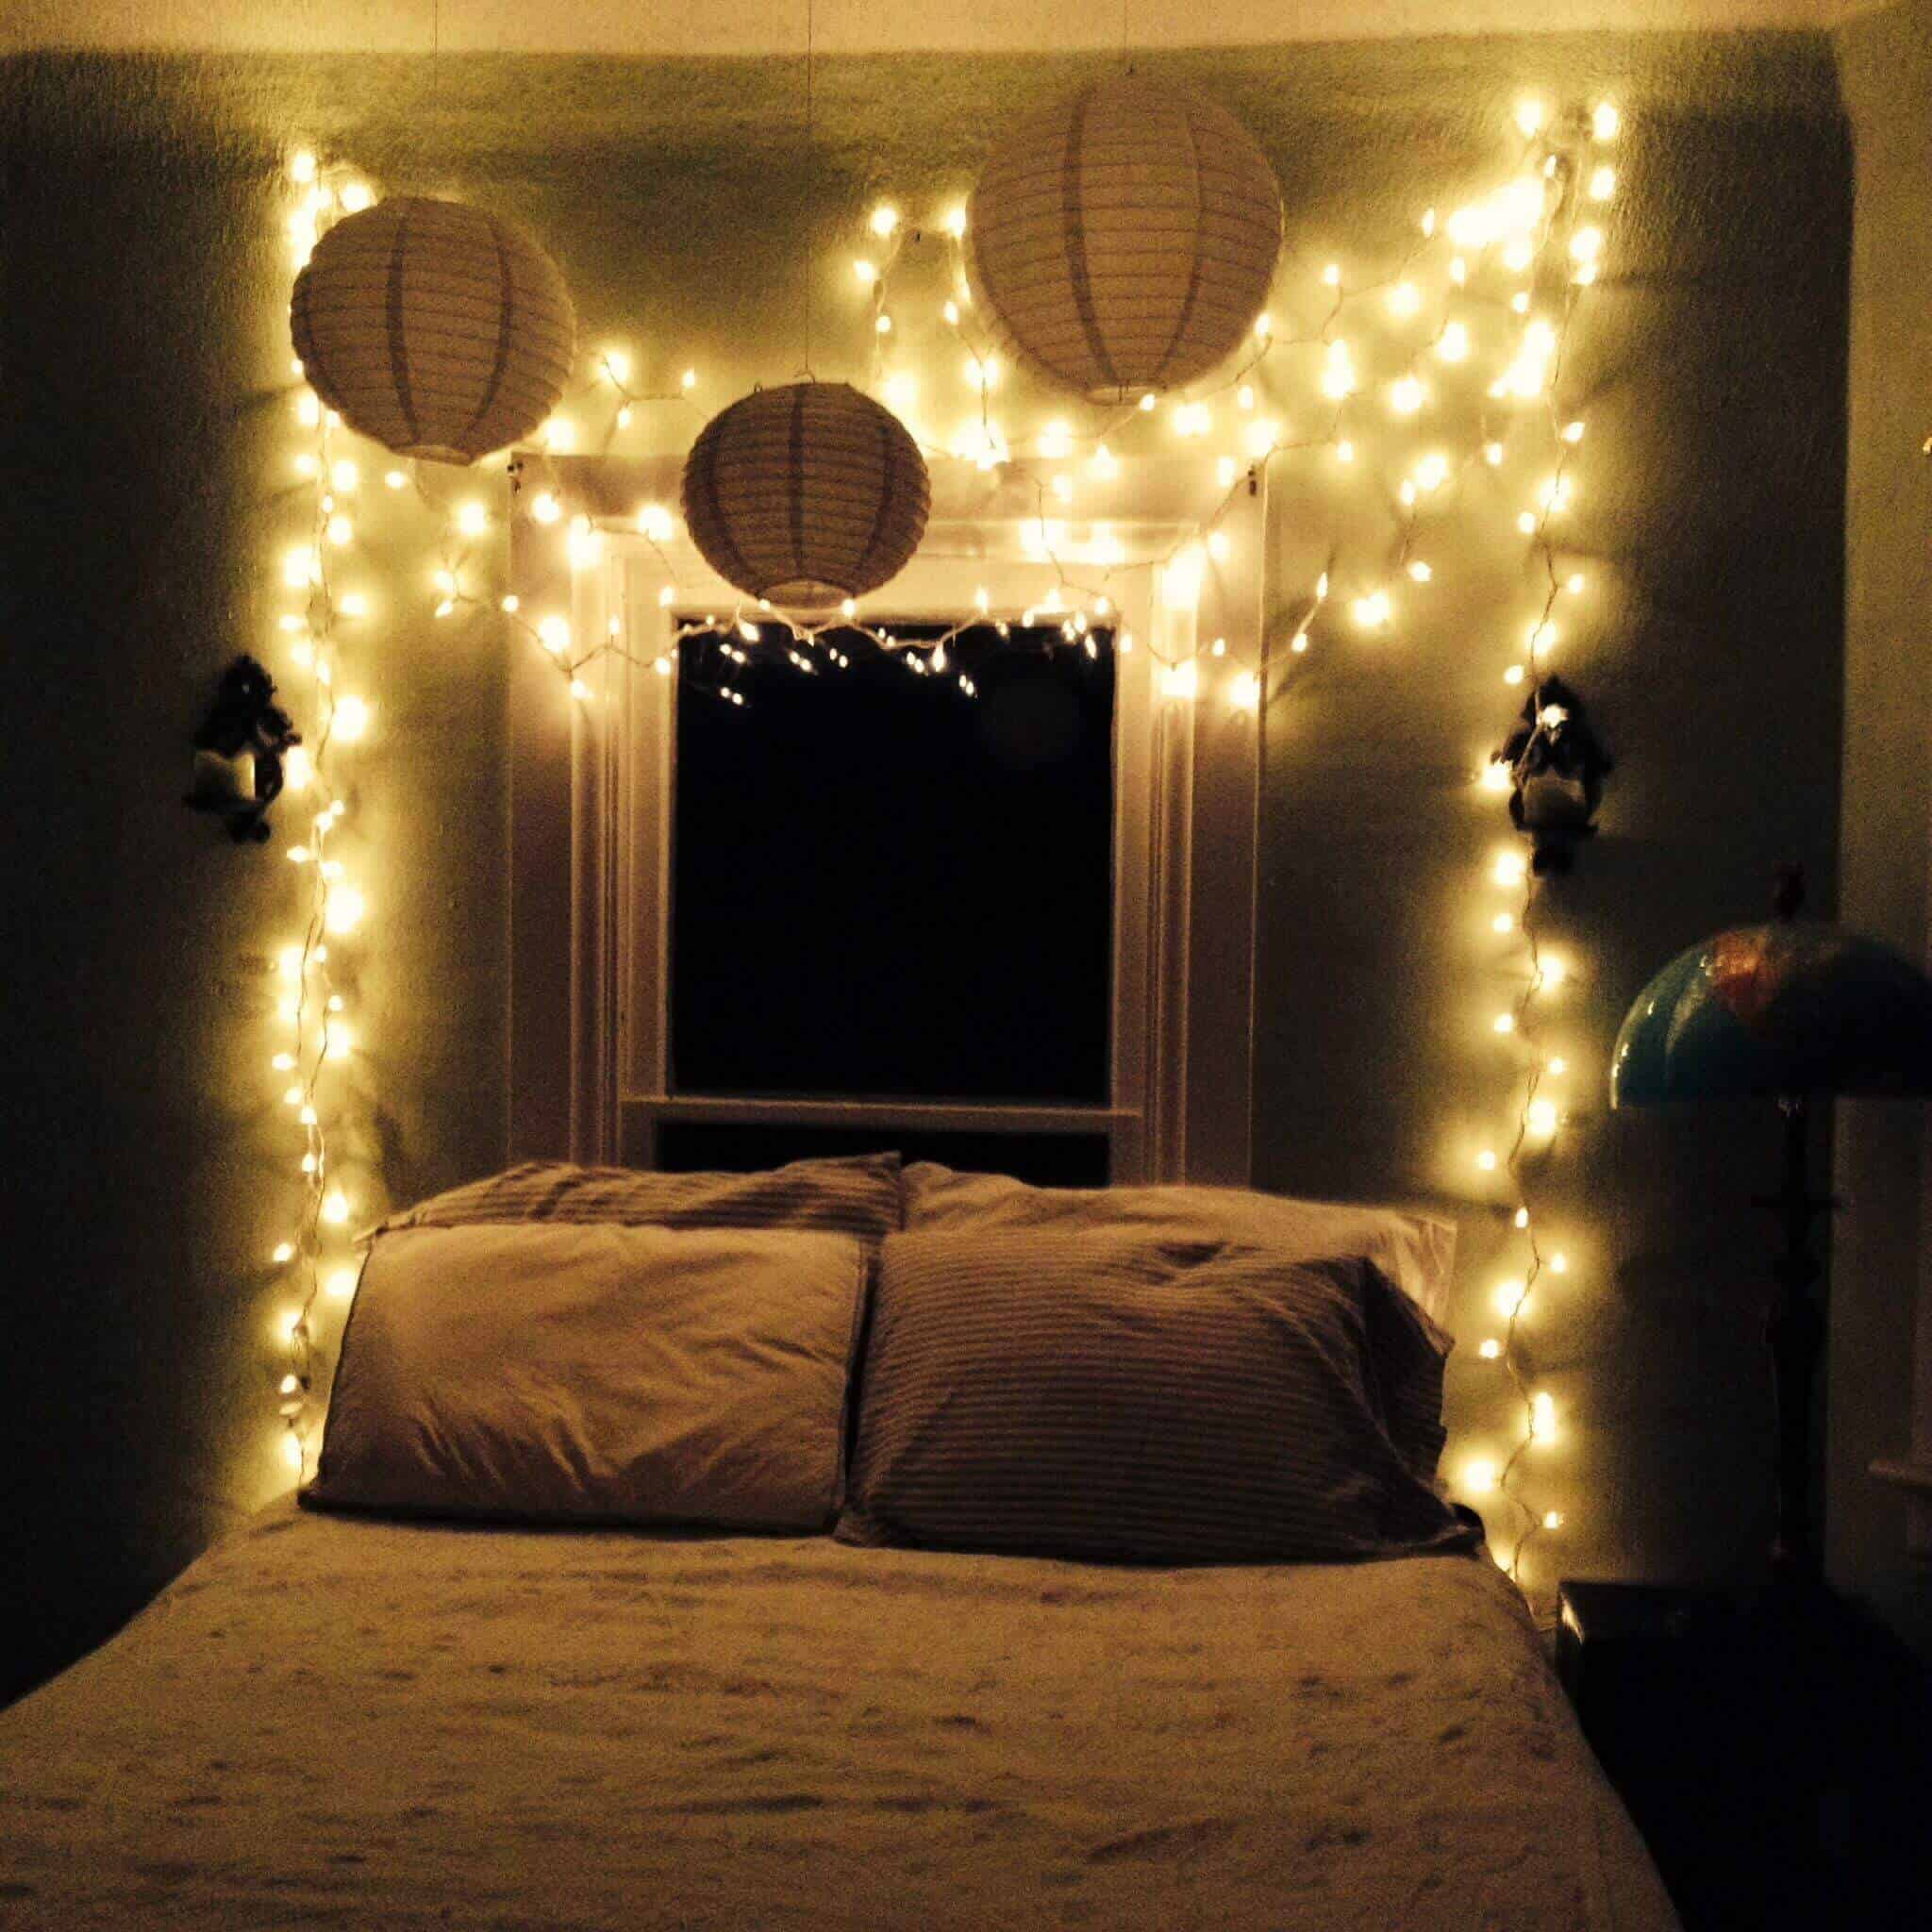
Bedroom: Transform your bedroom into a peaceful retreat with the addition of wood paneling. Consider installing wood paneling on the wall behind the bed to create a stylish focal point. Opt for a lighter wood tone or a whitewashed finish for a more calming and serene ambiance. Pair the wood paneling with soft, neutral colors, and cozy bedding to create a cozy and inviting sleep space.
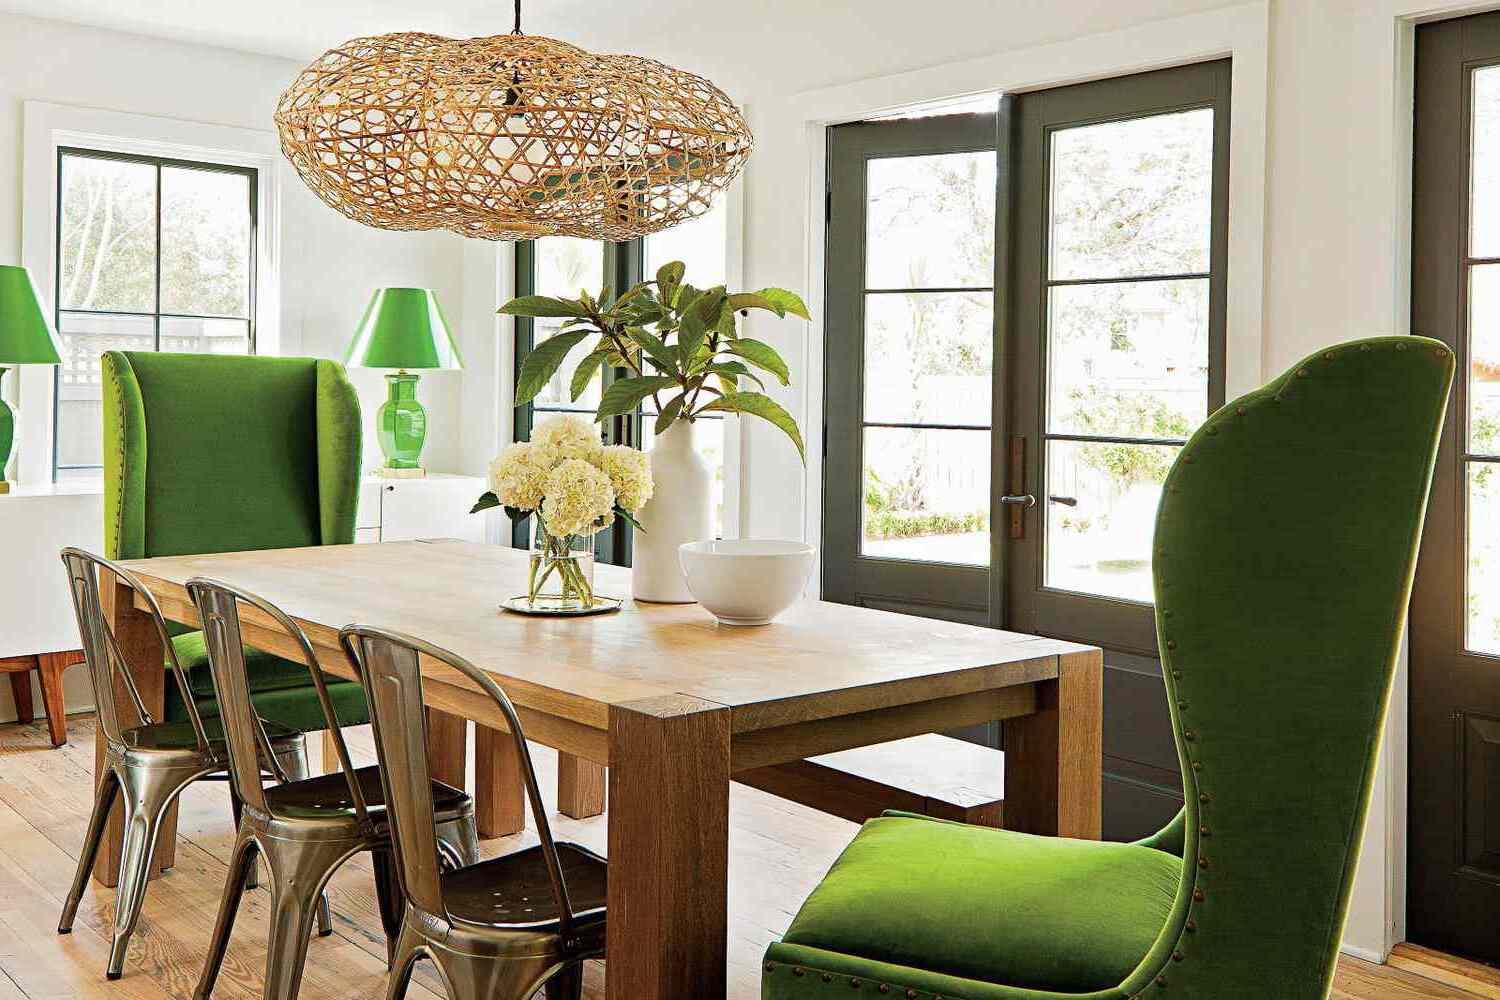
Dining Room: Add a touch of elegance and charm to your dining room with wood paneling. Consider installing paneling on one wall or as wainscoting around the entire room. Choose a rich, dark wood finish, such as walnut or mahogany, to create a formal and sophisticated dining space. Pair it with a statement chandelier, elegant furniture, and luxurious textiles to complete the refined look.
Home Office: Create a productive and inspiring work environment with wood paneling in your home office. Install paneling on the wall behind your desk to create a focal point and add warmth to the space. Opt for a lighter wood tone or a painted finish to keep the room bright and airy. Pair the paneling with modern furniture, ample storage, and plenty of natural light to create a stylish and functional home office.
Kitchen: While wood paneling may not be as common in kitchens, it can be incorporated to introduce a touch of rustic charm. Consider installing wood paneling on the kitchen island or as a backsplash behind the stove to add visual interest. Opt for a water-resistant wood species, such as cedar or teak, and seal the paneling properly to protect it from moisture. Pair the paneling with sleek countertops, stainless steel appliances, and modern cabinetry to achieve a stylish and balanced look.
Bathroom: Wood paneling can create a spa-like ambiance in the bathroom. Consider installing paneling in a horizontal design to elongate the walls and make the space appear larger. Choose a light wood tone or a whitewashed finish to keep the bathroom feeling bright and airy. Ensure proper ventilation and seal the paneling to protect it from moisture. Pair the wood paneling with natural stone accents, soft lighting, and earthy accessories to create a serene and luxurious bathroom retreat.
When incorporating wood paneling in different rooms, it’s important to consider the overall style and function of the space. Choose the appropriate wood tone, finish, and installation technique to complement the room’s design concept. By incorporating wood paneling thoughtfully, you can add warmth, character, and a touch of nature to any room in your home.
Maintenance and Care for Wood Paneling
Wood paneling can add beauty and warmth to your home, but it also requires proper maintenance to ensure its longevity and preserve its appearance. By following these maintenance tips, you can keep your wood paneling looking fresh and vibrant for years to come.
1. Regular Cleaning: Dust and dirt can accumulate on the surface of wood paneling over time, dulling its natural shine. Regular cleaning is essential to maintain its beauty. Use a soft, lint-free cloth or a microfiber duster to wipe down the paneling regularly, removing dust and debris. Avoid using harsh chemicals or abrasive cleaners, as they can damage the wood or its finish. Instead, opt for a mild wood cleaner recommended for your specific type of wood paneling.
2. Preventive Measures: Take preventive measures to protect your wood paneling from potential damage. Avoid placing furniture or objects directly against the paneling, as they can scratch or dent the surface. Use felt pads or furniture coasters to create a barrier between the furniture and the paneling. Additionally, keep an eye on the humidity levels in your home, as excessive moisture can cause the wood to warp or mold. Use a dehumidifier or humidifier as needed to maintain the ideal humidity level for your specific climate.
3. Avoid Sun Exposure: Prolonged exposure to sunlight can cause the wood paneling to fade or discolor over time. To prevent this, consider using curtains or blinds to filter the sunlight during peak hours. If possible, position furniture or decorative items to create shade and minimize direct sunlight on the paneling. This will help preserve the natural color and beauty of the wood.
4. Repair Scratches and Dents: Despite your best efforts, small scratches or dents may still occur on the surface of the wood paneling. To repair minor damage, use a touch-up kit or a wood marker in a matching color. Apply the touch-up solution to the affected area and gently buff it to blend in with the surrounding wood. For deeper scratches or dents, consult a professional for repairs or refinishing options.
5. Refinishing: Over time, the finish on your wood paneling may wear down or become dull. If this happens, refinishing the paneling can revive its appearance. Start by cleaning the paneling thoroughly to remove any dirt or residue. Then, sand the surface lightly to create a smooth texture. Apply a fresh coat of wood stain or finish, following the manufacturer’s instructions. This process will restore the sheen and protect the wood from further damage.
6. Regular Inspections: Regularly inspect your wood paneling for any signs of damage, such as cracks, warping, or loose panels. Promptly address any issues to prevent further damage and maintain the structural integrity of the paneling. If you notice any significant issues that you are unsure how to handle, consult a professional for guidance and assistance.
7. Professional Maintenance: Depending on the condition of your wood paneling and your personal preferences, you may consider professional maintenance services. Professional cleaning, refinishing, or repairs can ensure that your wood paneling receives the care it needs to stay in optimal condition. Consult with a reputable wood restoration professional to discuss your options and determine the best course of action for your specific situation.
With proper maintenance and care, wood paneling can retain its beauty and charm for many years. By incorporating regular cleaning, preventive measures, and occasional refinishing, you can enjoy the natural warmth and elegance of wood paneling in your home for generations to come.
Conclusion
Wood paneling has made a remarkable comeback in modern interior design, capturing the hearts of homeowners and designers alike. Its timeless appeal, warmth, and versatility make it a desirable choice for creating unique and inviting living spaces. By choosing the right type of wood paneling, preparing the walls properly, and following a step-by-step installation guide, you can bring this retro design trend into your home with ease.
Wood paneling offers endless possibilities for customization, allowing you to play with different finishes, textures, and colors to suit your personal style and design preferences. Whether you choose to stain or paint the paneling, or even distress it to achieve an aged look, the outcome can be truly transformative.
Pairing wood paneling with modern décor elements can create an eclectic and visually striking combination, blending warmth and character with contemporary style. The contrasting textures, colors, and materials can create a harmonious balance that captures attention and creates a unique atmosphere.
From the living room to the bedroom, dining room to the home office, wood paneling can be incorporated into various rooms to evoke different moods and aesthetics. With proper maintenance and care, you can ensure that your wood paneling remains beautiful and vibrant for years to come.
Regular cleaning, preventive measures, and occasional refinishing will help maintain the wood’s natural beauty and protect it from damage. By staying proactive and addressing any issues promptly, you can keep your wood paneling looking fresh and inviting.
In conclusion, wood paneling is not just a retro design trend of the past—it is a versatile and timeless element that can transform any space. Whether you embrace its traditional charm or pair it with modern décor, wood paneling creates a unique and captivating ambiance. From cozy living room retreats to elegant dining spaces and serene bedrooms, wood paneling allows you to infuse warmth and character into your home. With proper installation, care, and maintenance, your wood-paneled rooms can become cherished havens that exude style and comfort for years to come.
Frequently Asked Questions about Wood Paneling Is Back: How To Incorporate The Retro Look In Your Home
Was this page helpful?
At Storables.com, we guarantee accurate and reliable information. Our content, validated by Expert Board Contributors, is crafted following stringent Editorial Policies. We're committed to providing you with well-researched, expert-backed insights for all your informational needs.


0 thoughts on “Wood Paneling Is Back: How To Incorporate The Retro Look In Your Home”