Home>Construction & Tools>Building Materials>How To Make A Stucco Mailbox
Building Materials
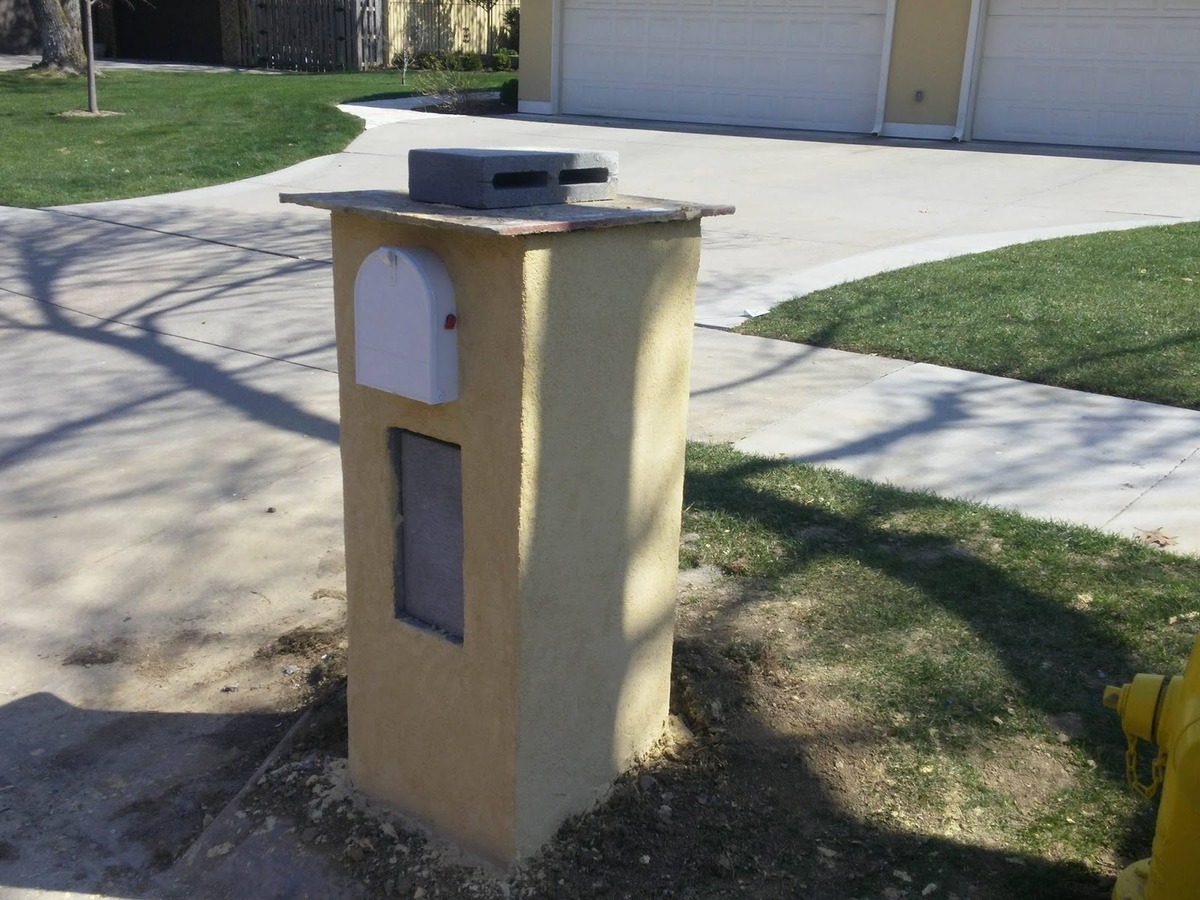
How To Make A Stucco Mailbox
Modified: May 6, 2024
Learn how to make a stucco mailbox using building materials. Follow our step-by-step guide for a durable and attractive DIY project.
(Many of the links in this article redirect to a specific reviewed product. Your purchase of these products through affiliate links helps to generate commission for Storables.com, at no extra cost. Learn more)
Introduction
If you're looking to enhance the curb appeal of your property while adding a touch of personal flair, building a stucco mailbox can be a rewarding and aesthetically pleasing project. A stucco mailbox not only serves as a functional receptacle for your mail but also stands as a stylish statement piece that complements the exterior of your home.
In this comprehensive guide, we will walk you through the step-by-step process of creating a stucco mailbox that exudes durability, charm, and individuality. From selecting the right materials and tools to adding the finishing touches, you'll gain valuable insights into every facet of this engaging endeavor.
Embark on this journey with us as we delve into the art of crafting a stucco mailbox that seamlessly integrates with your property's architectural aesthetics. Whether you're a seasoned DIY enthusiast or a novice looking to explore the world of construction, this project offers a fulfilling opportunity to showcase your creativity and elevate the visual appeal of your home.
Key Takeaways:
- Building a stucco mailbox involves selecting materials, constructing a sturdy base, creating the structure, applying stucco, and adding finishing touches to enhance curb appeal and functionality.
- The process of building a stucco mailbox allows for personalization, creativity, and attention to detail, resulting in a unique and enduring structure that reflects individual style and craftsmanship.
Read more: How To Make Mailbox Greenery
Materials and Tools
Before diving into the construction of your stucco mailbox, it’s essential to gather the necessary materials and tools to ensure a smooth and efficient building process. Here’s a comprehensive list of what you’ll need:
Materials:
- Concrete blocks or bricks for the base
- Metal mailbox insert
- Galvanized wire mesh
- Stucco mix
- Concrete mix
- Waterproofing sealer
- Rebar for reinforcement
- Wood or metal stakes
- Gravel
- Plastic sheeting or tarp
Tools:
- Shovel
- Level
- Trowel
- Wire cutters
- Masonry saw (if cutting blocks or bricks is necessary)
- Measuring tape
- Bucket for mixing stucco and concrete
- Work gloves
- Protective eyewear
- Dust mask
Having these materials and tools on hand will streamline the construction process and ensure that you’re well-equipped to bring your stucco mailbox to life. As you prepare your workspace and organize your supplies, you’re one step closer to creating a stunning and functional addition to your property.
Choosing the Right Location
When embarking on the construction of a stucco mailbox, selecting the optimal location is crucial for both practical and aesthetic considerations. Here are several factors to keep in mind when choosing the perfect spot for your new mailbox:
Read more: How To Make Stucco Pillars
Accessibility:
Ensure that the location of your stucco mailbox allows for easy access by mail carriers and yourself. It should be visible and easily reachable from the street or sidewalk, providing a convenient and efficient mail delivery experience.
Property Aesthetics:
Consider how the mailbox will complement the overall look of your property. Whether you opt for a traditional, contemporary, or rustic design, the mailbox should harmonize with the architectural style and landscaping of your home, enhancing its visual appeal.
Regulations and Guidelines:
Check with your local postal service or neighborhood association to understand any regulations or guidelines regarding mailbox placement. Adhering to these specifications will ensure compliance and avoid any potential issues with mail delivery.
Safety and Visibility:
Choose a location that prioritizes safety and visibility. Avoid placing the mailbox in areas with poor lighting or obstructed views, as this could pose safety hazards and make it challenging for mail carriers to access the mailbox.
Read more: How To Make A Stucco Fence
Landscaping Integration:
Integrate the stucco mailbox seamlessly into your landscaping design. Whether you incorporate decorative plants, stones, or lighting around the mailbox, ensure that it becomes a cohesive and attractive element within your outdoor environment.
By carefully considering these factors, you can identify the ideal location for your stucco mailbox, ensuring that it not only serves its practical function but also contributes to the overall charm and functionality of your property.
Building the Base
The foundation of your stucco mailbox is integral to its stability and longevity. Constructing a sturdy and level base sets the stage for the rest of the project, ensuring that your mailbox stands the test of time. Here’s a step-by-step guide to building a solid base for your stucco mailbox:
1. Site Preparation:
Clear the chosen location of any debris, vegetation, or obstacles that may hinder the construction process. Use a shovel to level the ground and create a firm, even surface for the base.
2. Layout and Marking:
Use wooden or metal stakes and string to outline the dimensions of the base. Double-check the measurements to ensure that the layout aligns with your design plans and meets any relevant regulations.
Read more: How To Build A Brick Mailbox
3. Excavation and Gravel Bed:
Dig a trench for the base, ensuring that it’s deep enough to accommodate the concrete blocks or bricks. Add a layer of gravel to the excavated area, providing a stable and well-drained foundation for the base structure.
4. Placement of Concrete Blocks or Bricks:
Position the concrete blocks or bricks within the trench, using a level to ensure that they are perfectly aligned and evenly spaced. This will form the structural support for the mailbox and provide a solid base for the stucco application.
5. Secure the Metal Mailbox Insert:
If using a metal mailbox insert, place it securely within the designated space on the base. Ensure that it is level and firmly anchored, as it will serve as the receptacle for incoming mail.
6. Reinforcement:
For added stability and strength, consider reinforcing the base with rebar. This will enhance the structural integrity of the base, especially in areas prone to inclement weather or soil movement.
By following these steps, you’ll establish a durable and well-constructed base for your stucco mailbox, laying the groundwork for the subsequent stages of the project. With the foundation in place, you’re ready to progress to the next phase of constructing the body of the mailbox.
Constructing the Structure
With the base of your stucco mailbox firmly in place, it’s time to focus on constructing the structural framework that will define the form and function of the mailbox. This phase involves building the walls and ensuring that the structure is resilient and visually appealing. Here’s a detailed overview of the steps involved in creating the framework for your stucco mailbox:
1. Assembling the Walls:
Using concrete blocks or bricks, begin assembling the walls of the mailbox structure. Lay the blocks or bricks in a staggered pattern to provide stability and strength. Ensure that the walls are level and plumb, making adjustments as necessary to maintain uniformity.
2. Integration of Metal Mailbox Insert:
If you’re using a metal mailbox insert, incorporate it into the structure as you build the walls. Position it securely within the designated space, ensuring that it aligns with the layout and dimensions of the mailbox.
3. Reinforcement and Stability:
As you progress with the construction of the walls, consider reinforcing the structure with galvanized wire mesh. This additional layer of reinforcement enhances the integrity of the stucco application and provides structural support for the entire mailbox.
Read more: How To Make A Stucco House Look Modern
4. Customization and Design Elements:
Integrate any design elements or custom features into the structure during this phase. Whether you incorporate decorative patterns, insets, or architectural embellishments, this is the opportune time to personalize the appearance of your stucco mailbox.
5. Visual Assessment and Adjustments:
Periodically step back and visually assess the progress of the structure. Ensure that the walls are uniform in height, alignment, and overall appearance. Make any necessary adjustments to maintain the integrity and aesthetics of the mailbox.
By meticulously following these steps, you’ll establish a robust and visually appealing framework for your stucco mailbox. With the structure taking shape, you’re poised to move on to the next phase of the project—applying the stucco finish that will impart durability and character to your creation.
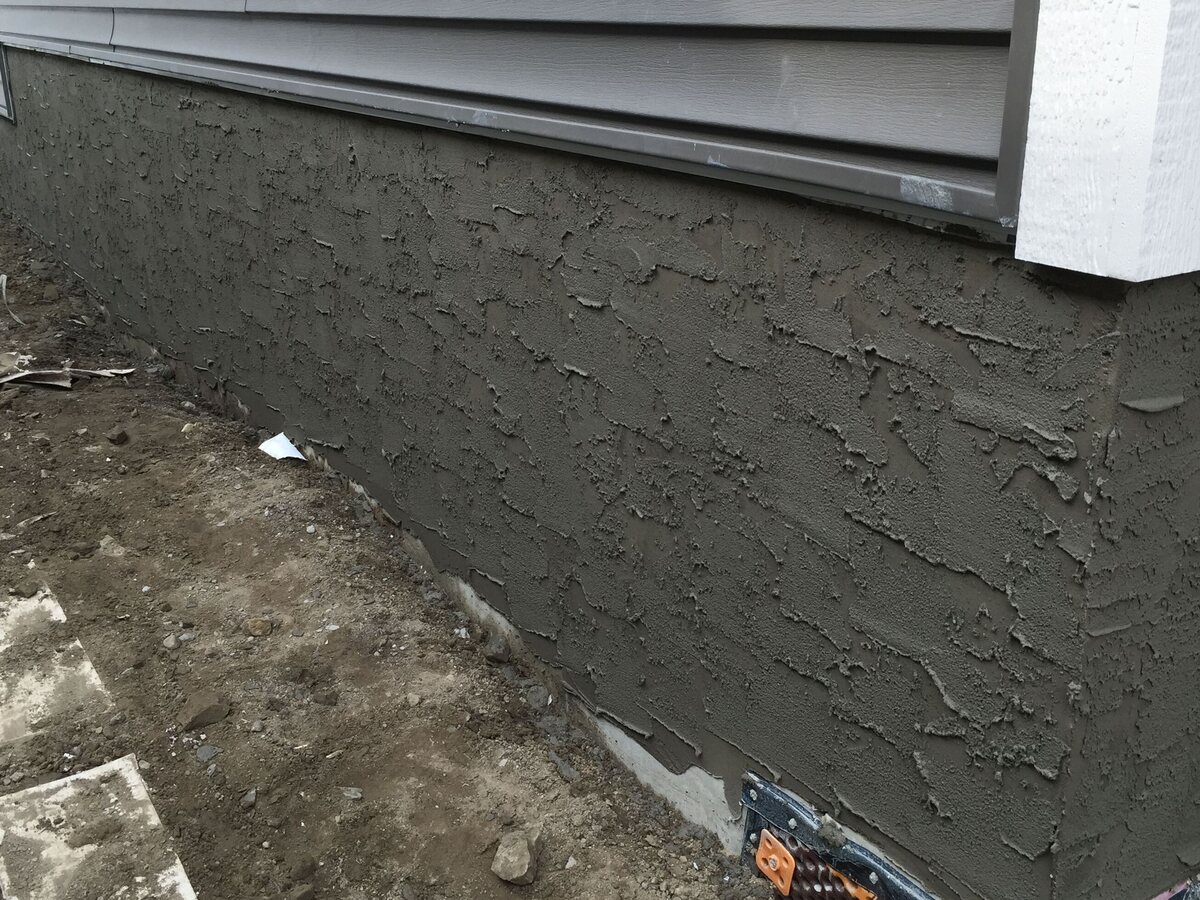
Applying the Stucco
Applying the stucco is a pivotal stage in the construction of your mailbox, as it not only enhances the durability of the structure but also provides a customizable surface for adding texture and visual interest. The stucco application process requires precision and attention to detail to achieve a smooth, resilient finish. Here’s a comprehensive guide to applying stucco to your mailbox:
1. Preparation of Stucco Mix:
Begin by preparing the stucco mix according to the manufacturer’s instructions. Ensure that the mix achieves the desired consistency for optimal adhesion and workability. It’s essential to mix the stucco thoroughly to eliminate any lumps or inconsistencies.
Read more: How To Build A Custom Mailbox
2. Application onto the Structure:
Using a trowel, apply the stucco mix evenly onto the surface of the mailbox structure. Work in manageable sections, smoothing the stucco to create a uniform layer. Pay attention to achieving a consistent thickness throughout the application process.
3. Texture and Finishing Techniques:
As the stucco begins to set, you have the opportunity to incorporate texture and finishing techniques to customize the appearance of the mailbox. Depending on your preferences, you can create a smooth, textured, or patterned finish using the appropriate tools and methods.
4. Curing and Damp Curing:
Allow the stucco to cure according to the manufacturer’s recommendations. To promote proper curing and minimize cracking, consider damp curing the stucco by lightly misting it with water at regular intervals during the initial drying process. This helps enhance the strength and resilience of the stucco finish.
5. Quality Assessment and Touch-ups:
Once the stucco has fully cured, inspect the surface for any imperfections or irregularities. Perform any necessary touch-ups to ensure a flawless finish, addressing any areas that may require additional stucco or smoothing for uniformity.
By meticulously following these steps, you’ll achieve a professionally executed stucco finish that enhances the structural integrity and visual appeal of your mailbox. With the stucco application complete, you’re ready to add the finishing touches that will elevate the aesthetic impact of your stucco mailbox.
Read more: How To Replace A Mailbox In Brick
Adding Finishing Touches
As you near the completion of your stucco mailbox project, adding the finishing touches will elevate its visual appeal and ensure that it seamlessly integrates with the surrounding environment. These final details contribute to the overall charm and functionality of the mailbox, transforming it into a captivating feature of your property. Here’s a guide to adding the finishing touches to your stucco mailbox:
1. Waterproofing and Sealing:
Apply a high-quality waterproofing sealer to the stucco surface to protect it from moisture, UV exposure, and environmental elements. This crucial step enhances the longevity of the stucco finish and preserves its pristine appearance over time.
2. Decorative Accents:
Enhance the visual appeal of the mailbox by incorporating decorative accents such as trim, molding, or architectural embellishments. These elements can be customized to complement the architectural style of your home and add a touch of sophistication to the mailbox design.
3. Address Plaque or House Numbers:
Consider adding an address plaque or house numbers to the mailbox, providing a practical and visually appealing way to display your address. Choose a style that aligns with the overall design of the mailbox and ensures clear visibility for mail carriers and visitors.
Read more: How To Hang Mailbox On Siding
4. Landscaping Integration:
Integrate the stucco mailbox seamlessly into your landscaping by incorporating plants, flowers, or decorative stones around its base. This landscaping integration softens the transition between the mailbox and the surrounding environment, enhancing its aesthetic impact.
5. Lighting Enhancement:
Illuminate the stucco mailbox with strategically placed outdoor lighting to enhance its visibility and create a welcoming ambiance. Whether through low-voltage landscape lighting or solar-powered fixtures, lighting adds a touch of warmth and security to the mailbox area.
6. Personalization and Customization:
Consider personalizing the mailbox with custom paint colors, artistic motifs, or unique design elements that reflect your individual style. This personal touch infuses the mailbox with character and makes it a distinctive feature of your property.
By attending to these finishing touches, you’ll transform your stucco mailbox into a captivating and functional addition to your home. With its enhanced visual appeal and thoughtful details, the mailbox becomes a reflection of your style and a welcoming focal point of your property.
Conclusion
Embarking on the journey of constructing a stucco mailbox has allowed you to merge creativity, craftsmanship, and practicality into a single project, resulting in a striking and functional addition to your property. From the initial selection of materials to the final embellishments, each step has contributed to the creation of a unique and enduring structure that enhances the curb appeal of your home.
As you reflect on the process, you’ve not only gained valuable hands-on experience in construction and design but also cultivated a deeper appreciation for the artistry and attention to detail required to bring a vision to life. The stucco mailbox stands as a testament to your dedication and ingenuity, embodying the fusion of form and function.
Moreover, the stucco mailbox serves as more than a mere receptacle for mail; it embodies the pride you take in your home and the desire to infuse it with personalized touches that reflect your individuality. Its presence adds a touch of elegance and distinction to your property, leaving a lasting impression on visitors and passersby alike.
As you admire the completed stucco mailbox, take pride in the craftsmanship and artistry that have gone into its creation. Whether you’re a seasoned DIY enthusiast or someone exploring the realm of construction for the first time, this project has allowed you to showcase your skills and creativity while making a tangible impact on your surroundings.
With the stucco mailbox now standing as a beacon of charm and functionality, you’ve not only enhanced the visual allure of your property but also left an indelible mark on its landscape. As you continue to infuse your living space with personal projects and thoughtful details, the stucco mailbox serves as a reminder of the transformative power of hands-on craftsmanship and the joy of creating something truly unique.
Embrace the sense of accomplishment that comes with completing this project, and let the stucco mailbox stand as a testament to your ability to turn a vision into reality, one carefully crafted detail at a time.
If you're feeling inspired after creating your stucco mailbox, why not tackle some new challenges in your outdoor space? Our guide on outdoor projects offers a plethora of creative ideas to enhance your garden, patio, or backyard. Whether you're planning to build a cozy fire pit, install a water feature, or set up a delightful outdoor kitchen, this guide has something for everyone. Ready to transform your outdoor areas into captivating and functional spaces? Dive into our comprehensive guide and let your creativity flourish!
Frequently Asked Questions about How To Make A Stucco Mailbox
Was this page helpful?
At Storables.com, we guarantee accurate and reliable information. Our content, validated by Expert Board Contributors, is crafted following stringent Editorial Policies. We're committed to providing you with well-researched, expert-backed insights for all your informational needs.


0 thoughts on “How To Make A Stucco Mailbox”