Home>Furniture & Design>Outdoor Furniture>How To Build A Small Outdoor Table
Outdoor Furniture
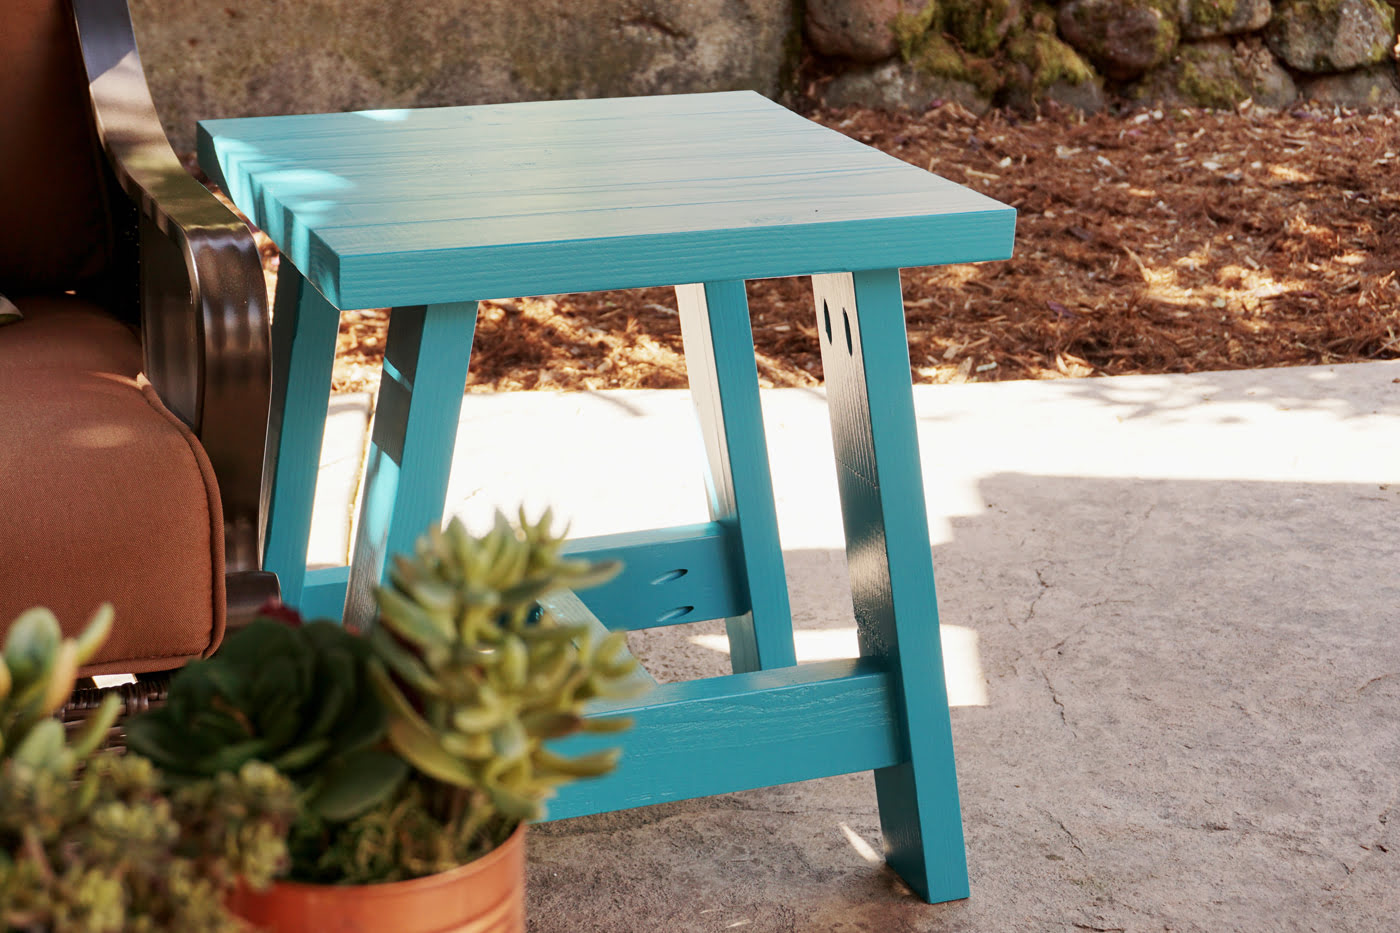
How To Build A Small Outdoor Table
Published: January 11, 2024
Learn how to create a stylish and functional small outdoor table with our easy-to-follow guide. Discover expert tips for building outdoor furniture.
(Many of the links in this article redirect to a specific reviewed product. Your purchase of these products through affiliate links helps to generate commission for Storables.com, at no extra cost. Learn more)
Introduction
Welcome to the world of DIY outdoor furniture! Building your own small outdoor table can be a rewarding and enjoyable project that adds a personal touch to your outdoor space. Whether you're a seasoned woodworker or a novice looking to hone your skills, creating a small outdoor table is a fantastic way to unleash your creativity and craft a functional piece of furniture.
In this guide, we'll take you through the step-by-step process of building a small outdoor table from scratch. You'll learn how to select the right materials, use essential tools, and master woodworking techniques to bring your vision to life. By the end of this journey, you'll have a beautiful and sturdy outdoor table that's perfect for enjoying a morning coffee, hosting intimate gatherings, or simply admiring the beauty of your outdoor oasis.
So, roll up your sleeves, unleash your inner craftsman, and let's dive into the wonderful world of DIY outdoor furniture as we embark on the exciting journey of building a small outdoor table!
Key Takeaways:
- Crafting a small outdoor table is an exciting DIY project that lets you unleash your creativity and woodworking skills. With the right materials and tools, you can build a sturdy and stylish table to enjoy outdoor moments.
- By carefully cutting, assembling, and finishing the table, you’ll create a functional masterpiece that adds a personal touch to your outdoor space. Embrace the satisfaction of crafting a tangible piece of furniture with your own hands.
Read more: How To Build An Outdoor Dining Table
Materials and Tools
Before diving into the construction process, it’s essential to gather all the necessary materials and tools. Here’s a comprehensive list to ensure you’re well-prepared for the project:
Materials:
- Pressure-treated lumber or cedar: These are excellent choices for outdoor furniture due to their durability and resistance to the elements.
- Wood screws: Opt for weather-resistant screws to ensure the longevity of your outdoor table.
- Wood glue: A reliable wood glue will reinforce the joints and enhance the table's stability.
- Sandpaper: You'll need coarse and fine-grit sandpaper to smoothen the wood surfaces and achieve a polished finish.
- Wood stain or outdoor sealant: This will protect the wood from moisture, UV rays, and general wear and tear.
- Wood filler: To fill any gaps or imperfections in the wood for a seamless appearance.
Tools:
- Measuring tape and pencil: Essential for marking and measuring the wood accurately.
- Saw: A circular saw or miter saw for cutting the lumber to the required dimensions.
- Drill/driver: For drilling pilot holes and driving screws into the wood.
- Square: To ensure precise right angles during assembly.
- Sandpaper block or orbital sander: For smoothing the wood surfaces.
- Paintbrushes or a rag: For applying wood stain or outdoor sealant.
- Safety gear: Don't forget safety glasses, a dust mask, and hearing protection to keep yourself safe during the woodworking process.
With these materials and tools at your disposal, you’re ready to embark on the exciting journey of crafting your own small outdoor table. Now, let’s move on to the first step: cutting the wood.
Step 1: Cutting the Wood
When it comes to building a small outdoor table, precision is key, especially during the wood cutting phase. Follow these steps to ensure accurate and clean cuts:
Read more: How To Decorate A Small Dining Table
1.1 Selecting the Lumber:
Start by choosing high-quality pressure-treated lumber or cedar. These wood types are renowned for their durability and ability to withstand outdoor conditions. Ensure that the lumber is straight and free from any warping or defects to guarantee a sturdy and visually appealing table.
1.2 Taking Measurements:
Using a measuring tape and pencil, mark the dimensions for the tabletop and legs according to your desired table size. Double-check the measurements to avoid errors before making any cuts.
1.3 Cutting the Tabletop and Legs:
Carefully use a saw, such as a circular saw or miter saw, to cut the lumber to the precise measurements. It’s crucial to maintain straight and perpendicular cuts to achieve a professional-looking result. Take your time and exercise caution during this phase to ensure accuracy.
1.4 Smoothening the Edges:
After cutting the wood, use coarse and fine-grit sandpaper to smooth the edges and surfaces of the tabletop and legs. This step is vital for achieving a polished and splinter-free finish.
By meticulously following these steps, you’ll lay a solid foundation for the construction of your small outdoor table. With the wood cut to perfection, you’re now ready to move on to the next phase: assembling the tabletop.
Read more: How To Build A Small Storage Shed
Step 2: Assembling the Tabletop
Assembling the tabletop is a pivotal stage in the construction of your small outdoor table. This step requires precision and attention to detail to ensure a flat and stable surface. Here’s a guide to help you through the process:
2.1 Arranging the Boards:
Lay the cut lumber pieces for the tabletop on a flat and level surface. Position the boards side by side, ensuring that the edges align seamlessly. This arrangement will provide a clear view of how the tabletop will come together.
2.2 Applying Wood Glue:
Once the boards are arranged, apply a thin and even layer of wood glue along the edges of each board that will be joined together. The wood glue will enhance the bond between the boards, resulting in a sturdy tabletop.
2.3 Clamping the Boards:
After applying the wood glue, use clamps to secure the boards together. The clamps will exert pressure, ensuring that the boards adhere firmly to each other. Wipe off any excess glue that seeps out to maintain a clean finish.
Read more: How To Build A Console Table
2.4 Reinforcing with Screws:
To further strengthen the tabletop, drill pilot holes and drive wood screws through the underside of the tabletop. This additional reinforcement will fortify the bond between the boards, adding stability and longevity to the tabletop.
2.5 Smoothening the Surface:
Once the glue has dried and the boards are securely joined, use fine-grit sandpaper to smooth the tabletop’s surface. This step will eliminate any rough patches and imperfections, preparing the tabletop for the next phase of the construction process.
With the tabletop expertly assembled, you’ve achieved a significant milestone in building your small outdoor table. The next step involves crafting the table legs, which will provide essential support and aesthetic appeal. Let’s delve into the art of building sturdy and stylish table legs in the following section.
Step 3: Building the Table Legs
The table legs play a crucial role in providing stability and defining the aesthetic appeal of your small outdoor table. Crafting sturdy and visually appealing table legs requires careful planning and precise execution. Here’s a detailed guide to help you through the process:
3.1 Selecting the Leg Design:
Begin by choosing a leg design that complements the overall style of your outdoor table. Whether you opt for classic straight legs, elegantly tapered legs, or a custom design, ensure that the dimensions and proportions align harmoniously with the tabletop.
Read more: How To Build Outdoor Furniture
3.2 Cutting the Leg Pieces:
Using the selected lumber, accurately measure and cut the pieces for the table legs. Whether you’re crafting four individual legs or a connected leg frame, precise cuts are essential to maintain uniformity and balance in the final structure.
3.3 Creating Joinery (Optional):
If you’re inclined towards advanced woodworking techniques, consider incorporating joinery such as mortise and tenon joints or half-lap joints to connect the leg pieces. These traditional methods can elevate the craftsmanship and durability of the table legs.
3.4 Reinforcement and Stability:
Regardless of the chosen leg design, reinforcing the joints with wood glue and screws or dowels is crucial for ensuring the structural integrity of the table legs. This step is essential for enhancing stability and longevity.
3.5 Smoothing and Shaping:
Once the table legs are assembled, use sandpaper to smooth any rough edges and refine the contours of the legs. This process adds a touch of finesse to the legs and prepares them for the final phase of integration with the tabletop.
With the table legs meticulously crafted, you’re now equipped to seamlessly integrate them with the tabletop, bringing your small outdoor table one step closer to completion. The next section will guide you through the process of attaching the legs to the tabletop, culminating in the unification of all components into a functional and visually captivating piece of outdoor furniture.
Read more: How To Build An Outdoor Toilet
Step 4: Attaching the Legs to the Tabletop
Assembling the tabletop and the table legs marks a pivotal stage in the construction of your small outdoor table. This step requires precision and attention to detail to ensure a stable and visually appealing final product. Here’s a comprehensive guide to help you seamlessly integrate the table legs with the tabletop:
4.1 Positioning the Table Legs:
Carefully position the table legs at the corners or designated points on the underside of the tabletop. Ensure that the legs are aligned symmetrically and equidistant from the edges to maintain balance and stability.
4.2 Marking and Preparing for Attachment:
Using a pencil, mark the areas on the tabletop where the legs will be attached. If you’re utilizing screws or bolts to secure the legs, drill pilot holes in the marked locations to facilitate the attachment process.
4.3 Attaching the Legs:
Depending on your chosen attachment method, whether it’s screws, bolts, or specialized hardware, carefully affix the table legs to the tabletop. Exercise caution to ensure that the legs are securely fastened and aligned according to the initial markings.
Read more: How To Build An Outdoor Grill
4.4 Reinforcement and Stability:
Once the legs are attached, reinforce the connection by applying wood glue to the joints. This additional reinforcement enhances the stability of the table and fortifies the bond between the tabletop and legs.
4.5 Final Checks and Adjustments:
After attaching the legs, perform a thorough inspection to ensure that the tabletop is level and the legs are firmly secured. Make any necessary adjustments to guarantee that the table stands evenly on all legs.
4.6 Finishing Touches:
Before proceeding to the final step, take a moment to appreciate the progress and consider applying a protective coat of outdoor sealant or wood stain to safeguard the table against the elements and enhance its visual appeal.
With the table legs securely attached to the tabletop, your small outdoor table is nearing completion. The final step involves adding the finishing touches to refine the appearance and ensure the longevity of your handcrafted masterpiece. Let’s delve into the last phase of the construction process in the following section.
Step 5: Finishing Touches
As you approach the final phase of constructing your small outdoor table, it’s time to add the finishing touches that will elevate its visual appeal and durability. This step encompasses essential measures to protect the table from outdoor elements and enhance its overall aesthetic. Here’s a comprehensive guide to the finishing touches:
Read more: How To Build An Outdoor Table
5.1 Sanding and Smoothing:
Before applying any finish, thoroughly sand the entire table surface to ensure a smooth and even texture. Start with a coarse-grit sandpaper to remove any rough patches, followed by a finer grit to achieve a polished finish.
5.2 Applying Wood Finish:
Select a high-quality outdoor sealant or wood stain to protect the table from moisture, UV rays, and general wear. Apply the chosen finish evenly using a paintbrush or rag, ensuring complete coverage to safeguard the wood and enhance its natural beauty.
5.3 Adding Protective Feet:
Consider attaching protective feet or glides to the bottom of the table legs. These attachments will prevent the legs from directly contacting the ground, reducing the risk of moisture absorption and prolonging the table’s lifespan.
5.4 Final Inspection:
Conduct a thorough inspection of the entire table, ensuring that the finish is applied uniformly, and there are no overlooked imperfections. Address any remaining rough spots or inconsistencies to achieve a flawless result.
Read more: How To Build An Outdoor Gym
5.5 Celebrate Your Creation:
Take a moment to admire your handiwork and celebrate the completion of your small outdoor table. Embrace the satisfaction of bringing your vision to life and creating a functional piece of furniture that will enrich your outdoor space.
5.6 Maintenance and Care:
Lastly, familiarize yourself with the recommended maintenance practices for your outdoor table. Regularly clean and reapply the wood finish as needed to preserve its luster and protect it from the elements, ensuring years of enjoyment.
With the finishing touches applied, your small outdoor table is now ready to take its place as a centerpiece in your outdoor sanctuary. Whether it’s a tranquil garden, a cozy patio, or a bustling deck, your handcrafted table will serve as a testament to your craftsmanship and creativity, providing a welcoming space for relaxation and enjoyment.
Congratulations on completing the construction of your small outdoor table! Your dedication and skill have transformed raw materials into a functional and aesthetically pleasing piece of outdoor furniture. Now, it’s time to revel in the satisfaction of your DIY achievement and embrace the joy of crafting a tangible masterpiece with your own hands.
Conclusion
Congratulations on successfully navigating the exhilarating journey of building your own small outdoor table! Throughout this endeavor, you’ve ventured into the realm of woodworking, honed your craftsmanship, and created a tangible masterpiece that will enrich your outdoor living space for years to come.
By embracing the art of DIY outdoor furniture construction, you’ve not only crafted a functional and visually captivating table but also cultivated a deeper connection to your outdoor sanctuary. The process of selecting materials, meticulously cutting and assembling wood, and adding the finishing touches has allowed you to infuse your unique personality and style into the creation of this essential piece of outdoor furniture.
As you admire your handiwork, envision the countless moments of relaxation, social gatherings, and cherished memories that will unfold around your small outdoor table. Whether it’s basking in the warmth of the sun with a refreshing beverage or savoring al fresco meals with loved ones, your meticulously crafted table will serve as a steadfast companion in your outdoor escapades.
Furthermore, the skills and knowledge acquired during this project have laid the groundwork for future woodworking endeavors, empowering you to embark on even more ambitious and creative projects. The satisfaction of witnessing your vision materialize into a tangible and functional creation is a testament to your ingenuity and dedication.
As you revel in the fulfillment of completing this DIY venture, remember that the journey doesn’t end here. Embrace the ongoing care and maintenance of your outdoor table, ensuring that it continues to exude its natural charm and withstand the elements with resilience. Your small outdoor table stands as a testament to your ability to transform raw materials into a cherished piece of functional art, embodying the spirit of creativity and craftsmanship.
So, as you embark on future woodworking endeavors and continue to infuse your outdoor space with personalized touches, let this small outdoor table stand as a symbol of your capability to create beauty and functionality from the ground up. With each passing season, it will faithfully accompany you on your outdoor adventures, a steadfast testament to your passion for craftsmanship and the joy of hands-on creation.
Embrace the pride of your accomplishment, and may your small outdoor table continue to serve as a beacon of creativity and comfort in your outdoor haven.
Frequently Asked Questions about How To Build A Small Outdoor Table
Was this page helpful?
At Storables.com, we guarantee accurate and reliable information. Our content, validated by Expert Board Contributors, is crafted following stringent Editorial Policies. We're committed to providing you with well-researched, expert-backed insights for all your informational needs.
0 thoughts on “How To Build A Small Outdoor Table”