Home>Furniture & Design>Outdoor Furniture>How To Build Outdoor Wood Burning Furnace
Outdoor Furniture
How To Build Outdoor Wood Burning Furnace
Modified: February 24, 2024
Learn how to build your own outdoor wood burning furnace with our comprehensive guide. Discover tips, designs, and safety considerations for creating the perfect outdoor furniture.
(Many of the links in this article redirect to a specific reviewed product. Your purchase of these products through affiliate links helps to generate commission for Storables.com, at no extra cost. Learn more)
Introduction
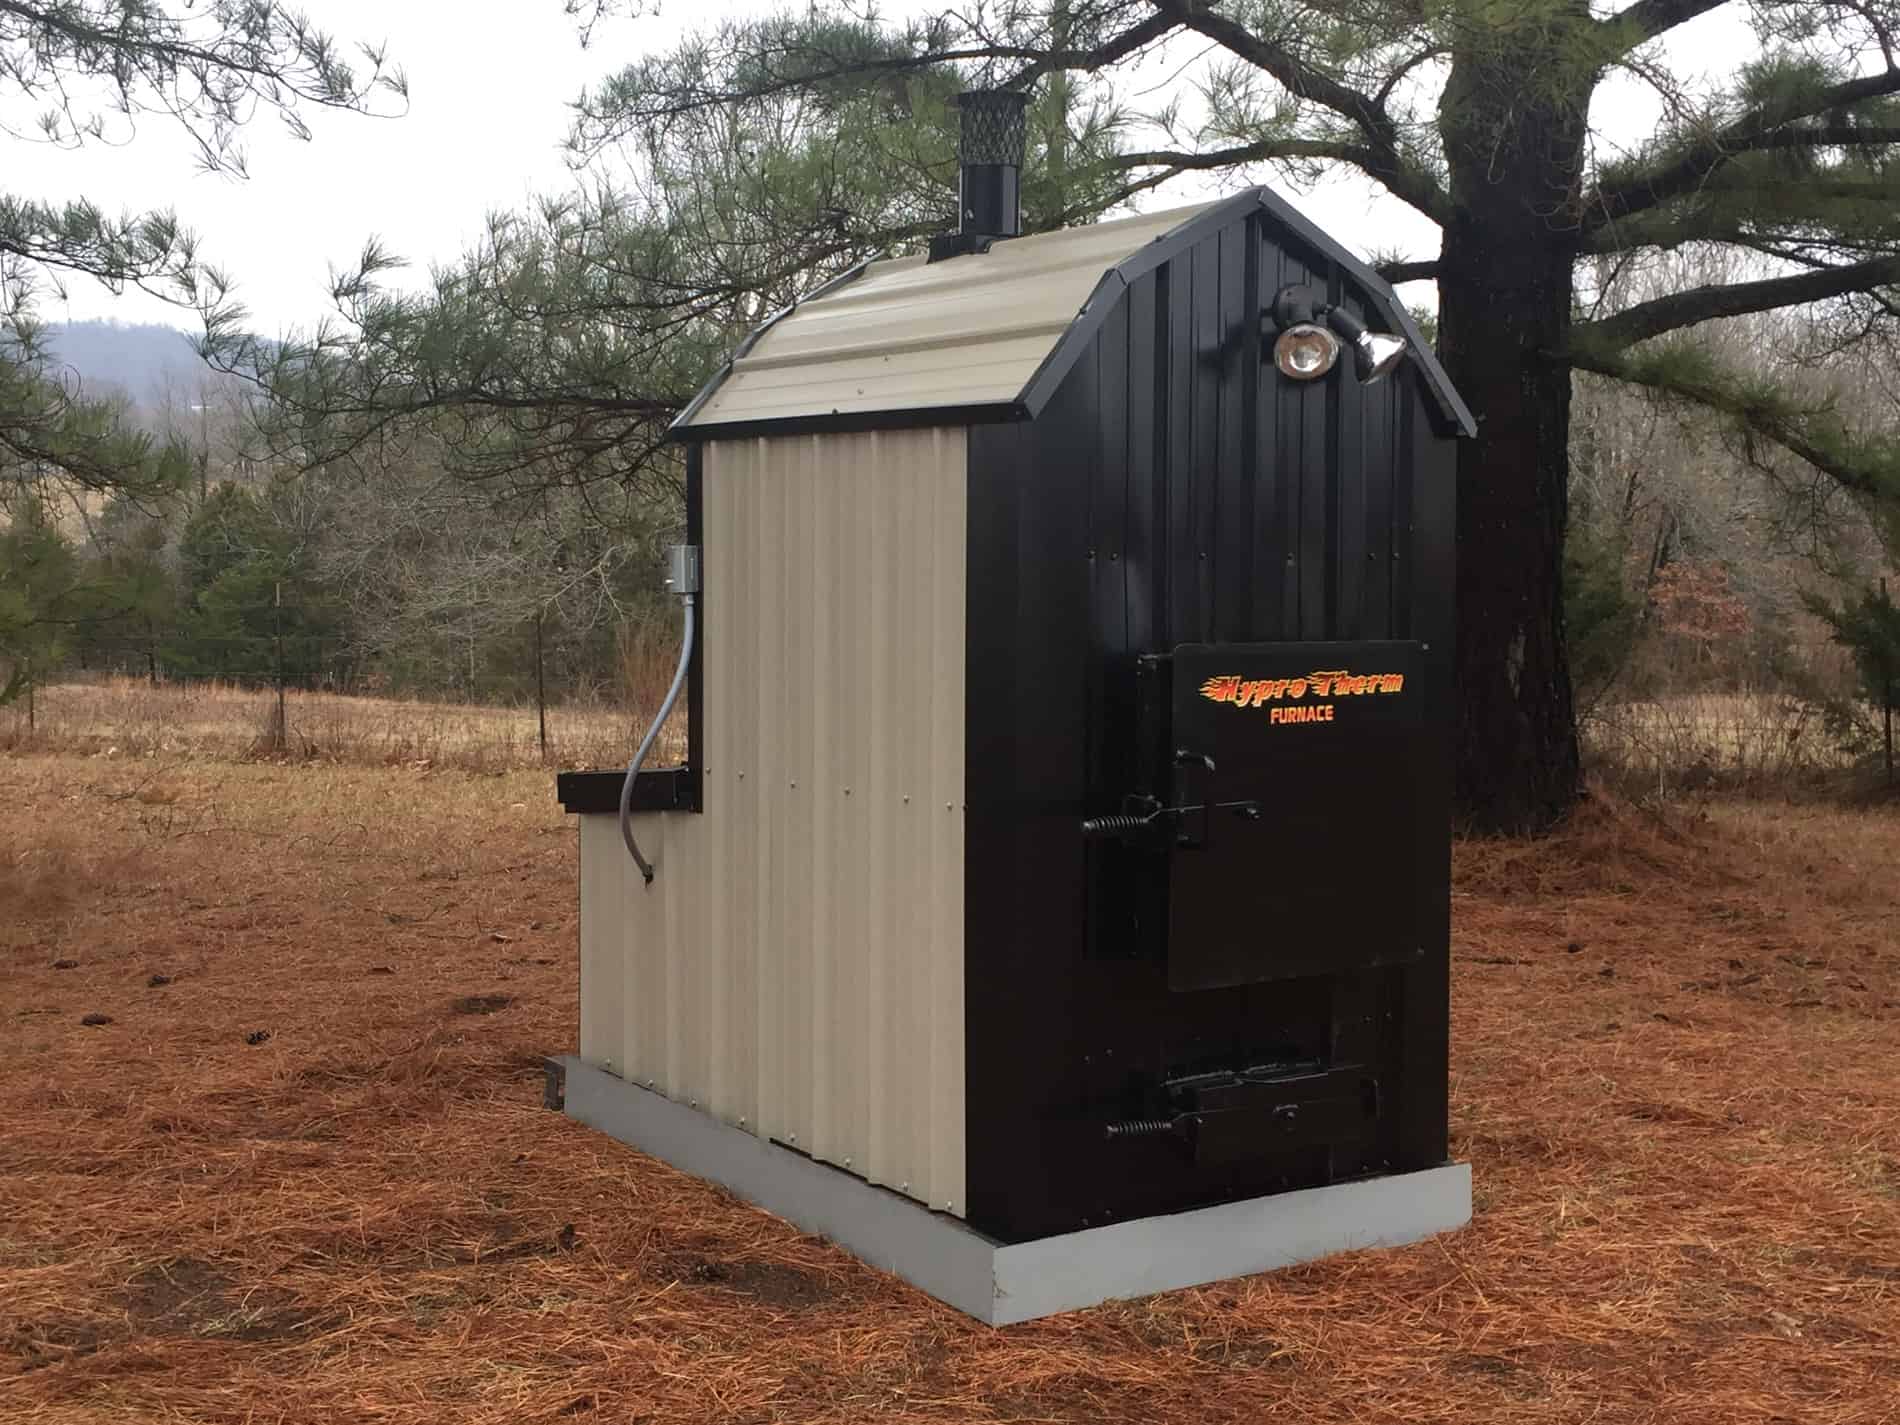
Welcome to the world of outdoor wood burning furnaces! If you're an outdoor enthusiast who enjoys the cozy warmth and ambiance of a wood-burning fire, then building your very own outdoor wood burning furnace can be an exciting and rewarding project. Not only does it offer a sustainable and cost-effective way to heat your outdoor spaces, but it also provides an opportunity to showcase your DIY skills and creativity.
In this comprehensive guide, we'll take you through the step-by-step process of building your outdoor wood burning furnace, from choosing the right location to testing and using the finished product. Whether you're looking to heat a backyard patio, a workshop, or a small cabin in the woods, this guide will equip you with the knowledge and skills needed to create a functional and efficient wood burning furnace.
Before we dive into the nitty-gritty of construction, it's important to note that safety should always be a top priority when working with fire and heat sources. Throughout the construction process, we'll highlight the essential safety considerations and fire protection measures to ensure that your outdoor wood burning furnace is not only effective but also safe to use.
So, if you're ready to embark on this exciting DIY adventure and bring the warmth of a wood fire to your outdoor space, let's roll up our sleeves and get started on building your very own outdoor wood burning furnace!
Key Takeaways:
- Embrace the warmth of a DIY outdoor wood burning furnace by choosing the right location, gathering materials, and prioritizing safety for a cozy and safe heating experience.
- Build a safe and efficient outdoor wood burning furnace by constructing a solid foundation, installing proper ventilation, and adding essential safety features for a worry-free heating experience.
Read more: How To Build Wood Burning Fireplace
Choosing the Right Location for Your Outdoor Wood Burning Furnace
Before you start building your outdoor wood burning furnace, it’s crucial to carefully select the location where it will be installed. The right location can significantly impact the efficiency and safety of your furnace. Here are some key considerations to keep in mind:
- Distance from Flammable Structures: Choose a location that is a safe distance away from any flammable structures such as sheds, trees, or wooden fences. This will help minimize the risk of accidental fires and ensure the safety of your property.
- Adequate Ventilation: Ensure that the chosen location provides ample ventilation for the furnace. Avoid placing the furnace in an enclosed or poorly ventilated area, as this can lead to smoke buildup and potential health hazards.
- Accessibility: Consider the accessibility of the location for loading wood and performing maintenance on the furnace. It should be easily reachable and not obstructed by obstacles.
- Wind Direction: Take note of the prevailing wind direction in your area. Position the furnace so that the smoke will not blow directly into your living spaces or neighboring properties.
- Clearance from Combustible Materials: Ensure that there is sufficient clearance between the furnace and any combustible materials. This includes maintaining a safe distance from wooden decks, overhanging branches, and other flammable objects.
Once you’ve identified a suitable location based on these considerations, mark out the area where the furnace will be installed. Clear any debris or vegetation from the site to create a clean and level foundation for the construction process. By carefully choosing the right location for your outdoor wood burning furnace, you can lay the groundwork for a safe, efficient, and enjoyable heating experience.
Gathering the Necessary Materials and Tools
Now that you’ve chosen the perfect location for your outdoor wood burning furnace, it’s time to gather all the materials and tools required for the construction process. Building a wood burning furnace requires a combination of sturdy materials and essential tools to ensure a well-constructed and functional end product. Here’s a comprehensive list of what you’ll need:
Materials:
- Firebricks: These high-temperature resistant bricks will form the inner lining of the furnace, providing insulation and durability.
- Steel Sheets or Plates: These will be used to construct the outer shell of the furnace, providing structural support and heat retention.
- Steel Pipes and Elbows: For the chimney and ventilation system, choose high-quality steel pipes and elbows that can withstand the heat and weather conditions.
- Grate or Grille: A sturdy metal grate or grille will support the wood and allow for proper airflow within the furnace.
- High-temperature Paint: To protect the exterior of the furnace from rust and corrosion, high-temperature paint is essential for a long-lasting finish.
- Insulation Material: Depending on the design, you may need insulation material to enhance the furnace's heat retention and efficiency.
- Concrete or Masonry Blocks: These will be used to create a stable foundation for the furnace, ensuring it is level and secure.
- Safety Features: Fireproof caulking, heat-resistant gloves, and other safety features should not be overlooked for the protection of both the furnace and its users.
Tools:
- Welder and Welding Equipment: A welder is essential for joining the steel components of the furnace securely.
- Angle Grinder: To cut and shape the steel sheets and pipes to the required dimensions.
- Drill and Bits: For creating holes and fastening components during the assembly process.
- Level and Measuring Tools: To ensure the furnace is constructed accurately and level on its foundation.
- Work Gloves and Safety Goggles: Personal protective equipment is essential for handling materials and using power tools safely.
- Masonry Tools: If you're building a masonry foundation, tools such as a trowel and mortar mixing equipment will be necessary.
By gathering these materials and tools, you’ll be well-prepared to commence the construction of your outdoor wood burning furnace. With the right resources at your disposal, you can proceed with confidence, knowing that you have everything needed to bring your furnace to life.
Read more: How Does An Outdoor Wood Furnace Work
Building the Foundation for Your Wood Burning Furnace
Before constructing the furnace itself, it’s essential to create a solid and level foundation to support the weight of the furnace and ensure its stability. The foundation serves as the base upon which the entire furnace structure will rest, so careful attention to detail is crucial. Here’s a step-by-step guide to building the foundation for your wood burning furnace:
1. Site Preparation:
Clear the chosen area of any debris, vegetation, or obstacles. Use a shovel and a rake to level the ground, ensuring that the foundation site is flat and free from any uneven surfaces or obstructions.
2. Marking the Foundation:
Using stakes and string, mark out the dimensions of the foundation according to the planned size of your wood burning furnace. Double-check the measurements to ensure accuracy.
3. Excavation:
Excavate the marked area to a depth that allows for the placement of a stable base material, such as concrete or masonry blocks. The depth of the excavation will depend on the specific design and size of your furnace.
Read more: How To Build Wood Outdoor Furniture
4. Base Material Installation:
If using concrete, pour and level the concrete within the excavated area to create a solid base for the furnace. Alternatively, if using masonry blocks, lay them in a level and compact manner to form a stable foundation. Ensure that the base material is accurately positioned and level.
5. Curing and Setting:
Allow the concrete to cure according to the manufacturer’s instructions, or ensure that the masonry blocks are securely set in place. This step is crucial for the long-term stability and durability of the foundation.
By following these steps, you can establish a robust foundation that will provide the necessary support for your wood burning furnace. A well-constructed foundation is the cornerstone of a safe and reliable outdoor heating system, setting the stage for the next phase of the construction process.
Constructing the Furnace Structure
With the foundation in place, it’s time to embark on the exciting phase of constructing the actual furnace structure. This involves assembling the inner firebox, insulation, and outer shell of the furnace to create a durable and efficient heating unit. Here’s a detailed guide to help you through the construction process:
1. Inner Firebox Assembly:
Begin by arranging the firebricks to form the inner lining of the furnace. Use a high-temperature mortar to secure the bricks in place, ensuring a tight and secure fit. The firebox should be designed to withstand high temperatures and provide optimal insulation for efficient combustion.
Read more: How To Burn Wood In A Fire Pit
2. Insulation Installation:
Depending on the design of your furnace, you may need to add insulation material between the inner firebox and the outer shell. This insulation helps retain heat within the furnace, improving its overall efficiency and heat output. Ensure the insulation material is properly fitted and does not obstruct the airflow within the furnace.
3. Outer Shell Construction:
Using the steel sheets or plates, construct the outer shell of the furnace around the inner firebox and insulation. Secure the steel components using welding equipment to create a sturdy and heat-resistant enclosure for the furnace. Pay close attention to the seams and joints to prevent heat leakage and ensure structural integrity.
4. Grate and Loading Door Installation:
Install a durable metal grate or grille at the base of the firebox to support the wood and allow for adequate airflow. Additionally, create a loading door or opening in the outer shell to facilitate the loading of wood into the furnace. Ensure the loading door is equipped with a secure latch or closure mechanism for safety.
5. Finishing Touches:
Once the basic structure of the furnace is in place, apply a coat of high-temperature paint to the exterior to protect it from corrosion and enhance its durability. This step will ensure that your outdoor wood burning furnace can withstand the elements and maintain its appearance over time.
By following these steps, you can construct a robust and well-insulated furnace structure that is ready to provide reliable heat for your outdoor space. The careful assembly of the inner firebox, insulation, and outer shell will contribute to the efficiency and longevity of your wood burning furnace.
Read more: How To Use A Wood Burning Fireplace
Installing the Chimney and Ventilation System
Proper ventilation is essential for the efficient operation of your outdoor wood burning furnace. The chimney and ventilation system play a crucial role in directing smoke and combustion byproducts safely away from the furnace and your outdoor living areas. Here’s a detailed guide to help you install the chimney and ventilation system for your wood burning furnace:
1. Chimney Placement:
Determine the optimal location for the chimney based on the layout of your outdoor space and the prevailing wind direction. The chimney should be positioned to draw smoke away from gathering areas and neighboring properties. It should also extend above the roofline to prevent downdrafts and ensure proper ventilation.
2. Chimney Construction:
Assemble the steel pipes and elbows to create the chimney structure. Ensure that the chimney components are securely connected and sealed to prevent smoke leakage. The height of the chimney should comply with local building codes and safety standards to promote effective smoke dispersion.
3. Ventilation Ducts:
In addition to the chimney, the furnace may require ventilation ducts to facilitate airflow and combustion within the firebox. Install ventilation ducts as needed to ensure proper oxygen supply for the wood-burning process. These ducts should be designed to withstand high temperatures and promote efficient combustion.
4. Spark Arrestor Installation:
To enhance safety and prevent the release of sparks, consider installing a spark arrestor at the top of the chimney. A spark arrestor is a mesh or screen designed to trap embers and sparks, reducing the risk of fire hazards and protecting surrounding vegetation and structures.
5. Sealing and Insulation:
Inspect the connections and joints of the chimney and ventilation ducts to ensure they are properly sealed and insulated. This helps prevent heat loss and ensures that the smoke and combustion byproducts are efficiently directed outside the furnace and away from the surrounding area.
By carefully installing the chimney and ventilation system, you can create a safe and effective means of directing smoke and ensuring proper airflow for your outdoor wood burning furnace. Proper ventilation not only enhances the performance of the furnace but also contributes to a comfortable and enjoyable outdoor heating experience.
Adding Safety Features and Fire Protection
When it comes to outdoor wood burning furnaces, prioritizing safety features and fire protection measures is paramount. By incorporating these elements into the design and construction of your furnace, you can ensure the well-being of both the heating system and its surroundings. Here’s a comprehensive guide to adding essential safety features and fire protection to your outdoor wood burning furnace:
1. Heat Resistant Barriers:
Install heat-resistant barriers around the furnace to create a designated safety zone. These barriers can be made of non-combustible materials such as concrete, stone, or metal, and should be positioned to prevent accidental contact with the hot surfaces of the furnace.
2. Fireproof Caulking and Sealants:
Apply fireproof caulking and sealants to the joints and seams of the furnace structure to prevent the escape of heat, smoke, and combustion byproducts. This not only enhances the efficiency of the furnace but also reduces the risk of fire hazards associated with heat leakage.
3. Clear Signage and Safety Instructions:
Display clear signage and safety instructions near the furnace to inform users and visitors about safety protocols, proper operation, and emergency procedures. This ensures that everyone interacting with the furnace is aware of the necessary precautions and actions to take in case of an emergency.
4. Fire Extinguishing Equipment:
Keep fire extinguishing equipment, such as a fire extinguisher or a water source, readily accessible near the furnace. In the event of an unexpected fire or ignition, having the means to quickly extinguish flames is crucial for minimizing damage and ensuring the safety of the surrounding area.
5. Regular Maintenance and Inspections:
Establish a routine maintenance schedule to inspect and clean the furnace, chimney, and ventilation system. Regular maintenance helps identify and address potential safety issues, such as creosote buildup in the chimney or wear and tear on furnace components, before they escalate into hazards.
Read more: How To Make A Wood-Burning Pizza Oven
6. Protective Gear and Training:
Equip yourself and others who will be operating or maintaining the furnace with appropriate protective gear, including heat-resistant gloves, eye protection, and sturdy footwear. Additionally, provide training on safe furnace operation and maintenance practices to minimize the risk of accidents.
By integrating these safety features and fire protection measures into your outdoor wood burning furnace setup, you can create a secure and reliable heating system that prioritizes the well-being of both users and the surrounding environment. Safety-conscious design and proactive fire protection measures are essential for enjoying the warmth and comfort of an outdoor wood burning furnace with peace of mind.
Testing and Using Your Outdoor Wood Burning Furnace
After completing the construction and safety preparations, it’s time to put your outdoor wood burning furnace to the test and begin enjoying its warmth and functionality. However, before firing it up for regular use, it’s crucial to conduct thorough testing and familiarize yourself with the proper operation and maintenance procedures. Here’s a step-by-step guide to testing and using your outdoor wood burning furnace:
1. Initial Burn Test:
Conduct an initial burn test to evaluate the performance of the furnace. Load a small amount of dry, seasoned wood into the firebox and ignite it. Observe the combustion process, chimney draft, and smoke dispersion to ensure that the furnace is functioning as intended. Make any necessary adjustments to the ventilation system or chimney if needed.
2. Heat Output Evaluation:
Measure the heat output of the furnace to determine its heating capacity and efficiency. Use a thermometer to monitor the temperature within the furnace and in the immediate vicinity. This will help you gauge the furnace’s ability to provide the desired level of warmth for your outdoor space.
3. Safety and Ventilation Checks:
Verify that the safety features, such as heat-resistant barriers and clear signage, are effectively in place. Additionally, confirm that the ventilation system is operating optimally, with proper smoke dispersion and minimal backdraft or smoke accumulation near the furnace.
4. User Instructions and Guidelines:
Share user instructions and guidelines with anyone who will be using or maintaining the furnace. Educate them on proper loading procedures, safety precautions, and the importance of regular maintenance. Encourage users to report any issues or anomalies observed during furnace operation.
5. Regular Maintenance Schedule:
Establish a regular maintenance schedule for the furnace, chimney, and ventilation system. This should include cleaning out ash and soot, inspecting the chimney for creosote buildup, and ensuring that all components are in good working condition. Regular maintenance is essential for the longevity and safety of the furnace.
6. Enjoying the Warmth:
Once testing and safety checks are completed, you can confidently begin using your outdoor wood burning furnace to create a cozy and inviting outdoor environment. Whether it’s for entertaining guests, relaxing on a chilly evening, or simply enjoying the ambiance of a crackling fire, your well-constructed and thoroughly tested furnace is ready to provide reliable warmth and comfort.
By following these steps, you can ensure that your outdoor wood burning furnace is not only operational but also safe and efficient. Regular testing, maintenance, and responsible use will allow you to make the most of your furnace while prioritizing safety and environmental considerations.
Frequently Asked Questions about How To Build Outdoor Wood Burning Furnace
Was this page helpful?
At Storables.com, we guarantee accurate and reliable information. Our content, validated by Expert Board Contributors, is crafted following stringent Editorial Policies. We're committed to providing you with well-researched, expert-backed insights for all your informational needs.

0 thoughts on “How To Build Outdoor Wood Burning Furnace”