Home>Furniture>Outdoor Furniture>How Do You Lay A Patio
Outdoor Furniture
How Do You Lay A Patio
Modified: September 1, 2024
Discover the best way to lay a patio with our step-by-step guide. Transform your outdoor space with the right tools and outdoor furniture.
(Many of the links in this article redirect to a specific reviewed product. Your purchase of these products through affiliate links helps to generate commission for Storables.com, at no extra cost. Learn more)
Introduction
When it comes to creating a beautiful outdoor space, a patio can be a wonderful addition. Not only does it provide a space for relaxation and entertainment, but it also adds value to your home. However, before you can start enjoying your patio, there are a few essential steps you need to take to ensure its proper installation.
In this guide, we will take you through the process of laying a patio, starting with preparing the ground. By following these steps, you’ll be well on your way to creating a stunning and durable patio that you can enjoy for years to come.
Key Takeaways:
- Properly preparing the ground, laying the pavers, and securing the patio ensures a stable and beautiful outdoor space for relaxation and entertainment.
- Regular maintenance, including clearing debris and filling gaps, will keep your patio looking its best and ready for memorable moments with friends and family.
Read more: How Do You Lay Decking
Step 1: Preparing the Ground
Before you can lay your patio, it’s crucial to properly prepare the ground to ensure a stable and long-lasting foundation. Here are the key tasks you need to complete:
1.1 Clearing the Area
Start by removing any obstacles such as rocks, weeds, or vegetation from the area where you plan to lay your patio. This will ensure a clean work surface and prevent any potential issues during the installation process.
1.2 Marking the Layout
Using stakes and string, mark the outline of your patio. Take into consideration the desired shape, size, and any existing structures or landscape features you want to incorporate.
1.3 Excavating the Area
Next, excavate the marked area to a depth that allows for the base material and the thickness of the patio pavers. This depth will depend on the specific requirements of your project, but generally, a depth of 6-8 inches is sufficient.
Read more: How To Lay A Cobblestone Patio
1.4 Leveling the Ground
Once the area is excavated, use a level and a straight-edged board to ensure that the ground is even. This step is crucial to prevent any unevenness or sinking of the patio in the future.
1.5 Adding a Weed Barrier
To prevent weeds from growing through your patio, it’s essential to lay down a weed barrier fabric on the excavated ground. This will help maintain the aesthetics and durability of your patio over time.
1.6 Installing Edging
Installing edging along the perimeter of your patio will provide a clean and polished look and prevent the surrounding materials from encroaching onto the patio area. Choose a durable material such as plastic or metal for your edging.
By completing these initial steps of preparing the ground, you have set the foundation for a successful patio installation. With a clear and level surface, proper weed prevention, and defined boundaries, you are ready to move on to the next steps of creating your dream patio.
Key Takeaways:
- Properly preparing the ground, laying the pavers, and securing the patio ensures a stable and beautiful outdoor space for relaxation and entertainment.
- Regular maintenance, including clearing debris and filling gaps, will keep your patio looking its best and ready for memorable moments with friends and family.
Read more: How Do You Lay Decking
Step 1: Preparing the Ground
1.1 Clearing the Area
Before you can begin laying your patio, it’s essential to clear the area of any obstacles that may hinder the installation process. Clearing the area will not only ensure a smooth and efficient installation but also provide a clean and aesthetically pleasing space. Here’s what you need to do:
Remove Rocks and Debris: Start by removing any rocks, branches, or other debris from the area where you plan to lay your patio. These obstacles can interfere with leveling the ground and affect the stability of your patio. Use a rake or shovel to clear the area thoroughly.
Eliminate Weeds and Vegetation: Weeds and vegetation can grow through the cracks of your patio, causing damage and compromising its overall appearance. Take the time to remove any existing weeds, grass, or plants by pulling them out at their roots. For more persistent weed growth, consider using an herbicide specifically designed to kill off unwanted plant growth.
Address Drainage Issues: Before proceeding with the patio installation, assess the area’s drainage to ensure water will effectively flow off the patio. If you notice any low spots where water tends to accumulate after rain, it’s important to address these drainage issues beforehand. You can fill in low areas with additional soil or incorporate a slight slope into your patio design to direct water away from your foundation.
Consider Tree Roots: If there are any trees near the intended patio area, be mindful of their roots. Tree roots can grow and spread, potentially causing damage to your patio in the future. If possible, create a buffer zone or install root barriers to prevent tree roots from encroaching on your patio space.
Protect Adjacent Features: If you have any existing features near the patio area, such as flower beds, shrubs, or outdoor furniture, take precautions to protect them during the clearing process. Use tarps or covers to shield these items and prevent them from getting damaged or dirty as you work on preparing the ground.
By taking the time to clear the area properly, you’ll create an optimal environment for your patio installation. Removing rocks, debris, and vegetation, addressing drainage issues, and protecting adjacent features will ensure a smooth and successful patio project. With a clean slate, you’re ready to move on to the next steps of marking the layout and excavating the area.
Key Takeaways:
- Properly preparing the ground, laying the pavers, and securing the patio ensures a stable and beautiful outdoor space for relaxation and entertainment.
- Regular maintenance, including clearing debris and filling gaps, will keep your patio looking its best and ready for memorable moments with friends and family.
Read more: How Do You Lay Decking
Step 1: Preparing the Ground
1.2 Marking the Layout
Once you have cleared the area for your patio, the next step is to mark the layout. Properly marking the layout ensures that your patio will be the desired shape and size, and that it aligns with any existing structures or landscape features you want to incorporate. Follow these steps to mark the layout of your patio:
Measure and Plan: Before marking the layout, take accurate measurements of the area where you want the patio to be. Consider the size and shape that will best suit your needs and complement your outdoor space. It’s helpful to sketch a rough plan on paper to visualize the layout and make any necessary adjustments.
Use Stakes and String: Once you have your measurements and plan in hand, secure stakes at each corner of the patio area. Make sure the stakes are firmly in the ground and at the correct distance from each other to reflect the dimensions of your patio. Connect the stakes with string, creating a perimeter that outlines the shape of your patio.
Check Alignment: Use a level or a measuring tape to ensure that the string is level and aligned accurately. This will help you create a symmetrical and visually pleasing patio. Adjust the string and stakes as needed to achieve the desired layout.
Create Curves or Angles: If you want to incorporate curves or angles into your patio design, use additional stakes and string to define these features. This step will require a bit more precision, but it will add a unique and artistic touch to your outdoor space.
Consider Existing Structures: If your patio will be adjacent to a house, fence, or other structures, consider how it will interface with them. Ensure that the patio’s layout aligns with these existing structures and that there is enough space for any desired walkways or access points.
Double Check Measurements: Before proceeding to the excavation stage, double-check all your measurements and verify that the layout is exactly as you want it. It’s better to catch any errors or miscalculations now than after you’ve already started the construction process.
By taking the time to carefully mark the layout of your patio, you’ll ensure that the end result meets your expectations and fits seamlessly into your outdoor space. With a well-defined layout, you’re ready to move on to the excavation stage and begin preparing the ground for your patio installation.
Key Takeaways:
- Properly preparing the ground, laying the pavers, and securing the patio ensures a stable and beautiful outdoor space for relaxation and entertainment.
- Regular maintenance, including clearing debris and filling gaps, will keep your patio looking its best and ready for memorable moments with friends and family.
Read more: How Do You Lay Decking
Step 1: Preparing the Ground
1.3 Excavating the Area
Once you have marked the layout of your patio, the next step in the preparation process is to excavate the area. Excavation involves removing the soil and creating a space for the base materials and pavers to be installed. Follow these steps to excavate the area for your patio:
Gather the Necessary Tools: Before you begin, gather the appropriate tools for excavation. These may include a shovel, a garden trowel, a wheelbarrow, and a rake. Having the right tools will make the excavation process smoother and more efficient.
Start Digging: Begin digging within the marked perimeter using a shovel. Start from the outside edges and work your way inward. Remove the top layer of turf or soil, making sure to dig to the desired depth for your patio. The depth will vary depending on the project requirements, but a typical depth for a patio is around 6 to 8 inches.
Check for Uniform Depth: As you excavate, periodically check the depth using a measuring tape or a stake with markings. Make adjustments as necessary to ensure that the depth remains consistent throughout the entire area.
Remove Excess Soil: Place the excavated soil into a wheelbarrow or other container for removal. If the soil is suitable for use elsewhere on your property, you can set it aside for future landscaping projects. Otherwise, dispose of the excess soil in accordance with local regulations.
Smooth the Surface: After excavating the full area, use a rake or garden trowel to smooth and level the exposed soil. This will create a flat surface for the next step of the patio preparation process.
Inspect for Drainage: Take a moment to inspect the excavated area for any potential drainage issues. If you notice areas where water may accumulate, make sure to address these concerns before moving forward with the patio installation. You may need to create a slight slope or add drainage channels to ensure proper water flow.
Remove Obstacles: While excavating, keep an eye out for any obstructions such as large rocks, tree roots, or underground utilities. Remove or relocate these obstacles to prevent any interference with the patio’s stability or integrity.
Excavating the area is a crucial step in preparing the ground for your patio. By following these steps and paying attention to detail, you’ll create a solid foundation for the next stages of construction. With the area properly excavated, you’re ready to move on to the next step: leveling the ground and preparing it for the base materials.
Key Takeaways:
- Properly preparing the ground, laying the pavers, and securing the patio ensures a stable and beautiful outdoor space for relaxation and entertainment.
- Regular maintenance, including clearing debris and filling gaps, will keep your patio looking its best and ready for memorable moments with friends and family.
Read more: How Do You Lay Decking
Step 1: Preparing the Ground
Read more: How To Lay A Cobblestone Patio
1.4 Leveling the Ground
After excavating the area for your patio, the next step in the preparation process is to level the ground. Leveling ensures that the surface is even and provides a stable foundation for the base materials and patio pavers. Follow these steps to level the ground:
Assess the Surface: Take a close look at the excavated area and identify any low spots or uneven areas. These may have been created during the excavation process or may be naturally occurring. It’s important to address these issues before proceeding with the patio installation.
Add or Remove Soil: If you notice any low spots or depressions, add compacted soil in those areas to fill them in. Use a shovel or rake to distribute the soil evenly and create a level surface. Conversely, if you identify any high spots, remove excess soil to achieve a consistent level throughout the entire area.
Use a Straight-Edged Board or Level: To ensure an accurate leveling process, use a long, straight-edged board or a level. Place it on the ground and check for any deviations from a level surface. Adjust the soil as needed, using the board or level as a guide.
Compact the Soil: Once you have achieved a level surface, use a plate compactor or a hand tamper to compact the soil. This step helps to stabilize the ground further and ensures that the patio surface remains flat and steady over time. Go over the entire area, focusing on any areas that appear loose or uneven.
Check for Drainage: As you level the ground, pay attention to the drainage of the area. Ensure that the surface is sloping away from your home or any other structures to facilitate proper water runoff. A gentle slope of about 1/8 inch per foot should be sufficient for adequate drainage.
Recheck the Level: After compacting the soil, recheck the surface level with your straight-edged board or level. Make any necessary adjustments to achieve a consistently level surface. Taking the time to ensure proper leveling at this stage will contribute to the overall stability and longevity of your patio.
Remove Debris: Before proceeding to the next steps of patio installation, thoroughly clean the leveled surface. Remove any remaining debris, rocks, or branches from the area to create a clean, workable surface.
By leveling the ground, you are setting the stage for a successful patio installation. A level surface will provide stability for the base materials and pavers, resulting in a durable and visually appealing patio. With a smooth and level ground, you’re ready to move on to the next step: adding a weed barrier to prevent unwanted growth.
Key Takeaways:
- Properly preparing the ground, laying the pavers, and securing the patio ensures a stable and beautiful outdoor space for relaxation and entertainment.
- Regular maintenance, including clearing debris and filling gaps, will keep your patio looking its best and ready for memorable moments with friends and family.
Read more: How Do You Lay Decking
Step 1: Preparing the Ground
1.5 Adding a Weed Barrier
One of the key aspects of preparing the ground for your patio is adding a weed barrier. A weed barrier is a protective layer that prevents weeds and unwanted vegetation from growing through your patio, maintaining its aesthetic appeal and longevity. Here’s how to add a weed barrier to your patio:
Select the Right Weed Barrier Material: There are various options for weed barrier materials, including landscaping fabric, geotextile membranes, and plastic sheets. Choose a high-quality weed barrier material that is durable, permeable to allow water drainage, and designed specifically for use in outdoor applications.
Measure and Cut the Weed Barrier: Measure the dimensions of your patio area and cut the weed barrier material to fit. Leave a slight overlap at the edges to ensure complete coverage and prevent weed growth along the perimeter.
Clear the Surface: Before laying the weed barrier, ensure that the leveled ground is free of any debris, rocks, or other obstacles. Smooth and clean the surface to provide a solid foundation for the weed barrier installation.
Lay the Weed Barrier: Place the cut weed barrier material over the entire patio area, starting from one end and moving towards the other. Smooth out any wrinkles or creases in the material to ensure a tight and even coverage. If needed, use landscape staples or pins to secure the weed barrier to the ground, preventing any shifting or movement during the patio installation process.
Overlap and Secure Seams: If you have multiple pieces of weed barrier material, overlap the edges by several inches to create a continuous barrier. Secure the overlapping seams using landscape staples or pins to keep the material in place.
Trim Excess Weed Barrier: Once the weed barrier is laid and secured, trim any excess material along the edges of the patio. This will ensure a neat and tidy appearance and prevent the weed barrier from being exposed once the patio pavers are installed.
Inspect and Smooth the Weed Barrier: After installing the weed barrier, inspect the surface for any bumps or uneven areas. Smooth out the material if needed to ensure a level and uniform surface for the patio pavers.
Adding a weed barrier is a crucial step in preventing weed growth and maintaining the integrity of your patio. By following these guidelines and selecting a reliable weed barrier material, you’ll create a strong defense against unwanted vegetation. With the weed barrier in place, you’re ready to move on to the next step: installing edging along the perimeter of your patio.
Key Takeaways:
- Properly preparing the ground, laying the pavers, and securing the patio ensures a stable and beautiful outdoor space for relaxation and entertainment.
- Regular maintenance, including clearing debris and filling gaps, will keep your patio looking its best and ready for memorable moments with friends and family.
Read more: How Do You Lay Decking
Step 1: Preparing the Ground
1.6 Installing Edging
Installing edging along the perimeter of your patio is an important step in the preparation process. Edging acts as a boundary that defines the patio area and helps prevent the surrounding materials from encroaching onto the patio space. Here’s how to install edging for your patio:
Choose the Right Edging Material: There are various options for edging materials, including plastic, metal, and concrete. Consider the overall aesthetics of your patio and select an edging material that complements the design and meets your preferences and budget.
Prepare the Ground: Ensure that the ground where the edging will be installed is clean and level. Remove any debris or weeds, and make sure the surface is properly compacted to provide a stable foundation for the edging material.
Measure and Mark the Edging Placement: Use a measuring tape or string to mark the desired placement of the edging along the perimeter of your patio. This will help you maintain a consistent distance from the edge and ensure an even installation.
Install the Edging: Begin by positioning the first piece of edging at a corner of the patio area. Use a rubber mallet or a hammer to drive the edging into the ground. Make sure it is properly aligned and level. Repeat this process for the remaining sections of edging, connecting them tightly together.
Secure the Edging: Depending on the type of edging material you are using, you may need to secure it further to ensure stability. This can be done by driving stakes or anchoring pins through the pre-drilled holes in the edging. Place these stakes or pins at regular intervals along the length of the edging.
Adjust and Trim: As you install the edging, make any necessary adjustments to ensure that it follows the designated shape and provides a clean and crisp boundary for your patio. Trim any excess edging material using a saw or utility knife for a neat and finished appearance.
Inspect and Finishing Touches: Once the edging is installed, inspect the entire perimeter to ensure that it is secure and aligned properly. Use a level to double-check that the top surface of the edging is even. Make any adjustments as needed to achieve a professional and polished look.
Step 2: Preparing the Base
With the edging in place, you’re ready to move on to the next step of preparing the ground for your patio: creating a solid base for the pavers. The base serves as a supporting layer that helps distribute the weight of the patio and ensures its long-term stability. Here’s what you need to do:
Calculate the Base Depth: The depth of the base will depend on several factors, including the type of soil, the expected level of foot traffic, and the size and weight of the patio pavers. Typically, a base depth of around 4 to 6 inches is appropriate for residential patios. Consult with local building codes or a professional if you need guidance on the appropriate base depth for your project.
Lay the Base Material: Start by spreading a layer of base material, such as crushed stone or gravel, evenly over the excavated area inside the edging. Use a rake or shovel to distribute the material and create a level surface. Make sure the base material fills the entire area up to the desired depth.
Compact the Base: Use a plate compactor or hand tamper to compact the base material. This step is essential for ensuring a solid and stable foundation for the patio pavers. Move the compactor over the base material in a systematic manner, applying even pressure to create a uniform and tightly packed surface.
Check the Base Level: Periodically check the levelness of the compacted base using a straight-edged board or a level. Adjust as necessary to achieve a flat and even surface. A level base will help prevent settling and unevenness in the patio pavers.
Verify Proper Drainage: As you prepare the base, ensure that it is sloped slightly away from your house or any other structures to promote proper water drainage. This will help prevent water accumulation and potential damage to your patio over time.
By installing edging and preparing a solid base, you’re setting the stage for a successful and long-lasting patio. The edging provides a clear boundary and prevents materials from encroaching onto the patio space, while the proper base ensures stability for the patio pavers. With these steps complete, you’re ready to move on to the exciting phase of laying the patio pavers themselves.
Step 2: Preparing the Base
2.1 Calculating the Base Depth
Calculating the proper base depth is a crucial step in preparing the ground for your patio. The base serves as a crucial foundation that supports the weight of the patio pavers and ensures long-term stability. Here’s how to determine the appropriate base depth for your patio:
Consider the Type of Patio Pavers: The type of patio pavers you plan to use plays a significant role in determining the base depth. Different pavers have varying thicknesses and weight-bearing capacities. Refer to the manufacturer’s recommendations or consult an expert to determine the ideal base depth for the specific type of pavers you have chosen.
Evaluate the Soil Type: The type of soil on which your patio will be installed also impacts the base depth. Generally, clay soils compact more easily and require a thinner base, while sandy or loamy soils may need a slightly thicker base to provide adequate support. Assessing the soil type will give you a better understanding of the base depth needed for your patio project.
Account for Foot Traffic: Consider the expected amount of foot traffic your patio will endure. If your patio will primarily serve as a decorative space with light foot traffic, a thinner base depth may be sufficient. However, if you anticipate heavy traffic or plan to use your patio for entertaining, a deeper base depth will provide added stability and durability.
Check Local Building Codes: It’s important to consult local building codes and regulations regarding patio construction. Some areas may have specific requirements for base depth based on climate, soil conditions, or other factors. Ensure that your chosen base depth complies with any applicable regulations in your area.
Consider Climate and Water Drainage: Climate and water drainage patterns also influence the base depth. If you live in an area with heavy rainfall or frequent freezing and thawing cycles, it is crucial to account for proper water drainage and potential soil movement. A deeper base depth may be necessary to ensure stability in such conditions.
Consult with Professionals: If you’re uncertain about the appropriate base depth for your patio, it’s wise to seek advice from professionals, such as landscape contractors or patio installation experts. They can assess your specific project requirements, soil conditions, and intended use to determine the most suitable base depth for optimal performance and longevity.
Remember the Compaction Factor: Keep in mind that the base material will compact under the weight of the patio pavers, so it’s essential to calculate the base depth before compaction. The final result after compaction should align with the desired base depth for your patio.
By carefully considering the type of pavers, soil conditions, foot traffic, local regulations, climate, and seeking professional advice if needed, you can accurately calculate the appropriate base depth for your patio. This ensures a solid foundation and enhances the stability and longevity of your outdoor space. With the base depth determined, you’re ready to move on to the next step: laying the base material for your patio.
Step 2: Preparing the Base
2.2 Laying the Base Material
After calculating the appropriate base depth for your patio, the next step is to lay the base material. The base material serves as a supporting layer that helps distribute the weight of the patio pavers and provides stability. Here’s how to properly lay the base material for your patio:
Gather the Necessary Materials: Before you start, gather all the materials you’ll need for laying the base. This typically includes crushed stone, gravel, or another suitable base material, a rake, a shovel, and a compacting tool such as a plate compactor or hand tamper.
Mark the Depth: Use stakes or markers to clearly indicate the depth of the base material according to the calculated base depth. This will serve as a guide when adding the base material and ensure a consistent depth across the entire patio area.
Add the Base Material: Start adding the base material within the marked area, spreading it evenly using a rake or shovel. Gradually build up the base material to the desired depth, ensuring it is consistent throughout the patio area. Use the rake to level the base material as you go.
Compact the Base Material: Once the base material is spread and leveled, it needs to be compacted to provide a solid foundation. Use a plate compactor or hand tamper to compact the material in small sections. Start from the outer edges and work your way inward, overlapping each pass to ensure proper compaction.
Check the Level: Periodically check the levelness of the compacted base material using a straight-edged board or level. Adjust as needed to achieve a uniformly level surface. This step is crucial as a level base will help prevent the patio pavers from settling unevenly over time.
Continue Adding and Compacting: Add more base material if necessary to achieve the desired depth and continue compacting, checking the level as you go. Ensure that the base material is compacted enough to provide a stable and solid surface for the patio pavers.
Inspect for Proper Drainage: During the process, keep an eye out for any areas where water might pool or collect. Make adjustments to the base material and the slope if needed to ensure proper water drainage away from your home or other structures.
Remove Excess Material: After completing the base material installation and ensuring proper compaction, remove any excess material that may be outside the designated patio area using a shovel or rake. This will allow for a clean and precise installation of the patio pavers.
By carefully laying and compacting the base material, you are establishing a sturdy foundation for your patio pavers. Taking the time to complete this step properly will ensure the overall stability and durability of your patio. With the base material in place, you’re now ready to move on to the exciting phase of laying the patio pavers.
Step 2: Preparing the Base
2.3 Compact the Base
After the base material has been laid for your patio, the next crucial step is to compact the base. Compacting the base ensures that it is firmly packed, providing a stable and level surface for the patio pavers. Here’s how to effectively compact the base material:
Choose the Right Compacting Tool: Depending on the size of your patio and personal preference, you can use either a plate compactor or a hand tamper for compacting. A plate compactor is a motorized tool that efficiently compacts large areas, while a hand tamper is a manual tool suitable for smaller patios or hard-to-reach areas.
Start from the Edges: Begin compacting the base material from the outer edges of the patio. Work in small sections, overlapping each pass to ensure proper compaction. This method helps avoid pushing loose base material towards the center of the patio.
Apply Even Pressure: Whether using a plate compactor or a hand tamper, apply even pressure as you move the tool over the base material. This helps spread the pressure evenly, ensuring thorough compaction and preventing uneven settling in the future.
Make Multiple Passes: To achieve optimal compaction, make multiple passes over the base material. The number of passes required will depend on the type of compactor or tamper you’re using, the thickness of the base material, and personal judgment. Aim for a surface that feels solid and does not noticeably shift underfoot.
Check for Levelness: Periodically check the levelness of the compacted base with a straight-edged board or level. This step ensures that the base is even and eliminates any high or low spots. Adjust as needed by adding or removing base material in these areas and recompact until a level surface is achieved.
Inspect for Proper Drainage: While compacting, keep an eye out for areas where water might pool or collect. If you notice any low spots or inadequate slope, address these areas by adjusting the base material or providing better drainage options. Proper drainage is essential to protect your patio from water damage and improve its longevity.
Continue Compacting the Entire Patio: Work your way from the edges towards the center, compacting the entire patio area. Ensure that all sections of the base material receive the same level of compaction to maintain consistency and stability across the entire patio surface.
Step 3: Laying the Patio
With the base compacted and ready, you can now begin the exciting process of laying the patio pavers. Follow these steps to ensure a proper and visually appealing installation:
Choose the Right Patio Pavers: Select patio pavers that align with your desired aesthetics, durability, and budget. Consider factors such as size, shape, color, pattern, and texture that will enhance the overall look of your outdoor space.
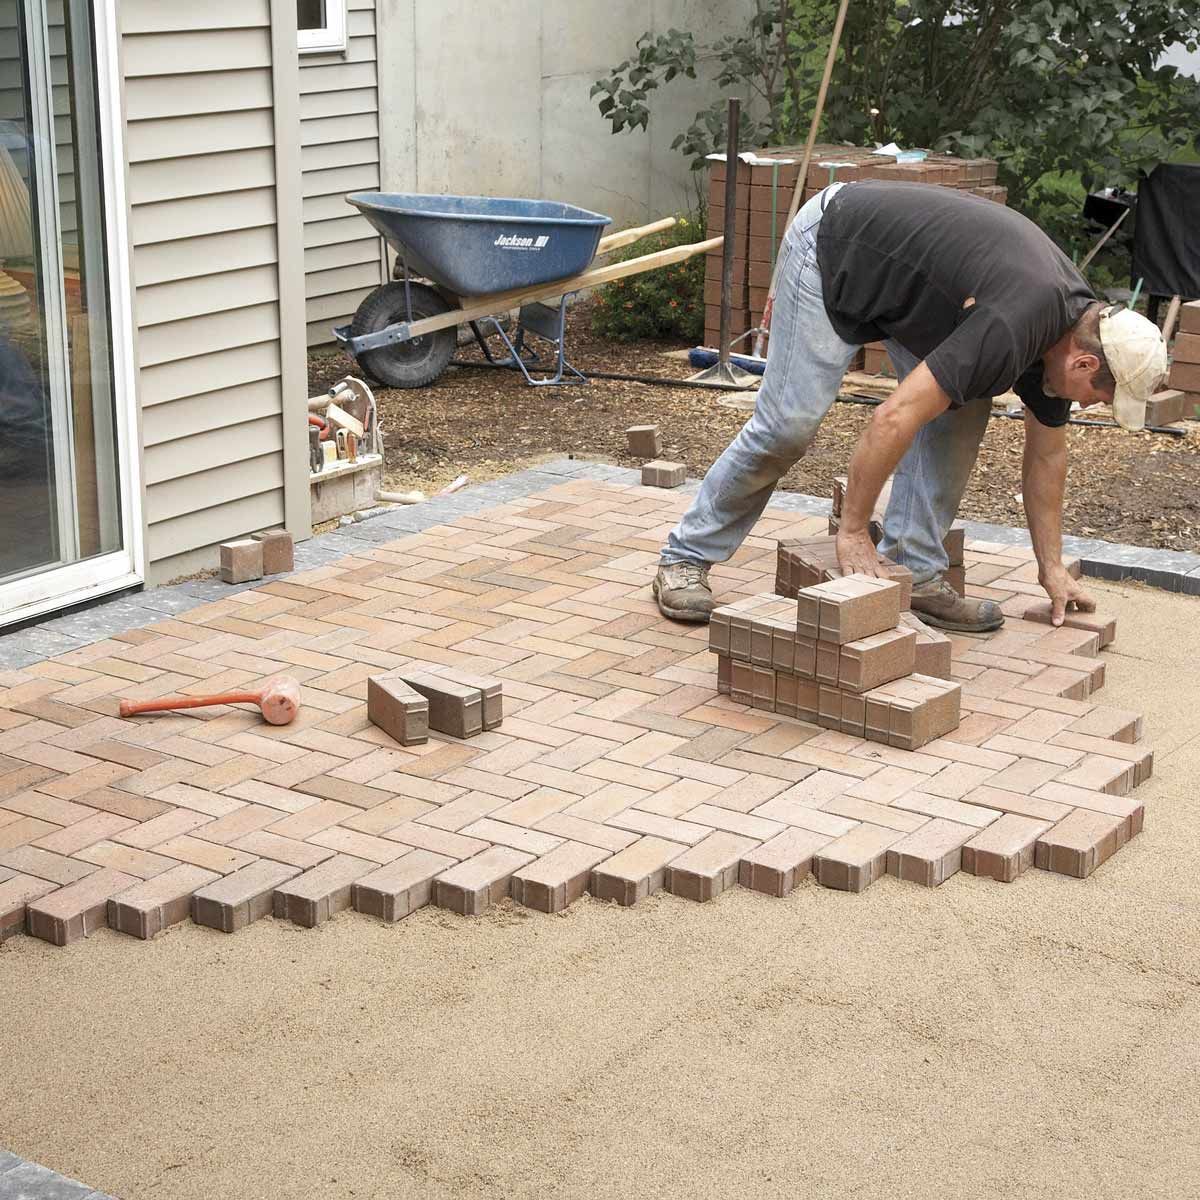
Lay the First Row: Start laying the pavers along one edge of the patio, using a string or guideline to ensure straight and aligned placement. Leave a small gap, typically around 1/8 to 1/4 inch, between the pavers for joint filling material.
Continue with Additional Rows: Lay the subsequent rows of pavers, working your way across the patio surface. Use a rubber mallet to gently tap each paver into place, ensuring they are firmly set on the compacted base and leveled with the surrounding pavers.
Cutting and Fitting Pavers: As you reach the edges or corners of the patio, you may need to cut some pavers to fit. Use a wet saw, a chisel, or a specialized cutting tool to carefully cut the pavers according to the required dimensions. Ensure precise measurements and maintain a consistent gap between the pavers.
Fill the Joints: Once all the pavers are laid, fill the joints between them with joint filling material such as polymeric sand or regular sand. Sweep the material horizontally and vertically, ensuring all gaps are adequately filled. Use a broom or brush to remove excess material from the surface of the pavers.
Compact the Patio: After the joints are filled, use a plate compactor or a hand tamper to lightly compact the entire patio surface. This step helps settle the pavers in place and ensures a tightly interlocked patio.
By compacting the base and carefully laying the patio pavers, you’re closer to enjoying a beautiful outdoor space. Taking the time to follow these steps will result in a visually pleasing patio that is stable, durable, and ready to be enjoyed.
Step 3: Laying the Patio
Read more: How To Lay Patio Slabs On Grass
3.1 Choosing the Patio Pavers
Choosing the right patio pavers is an exciting and important decision in creating a beautiful outdoor space. The type, color, size, and texture of the pavers you choose will greatly impact the overall aesthetics and functionality of your patio. Here are some factors to consider when selecting patio pavers:
Paver Material: Patio pavers are available in various materials, each with its own advantages and characteristics. Popular options include concrete, natural stone, brick, and pavers made from composite materials. Consider the look, durability, maintenance requirements, and budget associated with each material.
Style and Design: Think about the overall style and design of your outdoor space when selecting patio pavers. Whether you prefer a modern, traditional, rustic, or contemporary look, there are pavers available in a variety of shapes, patterns, and finishes. Choose pavers that complement your home’s architecture and landscaping.
Color: Pavers come in a range of colors to suit different preferences and design aesthetics. Consider the color scheme of your outdoor space and select pavers that either harmonize or provide a contrasting element. Light-colored pavers can create a bright and airy feel, while darker tones can lend a sense of depth and warmth.
Size and Shape: Consider the size and shape of the patio pavers that will best suit your needs. Larger pavers can create a clean and contemporary look, while smaller pavers can add intricacy to the design. Additionally, irregular or interlocking shapes offer the opportunity for unique and creative patterns.
Durability and Functionality: Assess the durability and functionality requirements of your patio pavers based on how you plan to use the space. If you expect heavy foot traffic, look for pavers made from durable materials that can withstand constant use. Consider factors such as slip resistance, weather resistance, and ease of maintenance.
Budget: It’s important to establish a budget for your patio project and choose pavers that fit within that budget. Keep in mind that the cost of pavers can vary depending on the material, size, and design. Consider the long-term value and durability of the pavers to make an informed decision.
Texture: Consider the texture of the pavers and how it will complement the overall design of your patio. Smooth pavers can provide a sleek and modern look, while textured surfaces can add visual interest and enhance slip resistance. Consider the comfort of walking on the pavers barefoot, especially if you plan to use the patio for lounging or relaxation.
Environmental Impact: If environmental sustainability is a priority, consider choosing pavers made from recycled materials or those that support responsible manufacturing practices. Some manufacturers offer eco-friendly options that minimize carbon footprint and conserve natural resources.
By considering these factors and choosing patio pavers that align with your style, functionality requirements, and budget, you can create an inviting and visually pleasing outdoor space. Take the time to explore different options, gather inspiration, and consult with professionals if needed. The right choice of patio pavers will enhance the beauty and value of your outdoor living area for years to come.
Step 3: Laying the Patio
3.2 Laying the First Row
As you embark on the process of laying your patio pavers, it’s important to start with a solid foundation. The first row of pavers sets the stage for the entire patio, creating a guideline for the rest of the installation. Here’s how to lay the first row with precision and accuracy:
Prepare the Base: Ensure that the base material is properly leveled and compacted before beginning the paver installation. The stability of the base will provide a solid surface for the first row and ensure the stability of the entire patio.
Establish a Straight Edge: Use a string, straight-edged board, or a laser level to create a straight guideline for the first row of pavers. This will ensure that the row is aligned and straight, serving as a reference point for subsequent rows.
Begin at a Corner: Start laying the first row of pavers at one corner of the patio area. This corner will act as your starting point and allow for a systematic installation. Align the first paver with the guideline and gently press it into the base material.
Ensure Proper Spacing: Place plastic spacers or another suitable spacer between each paver to ensure consistent spacing and allow room for joint filling material. The spacing will depend on the desired aesthetic and the type of pavers being used. Follow manufacturer recommendations or create a uniform gap, typically around 1/8 to 1/4 inch.
Check for Levelness: Use a level to ensure that each paver is level both individually and in relation to the adjacent pavers. Adjust the base material or add/remove material as needed to maintain a level surface. This step is crucial in creating a visually appealing and functional patio.
Tap Pavers into Place: Use a rubber mallet or a dead blow hammer to gently tap each paver into place. This helps ensure that the pavers are firmly set on the base material and snugly fit together. Be mindful not to apply excessive force, as it could result in damage to the pavers.
Measure and Cut if Necessary: If the first row requires smaller or unique-sized pavers to fit the patio’s design or accommodate corners or edges, measure and mark the pavers accordingly. Use a wet saw, chisel, or specialized cutting tool to make precise cuts and create a professional finish.
Continuity and Alignment: As you lay each paver, continuously check for continuity and alignment with the guideline and adjacent pavers. Take the time to step back and assess the overall appearance of the first row, ensuring that it aligns with your desired design and pattern.
Double Check Levelness: Once the first row is complete, use the level to recheck the levelness of the pavers. Adjust as necessary to ensure a uniform and level surface. This step is critical, as an uneven first row will impact the rest of the patio installation.
Additional Considerations: Pay attention to any specific guidelines or recommendations provided by the manufacturer of your patio pavers. They may offer additional instructions or tips for laying the first row and achieving the best results with their specific product.
By meticulously laying the first row of pavers, you set the foundation for a successful and visually pleasing patio installation. Take your time, follow the guidelines, and ensure accuracy and levelness. With the first row in place, you’re now ready to continue with the rest of the paver installation, creating a breathtaking outdoor space.
Step 3: Laying the Patio
3.3 Continue with Additional Rows
Now that the first row of pavers is in place, it’s time to continue with the installation by laying the additional rows. Following a systematic approach will ensure accuracy, stability, and a visually pleasing outcome. Here’s how to continue with the installation of the rest of the patio paver rows:
Work from the Established Row: Start each subsequent row from the established first row. Align the first paver of the new row with the adjacent paver of the previous row, ensuring a consistent spacing between the two. Use the straight guideline established in the first row as a reference to maintain straight lines throughout the patio.
Use a Staggered Pattern: To provide structural integrity and a visually appealing look, use a staggered pattern when laying the pavers in each row. Offset each paver in the row halfway or by a specific measurement from the paver above and below it. This creates interlocking joints and increases the stability of the patio.
Check for Levelness and Alignment: As you lay each paver in the subsequent rows, periodically check for levelness and alignment. Use a level to ensure that the pavers are flush with each other and create a smooth and even surface. Adjust the base material or the position of the pavers, if necessary, to maintain a consistent level throughout the patio.
Fill in Gaps and Irregular Shapes: As you progress with the installation, you may encounter gaps or irregular shapes at the edges or corners of the patio. Measure and cut pavers accordingly to fit these areas. Use a wet saw or a chisel to make precise cuts. Ensure that these cut pavers maintain the same spacing and alignment as the rest of the patio.
Use String or Guidelines: For longer sections, it can be helpful to use additional strings, guidelines, or laser levels to maintain straight lines and achieve an even installation. These tools serve as visual references and aid in keeping the rows straight and parallel.
Double Check for Continuity: As you progress with each row, regularly step back and assess the overall appearance of the patio. Check for continuity, ensuring that the pavers align neatly and create a cohesive design. Make any necessary adjustments to maintain consistency and achieve the desired aesthetic.
Continue Installation Methodically: Work row by row, consistently laying the pavers from one end of the patio to the other. Take breaks to reassess the alignment, levelness, and overall quality of the installation. This careful and methodical approach ensures a professional and visually pleasing outcome.
Follow Manufacturer Recommendations: Pay attention to any specific guidelines or recommendations provided by the manufacturer of your patio pavers during the installation process. They may provide valuable insights on specific patterns, specialized techniques, or joint filling requirements.
By continuing the installation with additional rows, you’re gradually transforming the patio space into a beautiful and functional area. Proceed systematically, check for levelness and alignment, and maintain the desired pattern and spacing. With each row in place, you’re one step closer to completing your patio installation project.
Step 3: Laying the Patio
3.4 Cutting and Fitting Pavers
As you continue with the installation of your patio pavers, you may encounter areas where pavers need to be cut and fitted to accommodate corners, edges, or irregular spaces. This step requires precision and attention to detail to ensure a seamless and professional-looking patio. Here’s how to cut and fit pavers:
Plan Ahead: Before cutting any pavers, carefully evaluate the design and layout of your patio. Identify the areas where pavers need to be cut or fitted to achieve a cohesive and symmetrical appearance. Take accurate measurements of the spaces that require custom-sized or shaped pavers.
Choose the Right Tool: Select a cutting tool appropriate for the type of pavers you are working with. A wet saw equipped with a diamond blade is the most effective tool for cutting patio pavers, providing clean and precise cuts. Alternatively, a chisel and hammer can be used for smaller adjustments or irregular shapes.
Ensure Safety: When using a wet saw or other cutting tools, prioritize safety measures. Wear safety goggles, gloves, and ear protection. Follow the manufacturer’s instructions for operating the tool and take necessary precautions to avoid injuries.
Mark the Pavers: Measure and mark the pavers where they need to be cut or shaped using a pencil or marker. Double-check your measurements to ensure accuracy. It’s recommended to make light and clear marks that are easily visible during the cutting process.
Make Precise Cuts: If using a wet saw, align the marked line with the cutting blade and slowly feed the paver into the blade. Apply even pressure to obtain smooth and accurate cuts. If using a chisel and hammer, carefully chip away small sections at a time until the desired shape is achieved.
Test the Fit: After making the necessary cuts, test the fit of the newly cut pavers in their respective spaces. Ensure that they align properly with the adjacent pavers and maintain the desired joint spacing. Make any additional adjustments if needed to achieve a snug and seamless fit.
Remove Excess Material: Once the pavers are properly fitted and aligned, use a broom or brush to remove any excess dust or debris from the installation process. This will help ensure a clean and finished appearance for your patio.
Step 4: Securing the Pavers
With the patio pavers in place, it’s essential to secure them to reinforce stability and prevent shifting over time. Here’s what you need to do to secure your patio pavers:
Filling the Joints: Once all the pavers are in place and properly fitted, fill the joints between the pavers with joint filling material. Common options include polymeric sand or regular sand. Sweep the filling material into the joints, ensuring they are fully packed and evenly distributed.
Compact the Patio: After filling the joints, use a plate compactor or hand tamper to lightly compact the patio surface. This step helps to settle the pavers in place and ensures a tightly interlocked patio. Repeat the compaction process a few times until the sand has settled into the joints and the surface is even.
Inspect and Re-fill: After compacting, inspect the patio for any gaps or voids in the joints. If necessary, add more filling material and repeat the compacting process until the joints are adequately filled and the surface is smooth.
Final Cleaning: Once the joints are filled and the patio is compacted, use a broom or brush to gently sweep away any excess filling material from the surface of the pavers. This step helps to achieve a clean and finished look for your patio.
By cutting and fitting pavers with precision and securing them properly, you ensure a flawless and long-lasting patio installation. Take your time, follow safety precautions, and pay attention to the details. With the pavers securely in place, your patio is ready to be enjoyed for years to come.
Step 4: Securing the Pavers
4.1 Filling the Joints
Filling the joints between your patio pavers is an essential step in securing the pavers, preventing weed growth, and enhancing the overall appearance of your patio. Properly filling the joints keeps the pavers in place, improves stability, and provides a finished and polished look. Here’s what you need to know about filling the joints:
Choosing the Right Joint Filling Material: There are different options available for filling the joints between your pavers. The most common choices are polymeric sand and regular sand. Polymeric sand is a mixture that hardens when dampened, providing a more solid and durable fill. Regular sand is a cost-effective option that allows for better water drainage.
Cleaning and Preparing the Patio: Before filling the joints, ensure that the patio surface is clean and free from debris. Use a broom or a leaf blower to remove any loose dirt, dust, or particles that may hinder the proper filling of the joints.
Applying the Joint Filling Material: Begin by spreading the chosen joint filling material evenly over the entire patio surface. If using regular sand, pour the sand directly onto the paver surface, making sure it reaches the joints. If using polymeric sand, follow the manufacturer’s instructions for proper application.
Sweeping and Distributing the Filling Material: Using a stiff-bristle broom or a brush, sweep the joint filling material back and forth, allowing it to fill the gaps between the pavers. Ensure that the filling material is evenly distributed and properly packed into the joints. Continue this process until all the joints are adequately filled.
Removing Excess Material: After the joints are filled, use the broom or brush to gently sweep away any excess filling material from the surface of the pavers. This step helps to create a clean and finished appearance and prevents the excess material from hardening on the surface.
Watering and Activating the Filling Material: If using polymeric sand, follow the manufacturer’s instructions for activating the filling material. Generally, this involves lightly misting the patio with water, ensuring that the sand is damp but not saturated. The water activates the sand, causing it to harden and strengthen the joints.
Checking for Settling and Refilling: After the joint filling material has settled and hardened (if using polymeric sand), inspect the patio for any gaps or voids that may have formed. Fill in any gaps with additional filling material and repeat the sweeping and watering process if necessary.
Maintaining the Filled Joints: Regularly inspect the joints between your pavers and address any signs of erosion, settling, or weed growth. Remove any weeds that may emerge between the pavers and refill the gaps as needed to maintain the stability and integrity of your patio.
Filling the joints between your patio pavers not only secures the pavers in place but also enhances the overall look and longevity of your patio. Taking the time to fill the joints properly ensures a stable and aesthetically pleasing outdoor space that you can enjoy for years. With the joints filled, your patio is now complete and ready for you to relax and entertain in style.
Step 4: Securing the Pavers
4.2 Compact the Patio
After filling the joints between your patio pavers, the final step in securing your patio is to compact the pavers. Compacting helps to settle the pavers in place, ensures stability, and provides a solid surface for your outdoor space. Here’s how to compact your patio:
Prepare the Area: Before compacting, ensure that the patio surface is clean and free from any debris. Remove any loose materials or objects that could interfere with the compaction process.
Choose the Right Compacting Tool: Select a plate compactor or a hand tamper suitable for the size of your patio. A plate compactor is a motorized tool that is efficient for large areas, while a hand tamper is suitable for smaller patios or hard-to-reach spots.
Start from the Edges: Begin compacting the patio from the outer edges, gradually moving towards the center. This method helps to avoid pushing loose pavers or joint filling material towards the interior of the patio.
Apply Even Pressure: Whether using a plate compactor or hand tamper, apply even pressure as you move over the pavers. This helps to spread the pressure evenly and ensures thorough and uniform compaction.
Make Multiple Passes: To achieve optimal compaction, make multiple passes over the entire patio area. The number of passes required will depend on the size and type of compactor, as well as the thickness of the pavers and joint filling material.
Check for Levelness: Regularly check for levelness during the compaction process using a straight board or level. This step helps to ensure a level surface as you compact the patio, preventing any unevenness or shifting of the pavers.
Inspect for Proper Drainage: As you compact, observe the patio for any areas where water might pool or collect. Adjust the base material or joint filling material if needed to ensure proper water drainage away from your home or other structures.
Repeat for Proper Compaction: Repeat the compacting process multiple times, gradually increasing the level of compaction with each pass. This ensures that the pavers and joint filling material are compacted thoroughly for stability and durability.
Final Inspection: After completing the compaction process, inspect the patio to ensure that the pavers are secure and stable. Check for any loose pavers or issues with the joint filling material. Readdress any areas that may require additional compaction or adjustment.
Read more: How To Lay Patio Pavers On Grass
Conclusion
Congratulations! You have successfully completed the process of laying and securing your patio pavers. Each step, from preparing the ground to compacting the patio, has contributed to creating a stable, visually appealing, and functional outdoor space.
Your patio is now a beautiful extension of your home, offering a place to relax, entertain, and enjoy the outdoors. The thorough preparation, precise installation, and proper securing of the pavers ensure the long-lasting integrity and durability of your patio for years to come.
Remember to regularly inspect and maintain your patio. Clear away debris, remove any weeds that may emerge between the pavers, and refill gaps in the joint filling material as needed to keep your patio looking its best.
Now, it’s time for you to kick back, invite friends and family, and enjoy your stunning new patio. Whether for quiet moments of solitude or lively gatherings, your patio will provide the perfect space to create lasting memories. Cheers to your beautiful outdoor oasis!
Frequently Asked Questions about How Do You Lay A Patio
Was this page helpful?
At Storables.com, we guarantee accurate and reliable information. Our content, validated by Expert Board Contributors, is crafted following stringent Editorial Policies. We're committed to providing you with well-researched, expert-backed insights for all your informational needs.


0 thoughts on “How Do You Lay A Patio”