Home>Garden Essentials>How Do You Lay Synthetic Grass With Pavers Inside
Garden Essentials
How Do You Lay Synthetic Grass With Pavers Inside
Modified: August 17, 2024
Learn how to lay synthetic grass with pavers inside your garden. Create a beautiful and low-maintenance outdoor space with this step-by-step guide.
(Many of the links in this article redirect to a specific reviewed product. Your purchase of these products through affiliate links helps to generate commission for Storables.com, at no extra cost. Learn more)
Introduction
Welcome to the world of synthetic grass and pavers! If you’re looking to transform your indoor space, combining synthetic grass with pavers can create a stunning and low-maintenance environment. Whether you want to create a green oasis in your living room, add a touch of nature to your patio, or bring the beauty of a garden into your office space, this innovative combination offers endless possibilities.
Using synthetic grass with pavers indoors has numerous benefits. Not only does it provide the aesthetic appeal of a lush green lawn, but it also requires minimal upkeep compared to natural grass. With synthetic grass, you won’t have to worry about mowing, watering, or dealing with pests and allergies. Plus, the addition of pavers adds a stylish and functional element to your indoor landscape, making it easier to clean and maintain.
Before diving into the installation process, it’s important to choose the right type of synthetic grass that suits your indoor environment. Consider the intended use, foot traffic, and the amount of sunlight exposure in the area. Additionally, explore different paver options to find the perfect style and shape that complements your design vision.
Once you’ve selected the ideal synthetic grass and pavers, it’s time to prepare the area for installation. This includes clearing the space, removing any existing flooring or materials, and ensuring a smooth and even surface. Proper preparation is crucial as it provides a solid base for the pavers and synthetic grass, ensuring a long-lasting and visually pleasing result.
Now, let’s dive into the step-by-step process of laying synthetic grass with pavers inside. Follow these instructions and soon you’ll have a beautiful and vibrant indoor landscape that will impress your guests and create a tranquil atmosphere.
Key Takeaways:
- Create a low-maintenance indoor oasis by combining synthetic grass with pavers. Enjoy the beauty of nature without the hassle of traditional lawn upkeep.
- Care for your indoor landscape by regularly brushing the grass, removing debris, and addressing any spots or stains. Keep your green oasis looking fresh and vibrant.
Read more: How To Lay Pavers On Grass
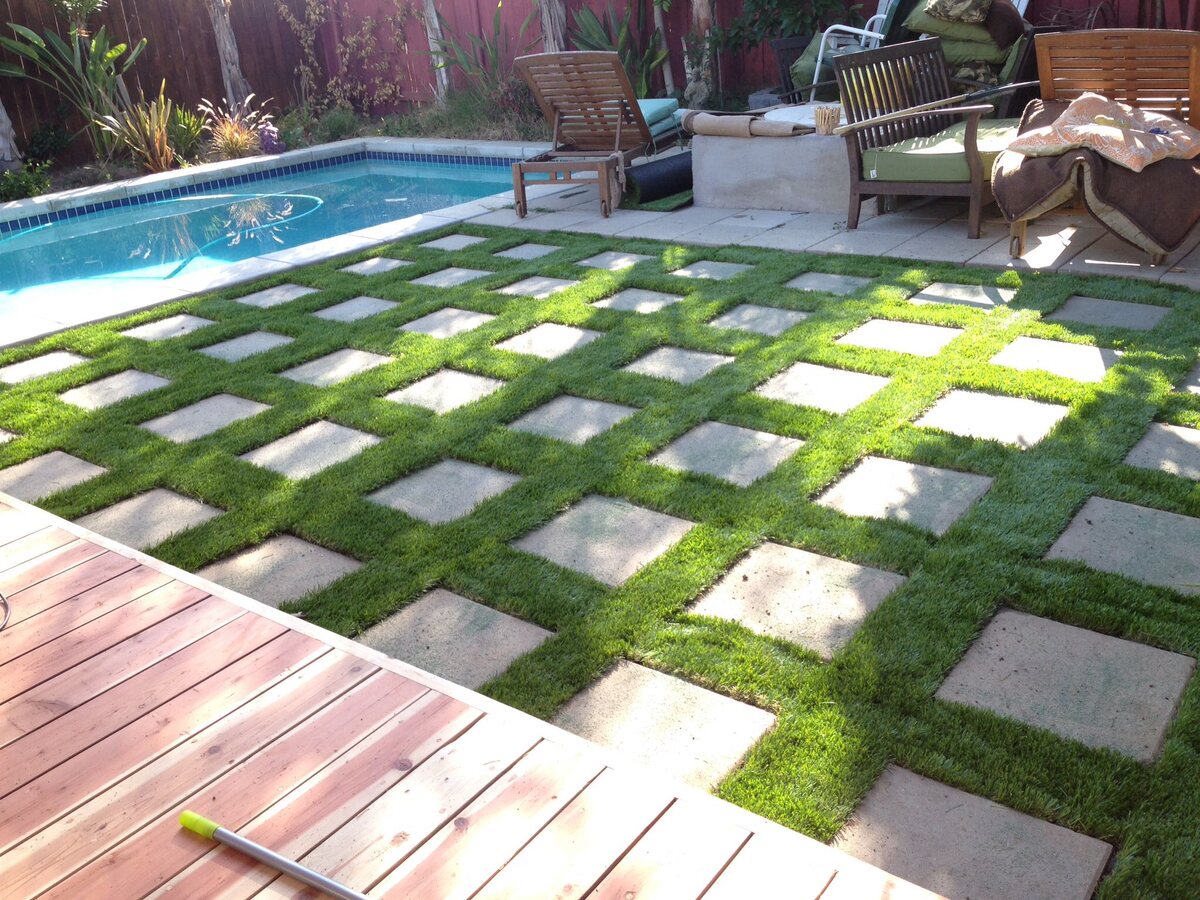
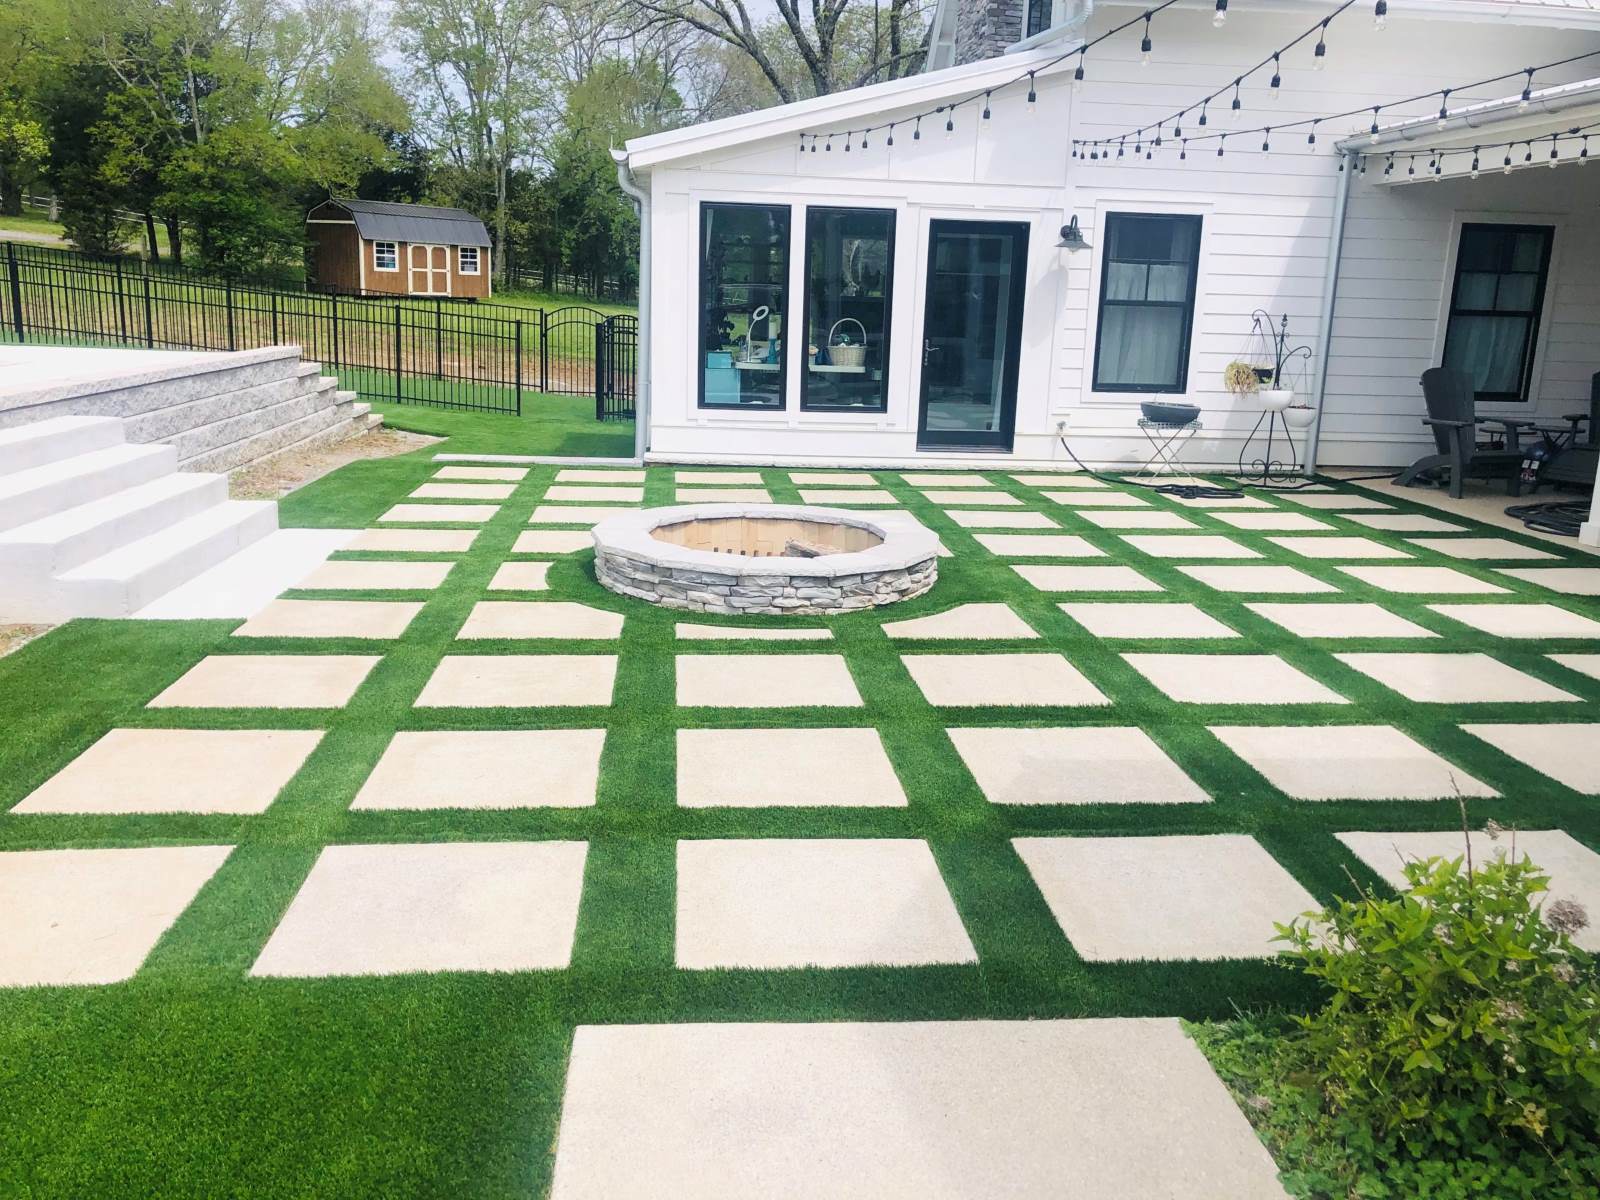
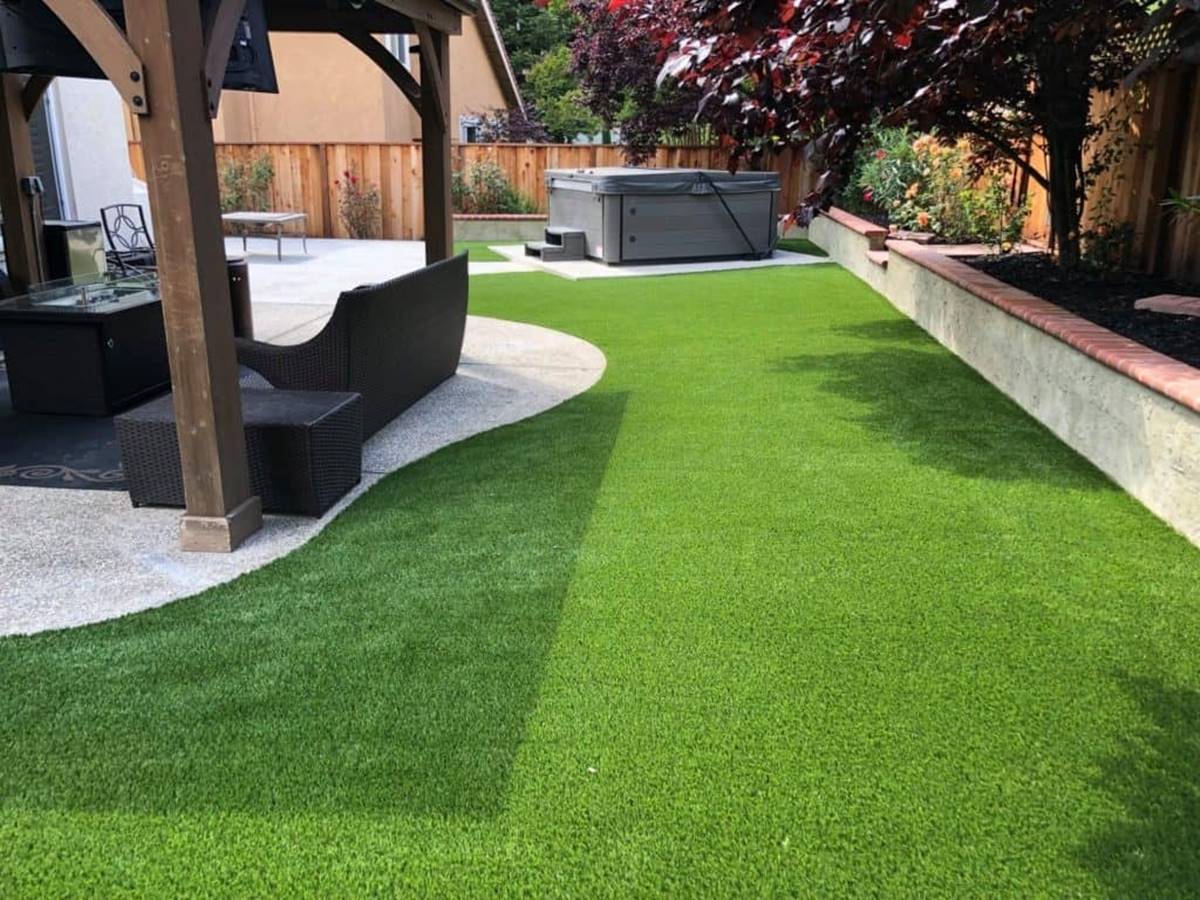
Benefits of Using Synthetic Grass with Pavers Inside
Combining synthetic grass with pavers indoors offers a multitude of benefits that can enhance both the aesthetic appeal and functionality of your space. Let’s explore some of the advantages of using synthetic grass with pavers indoors:
- Low Maintenance: One of the greatest advantages of synthetic grass is its low maintenance requirements. Unlike natural grass, which needs regular mowing, watering, and fertilizing, synthetic grass eliminates the need for these time-consuming tasks. With synthetic grass, you won’t have to worry about watering schedules, saving you both time and money on water bills.
- Durability: Synthetic grass is designed to withstand heavy foot traffic, making it an excellent choice for high-traffic indoor areas. Its durable nature ensures that the grass will maintain its beauty and vitality, even in areas where natural grass might struggle.
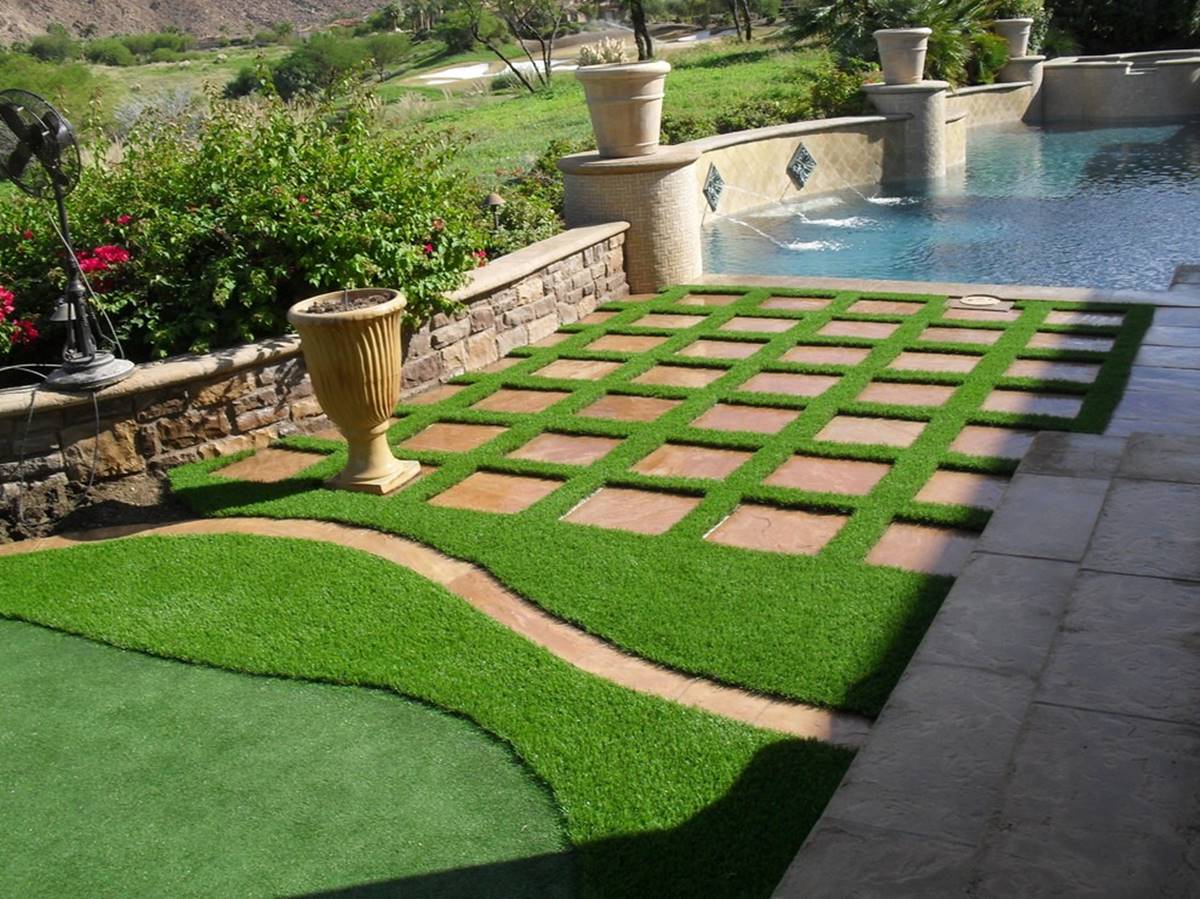
- Aesthetically Pleasing: Synthetic grass adds a vibrant and natural touch to your indoor space. Its lush green color, combined with the texture of real grass, creates a visually appealing and inviting atmosphere. The addition of pavers further enhances the overall aesthetic, providing a seamless balance between nature and modern design.
- Allergy and Pest-Free: For individuals with allergies or sensitivities to pollen or grass, synthetic grass provides a great alternative. It eliminates the risk of pollen-related allergies and doesn’t attract pests like natural grass does. You can enjoy the beauty of a green landscape without worrying about sneezing or dealing with unwanted critters.
- Easy to Clean: Synthetic grass is incredibly easy to clean, making it ideal for indoor areas that are prone to spills or accidents. Simply use a brush or a leaf blower to remove any debris, and for stubborn stains, a mixture of mild detergent and water will do the trick. Unlike natural grass, there won’t be any mud or dirt to track into your home or office space.
- Year-round Greenery: Synthetic grass stays green and vibrant throughout the year, regardless of the weather or season. You can enjoy the beauty of a lush green lawn even during the coldest winter months. The addition of pavers ensures that your indoor landscape remains visually appealing and functional no matter the time of year.
By incorporating synthetic grass with pavers indoors, you can create a stunning, low-maintenance, and long-lasting landscape that brings the beauty of the outdoors inside. It not only enhances the visual appeal of your space but also provides a comfortable and inviting environment for you and your guests to enjoy year-round.
Choosing the Right Type of Synthetic Grass for Pavers
When it comes to choosing the right type of synthetic grass for pavers, there are several factors to consider. This includes the intended use of the area, foot traffic, and the amount of sunlight exposure the space receives. Here are some tips to help you make the right decision:
- Quality: Look for synthetic grass that is made with high-quality materials. Opt for a reputable brand that offers durability and longevity. Quality artificial turf will have a natural-looking appearance and feel, replicating the texture of real grass.
- Pile Height and Density: The pile height refers to the length of the grass blades. Choose a pile height that suits your aesthetic preferences and the intended use of the area. For areas with heavy foot traffic, opt for a shorter pile height, as it offers better resilience and durability. Additionally, consider the density of the grass, which contributes to its overall look and feel.
- Color and Realism: Synthetic grass comes in various shades of green. Consider the lighting conditions of your indoor space and choose a color that complements the surrounding décor. Additionally, look for synthetic grass with a combination of different blade colors to enhance its realism and natural appearance.
- Drainage System: Good drainage is essential, especially if the area is prone to spills or water accumulation. Opt for synthetic grass with an efficient drainage system that allows for easy water runoff. This will prevent water from pooling and potentially damaging the pavers or the turf itself.
- UV Protection: Ensure that the synthetic grass has built-in UV protection. This will prevent the color from fading and the material from deteriorating over time due to sun exposure. UV-resistant synthetic grass will maintain its vibrant color and appearance for years to come.
- Maintenance Requirements: Consider the level of maintenance required for the synthetic grass. Some varieties are designed to be low-maintenance, requiring minimal brushing or cleaning. This can be beneficial if you prefer to spend less time on upkeep.
- Professional Installation: To ensure a proper and professional installation, consider hiring an experienced synthetic grass installer. They will have the expertise to prepare the area correctly, lay the turf evenly, and secure it firmly to the base.
By taking these factors into consideration, you can choose the right type of synthetic grass that will perfectly complement your pavers and create a beautiful and realistic indoor landscape. Remember, selecting high-quality synthetic grass will result in a long-lasting and visually appealing addition to your indoor space.
Preparing the Area for Installation
Proper preparation of the area is crucial for a successful installation of synthetic grass with pavers indoors. Follow these steps to ensure a smooth and even surface:
- Clear the Space: Remove any furniture, plants, or obstacles from the area. This will give you a clear workspace to work with and prevent any damage to the existing items.
- Remove Existing Flooring: If there is any existing flooring, such as carpet or tiles, remove it to expose the subfloor. Ensure that the subfloor is clean, dry, and free from any debris.
- Check for Evenness: Use a level to check the evenness of the subfloor. If there are any uneven areas, use a floor leveling compound to create a smooth surface. Allow the compound to dry completely before proceeding.
- Clean the Subfloor: Sweep or vacuum the subfloor to remove any dust or dirt particles. This will ensure proper adhesion of the synthetic grass and prevent any bumps or lumps from forming underneath.
- Apply a Weed Barrier: To prevent weed growth, lay a weed barrier fabric over the subfloor. This will help maintain a clean and weed-free indoor landscape.
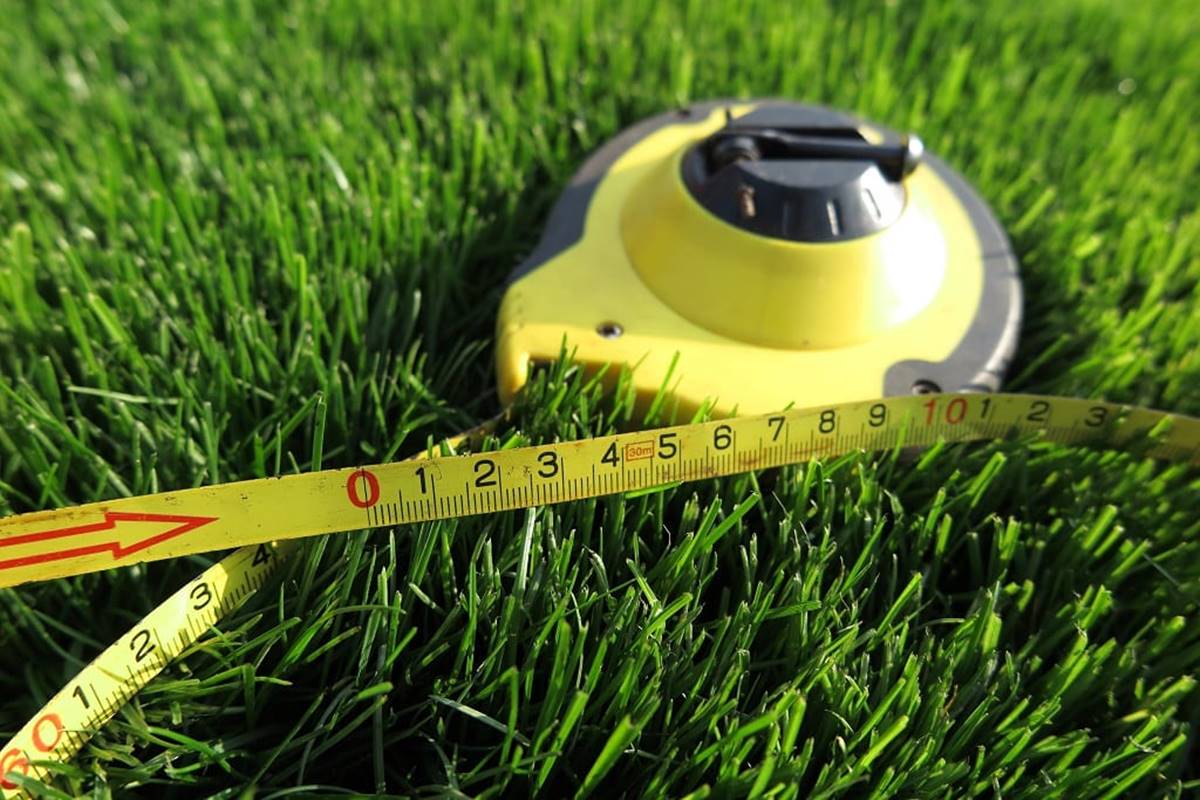
- Measure and Mark: Carefully measure the area where you plan to install the synthetic grass. Mark the edges with chalk or tape to provide a visual guide during the installation process.
- Consider Drainage: If the area is prone to water accumulation, ensure that there is a suitable drainage system in place. This could involve installing drains or creating a slight slope to allow water to flow away from the area.
- Consult with a Professional: If you’re unsure about any of the preparation steps or have specific requirements, it’s advisable to consult with a professional installer. They can guide you through the process and ensure that the area is properly prepared for the installation of synthetic grass with pavers.
By taking the time to adequately prepare the area, you will create a stable and level foundation for the synthetic grass and pavers. This will ensure a long-lasting and visually appealing indoor landscape that you can enjoy for years to come.
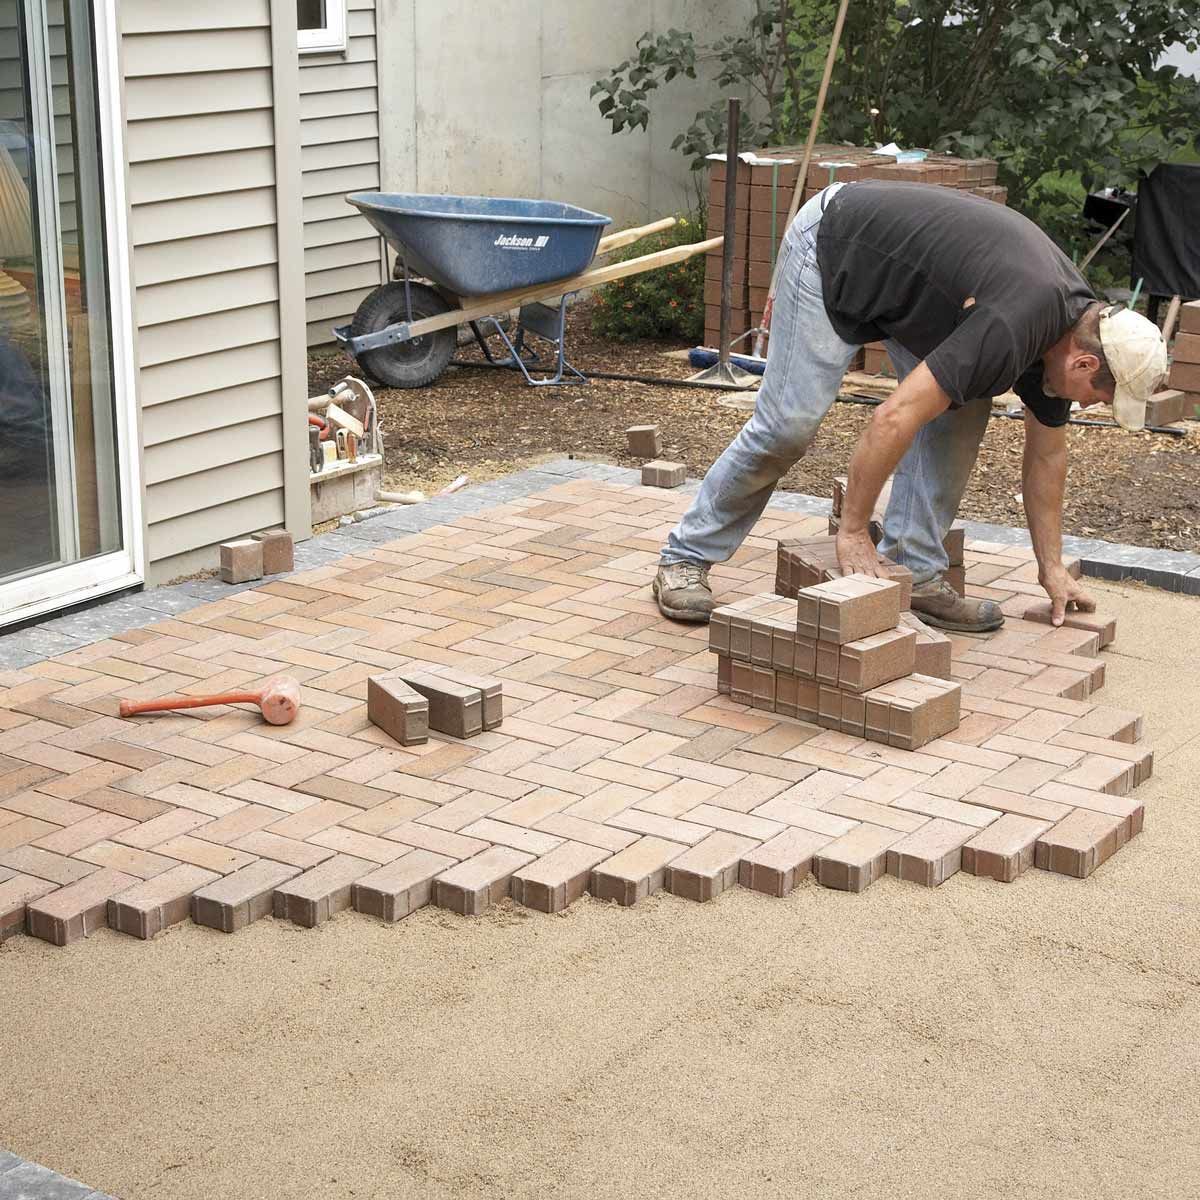
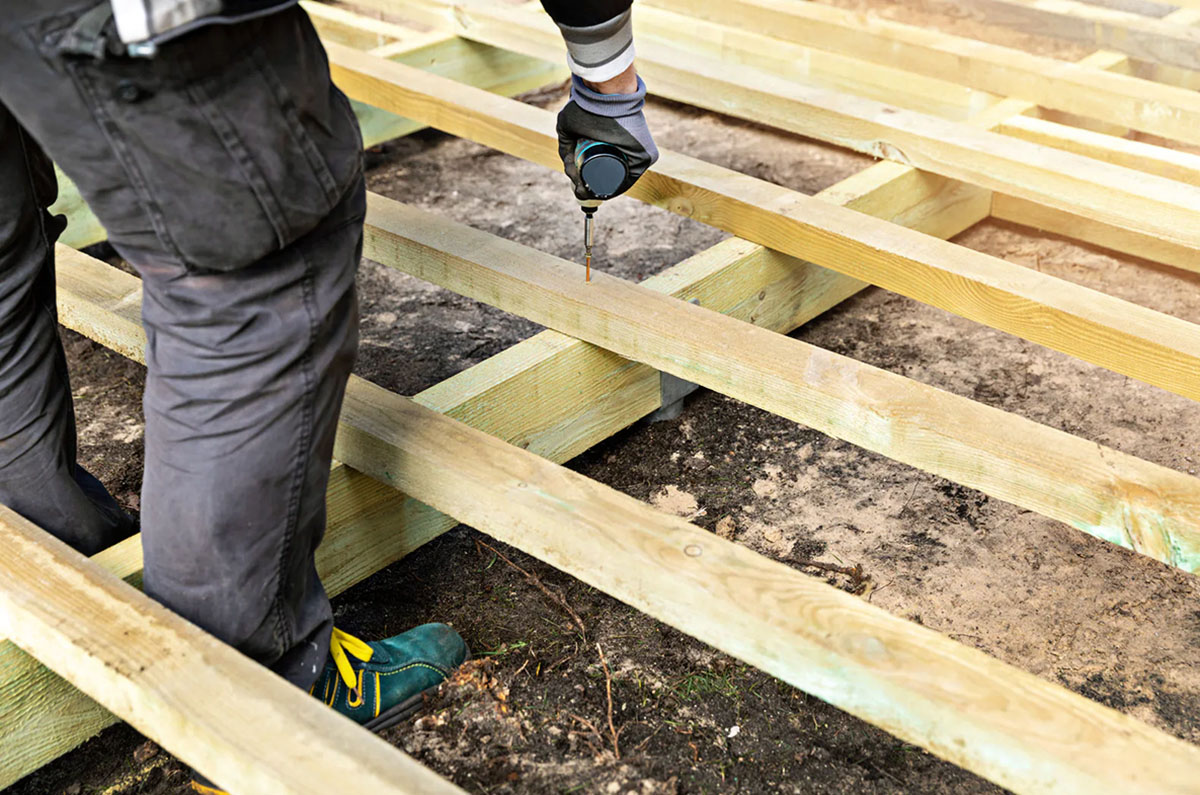
Installing the Pavers
Once the area is properly prepared, it’s time to move on to the installation of the pavers. Follow these steps to ensure a smooth and successful installation:
- Create a Layout Plan: Start by creating a layout plan for the pavers. Consider the size and shape of the pavers, as well as any patterns or designs you want to incorporate. This will help ensure a visually pleasing result.
- Prepare the Base: Dig out the area to a depth of approximately 4-6 inches. This will provide enough space for the pavers and allow for a stable base. Ensure the ground is level and compact the soil to create a solid foundation.
- Add a Layer of Base Material: Lay a layer of compacted base material, such as crushed gravel or limestone screenings, to a depth of 2-4 inches. This will provide stability and aid in proper drainage.
- Level the Base Material: Use a rake to level the base material and ensure an even surface. This step is crucial for a uniform installation of the pavers.
- Install Edge Restraints: Place edge restraints, such as plastic or metal strips, around the perimeter of the paver area. This will help keep the pavers in place and prevent them from shifting over time.
- Lay the Pavers: Starting from one corner, begin laying the pavers according to your layout plan. Place each paver tightly against the next, ensuring a consistent gap of approximately 1/8 to 1/4 inch between each paver. Use a level to check for evenness.
- Cut Pavers if Necessary: If you encounter any areas where the full-size pavers won’t fit, use a masonry saw or paver splitter to cut them to the desired size. Wear safety goggles and follow the manufacturer’s instructions for proper cutting techniques.
- Fill the Joints: Once all the pavers are in place, sweep a layer of sand or polymeric jointing sand over the surface. Use a broom to push the sand into the joints between the pavers, ensuring they are fully filled. This will help stabilize the pavers and prevent weed growth.
- Compact the Pavers: Use a plate compactor to gently compact the pavers and sand. This will help set the pavers firmly in place and create a solid surface.
By following these steps, you can successfully install the pavers, creating a visually pleasing and functional base for the synthetic grass. Take your time during this process to ensure accuracy and precision, as it will set the foundation for the next step of installing the synthetic grass.
Read more: How To Lay A Paver Patio
Preparing the Base for Synthetic Grass
Once the pavers are properly installed, it’s time to prepare the base for the synthetic grass. Follow these steps to ensure a solid foundation for the turf:
- Clear the Paver Surface: Remove any debris or excess sand from the surface of the pavers. Use a broom or leaf blower to sweep away any loose materials.
- Apply a Layer of Fine Base Material: Spread a thin layer of finely crushed stone or decomposed granite over the paver surface. This layer should be around 1/4 to 1/2 inch thick and will provide a smooth and stable base for the synthetic grass.
- Compact the Base Material: Use a plate compactor or hand tamper to compact the base material. This will help create a firm and even surface. Pay attention to areas with uneven or soft spots, and add more base material as needed.
- Check for Proper Drainage: Ensure that the compacted base material allows for proper drainage. If necessary, make slight adjustments to the slope or add additional base material to create a gentle slope away from any structures.
- Install a Geotextile Fabric: Lay a geotextile fabric over the compacted base material. This fabric acts as a barrier, preventing weeds from growing through the synthetic grass and promoting proper drainage.
- Add a Layer of Fine Sand: Spread a layer of fine sand, such as silica sand, evenly over the geotextile fabric. This layer should be approximately 1/4 inch thick and will provide additional stability to the synthetic grass.
- Level and Smooth the Sand: Use a rake or leveling board to distribute the sand evenly and create a smooth surface. Pay attention to any uneven spots and make corrections as necessary. The sand layer should be level and provide a solid base for the synthetic grass.
- Moisten the Sand: Lightly moisten the sand with water, being careful not to oversaturate it. This will help settle the sand and provide a stable surface for the synthetic grass.
By following these steps, you will create a well-prepared base for the synthetic grass. The compacted base material and sand layer will ensure stability, proper drainage, and a smooth surface for the installation of the synthetic grass.
When laying synthetic grass with pavers, make sure to properly prepare the area by removing any existing grass or debris. Install a base layer of crushed rock and sand before laying the pavers and then the synthetic grass on top. This will ensure a stable and level surface for your synthetic grass.
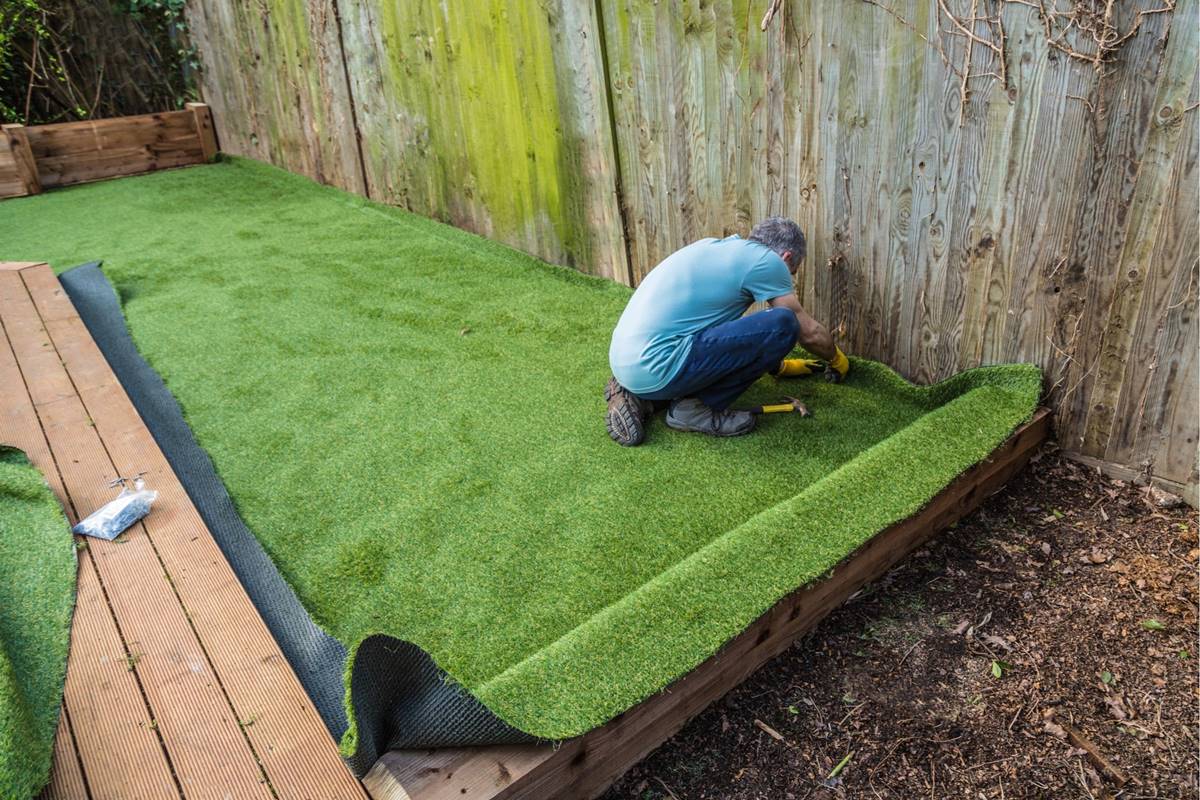
Installing the Synthetic Grass
With the base properly prepared, it’s time to move on to the exciting step of installing the synthetic grass. Follow these steps for a successful installation:
- Roll Out the Synthetic Grass: Start by unrolling the synthetic grass on top of the prepared base. Make sure the grass fibers are facing the desired direction and that the edges of the grass align with the outline of the area.
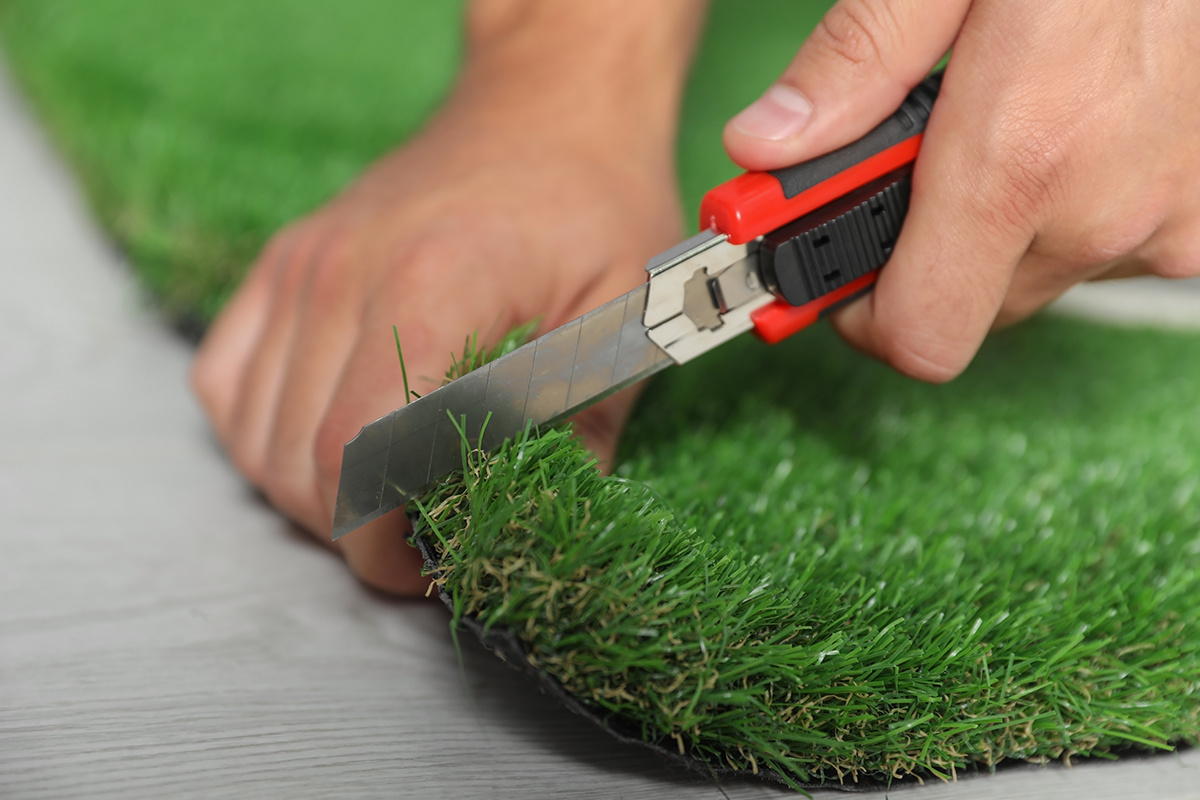
- Trim Excess Grass: Use a utility knife to trim any excess grass along the edges. Take care to make clean and straight cuts to achieve a neat and professional appearance. You can use a straight edge or a piece of wood as a guide to ensure accuracy.
- Fit the Grass Around Obstacles: If there are any objects or obstacles, such as trees or pillars, carefully cut the grass to fit around them. Make small, precise cuts to create a snug fit without leaving any gaps or overlaps.
- Seam the Grass: If the space is large and requires multiple rolls of synthetic grass, seam them together using a high-quality adhesive and seaming tape. Follow the manufacturer’s instructions for proper seaming techniques to ensure a secure and seamless connection.
- Secure the Edges: Secure the edges of the synthetic grass using galvanized landscape staples or nails. Space them approximately 6-12 inches apart along the perimeter and closer together near the seams. This will ensure the grass stays in place and prevents any shifting or movement.
- Brush the Grass: Use a stiff-bristled broom or power brush to brush the synthetic grass fibers in the opposite direction. This will help the grass blades to stand upright and create a more natural appearance. Pay special attention to high traffic areas to ensure the blades are properly lifted.
- Infill the Grass: Depending on the type of synthetic grass you’ve chosen, you may need to add infill material to the grass. Infill helps provide stability, improve traction, and enhance the overall look. Use a spreader or your hands to evenly distribute the infill material, such as silica sand or rubber granules, into the grass fibers.
- Brush and Flatten the Grass: Once the infill is added, use a brush or power broom to brush the grass fibers once again, this time in the direction of the desired look. This will help distribute the infill more evenly and ensure a uniform appearance.
By following these steps, you will successfully install the synthetic grass, creating a lush and vibrant indoor landscape. Take your time during the installation process to ensure accuracy and attention to detail, resulting in a professional and visually appealing finish.
Securing the Synthetic Grass
Securing the synthetic grass is an important step to ensure that it stays in place and maintains its appearance over time. Follow these steps to properly secure the synthetic grass:
- Nail or Staple the Perimeter: Start by securing the perimeter of the synthetic grass. Use galvanized nails or landscape staples to anchor the edges of the grass to the base material or pavers. Space the nails or staples approximately 6-12 inches apart to provide sufficient support.
- Secure the Seams: If you have multiple rolls of synthetic grass that were seamed together, it’s essential to secure the seams properly. Apply adhesive to the seaming tape and press the seams together firmly. Place heavy objects or weights on top of the seam for a few hours to allow the adhesive to set properly.
- Apply Additional Adhesive (Optional): For added security, you may choose to apply additional adhesive underneath the synthetic grass along the seams or at high-traffic areas. This will further prevent any shifting or separation over time. Follow the manufacturer’s instructions for the specific adhesive you are using.
- Double Check Edges and Corners: Pay close attention to the edges and corners of the synthetic grass. Ensure that they are securely fastened and properly anchored to prevent any lifting or curling. Use additional nails or staples if needed to reinforce these areas.
- Trim Excess Material: After securing the synthetic grass, check for any excess material along the edges or corners. Trim any excess grass or seams to achieve a clean and seamless appearance. Use a sharp utility knife or scissors to make precise cuts.
- Inspect and Adjust: Once everything is secured, take a step back and inspect the entire area. Look for any loose areas or visible seams that may require additional attention. If needed, make any necessary adjustments to ensure a tight and secure installation.
By following these steps, you can ensure that your synthetic grass remains securely in place, even in high-traffic areas. Properly securing the synthetic grass will not only maintain its appearance but also prevent any potential hazards or tripping hazards. Keep in mind that regular maintenance and periodic inspections will help identify any areas that may need re-securing or adjustments in the future.
Finishing Touches
Now that the synthetic grass is installed and secured, it’s time to add the finishing touches to complete the look of your indoor landscape. Consider the following steps to enhance the overall aesthetic appeal:
- Add Decorative Elements: Incorporate decorative elements such as potted plants, outdoor furniture, or decorative stones to enhance the visual appeal of the space. These elements can add a touch of personality and style, making your indoor landscape feel more inviting and cohesive.
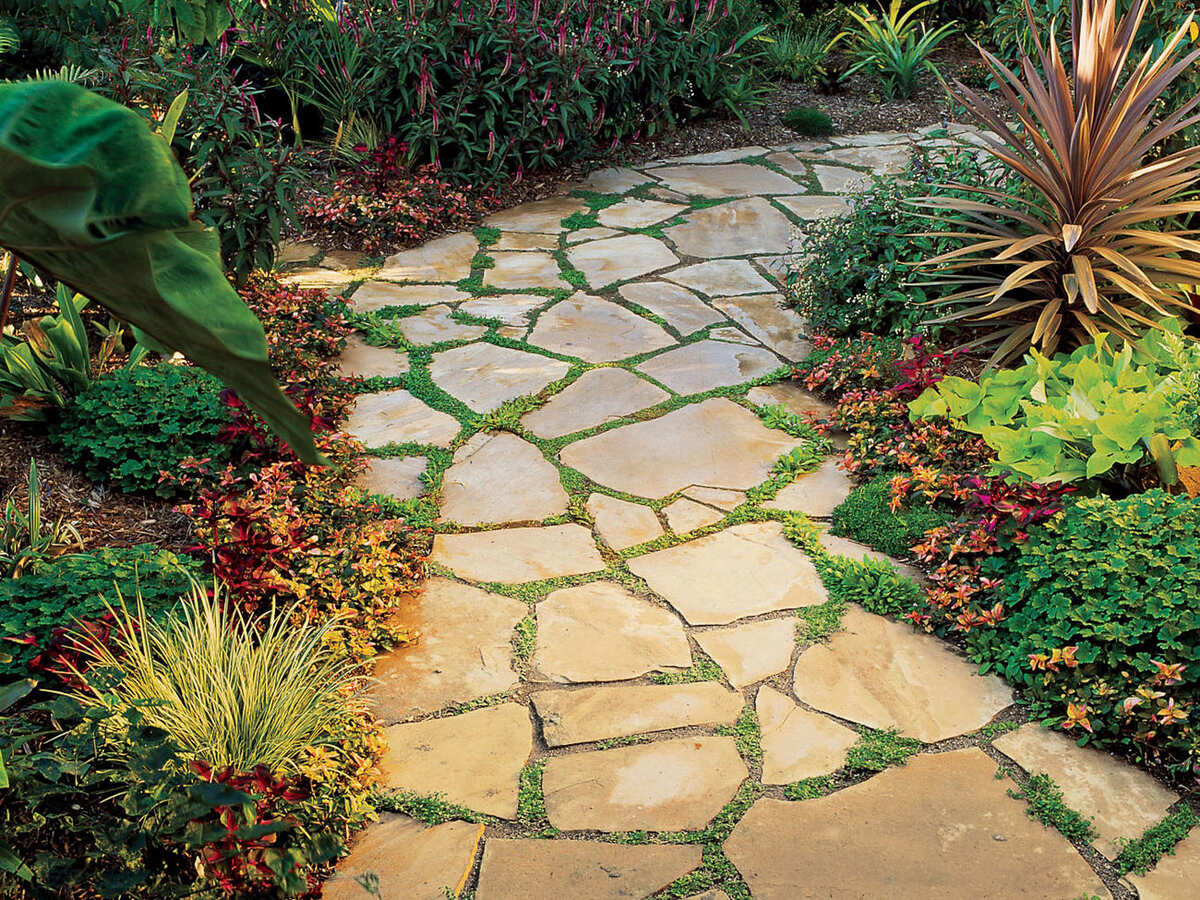
- Install Pathways: If your synthetic grass installation includes a larger area, consider installing pathways using pavers or stepping stones. This not only adds visual interest but also provides a functional and easily accessible walkway through your indoor landscape.
- Consider Lighting: Install outdoor lighting to highlight specific areas or create a warm ambiance in the evening. This can include landscape lighting that illuminates the synthetic grass, pavers, and surrounding features. Lighting adds an extra layer of beauty and functionality to your indoor landscape.
- Regular Cleaning and Maintenance: To keep your synthetic grass and pavers in optimal condition, establish a regular cleaning and maintenance routine. This may include removing debris, brushing the grass to keep it looking lush, and occasional power washing of the pavers to keep them clean and free of stains.
- Retouch and Repair: Over time, your synthetic grass and pavers may require some touch-ups or repairs. Keep an eye out for any signs of wear, such as faded spots or loose edges, and address them promptly. This will help maintain the longevity and beauty of your indoor landscape.
- Reevaluate and Refresh: Periodically reassess your indoor landscape to see if any changes or improvements are desired. This could involve rearranging furniture, adding new plants, or exploring different decorative elements. By refreshing the space, you can keep it visually appealing and enjoyable for years to come.
By paying attention to these finishing touches, you can elevate the overall look and feel of your indoor landscape. These final details help create a cohesive and inviting space that brings the beauty of the outdoors inside. Don’t forget to regularly maintain and update the area to ensure it remains a source of joy and relaxation.
Read more: How To Lay Synthetic Grass On Concrete
Maintaining Synthetic Grass with Pavers
Maintaining your synthetic grass with pavers is relatively simple and requires minimal upkeep compared to natural grass. By following these maintenance tips, you can keep your indoor landscape looking vibrant and beautiful:
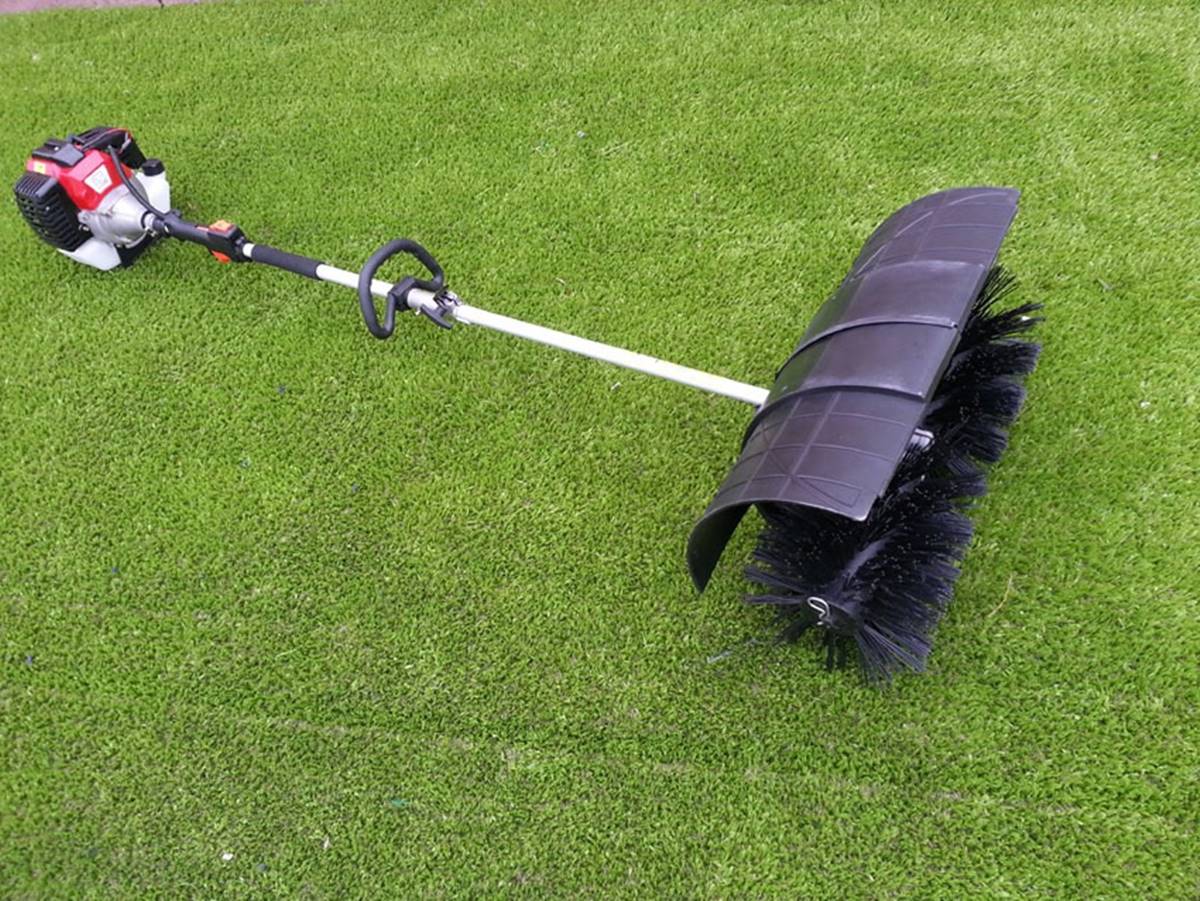
- Regularly Brush the Grass: Use a stiff-bristled broom or power brush to regularly brush the synthetic grass. This helps to remove debris, keep the grass blades upright, and maintain a natural appearance. Brushing also helps redistribute infill material and prevent matting.
- Remove Debris: Clear the synthetic grass of any leaves, twigs, or other debris that may accumulate over time. Use a leaf blower or a rake to gently remove the debris. Regularly clearing the grass helps ensure proper drainage and prevents the growth of unwanted plants or weeds.
- Clean Spots and Stains: If you notice any spots or stains on the synthetic grass, address them promptly. Diluted dish soap or a mild detergent coupled with water can usually remove most stains. Avoid using harsh chemicals or bleach as they may damage the grass fibers.
- Address Pet Waste: If you have pets using the indoor landscape, promptly clean up any pet waste and rinse the area with water. Regularly rinsing the synthetic grass helps maintain hygiene and ensures the longevity of the turf.
- Inspect and Repair: Periodically inspect the synthetic grass for any signs of wear, damage, or loose edges. Address any issues promptly to prevent further damage and maintain the appearance of a seamless installation. Repair any loose edges by resecuring them with nails or staples.
- Power Wash the Pavers: To keep the pavers looking clean and fresh, power wash them periodically. This helps remove dirt, grime, and stains that may accumulate over time. Follow the manufacturer’s recommendations for pressure settings to avoid any damage to the pavers.
- Replenish Infill Material: Over time, the infill material in the synthetic grass may require replenishment. This is especially true in high-traffic areas where the infill may settle or get displaced. Add more infill material as needed to maintain the stability and appearance of the grass.
- Regularly Inspect the Drainage: Ensure that the drainage system is working effectively by checking for any blockages or buildup. Clear any debris or obstructions to maintain proper water flow and prevent pooling or flooding on the synthetic grass.
By following these maintenance practices, you can keep your synthetic grass with pavers looking fresh and vibrant. Regular cleaning, addressing repairs promptly, and ensuring proper drainage will help ensure the longevity and beauty of your indoor landscape. Enjoy the low-maintenance benefits of synthetic grass while basking in the beauty of your green oasis.
Conclusion
Combining synthetic grass with pavers indoors offers a unique and innovative way to create a stunning and low-maintenance indoor landscape. By carefully selecting the right type of synthetic grass and properly preparing the area, you can transform your space into a beautiful oasis that brings the beauty of nature indoors.
The benefits of using synthetic grass with pavers are numerous. From its low maintenance requirements and durability to its aesthetic appeal and allergen-free nature, synthetic grass provides a practical and visually pleasing solution for any indoor space. The addition of pavers further enhances the functionality and design, creating a seamless blend of nature and modern aesthetics.
Through careful installation and securing of the synthetic grass, you can ensure a long-lasting and visually appealing result. By properly maintaining and caring for your synthetic grass and pavers, you can enjoy a lush and vibrant indoor landscape for years to come.
Remember to regularly brush the grass, remove debris, and address any spots or stains. Additionally, inspect the area for any repairs or adjustments that may be needed. By following these simple maintenance steps, you can keep your indoor landscape looking fresh and vibrant.
Thank you for joining us on this journey of exploring the world of synthetic grass with pavers inside. We hope that this comprehensive guide has provided you with valuable insights and tips to create your own green oasis indoors. Enjoy the beauty, functionality, and low maintenance of your synthetic grass and paver combination, and revel in the natural tranquility it brings to your indoor space.
Now that you're equipped with the know-how to lay synthetic grass with pavers, why not complement your outdoor space with some creative boundaries? Dive into our guide on landscaping ideas, where you'll find "40 Best Garden Fence Ideas To Try In 2022." Perfect for any garden size or style, these ideas will help enhance your space's beauty and functionality. Ready to transform your garden into a picturesque retreat? Check out our detailed guide and get inspired!
Frequently Asked Questions about How Do You Lay Synthetic Grass With Pavers Inside
Was this page helpful?
At Storables.com, we guarantee accurate and reliable information. Our content, validated by Expert Board Contributors, is crafted following stringent Editorial Policies. We're committed to providing you with well-researched, expert-backed insights for all your informational needs.

0 thoughts on “How Do You Lay Synthetic Grass With Pavers Inside”