Home>Garden Essentials>How To Draw A 3D Garden Design

Garden Essentials
How To Draw A 3D Garden Design
Modified: March 7, 2024
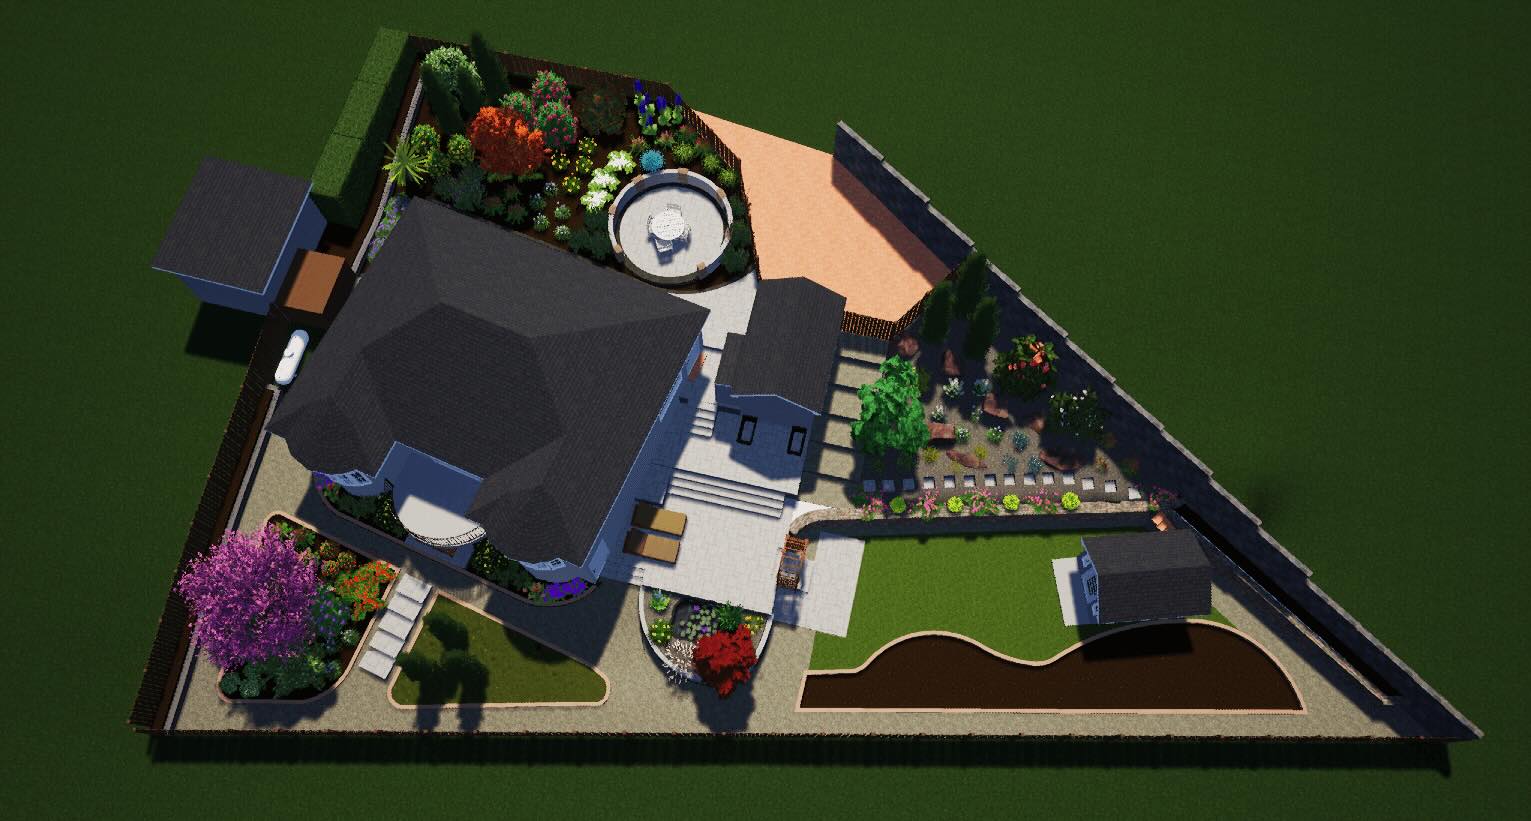
Learn how to create stunning 3D garden designs with our step-by-step guide. Discover helpful tips and techniques for designing your dream garden.
(Many of the links in this article redirect to a specific reviewed product. Your purchase of these products through affiliate links helps to generate commission for Storables.com, at no extra cost. Learn more)
Introduction
Designing a 3D garden can be a fun and rewarding project that allows you to unleash your creativity and create a stunning outdoor space. Whether you have a green thumb or simply enjoy the beauty of nature, drawing a 3D garden design is a great way to visualize your ideas and bring your dream garden to life.
In this article, we will guide you through the process of drawing a 3D garden design step by step. From planning your garden layout to adding intricate details, we will provide you with valuable tips and tricks to make your garden design stand out.
Before we dive into the technical aspects of drawing, it’s important to gather the necessary materials. You will need a pencil, paper, ruler, and eraser to create your 3D garden design. With these tools in hand, you’re ready to begin your garden design journey.
So, dust off your creative skills and let’s start drawing your dream garden!
Key Takeaways:
- Unleash your creativity and bring your dream garden to life with a 3D garden design. Plan, sketch, add depth, and color to create a visually stunning representation of your outdoor space.
- Gather the right materials, plan your garden layout, and add intricate details to draw a captivating 3D garden design. Let your imagination flourish and enjoy the rewarding process of creating your dream garden on paper.
Materials Needed
Before you start drawing your 3D garden design, it’s essential to gather the necessary materials. Here are the items you will need:
- Pencil: A pencil will be your trusty tool throughout the drawing process. Make sure to choose a pencil with a medium lead hardness, such as an HB or 2B, which will allow you to make clear and precise lines.
- Paper: Select a large sheet of paper that will provide enough space for your garden design. It’s recommended to use a thicker paper, such as drawing paper or cardstock, to prevent any smudging or tearing.
- Ruler: A ruler will help you create straight lines and accurate measurements in your drawing. Choose a ruler with a clear metric or imperial scale to ensure precision in your garden design.
- Eraser: Mistakes happen, and that’s where an eraser comes in handy. Opt for a soft eraser that won’t damage the paper, allowing you to effortlessly fix any errors without leaving smudges or residue.
Having these materials readily available will make your drawing process smoother and more enjoyable. Now that you have everything you need, it’s time to get started on planning your 3D garden design!
Step 1: Planning Your Garden Design
Before putting pencil to paper, it’s crucial to have a clear plan for your garden design. This step will lay the foundation for your 3D drawing and help you bring your vision to life. Here’s what you need to do:
- Determining the size and shape of your garden: Consider the available space in your backyard or the area where you want to create your garden. Measure the dimensions and take note of any existing features or obstacles, such as trees, fences, or pathways.
- Choosing the types of plants and features you want to include: Think about the style and theme of your garden. Would you like a vibrant flower garden, a serene Japanese Zen garden, or a practical vegetable patch? Research different plant varieties that thrive in your climate and suit your desired aesthetics. Additionally, consider including features like a pergola, fountain, or seating area to enhance the overall design.
By carefully planning the size, shape, and elements of your garden, you can create a well-balanced and visually appealing design. Take your time during this phase to imagine how you want your garden to look and feel, as it will guide your decisions throughout the drawing process.
Once you have a clear plan in mind, you’re ready to move on to the next step: drawing the base outline of your 3D garden design.
Step 2: Drawing the Base Outline
Now that you have a clear plan for your garden design, it’s time to transfer your ideas onto paper. This step involves creating the base outline of your 3D garden design. Here’s how you can do it:
- Measuring and marking the dimensions of your garden on paper: Using your ruler, measure the dimensions of your garden and mark them on your paper. Ensure that the scale is proportionate to the size of your paper. For example, if your garden is 20 feet by 30 feet, you can use a scale of 1 inch represents 5 feet or any other scale that suits your paper size.
- Using the ruler to create straight lines for the outline: Start at one corner of your paper and use the ruler to draw straight lines to create the outline of your garden. Keep in mind the measurements you previously marked and strive for accuracy in your lines. Ensure that the lines correspond to the shape and dimensions of your garden.
As you draw the base outline, you can use light pencil strokes to make any necessary adjustments or corrections. It’s important to take your time during this step to ensure that the outline is as precise as possible.
Remember, the base outline will serve as the framework for the rest of your 3D garden design, so it’s crucial to get it right. Once you’re satisfied with the outline, you can move on to the next step: adding depth and perspective to your drawing.
Step 3: Adding Depth and Perspective
Creating depth and perspective is a key element in making your 3D garden design come to life. It adds realism and an immersive feel to your drawing. Follow these steps to add depth to your garden design:
- Understanding the concept of perspective in 3D drawings: Perspective is a technique used in art to create the illusion of depth and distance. In a 3D garden design, it involves portraying objects in a way that reflects their spatial relationship and distance from the viewer. Study and familiarize yourself with different perspectives to effectively incorporate them into your drawing.
- Adding depth to your garden design by using vanishing points and lines: Vanishing points are imaginary points on the horizon line where objects appear to converge. By drawing lines towards these points, you can create realistic depth in your garden design. Use the ruler to draw lines that converge towards the vanishing point, replicating the perspective you want to achieve.
It’s essential to determine the placement of your vanishing point(s) based on the perspective you want to depict in your garden design. Consider the viewing angle and the position of your features and elements to create an accurate representation of depth.
Adding depth and perspective will elevate your 3D garden design and make it visually captivating. Once you’ve grasped the concept and applied it to your drawing, you can move on to the next step: sketching the plant beds and paths in your garden.
Read more: How Hard Is 3D Modeling
Step 4: Sketching the Plant Beds and Paths
Now that you’ve added depth and perspective to your garden design, it’s time to focus on the plant beds and paths. This step involves sketching the outlines of your plant beds and creating pathways and walkways within your garden. Here’s how you can do it:
- Drawing the outlines of your plant beds: Begin by visualizing where you want your plant beds to be in your garden design. Using your pencil, carefully draw the outlines of each plant bed, keeping in mind the size and shape you previously determined. You can vary the shapes and sizes of the plant beds to create interest and balance.
- Creating pathways and walkways within your garden: Consider the flow and functionality of your garden. Determine where you want pathways and walkways to be located. Sketch these pathways using straight or curved lines, depending on the aesthetic you’re aiming for. You can also include intersections or focal points along the pathways to add visual interest.
As you sketch the plant beds and paths, remember to refer back to the base outline and perspective lines to maintain a cohesive and realistic design. Make adjustments as needed to ensure the proportions and positioning of the plant beds and paths align with the overall vision of your garden.
By completing this step, you will have the basic structure of your garden in place. Your 3D garden design is starting to take shape, but there’s more to come. In the next step, we’ll focus on adding plants and other features to enhance the beauty of your garden.
When drawing a 3D garden design, start by sketching the basic shapes of the garden elements in perspective. Use vanishing points to create depth and add details like plants and pathways to bring the design to life.
Step 5: Adding Plants and Features
Now that you have the plant beds and paths sketched, it’s time to breathe life into your garden design by adding plants and other features. This step allows you to showcase your creativity and personalize your 3D garden. Here’s how:
- Sketching the different types of plants and flowers you want in your garden: Consider the types of plants and flowers that resonate with your desired garden theme. Use reference images or your own imagination to sketch the various plants in their designated plant beds. Pay attention to details such as leaves, petals, and sizes to make your drawing more realistic.
- Including features such as a pond, gazebo, or seating area: Think about additional elements that would enhance your garden design. Would you like a tranquil pond surrounded by lush greenery? Or perhaps a cozy gazebo where you can relax? Sketch these features near the plant beds or in designated areas to incorporate them seamlessly into your garden design.
As you add plants and features, consider their placement in relation to the perspective lines and vanishing points. This will help maintain a sense of depth and coherence in your 3D garden design.
Taking the time to sketch the specific plants and features of your desired garden will help you visualize the final result. It brings character and charm to your design, making it truly unique.
In the next step, we’ll focus on adding details and textures to create more depth and realism in your garden drawing.
Step 6: Adding Details and Textures
Now that you have the main components of your garden design sketched, it’s time to add details and textures to bring your 3D garden to life. This step involves adding intricate elements that add depth, realism, and visual interest to your drawing. Here’s what you can do:
- Adding details like leaves, petals, and texture to your plants: Take your time to add finer details to your sketched plants. Add individual leaves, petals, or patterns to convey texture and realism. You can use tiny strokes or dots to indicate the texture of the plants. Pay attention to the shape, color, and texture of different types of vegetation to make your plants appear more lifelike.
- Incorporating textures for pathways, walls, and other garden elements: Consider the textures of various garden components and incorporate them into your drawing. Use techniques such as cross-hatching or stippling to depict textured surfaces like pathways, walls, or fences. Vary your strokes and shading to create depth and visual interest.
Adding details and textures is where your artistic skills can truly shine. Take your time and enjoy the process of adding these elements. They will elevate your drawing and make it visually captivating.
By investing effort into adding details and textures, you are transforming your 3D garden design into a realistic representation of your dream garden. In the next step, we’ll focus on adding color to make your garden design truly vibrant and eye-catching.
Step 7: Coloring Your 3D Garden Design
After adding details and textures, it’s time to add color to your 3D garden design. Coloring brings vibrancy and realism to your drawing, making it visually captivating. Follow these steps to color your garden design:
- Choosing an appropriate color palette for your garden: Consider the overall theme and style of your garden. Choose colors that reflect the natural hues of plants, flowers, and other elements you’ve included in your design. Research color combinations and harmonies to create a visually pleasing and cohesive color palette.
- Using shading and gradients to add depth and realism to your drawing: When applying color, focus on creating depth and dimension. Use shading techniques to add shadows and highlights to your plants and features, giving them a three-dimensional appearance. Gradually blend colors together to create smooth transitions and realistic texturing.
As you color your garden design, refer back to the perspective lines and vanishing points to maintain consistency and a sense of depth. Consider the lighting direction and cast shadows accordingly to add further realism to your drawing.
Experiment with different coloring techniques and be patient with the process. Coloring your garden design will make it come alive and bring your vision to fruition.
Once you’re satisfied with the coloring, take a step back to admire your completed 3D garden design. It’s an accomplishment that showcases your creativity and passion for gardening.
Remember, practice makes perfect, so don’t hesitate to keep refining your skills and experimenting with new techniques to take your garden designs to the next level.
Read more: Where To Put A 3D Printer
Conclusion
Congratulations on completing your 3D garden design! By following the step-by-step process outlined in this article, you have successfully transformed your ideas into a visually stunning and realistic representation of your dream garden.
Throughout the journey, you learned how to plan your garden design, draw the base outline, add depth and perspective, sketch plant beds and paths, incorporate plants and features, add details and textures, and finally, bring it all to life with color. Each step contributed to the overall beauty and realism of your garden design.
Remember that creating a 3D garden design is a creative process, and it’s essential to infuse your own unique style and preferences into your drawing. Let your imagination run wild as you experiment with different plant selections, features, textures, and colors.
Additionally, don’t be afraid to make mistakes along the way. Embrace them as opportunities to learn and improve your skills. Keep practicing, exploring new techniques, and observing real gardens to enhance your understanding of garden design.
With your completed 3D garden design, you now have a visual blueprint to guide you as you bring your garden to life in reality. It can serve as a useful reference when selecting and arranging plants, creating pathways, and organizing features.
So, whether you’re an aspiring landscape designer or simply a gardening enthusiast looking to unleash your creativity, drawing a 3D garden design is an enjoyable and rewarding process. It allows you to envision the possibilities and potential of your outdoor space.
Now, grab your pencil, paper, ruler, and eraser, and let your imagination take flight as you embark on the journey of creating your dream garden on paper.
Happy drawing and happy gardening!
Additional Tips and Tricks
As you continue to explore and refine your 3D garden design skills, here are some additional tips and tricks to keep in mind:
- Study real gardens: Take inspiration from real gardens by observing their layouts, plant arrangements, and features. Visiting botanical gardens or researching garden designs online can provide valuable insights and ideas for your own creation.
- Experiment with different perspectives: Don’t be afraid to explore different perspectives in your garden design. Play with eye-level views, bird’s-eye views, or even ground-level views to add variety and creative flair to your drawings.
- Practice shading and blending: Mastering shading techniques will greatly enhance the depth and realism of your drawings. Experiment with different pencil pressures and blending tools to achieve smooth transitions and realistic lighting effects.
- Reference plant and flower guides: When sketching plants and flowers, refer to botanical guides or online resources to ensure accuracy in your illustrations. Pay attention to the shape, size, and details of each plant for a more realistic representation.
- Use color strategically: Color can create a powerful impact in your garden design. Use it strategically to highlight focal points, create depth, and evoke different moods. Look for color harmonies and contrasts to make your design visually captivating.
- Seek feedback and learn from others: Share your garden designs with fellow artists, garden enthusiasts, or even professionals in the field. Their feedback and insights can help you grow and improve your skills and designs.
- Think beyond plants: Don’t limit yourself to plants alone. Consider adding other elements such as statues, decorative elements, or even outdoor furniture to enhance the overall aesthetics of your garden design.
- Stay open to inspiration: Inspiration can strike from unexpected sources. Keep an open mind and draw inspiration from art, movies, books, or even your own travels. Allow your imagination to roam freely and incorporate unique elements into your garden design.
Remember, drawing a 3D garden design is a creative process that allows you to express your personal style and vision. Enjoy the journey, embrace experimentation, and let your passion for gardening shine through in your designs.
Happy drawing and may your garden designs continue to flourish and inspire!
Frequently Asked Questions (FAQs)
Q: Do I need to have artistic skills to draw a 3D garden design?
A: While some artistic skills can be helpful, they are not a requirement. Drawing a 3D garden design is more about capturing your ideas and creativity on paper. With practice and patience, anyone can create a visually appealing garden design.
Q: Can I use software or online tools to create a 3D garden design?
A: Yes, there are several software programs and online tools available that can help you create a digital 3D garden design. These tools offer additional features such as 3D modeling, realistic rendering, and landscape design templates, which can be great options for those who prefer a digital approach.
Q: How can I make my garden design more sustainable?
A: To make your garden design more sustainable, consider incorporating eco-friendly features such as rainwater harvesting systems, compost bins, and native plants that require less water and maintenance. Additionally, using organic fertilizers and natural pest control methods can help create a more environmentally friendly garden.
Q: How do I choose the right plants for my garden design?
A: When choosing plants, consider factors such as your climate, soil conditions, and the amount of sunlight your garden receives. Research different plant species that thrive in your area and align with your garden’s overall theme and design goals. It’s also important to consider the maintenance requirements and growth habits of each plant.
Q: Can I incorporate hardscaping elements in my garden design?
A: Absolutely! Hardscaping elements such as paths, walls, pergolas, and seating areas can add structure and functionality to your garden design. They can create visually appealing focal points and provide spaces for relaxation and entertainment.
Q: How can I maintain the proportions and scale in my garden design?
A: Maintaining correct proportions and scale is crucial for a visually balanced garden design. Use measurements and references to ensure that the sizes of plants, features, and pathways are in proportion to each other and the overall space. Regularly reviewing and adjusting your design can help maintain accurate scale.
Q: Can I make changes to my garden design as I progress?
A: Absolutely! Your garden design is a creative process, and it’s common to make adjustments and changes along the way. Embrace the flexibility and use your initial sketches as a starting point to refine and fine-tune your design as you go.
Remember, these FAQs are just a starting point, and your individual needs may vary. Feel free to seek additional guidance from gardening experts, landscape designers, or online resources to help further enhance your 3D garden design journey.
Frequently Asked Questions about How To Draw A 3D Garden Design
Was this page helpful?
At Storables.com, we guarantee accurate and reliable information. Our content, validated by Expert Board Contributors, is crafted following stringent Editorial Policies. We're committed to providing you with well-researched, expert-backed insights for all your informational needs.




0 thoughts on “How To Draw A 3D Garden Design”