Home>diy>Architecture & Design>How To Do 3D Modeling
Architecture & Design
How To Do 3D Modeling
Modified: October 20, 2024
Learn the process of 3D modeling in architecture design and create stunning visualizations for your projects. Master the techniques and tools needed for professional 3D modeling.
(Many of the links in this article redirect to a specific reviewed product. Your purchase of these products through affiliate links helps to generate commission for Storables.com, at no extra cost. Learn more)
Introduction
Welcome to the exciting world of 3D modeling! Whether you’re a professional designer, an aspiring artist, or just someone curious about the intricacies of digital design, learning how to create 3D models is a valuable skill to have. In this article, we will explore the fundamentals of 3D modeling, the tools and software you need to get started, and the steps involved in the process.
3D modeling is the art of creating three-dimensional objects in a virtual space. Unlike traditional two-dimensional art forms, 3D modeling allows you to bring your ideas to life by giving depth, volume, and realism to your designs. From architectural renderings to character animations, 3D modeling has a wide range of applications across industries such as gaming, film, product design, and more.
Before we dive into the technical details of 3D modeling, it’s important to understand that the key to creating compelling and realistic 3D models lies in the ability to visualize and understand the structure of objects in three dimensions. This requires a combination of artistic skills and a solid understanding of the underlying principles of geometry and spatial relationships.
In the following sections, we will explore the various stages involved in the 3D modeling process. We will cover everything from software choices and workflow considerations to the techniques used to create and refine 3D models. By the end of this article, you will have a good grasp of the fundamentals and be ready to embark on your own 3D modeling journey.
So, whether you’re interested in creating stunning visual effects, designing innovative products, or simply expressing your artistic vision, let’s dive into the world of 3D modeling and unlock your creativity!
Key Takeaways:
- Dive into the world of 3D modeling, from mastering 3D geometry to adding textures and lighting. Unleash your creativity and bring your ideas to life in the virtual realm!
- Elevate your 3D models with detailed sculpting, realistic lighting, and captivating animations. Master the art of rendering and exporting to showcase your creations in the best light.
Read more: How Hard Is 3D Modeling
Overview of 3D Modeling
3D modeling is the process of creating three-dimensional objects within a virtual environment. It involves using specialized software and tools to construct digital representations of physical objects or imaginary concepts. These models can range from simple geometric shapes to complex, photorealistic renderings.
The primary goal of 3D modeling is to accurately depict the form, structure, and appearance of an object from multiple angles. It allows designers, architects, and artists to visualize their ideas and bring them to life in a virtual space. With 3D modeling, you can create realistic prototypes, simulate physical phenomena, and even animate objects to tell captivating stories.
There are several different approaches to 3D modeling, each with its own strengths and applications. Some common techniques include:
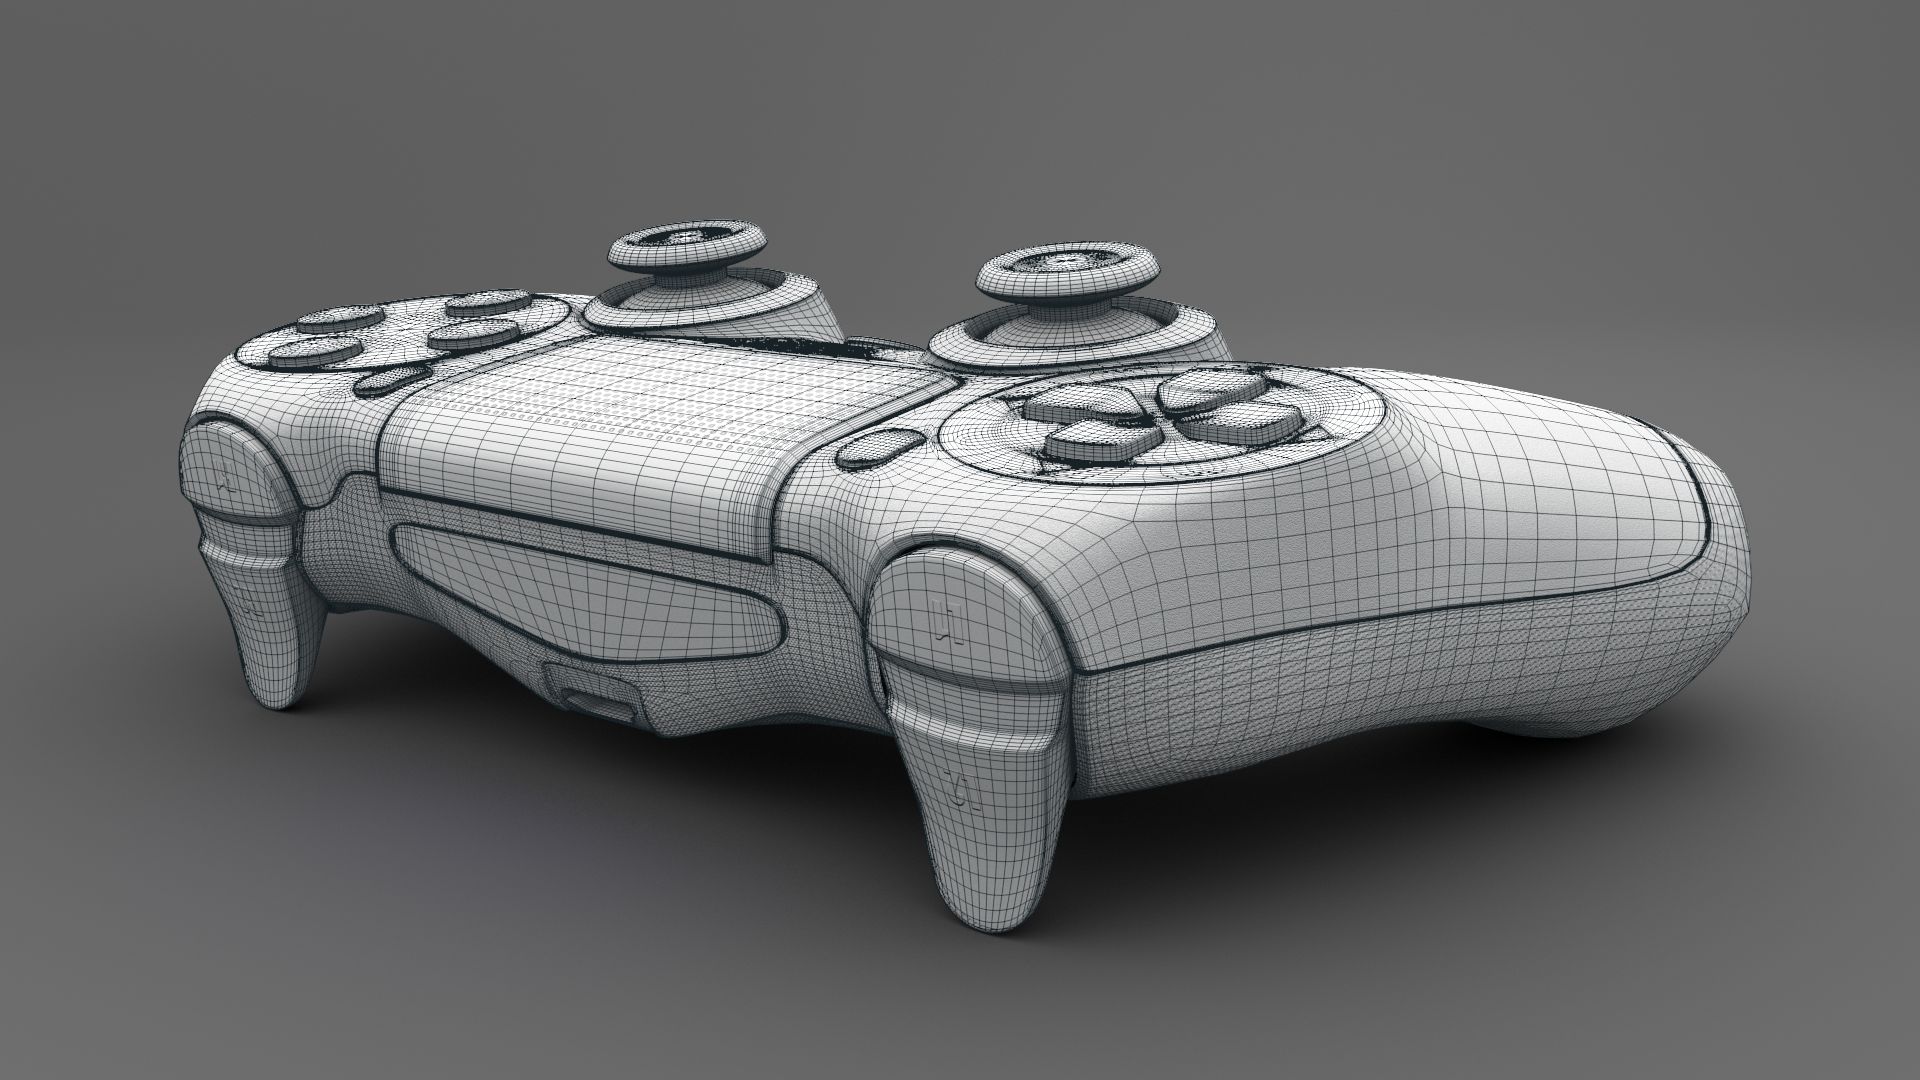
- Polygonal modeling: This is the most common method of 3D modeling. It involves creating objects using polygons, which are flat, two-dimensional shapes with straight sides. By connecting these polygons and manipulating their vertices, designers can create complex 3D shapes.
- NURBS modeling: Non-Uniform Rational B-Splines (NURBS) modeling is a mathematical approach to 3D modeling. It uses curves and control points to create smooth and precise surfaces. NURBS modeling is commonly used in industrial design and automotive design due to its ability to create precise and organic shapes.
- Voxel modeling: Voxel modeling involves working with small building blocks, similar to the pixels in a 2D image. By assembling and arranging these blocks, detailed 3D objects can be created. Voxel modeling is often used in voxel-based games or for creating detailed digital sculptures.
- Procedural modeling: Procedural modeling relies on algorithms and mathematical functions to generate complex 3D geometry. It is commonly used for creating natural landscapes, cityscapes, and other organic structures that would be labor-intensive to model manually.
Regardless of the technique used, the process of 3D modeling typically involves defining the general shape and structure of the object, refining the details, applying textures and materials, setting up lighting and cameras, and finally rendering the object into a 2D image or animation.
Now that we have a general understanding of what 3D modeling is and the different techniques involved, let’s explore the software and tools commonly used in the industry.
Software and Tools for 3D Modeling
When it comes to 3D modeling, there are numerous software options available, each with its own set of features and capabilities. Here are some of the most popular software tools used by professionals in the industry:
- Blender: Blender is a free and open-source 3D modeling software that offers a comprehensive set of features for modeling, animation, rigging, rendering, and more. It is a powerful tool suitable for beginners and advanced users alike.
- Autodesk Maya: Maya is a professional-grade 3D modeling and animation software widely used in the film, television, and gaming industries. It offers an extensive toolset for creating complex character models, realistic animations, and stunning visual effects.
- 3ds Max: 3ds Max, also developed by Autodesk, is another popular choice for 3D modeling and rendering. It is widely used for architectural visualization, product design, and creating immersive environments for games and virtual reality.
- ZBrush: ZBrush is a digital sculpting tool that allows artists to create highly detailed models using intuitive brush-based sculpting techniques. It is commonly used for character and creature modeling, as well as for generating high-resolution textures and displacement maps.
- Cinema 4D: Cinema 4D is a 3D modeling, animation, and rendering software known for its ease of use and powerful features. It is widely used in motion graphics, architectural visualization, and product design.
In addition to the software mentioned above, there are many other specialized tools available for specific industries or purposes. For example, Rhino is often used in industrial design, SketchUp is popular for architectural modeling, and Substance Painter is a widely used texturing and materials tool.
Aside from software, there are also various hardware tools that can enhance the 3D modeling workflow. These include:
- Graphics tablet: A graphics tablet, such as those from Wacom, allows for more natural and precise input when sculpting or sketching in 3D.
- 3D scanner: A 3D scanner enables the capture of real-world objects and environments, which can be used as a reference for modeling or for creating digital replicas.
- High-performance computer: 3D modeling can be computationally intensive, especially when working with complex scenes and high-resolution models. Investing in a powerful workstation with sufficient RAM and a dedicated graphics card is essential for optimal performance.
Remember, the choice of software and tools ultimately depends on your specific needs, budget, and personal preferences. It’s recommended to experiment with different options and find the tools that work best for your workflow.
Now that we have covered the software and tools, we will delve into the fundamentals of 3D geometry and how it applies to modeling in the next section.
Understanding 3D Geometry
At the heart of 3D modeling lies the concept of 3D geometry. Understanding the fundamentals of geometric shapes and spatial relationships is crucial for creating accurate and realistic 3D models. Let’s explore some key aspects of 3D geometry:
Points: In 3D modeling, a point represents a specific location in space. It has no size or shape and is often denoted by coordinates in a three-dimensional Cartesian coordinate system (X, Y, Z).
Lines and Edges: Lines connect points and form the basic building blocks for geometry. In 3D modeling, lines are often represented as edges, which are straight segments connecting two vertices (points). Edges define the boundaries of shapes and help create the overall structure of a 3D object.
Faces: Faces are flat surfaces bounded by edges. They can be triangular (composed of three vertices and three edges) or quadrilateral (composed of four vertices and four edges). Faces are used to create the surfaces and planes of 3D objects.
Vertices: Vertices are points where edges meet. They define the corners and intersections of 3D geometry. By connecting vertices with edges and filling the resulting faces, complex shapes can be created.
Meshes: A mesh is a collection of vertices, edges, and faces that define the surface of a 3D object. It is the most common representation used in 3D modeling. Meshes can be made up of a variety of polygon types, including triangles, quadrilaterals, and more complex polygons.
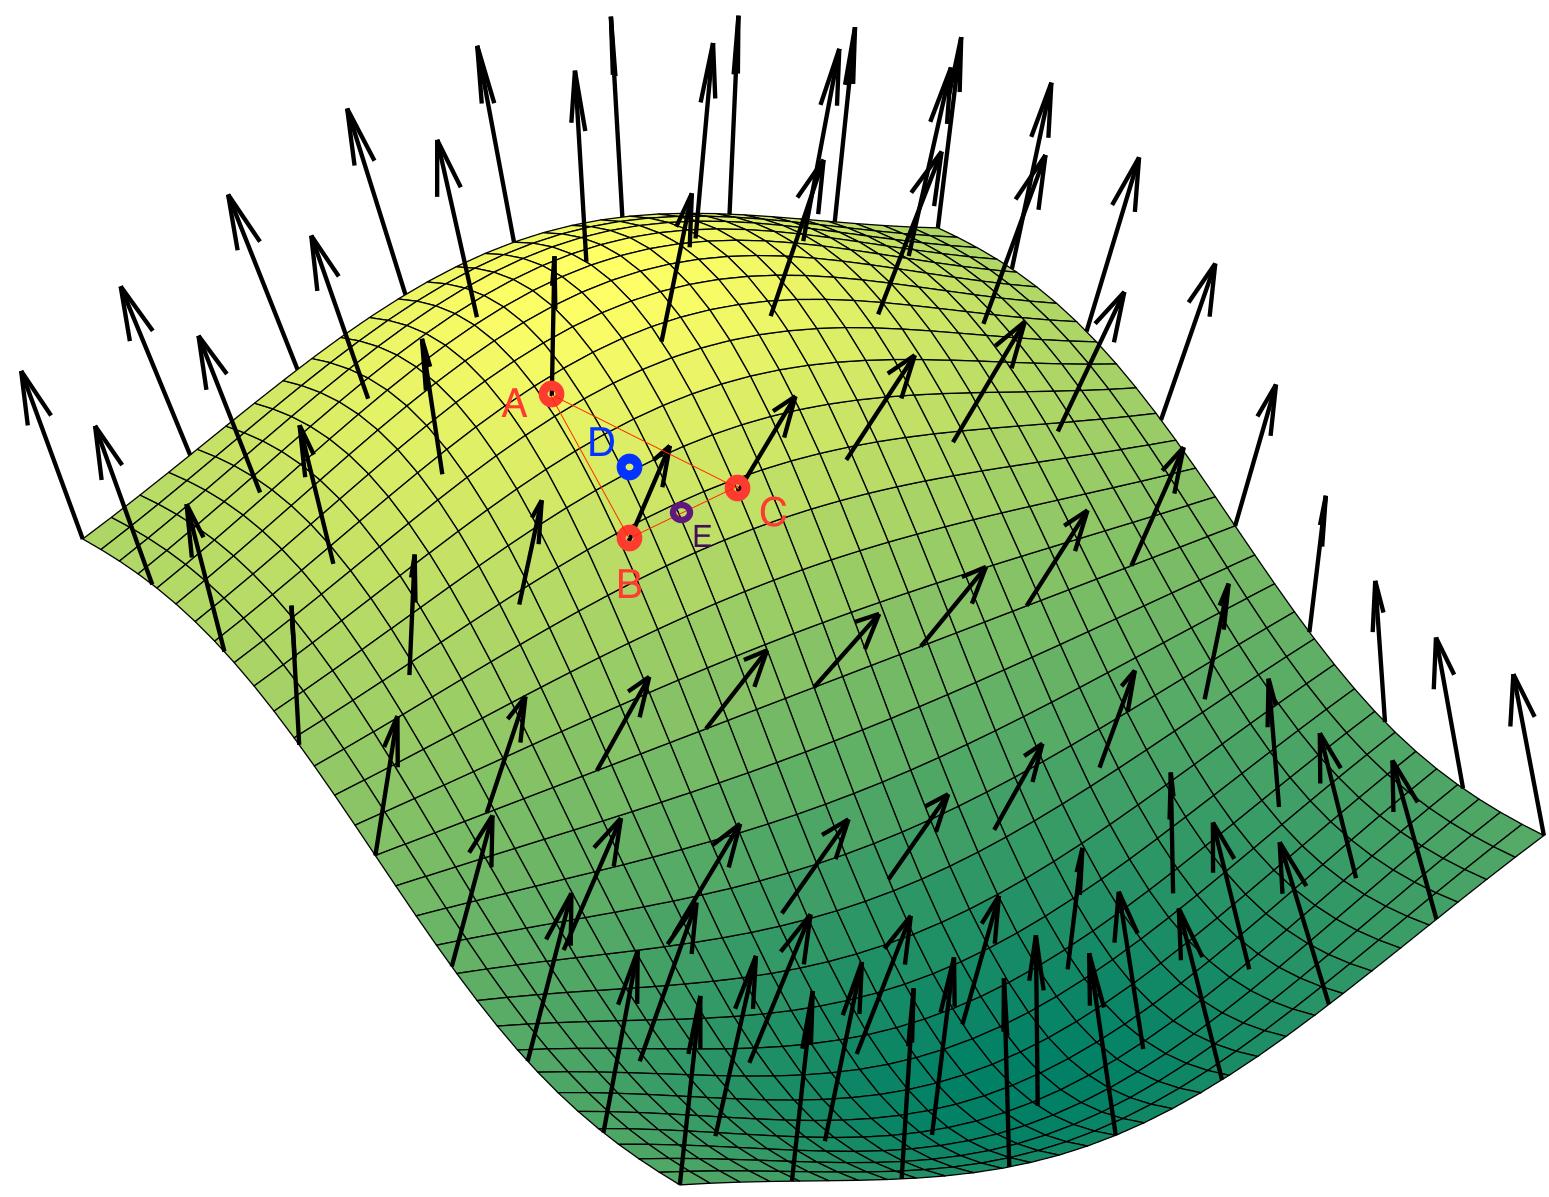
Normals: Normals are vectors perpendicular to the surface of a face, pointing outward or inward from the object. They determine how light interacts with the object’s surfaces and affect shading and rendering. Normals are essential for creating smooth and realistic 3D models.
By manipulating these basic geometric elements, 3D modelers can create intricate and realistic objects in virtual space. Understanding how these elements relate to one another is crucial for constructing accurate and visually appealing 3D models.
Now that we have a solid understanding of 3D geometry, we can move on to the next step: creating basic 3D shapes. This will serve as the foundation for more complex modeling techniques.
Creating Basic 3D Shapes
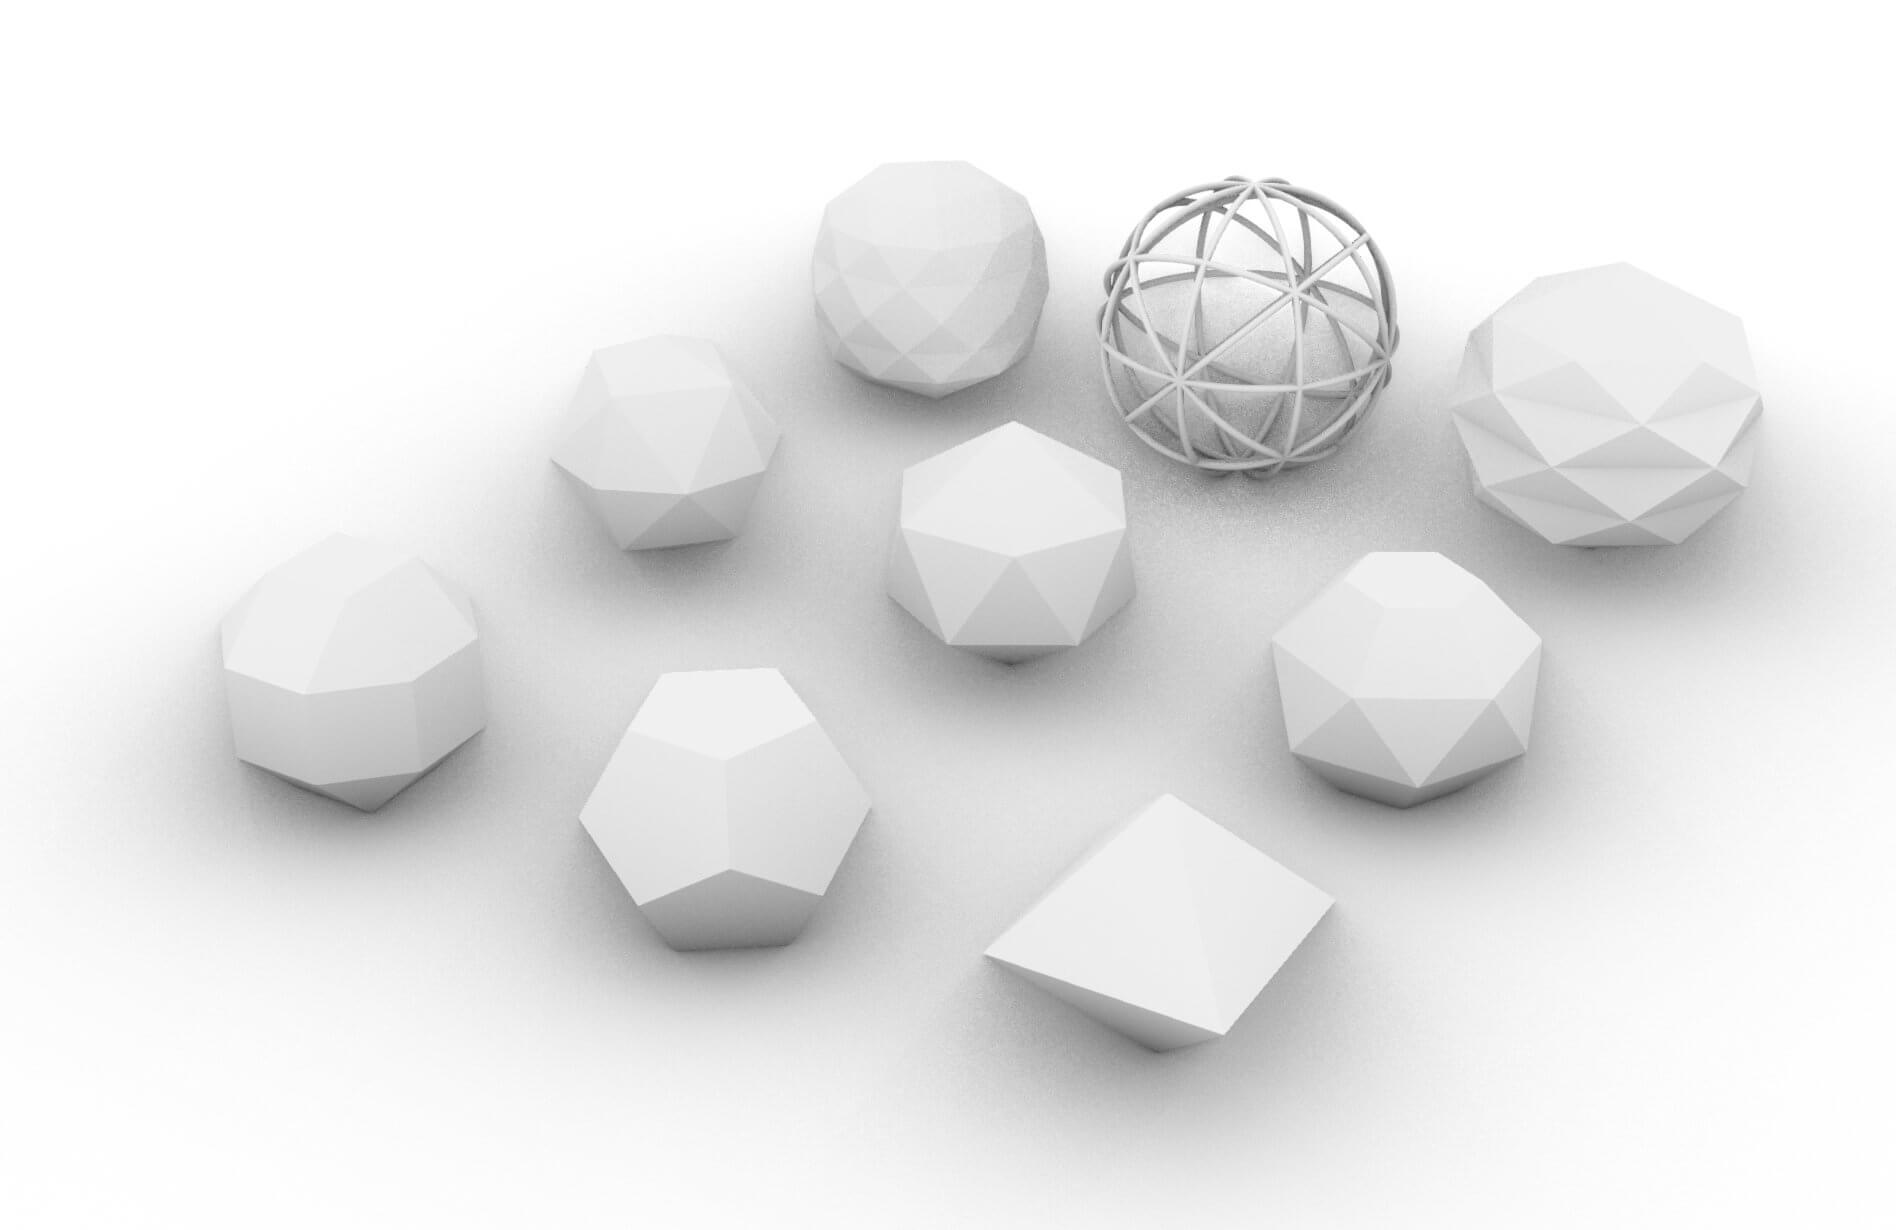
When it comes to 3D modeling, the ability to create basic shapes is essential. These shapes serve as the building blocks for more complex objects and scenes. Let’s explore some common methods of creating basic 3D shapes:
Box: The box, or cube, is one of the simplest 3D shapes. It has six faces, each made up of four sides. To create a box, you can start by defining the dimensions (length, width, and height) and then extruding or scaling the edges and faces to achieve the desired proportions.
Sphere: A sphere is a round, ball-like shape. To create a sphere, you typically start with a single point and then progressively add more points and edges, shaping them into a smooth and symmetrical form. Many modeling software tools have dedicated sphere creation options.
Cylinder: A cylinder is a geometric shape with a circular base and straight sides. To create a cylinder, you can start with a circle and then extrude or scale it in the vertical direction to define the height. A cylinder is often used to represent objects like columns, pipes, or containers.
Cone: A cone is a shape with a circular base that narrows to a point. To create a cone, you can start with a circle and then taper the edges towards a single point. Cones are commonly used to create objects like traffic cones or ice cream cones.
Pyramid: A pyramid is a shape with a polygonal base and triangular faces that converge to a single point. To create a pyramid, you can start with a polygon and then connect the edges of the polygon to a single apex point. Pyramids are often used to create architectural elements or as part of larger structures.
Modifiers: Many 3D modeling tools offer modifiers or procedural techniques that allow you to quickly create basic shapes and modify them. These modifiers can include options like subdivision surfaces, boolean operations, and symmetry tools, among others. Modifiers can greatly speed up the modeling process and provide more control over creating and editing basic shapes.
Once you have created basic shapes, you can then further refine them by manipulating vertices, edges, and faces to add more detail and complexity. This can include techniques such as adding edge loops, extruding faces, beveling edges, and merging vertices.
By combining and transforming these basic 3D shapes, you can create a wide variety of objects, from simple props to complex architectural structures. Understanding how to manipulate these shapes will provide you with the foundation for more advanced modeling techniques.
Now that we have explored the creation of basic shapes, let’s move on to applying textures and materials to our 3D models to enhance their appearance and realism.
Applying Textures and Materials
One of the key aspects of creating realistic and visually appealing 3D models is applying textures and materials. Textures and materials bring a sense of realism by adding surface details, reflectivity, and color to objects. Let’s explore how to apply textures and materials to your 3D models:
UV Mapping: UV mapping is the process of creating a 2D representation, or UV map, of the 3D surface of an object. This UV map is then used to “wrap” a 2D texture around the 3D model. By properly mapping the UV coordinates, you can ensure that the texture applies correctly and uniformly to the model’s surface.
Texture Mapping: Once you have a UV map, you can apply textures to your 3D model. Textures are 2D images or patterns that are wrapped around the UV coordinates of the model to simulate different surface properties. Common types of textures include diffuse maps (colors and patterns), specular maps (shininess and reflectivity), normal maps (surface details and bumps), and displacement maps (complex deformations).
Procedural Textures: In addition to using image-based textures, many 3D modeling software tools offer the ability to create textures procedurally. This means that you can generate textures mathematically or using algorithms instead of relying on pre-made imagery. Procedural textures can add a high level of realism and flexibility, as they can be infinitely scaled and modified.
Material Properties: In addition to textures, materials define how light interacts with the surface of an object. Material properties include attributes such as color, reflectivity, transparency, roughness, and more. By adjusting these properties, you can control how light bounces off the surface, giving your object the desired appearance and material characteristics.
Material Libraries: Many 3D modeling software tools come with pre-built material libraries, offering a wide range of ready-to-use materials such as metals, plastics, glass, wood, and more. These libraries save time by providing a starting point for materials and allowing you to easily apply and modify them for your 3D models.
Texture Painting: Some 3D modeling software tools offer the ability to paint directly onto your 3D models. This allows you to create custom textures and add intricate details using a brush-based approach. Texture painting is particularly useful for character models, props, and organic objects that require hand-painted textures.
By properly applying textures and materials to your 3D models, you can elevate their realism and visual impact. Experimenting with different textures, materials, and surface properties will help you achieve the desired look for your models.
Now that we have covered applying textures and materials, let’s delve into the importance of lighting and shadows in 3D modeling to further enhance the realism of our models.
When starting 3D modeling, focus on learning the basic tools and techniques first before moving on to more advanced features. Building a strong foundation will make the learning process smoother and more enjoyable.
Lighting and Shadows in 3D Modeling
When it comes to creating realistic and visually striking 3D models, lighting and shadows play a crucial role. Properly setting up and manipulating lighting not only enhances the overall aesthetic appeal of your models but also helps convey depth, mood, and atmosphere. Let’s explore the importance of lighting and shadows in 3D modeling:
Ambient Light: Ambient light is the overall illumination that is present in a scene without any direct light sources. It provides a base level of lighting and helps prevent objects from appearing completely dark. Adjusting the intensity and color of ambient light can significantly impact the mood and tone of your scene.
Point Lights: Point lights simulate a light source at a specific point in space, radiating light in all directions evenly. They can be used to create realistic light sources such as light bulbs or candles. Point lights can also cast shadows if enabled, adding depth and realism to your scene.
Directional Lights: Directional lights simulate a light source that is located at an infinite distance and emits parallel rays of light. They are often used to simulate sunlight or moonlight in outdoor environments. Directional lights can cast long shadows across your scene, enhancing the sense of depth and realism.
Spot Lights: Spot lights simulate a directed light source that emits light within a cone-shaped area. They are often used to simulate light fixtures, flashlights, or focused beams of light. Spot lights can cast shadows and create dramatic lighting effects in your scene.
Area Lights: Area lights simulate a light source that has an extended shape, such as a rectangle or a sphere. Area lights provide soft, diffused lighting and are commonly used to simulate lighting fixtures like fluorescent lights or softboxes. They can create soft shadows and spread light more evenly across your scene.
Global Illumination: Global illumination refers to the simulation of indirect light bouncing off surfaces in your scene. It takes into account light reflections, refractions, and diffuse interactions, resulting in more realistic light distribution and shading. Global illumination algorithms, such as radiosity or ray tracing, can greatly enhance the realism of your models.
Shadows: Shadows are a critical element in creating depth and realism in your 3D models. They provide important visual cues about the spatial relationships between objects and their interaction with light sources. By adjusting settings like shadow intensity, softness, and color, you can control the appearance and impact of shadows in your scene.
Experimenting with different lighting setups, intensities, and shadow types can dramatically change the mood and visual impact of your 3D models. Paying attention to lighting and shadows will help you create more realistic and captivating scenes.
Now that we understand the importance of lighting and shadows, let’s move on to adding details and fine-tuning our 3D models to make them more visually appealing and realistic.
Adding Details and Fine-tuning
Adding details and fine-tuning is a crucial step in the 3D modeling process. It involves refining the overall appearance of your models by adding intricate details, adjusting proportions, and ensuring they meet your desired level of realism. Let’s explore some techniques for adding details and fine-tuning your 3D models:
Sculpting: Sculpting is a technique that allows you to add detailed texture, surface wrinkles, and intricate shapes to your models. Using tools like brushes, you can manipulate the geometry of your models to achieve the desired level of detail. Sculpting is particularly useful for organic models, characters, and creatures.
Edge Loops and Subdivision: Edge loops are continuous sets of edges that define the flow and shape of your models. By adding or refining edge loops in specific areas, you can enhance the smoothness and definition of your models. Combined with subdivision surfaces, which smooth out the geometry, edge loops help achieve higher levels of detail and realism.
Adding Geometry: Sometimes, adding more geometry is necessary to achieve the desired level of detail. This can involve extruding faces to create additional structures like buttons or panels, or using boolean operations to combine or subtract geometry. By strategically adding geometry, you can bring intricate features and complex shapes to your models.
Texturing and Materials: Adding detailed textures and materials can significantly enhance the realism and visual appeal of your models. This can involve creating custom textures for small details, using bump or displacement maps to add surface variations, or applying different materials to specific parts of your models. Paying attention to the textures and materials will make your models come to life.
Fine-tuning Proportions: Ensuring that your models have accurate proportions is important for achieving a realistic and visually pleasing result. By carefully adjusting the size, scale, and proportions of different elements, you can make your models more visually appealing and believable. This is particularly important for characters, architectural models, and product design.
Refining Surfaces: Take the time to carefully refine the surfaces of your models, ensuring they are smooth and free of imperfections. This involves eliminating any unwanted gaps, creases, or overlapping faces. Pay attention to the overall flow of your surfaces, ensuring they are cohesive and have a consistent level of detail.
Iterative Process: Adding details and fine-tuning is often an iterative process. It requires patience and the willingness to revise and refine your models. Continuously revisit and evaluate your work, making adjustments as needed. Taking breaks and gaining fresh perspective can often lead to new insights and improvements.
By focusing on adding details and fine-tuning your 3D models, you can elevate their realism, visual impact, and overall quality. These techniques allow you to create models that capture the intricacies and nuances of the real world.
Now that we have explored the process of adding details and fine-tuning, let’s move on to the exciting realm of animating 3D models and bringing them to life.
Animating 3D Models
Animating 3D models is an exciting aspect of the 3D modeling process that brings your creations to life. Whether you’re creating character animations, architectural walkthroughs, or product demonstrations, animation adds movement, expression, and storytelling to your models. Let’s explore the key elements and techniques involved in animating 3D models:
Keyframes: Keyframes are essential building blocks of animations. They mark important moments in time where you set the position, rotation, and scale of your models. By setting keyframes at different intervals, the animation software interpolates the values between these keyframes, creating smooth and continuous movement.
Timeline and Curves: The timeline allows you to view and manipulate keyframes, and to control the timing and duration of your animation. You can adjust the curves between keyframes to control the speed and easing of movement. This gives you precise control over the timing and motion of your models.
Character Rigging: Creating a rig is the process of setting up controls and bones that enable you to deform and move characters in a natural and realistic way. A rig consists of hierarchies, joints, and controls that allow you to manipulate different parts of the model, such as the limbs, facial expressions, or other movable elements.
Animation Controllers: Animation controllers provide a more intuitive way to control and manipulate the animation of your models. These can include sliders, buttons, or custom interfaces that affect specific attributes, such as changing facial expressions or activating complex motion sequences.
Physics Simulations: Physics simulations add realism to your animations by simulating real-world phenomena such as gravity, collisions, or cloth dynamics. By applying physical properties to your models, you can create more natural and lifelike animations.
Path Animation: Path animation allows you to create animations where models follow a predefined path or trajectory. This technique is useful for creating camera movements, automated object movements, or even complex vehicle animations.
Rendering and Playblasting: Rendering is the process of generating the final images or frames of your animation. It involves applying proper lighting, materials, and textures to your models and scenes. Playblasting is a preview rendering technique that allows you to quickly visualize your animation before the final rendering, helping you spot any issues or fine-tune the motion.
Iterative Process: Similar to the iterative process of adding details, animating 3D models often involves refining and experimenting. Start with key poses and movements, evaluate the timing and motion, and make adjustments as needed. Continuously play and review your animation to ensure it meets the desired quality and intent.
With the power of animation, you can breathe life into 3D models, evoking emotions, storytelling, and engagement. It is a creative and dynamic aspect of 3D modeling that allows you to create captivating visual experiences.
Now that we have explored the process of animating 3D models, let’s dive into the final stages: rendering and exporting your 3D models for presentation and distribution.
Read more: Who Invented 3D Modeling
Rendering and Exporting 3D Models
Rendering and exporting your 3D models is the final step in the 3D modeling process, where you produce the final images, videos, or interactive content that showcase your creations. Let’s explore the key aspects of rendering and exporting 3D models:
Rendering Software: Rendering software is used to generate the final images or animations from your 3D models. Different rendering engines offer various features and capabilities, including realistic lighting, advanced materials, global illumination, and specialized effects. Some popular rendering software options include Arnold, V-Ray, RenderMan, and Cycles.
Render Settings: Before rendering your models, you need to configure the desired rendering settings. This includes attributes such as image resolution, aspect ratio, anti-aliasing, shading quality, and output file format. Adjusting these settings allows you to balance the quality and performance trade-offs for your specific needs.
Rendering Time: Rendering can be a time-intensive process, especially for complex scenes or high-quality output. Factors like the complexity of models, lighting, number of polygons, and sampling settings can all influence the rendering time. It’s essential to optimize your scene and use render farms or distributed rendering to speed up the process.
Rendering Techniques: Different rendering techniques can enhance the appearance of your models. This includes techniques like ambient occlusion, depth of field, motion blur, volumetric lighting, and image-based lighting. Experimenting with these techniques can add depth, realism, and visual interest to your final renderings.
Materials and Textures: Ensure that materials and textures are properly configured for rendering. Double-check that textures are linked properly, and materials are set up with the necessary attributes. Adjust parameters like reflectivity, glossiness, transparency, and specularity to achieve the desired visual result.
Compositing: Compositing is the process of combining multiple rendered elements, such as different passes (e.g., diffuse, specular, ambient occlusion) or layers, into a final composite image or video. This allows for greater control over the final output, as you can adjust the colors, apply post-processing effects, and fine-tune the overall look of your composition.
Exporting Formats: When exporting your 3D models, you have a variety of file formats to choose from, depending on your intended use. Some common formats include OBJ, FBX, STL, and Alembic. Ensure that you choose a format that is compatible with the software or platform you plan to use for viewing or further editing.
Documentation and Presentation: Consider creating documentation or presentations to provide additional context or information about your 3D models. This could include sketches, wireframe views, annotations, or screenshots of the modeling process. Comprehensive documentation can be valuable for sharing your work with clients, collaborators, or for personal reference.
Rendering and exporting your 3D models is the final step in the journey of bringing your creations to life. It’s the culmination of all the hard work and dedication put into modeling, texturing, and animating. By paying attention to the rendering process and optimizing your settings, you can present your 3D models in the best possible light.
Now that we have covered the rendering and exporting stage, let’s wrap up our article with some concluding thoughts.
Conclusion
Congratulations! You have now gained a comprehensive understanding of 3D modeling and the various stages involved in creating stunning 3D models. From the initial conceptualization to the final rendering and exporting, each step contributes to the overall success of your creations. Let’s recap what we’ve explored:
We began with an introduction to the world of 3D modeling, highlighting its versatility and the importance of combining artistic skills with technical knowledge. We then delved into the overview of 3D modeling, discussing different techniques and approaches commonly used in the industry. Software and tools for 3D modeling were also highlighted to assist you in selecting the best options to suit your needs.
We then moved on to understanding 3D geometry, which forms the foundation of 3D modeling. By familiarizing yourself with points, lines, faces, and meshes, you can construct complex models with accuracy and precision. Creating basic 3D shapes allows you to build upon these fundamentals and create more complex objects.
Applying textures and materials takes your models to the next level, adding realism and visual appeal. Understanding UV mapping, texture mapping, and material properties help you create convincing surfaces, allowing light to interact realistically with your models. Lighting and shadows further enhance the realism, creating depth and atmosphere within your scenes.
We explored the importance of adding details and fine-tuning your models, using techniques such as sculpting, refining surfaces, and adjusting proportions to achieve the desired level of complexity and realism. Animating your models gives them life and movement, whether through keyframes, character rigging, physics simulations, or path animations.
Lastly, we covered the final stages of rendering and exporting your 3D models. Configuring render settings, optimizing render times, and compositing your final output ensure that your models are presented in the best possible light. Exporting them in the appropriate file formats and creating documentation or presentations adds value and context to your work.
Remember, 3D modeling is a continuous learning process. As you gain experience and explore new techniques, your skills will continue to evolve. Be open to experimentation, practice regularly, and seek inspiration from other artists and designers in the field.
Now that you’re equipped with the knowledge and understanding of 3D modeling, it’s time to unleash your creativity and embark on your own 3D modeling journey. Whether you’re creating captivating characters, breathtaking environments, or innovative products, let your imagination soar and bring your ideas to life in the virtual world of 3D modeling!
Frequently Asked Questions about How To Do 3D Modeling
Was this page helpful?
At Storables.com, we guarantee accurate and reliable information. Our content, validated by Expert Board Contributors, is crafted following stringent Editorial Policies. We're committed to providing you with well-researched, expert-backed insights for all your informational needs.


0 thoughts on “How To Do 3D Modeling”