Home>Garden Essentials>How To Germinate Chacruna Leaf
Garden Essentials
How To Germinate Chacruna Leaf
Modified: March 15, 2024
Learn how to successfully germinate chacruna leaf in your garden and enjoy its beautiful and medicinal properties. Follow our step-by-step guide for best results.
(Many of the links in this article redirect to a specific reviewed product. Your purchase of these products through affiliate links helps to generate commission for Storables.com, at no extra cost. Learn more)
Introduction
Welcome to this comprehensive guide on how to germinate Chacruna leaf seeds. Chacruna, also known scientifically as Psychotria viridis, is a plant native to the Amazon rainforest. It is highly revered by indigenous communities for its spiritual and medicinal properties. Chacruna is particularly famous for containing the potent psychoactive compound, dimethyltryptamine (DMT), which is used in traditional Ayahuasca ceremonies.
Germinating Chacruna seeds is the crucial first step in cultivating this remarkable plant. Whether you are a curious hobbyist or an avid gardener, this guide will provide you with detailed instructions to successfully germinate Chacruna seeds and start your own Chacruna garden. Let’s dive right in!
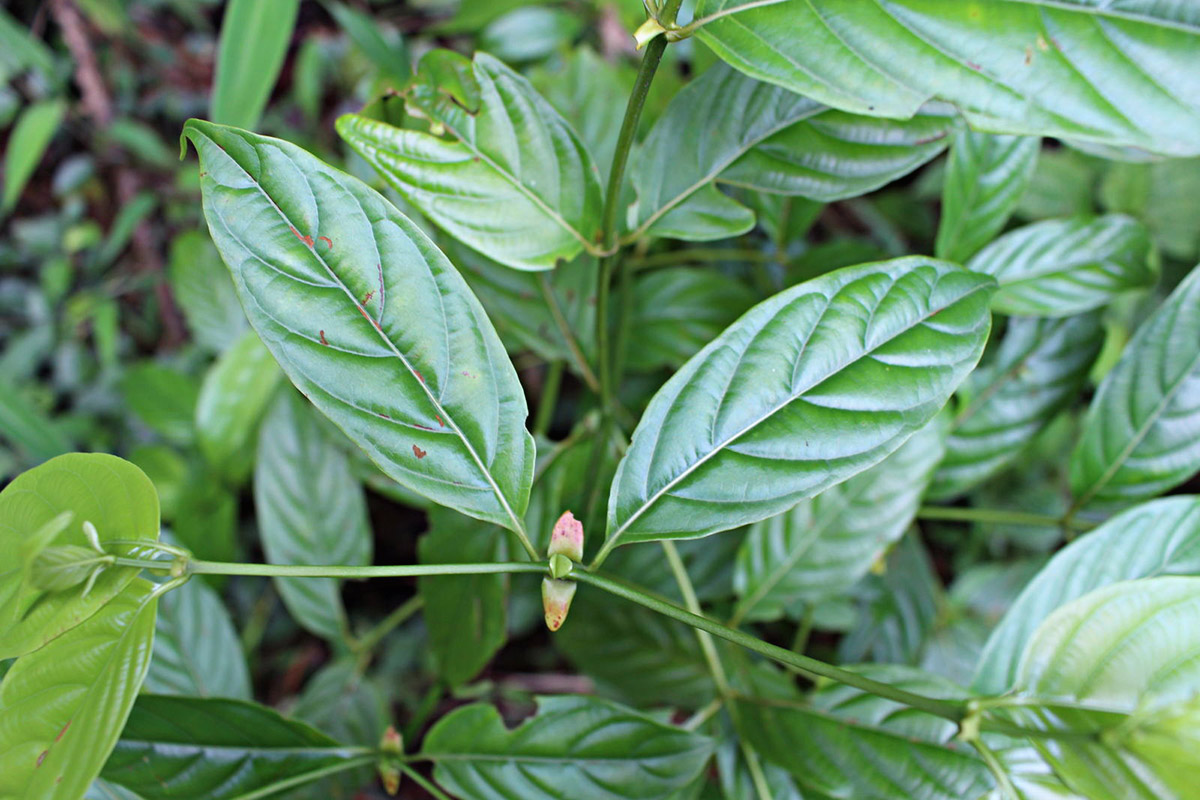
To effectively germinate Chacruna seeds, it is essential to understand the plant and its requirements. Chacruna belongs to the Rubiaceae family and is a perennial shrub that can reach a height of up to 6 meters. The leaves are elliptical and glossy, with a vibrant green color. Chacruna is known for its ability to thrive in tropical climates with consistent humidity and plenty of sunlight.
Before diving into the germination process, make sure you have the necessary materials and equipment. You will need Chacruna seeds, a germination tray or pot, high-quality potting soil, a spray bottle, and a transparent plastic cover or dome to create a humid environment. Additionally, ensure you have access to a warm and well-lit area where you can maintain the ideal growing conditions for the seedlings.
Now that you have the basic knowledge and equipment in place, we can move on to the step-by-step process of germinating Chacruna seeds. Stay tuned for the next section to learn about preparing the ideal germination environment!
Key Takeaways:
- Germinating Chacruna seeds requires creating a warm, humid environment similar to its natural habitat. Soak fresh seeds in water for 24-48 hours, plant them in moist soil, and provide indirect sunlight for successful germination.
- Protect germinating Chacruna seeds from pests, extreme temperatures, and overcrowding. Transplant the seedlings into well-draining soil, provide gentle care, and monitor their growth for healthy, thriving plants.
Read more: How To Store Leaf Blower
Understanding Chacruna Leaf
Before we dive into the process of germinating Chacruna seeds, let’s take a closer look at the Chacruna plant itself and understand its significance. Chacruna, scientifically known as Psychotria viridis, is a perennial shrub native to the Amazon rainforest in South America. It belongs to the Rubiaceae family, which also includes coffee plants.
Chacruna is highly valued for its leaves, which contain the potent psychoactive compound dimethyltryptamine (DMT). In traditional shamanic practices of the Amazonian indigenous cultures, Chacruna is used as a key ingredient in Ayahuasca, a powerful and sacred plant medicine.
While Chacruna is primarily known for its spiritual and entheogenic properties, it also has various medicinal uses. The leaves of Chacruna are believed to have antioxidant and anti-inflammatory effects. They are used in traditional medicine to alleviate pain, reduce fever, and treat various ailments including headaches, malaria, and gastrointestinal issues.
Chacruna is an attractive plant with elliptical, glossy green leaves. It can reach a height of up to 6 meters, creating a lush and vibrant presence in any garden. Cultivating Chacruna not only provides you with a deeper connection to the plant’s cultural and spiritual heritage but also allows you to explore its medicinal potential.
It’s important to note that Chacruna requires specific growing conditions to thrive. It is native to warm and humid tropical climates, with temperatures ranging from 20°C to 30°C (68°F to 86°F). These conditions are necessary for optimal growth and the production of DMT-rich leaves.
In terms of soil, Chacruna prefers acidic to slightly alkaline soil with good drainage. It is essential to provide adequate moisture without allowing water to accumulate and cause root rot.
Now that we have a better understanding of Chacruna and its significance, let’s move on to the next section to learn how to prepare the ideal germination environment for Chacruna seeds.
Preparing the Germination Environment
In order to successfully germinate Chacruna seeds, it is crucial to create an optimal environment that mimics the plant’s natural habitat. This will provide the seeds with the necessary conditions to sprout and develop into healthy seedlings. Here are the steps to prepare the germination environment:
- Select a suitable germination tray or pot: Choose a tray or pot that is at least 2-3 inches deep and has drainage holes at the bottom. This will ensure proper water drainage and prevent waterlogging, which can lead to rotting of the seeds.
- Choose high-quality potting soil: Use a well-draining potting mix that is rich in organic matter. You can easily find pre-mixed potting soil specifically formulated for tropical plants. Avoid heavy, compacted soils as they can restrict root growth.
- Moisten the potting soil: Before filling the germination tray or pot with soil, moisten it slightly by sprinkling water over it. The soil should be damp but not soggy.
- Fill the tray or pot with soil: Fill the tray or pot with the moistened potting soil, leaving about half an inch of space below the rim. Gently pat the soil to level it but avoid pressing it down too firmly.
- Create a humid environment: Place a transparent plastic cover or dome over the tray or pot to create a mini greenhouse effect. This will help trap moisture and create a humid environment for the seeds to germinate. Ensure that the cover is high enough to allow space for the seedlings to grow once they emerge.
- Position the germination tray or pot: Place the tray or pot in a warm location with indirect sunlight. Ideal temperatures for germinating Chacruna seeds range between 25°C to 30°C (77°F to 86°F).
By following these steps, you will create a favorable environment for Chacruna seeds to germinate. The warm and humid conditions will simulate the natural habitat of the plant, encouraging successful sprouting. In the next section, we will discuss how to select and soak the Chacruna seeds before planting them in the prepared environment.
Selecting and Soaking the Chacruna Seeds
Choosing the right Chacruna seeds is an essential step in the germination process. Look for fresh seeds from a reliable source to ensure a higher success rate. Here’s how to select and soak the Chacruna seeds for optimal germination:
- Selecting the seeds: Choose seeds that are plump, firm, and undamaged. Avoid seeds that are discolored, shriveled, or have any signs of mold or pest infestation. Fresh seeds have a higher chance of germinating successfully.
- Soaking the seeds: Soaking the Chacruna seeds before planting helps to soften the seed coat and kickstart the germination process. Fill a container with lukewarm water and place the seeds in it. Let them soak for 24 to 48 hours. During this time, the seeds will absorb water and swell up, preparing them for germination.
- Changing the water: After 24 hours, change the water to ensure freshness and remove any impurities. This will help prevent the growth of harmful bacteria or fungi that can hinder germination.
- Optional scarification: Chacruna seeds have a tough outer coating that can sometimes inhibit germination. If you notice that some seeds have not swollen or are showing signs of resistance, you can gently nick or file the seed coat to break the dormancy. This process, known as scarification, can improve the chances of successful germination for stubborn seeds.
- Drying the seeds: After soaking or scarification, remove the seeds from the water and place them on a clean paper towel or cloth to dry. Allow them to air dry for a few hours until they are no longer damp to the touch. Avoid exposing the seeds to direct sunlight or excessive heat, as this can damage them.
Soaking and preparing Chacruna seeds in this way helps to soften the seed coat and trigger the germination process. It increases the chances of successful sprouting and ensures a higher yield of healthy seedlings. Once the seeds are soaked and dried, it’s time to plant them in the prepared germination environment. In the next section, we will discuss how to go about planting the Chacruna seeds and providing the ideal growing conditions.
Planting the Chacruna Seeds
Now that you have selected and soaked the Chacruna seeds, it’s time to plant them in the prepared germination environment. Proper planting techniques are crucial for successful germination and the healthy growth of the seedlings. Here’s how to plant the Chacruna seeds:
- Make small indentations in the soil: Use your finger or a small tool to create shallow indentations in the moistened potting soil. Make each indentation about 1/4 to 1/2 inch deep. Space the indentations at least an inch apart to allow room for the seedlings to develop without crowding.
- Place the seeds in the indentations: Gently place one soaked Chacruna seed in each indentation. Cover the seeds lightly with a thin layer of soil. Ensure that the seeds are not buried too deeply, as this can hinder germination.
- Mist the soil: Use a spray bottle filled with water to mist the soil surface. This will provide additional moisture and help settle the soil around the seeds. Be careful not to overwater, as excessive moisture can lead to damping-off disease or rotting of the seeds.
- Label and record: It is a good practice to label the tray or pot with the date of planting and the seed variety. This will help you keep track of the development and progress of the seeds. Also, maintain a record of the planting details, including any observations or special considerations.
Now that the Chacruna seeds are planted, it’s time to provide the ideal growing conditions for them. In the next section, we will discuss the important factors to consider in order to ensure the healthy and successful growth of the germinating seeds.
To germinate Chacruna leaf, soak the seeds in warm water for 24 hours, then plant them in a well-draining soil mix and keep them in a warm, humid environment. Keep the soil moist but not waterlogged, and the seeds should germinate within a few weeks.
Read more: How To Store A Leaf Blower
Providing the Ideal Growing Conditions
Creating the ideal growing conditions for your Chacruna seeds is essential for their healthy development into seedlings. By ensuring proper temperature, lighting, and moisture levels, you can maximize the chances of successful germination. Here are the key factors to consider:
- Temperature: Chacruna seeds require a warm environment to germinate. Maintain a consistent temperature between 25°C to 30°C (77°F to 86°F) throughout the germination process. Avoid exposing the seeds to extreme temperature fluctuations, as it can disrupt the germination process.
- Lighting: Chacruna seeds need indirect sunlight to germinate. Place the germination tray or pot in a location that receives bright, indirect light. If natural light is insufficient, you can provide supplemental light using fluorescent grow lights. Maintain a light period of 12-14 hours per day to promote healthy growth.
- Moisture: Keep the soil consistently moist but not waterlogged. Avoid letting the soil dry out completely, as this can inhibit germination. Use a spray bottle to mist the soil regularly and maintain a humid environment inside the cover or dome. Monitor the moisture level closely and adjust accordingly to prevent overwatering or drying out.
- Ventilation: While maintaining a humid environment is important, ensure proper air circulation to prevent the growth of mold or fungus. Lift the cover or dome periodically to allow fresh air to circulate. This will help prevent damping-off disease and promote healthy seedling growth.
- Patience and observation: Germination can take anywhere from a few days to a few weeks. Be patient and resist the urge to disturb the seeds or check for germination too frequently. Instead, observe the tray or pot regularly for any signs of sprouting or changes in moisture. Patience and careful observation are key during this stage.
By providing the ideal growing conditions as described above, you give your Chacruna seeds the best chance of successful germination and healthy growth. Make sure to monitor the environment closely and address any issues promptly to ensure the optimal development of the seedlings. In the next section, we will discuss how to monitor and maintain moisture levels to support the germinating seeds.
Monitoring and Maintaining Moisture Levels
Proper moisture levels are crucial for the successful germination of Chacruna seeds. Monitoring and maintaining the moisture levels in the germination environment will ensure that the seeds have the necessary hydration for sprouting and early growth. Here’s how to effectively monitor and maintain moisture levels:
- Check the moisture daily: Regularly monitor the moisture level of the soil by gently touching the surface with your finger. It should feel moist but not overly wet. Avoid letting the soil dry out completely, as this can inhibit germination. If the soil feels dry, it’s time to mist it with water.
- Use a spray bottle: Fill a spray bottle with water and mist the soil surface when it starts to dry out. Take care to avoid waterlogging the soil by only misting until it feels moist. The spray bottle allows you to control the amount of moisture applied to the soil, preventing overwatering.
- Monitor humidity levels: Keep an eye on the humidity levels inside the cover or dome. If condensation builds up on the inner surface, it indicates excessive humidity. In such cases, remove the cover or dome for a short period of time to allow excess moisture to evaporate. Conversely, if the soil appears dry and the humidity is low, mist the soil and replace the cover or dome.
- Avoid waterlogging: While it is important to keep the soil moist, be cautious not to overwater. Excessive moisture can lead to waterlogging, which can suffocate the seeds and promote the growth of mold or fungus. If you notice water pooling at the bottom of the tray or pot, it’s a sign of overwatering. Remove any excess water to prevent damage to the seeds.
- Make adjustments as needed: Every environment and climate is different, so it’s important to adapt your watering routine accordingly. Factors such as temperature, humidity, and air circulation can affect the rate at which the soil dries out. Adjust the frequency of misting and the amount of water applied based on the needs of your Chacruna seeds.
Consistent monitoring and careful maintenance of moisture levels will support the germination process and ensure the health of the Chacruna seedlings. By providing adequate moisture without waterlogging, you create an optimal environment for the seeds to sprout and flourish. In the next section, we will discuss how to protect the germinating seeds from potential threats.
Protecting the Germinating Seeds
Protecting the germinating Chacruna seeds is crucial to ensure their successful development into healthy seedlings. During this delicate stage, the seeds are vulnerable to various threats, including pests, diseases, and environmental factors. Here’s how you can effectively protect the germinating seeds:
- Pest control: Keep a close eye on the germination tray or pot and watch for any signs of pests. Common pests that can affect Chacruna seeds are fungus gnats and aphids. If you notice any infestation, use appropriate organic pest control methods, such as neem oil or insecticidal soap, to eliminate the pests without harming the seeds or seedlings.
- Avoid overcrowding: Ensure that the Chacruna seeds are planted with enough space between them to allow for proper airflow and prevent overcrowding. Overcrowding can lead to increased moisture retention and promote the growth of mold or fungus, which can damage or kill the seedlings.
- Protect from extreme temperatures: Chacruna seeds require a warm and stable temperature for germination. Protect them from extreme heat or cold by keeping the germination tray or pot in a controlled environment with consistent temperatures. Avoid exposing the seeds to drafty areas or extreme temperature fluctuations.
- Prevent damping-off disease: Damping-off disease is a fungal infection that can affect germinating seeds. To prevent this, maintain good air circulation by periodically lifting the cover or dome and allowing fresh air to circulate. Avoid overwatering and ensure proper drainage to prevent conditions favorable to fungal growth.
- Be gentle when handling: Be careful when handling the germination tray or pot to avoid damaging the delicate seedlings. When it’s time to transplant the seedlings, handle them gently by their leaves and avoid touching or damaging the fragile stems.
- Monitor and address issues promptly: Regularly check the germination tray or pot for any signs of stress, disease, or other issues. Promptly address any problems that arise, such as yellowing leaves, wilted seedlings, or unusual discoloration. Take appropriate measures to rectify the issue and provide necessary care to ensure the health of the germinating seeds.
By properly protecting the germinating Chacruna seeds, you give them the best chance of thriving and developing into healthy seedlings. Vigilance and proactive measures are essential during this stage to prevent potential threats and provide optimal conditions for growth. In the next section, we will discuss the important process of transplanting the germinated seedlings.
Transplanting the Germinated Seedlings
Once the Chacruna seeds have successfully germinated and the seedlings have emerged, it is time to transplant them into their permanent growing containers or garden beds. This critical step will provide the seedlings with the space and resources they need to continue their growth. Follow these steps to transplant the germinated Chacruna seedlings:
- Select the appropriate containers: Choose containers that are at least 6-8 inches deep and have drainage holes at the bottom. Alternatively, if transplanting directly into the garden, prepare well-amended soil beds with good drainage.
- Prepare the transplant site: If transplanting into containers, fill them with a well-draining potting mix formulated for tropical plants. If transplanting into the garden, prepare the soil by loosening it and incorporating organic matter such as compost or well-rotted manure.
- Gently remove the seedlings: Carefully lift the seedlings from the germination tray, holding them by their leaves to avoid damaging the delicate stems. If the roots are entangled, gently separate them to promote healthier growth.
- Plant at the appropriate depth: Dig a small hole in the container or garden bed, slightly larger than the root ball of the seedling. Place the seedling in the hole, making sure that the soil level matches the same level as it was in the germination tray. Backfill the hole with soil and lightly pat it down to secure the seedling.
- Water thoroughly: After transplanting, water the seedlings generously to settle the soil around the roots, ensuring good contact and minimizing air pockets. Provide enough water to thoroughly dampen the soil, but avoid overwatering, as it can lead to root rot.
- Provide appropriate care: Place the transplanted seedlings in a location that receives bright, indirect light. Gradually acclimate them to longer periods of direct sunlight over the course of a week or two. Water the seedlings regularly, keeping the soil consistently moist but not soggy.
- Protect from harsh conditions: Shield the transplanted seedlings from strong winds, extreme temperatures, and intense sunlight in the initial days. Consider using shade cloth or providing temporary shade until the seedlings have adjusted to their new environment.
Transplanting the germinated Chacruna seedlings is a delicate process that requires care and attention. By following these steps and providing proper care, you give the seedlings the best chance of establishing themselves in their new containers or garden beds. Ensure you continue to monitor their growth, provide appropriate watering, and protect them from potential threats as they continue to mature.
Now that you’ve successfully transplanted the seedlings, it’s time to nurture and care for them as they grow into mature Chacruna plants. With proper attention, you can enjoy the beauty and benefits of these remarkable plants in your own garden.
Read more: What Is A Leaf Blower
Conclusion
Congratulations on completing this comprehensive guide on how to germinate Chacruna leaf seeds! By following the step-by-step instructions and understanding the specific requirements of Chacruna, you are now equipped with the knowledge needed to successfully cultivate this remarkable plant in your own garden. Here is a summary of the key points covered:
Chacruna, scientifically known as Psychotria viridis, is a plant native to the Amazon rainforest with spiritual and medicinal significance. It contains the psychoactive compound DMT and is used in traditional Ayahuasca ceremonies.
To germinate Chacruna seeds, it is important to create an ideal environment that mimics the plant’s natural habitat. This includes selecting a suitable tray or pot, using high-quality potting soil, creating a humid environment, and providing the right temperature and lighting conditions.
Properly selecting and soaking Chacruna seeds is crucial for successful germination. Look for fresh and undamaged seeds, soak them in lukewarm water for 24-48 hours, and consider scarification for stubborn seeds.
Planting the Chacruna seeds involves making indentations in the moistened soil, placing the seeds in the indentations, and lightly covering them with soil. Mist the soil regularly to keep it moist but not waterlogged.
During the germination period, it is important to monitor and maintain proper moisture levels. Use a spray bottle to mist the soil when it starts to dry out, avoid overwatering, and ensure adequate air circulation to prevent damping-off disease.
Protecting the germinating seeds involves being attentive to pests, preventing overcrowding, avoiding extreme temperatures, and being gentle when handling the seedlings.
Once the Chacruna seedlings have emerged, transplant them into suitable containers or garden beds using a well-draining potting mix or prepared soil. Provide adequate water, light, and protection from harsh conditions during the early stages of growth.
By following these guidelines and providing proper care, you can watch your Chacruna plants thrive and enjoy the beauty and benefits they offer. Remember to continue monitoring their growth, addressing any issues promptly, and providing the necessary care as they mature.
Now, it’s time to embark on your Chacruna gardening journey. Whether you are interested in exploring its cultural and spiritual significance or its medicinal properties, cultivating Chacruna will bring you closer to the wonders of the Amazon rainforest. Happy gardening!
Frequently Asked Questions about How To Germinate Chacruna Leaf
Was this page helpful?
At Storables.com, we guarantee accurate and reliable information. Our content, validated by Expert Board Contributors, is crafted following stringent Editorial Policies. We're committed to providing you with well-researched, expert-backed insights for all your informational needs.


0 thoughts on “How To Germinate Chacruna Leaf”