Home>Garden Essentials>How To Germinate Dried Lentils
Garden Essentials
How To Germinate Dried Lentils
Modified: March 15, 2024
Learn how to germinate dried lentils in your garden and start growing your own healthy and nutritious lentil plants. Discover the step-by-step process for successful lentil germination.
(Many of the links in this article redirect to a specific reviewed product. Your purchase of these products through affiliate links helps to generate commission for Storables.com, at no extra cost. Learn more)
Introduction
Welcome to the world of gardening! Growing your own plants, whether it’s vegetables, herbs, or flowers, can be a rewarding and fulfilling experience. It allows you to connect with nature, enjoy the beauty of plants, and even reap the benefits of your hard work by enjoying delicious homegrown produce.
If you’re a fan of lentils, you’re in luck! Did you know that you can easily germinate dried lentils and grow them into fresh and nutritious sprouts? That’s right – with just a few simple steps, you can transform those humble lentils into vibrant, edible sprouts that are bursting with flavor and packed with nutrients.
Germinating dried lentils is not only a fun and fascinating process, but it also brings a range of benefits. Sprouting lentils increases their nutritional value and makes them easier to digest. These sprouts are an excellent source of vitamins, minerals, and enzymes that promote overall health.
In this article, we will guide you through the step-by-step process of germinating dried lentils so you can enjoy the satisfaction of growing your own fresh sprouts. Before we dive in, let’s gather everything we need to get started.
Key Takeaways:
- Grow your own fresh and nutritious sprouts by germinating dried lentils. It’s a fun and rewarding process that increases their nutritional value and makes them easier to digest.
- With just a few simple steps, you can transform humble lentils into vibrant, edible sprouts bursting with flavor and packed with nutrients. Enjoy the satisfaction of growing your own fresh sprouts at home!
Supplies Needed
Before you begin the process of germinating dried lentils, it’s important to gather all the necessary supplies. Fortunately, you won’t need any specialized equipment or expensive tools. Here’s what you’ll need to get started:
1. Dried Lentils: Choose high-quality, organic lentils for the best germination results. You can find them at your local grocery store or purchase them online.
2. Jar or Container: Select a clear glass jar or container that is wide enough to allow airflow. Make sure it has a lid or a mesh screen to prevent dust and insects from entering while allowing air circulation.
3. Water: Use filtered or distilled water for soaking and rinsing the lentils. Tap water may contain chemicals, such as chlorine, that can hinder germination.
4. Paper Towels or Cheesecloth: You’ll need these to cover the jar during the initial soaking stage. They help to maintain moisture levels while still allowing airflow.
5. Colander: A colander or a fine-mesh sieve will come in handy for rinsing the sprouts during the germination process.
6. Storage Container: Once your lentil sprouts are ready to be harvested, you’ll need a container for storing them in the refrigerator. Opt for an airtight container or a resealable bag to keep them fresh.
It’s important to ensure that all the supplies are clean before you begin. Wash the jar, colander, and other reusable items with warm soapy water and rinse thoroughly to prevent any unwanted bacteria or contaminants from affecting the sprouting process.
Now that you have everything you need, it’s time to select the lentils and prepare them for germination. Let’s move on to the first step of the process.
Step 1: Selecting the Lentils
The first step in germinating dried lentils is to select the right lentils for the process. When it comes to choosing lentils for sprouting, there are a few things to keep in mind:
1. Quality and Freshness: Opt for high-quality lentils that are fresh and haven’t been sitting on the shelf for too long. Look for lentils that are firm, unbroken, and free from mold or any signs of damage.
2. Organic and Untreated Lentils: Whenever possible, choose organic lentils that have not been treated with any chemicals or pesticides. This ensures that you’re starting with lentils that are free from unwanted additives and contaminants.
3. Variety: Lentils come in different colors and sizes, such as green, brown, red, and black. While all varieties can be sprouted, some lentils may sprout more readily than others. Green and brown lentils, for example, are known to have a higher sprouting success rate.
4. Quantity: The amount of lentils you select will depend on how many sprouts you want to grow. Keep in mind that lentils will approximately triple in size during the sprouting process, so it’s best to start with a small batch.
5. Personal Preference: Consider your personal taste preferences when selecting lentils for sprouting. Each variety of lentil has a slightly different flavor and texture profile, so choose what appeals to you the most.
Once you’ve chosen your desired lentils, it’s time to move on to the next step: preparing the lentils for germination. Stay tuned for Step 2, where we will guide you through the process of preparing the lentils to kickstart the sprouting journey.
Step 2: Preparing the Lentils
Now that you have selected your lentils, it’s time to prepare them for germination. This step is crucial as it ensures that the lentils are clean and ready to absorb water and initiate the sprouting process. Follow these simple steps to properly prepare the lentils:
1. Rinse the Lentils: Start by giving the lentils a thorough rinse under tap water. Place them in a colander or fine-mesh sieve and run cool water over them. Gently swish the lentils around with your hand to remove any dirt or debris.
2. Sort and Discard: While rinsing the lentils, keep an eye out for any damaged or broken lentils, as well as small stones or foreign particles that may have made their way into the batch. Remove any undesirable lentils or impurities and discard them.
3. Soak the Lentils: Place the rinsed lentils in a bowl or jar. Add enough water to completely submerge the lentils and allow them to soak. The lentils will absorb the water and begin to rehydrate. Let them soak for about 8-12 hours, or overnight.
Note: Some lentil varieties, such as red lentils, may not require extended soaking and can be sprouted directly after rinsing. However, soaking lends itself to better sprouting success in most cases.
4. Drain the Lentils: Once the soaking time is complete, drain the water from the lentils. Use a colander or sieve to remove excess water and ensure thorough drainage. Make sure the lentils are not sitting in water, as this can lead to decay or mold formation.
With the lentils now properly prepared, they are ready for the next step: soaking. In Step 3, we will guide you through the process of soaking the lentils to initiate the germination process. Stay tuned!
Step 3: Soaking the Lentils
Now that the lentils are properly prepared, it’s time to begin the germination process by soaking them. Soaking helps to soften the lentils, kickstarting the sprouting process and promoting the development of healthy and vibrant sprouts. Follow these steps to soak the lentils:
1. Place the Prepared Lentils in a Jar: Transfer the drained lentils to a clean glass jar or container. Spread them out evenly to ensure good airflow during soaking.
2. Add Filtered Water: Pour filtered or distilled water into the jar, enough to fully cover the lentils. The lentils will absorb the water as they continue the germination process.
3. Cover the Jar: Use a paper towel or cheesecloth to cover the opening of the jar. Secure it in place with a rubber band or jar lid with holes punched in it. This will allow air circulation while preventing debris or insects from entering.
4. Soaking Time: Let the lentils soak for approximately 8-12 hours, or overnight. During this time, the lentils will absorb the water and begin the process of germination.
5. Check the Water Levels: After a few hours, check the water levels in the jar. If it appears to be getting low, you can add a small amount of water to ensure the lentils stay submerged. However, be cautious not to add too much water as it can lead to excess moisture and hinder the sprouting process.
Soaking the lentils is a crucial step as it provides the necessary moisture for germination and activates enzymes that aid the sprouting process. In Step 4, we will guide you through the important step of draining and rinsing the lentils. Stay tuned!
Read more: How To Store Sprouted Lentils
Step 4: Draining and Rinsing
After the lentils have soaked for the recommended time, it’s important to drain and rinse them to ensure optimal sprouting conditions. This step helps to remove any residual water and prevent the lentils from sitting in excess moisture, which can lead to rot or mold formation. Follow these simple steps to drain and rinse the lentils:
1. Remove the Covering: Carefully remove the paper towel or cheesecloth covering from the jar. You may notice that the lentils have increased in size and softened during the soaking process.
2. Drain the Water: Holding the jar at an angle or using a colander, gently pour out the water from the jar. Make sure to drain as much water as possible without losing any lentils.
3. Rinse the Lentils: Rinse the lentils thoroughly under cool running water. Use your hand or a gentle stream to swish the lentils around, ensuring that every lentil is rinsed. This helps to remove any residue and promotes a clean environment for sprouting.
4. Drain Again: Once rinsed, drain the excess water from the lentils. Tilt the jar and allow any remaining water to drain out. Ensure that the lentils are not sitting in water to prevent the risk of spoilage.
5. Repeat the Rinsing Process: It is essential to rinse the lentils multiple times a day. Aim to rinse them at least twice a day, in the morning and evening, to maintain moisture levels and remove any potential buildup or impurities.
After draining and rinsing, it’s time to move on to Step 5: germinating the lentils. This is when you’ll see the sprouts starting to emerge. Stay tuned for the next step in the process!
Soak dried lentils in water for 8-12 hours to germinate. Rinse and drain them every 8 hours. Once sprouted, they can be used in salads or cooked dishes.
Step 5: Germinating the Lentils
Now that the lentils have been properly soaked, drained, and rinsed, it’s time to move on to the exciting stage of germination. This step involves creating the ideal conditions for the lentils to sprout and grow. Follow these steps to germinate the lentils:
1. Return Lentils to the Jar: Once you have drained and rinsed the lentils, transfer them back to the clean, glass jar or container. Spread them out evenly to ensure proper airflow and prevent clumping.
2. Cover the Jar: Cover the jar with a paper towel or cheesecloth again, securing it with a rubber band or jar lid with holes. This will allow air circulation while keeping out debris and insects.
3. Keep the Jar in a Dark Place: Place the jar in a dark location, away from direct sunlight. Darkness stimulates the lentils to grow longer sprouts as they reach for the light. A pantry or cupboard is an ideal spot for germination.
4. Maintain Moisture: It’s crucial to keep the lentils moist throughout the germination process. Spritz them with a fine mist of water using a spray bottle 1-2 times a day to keep them hydrated. Be careful not to oversaturate them, as this can promote mold growth. The goal is to keep them consistently damp.
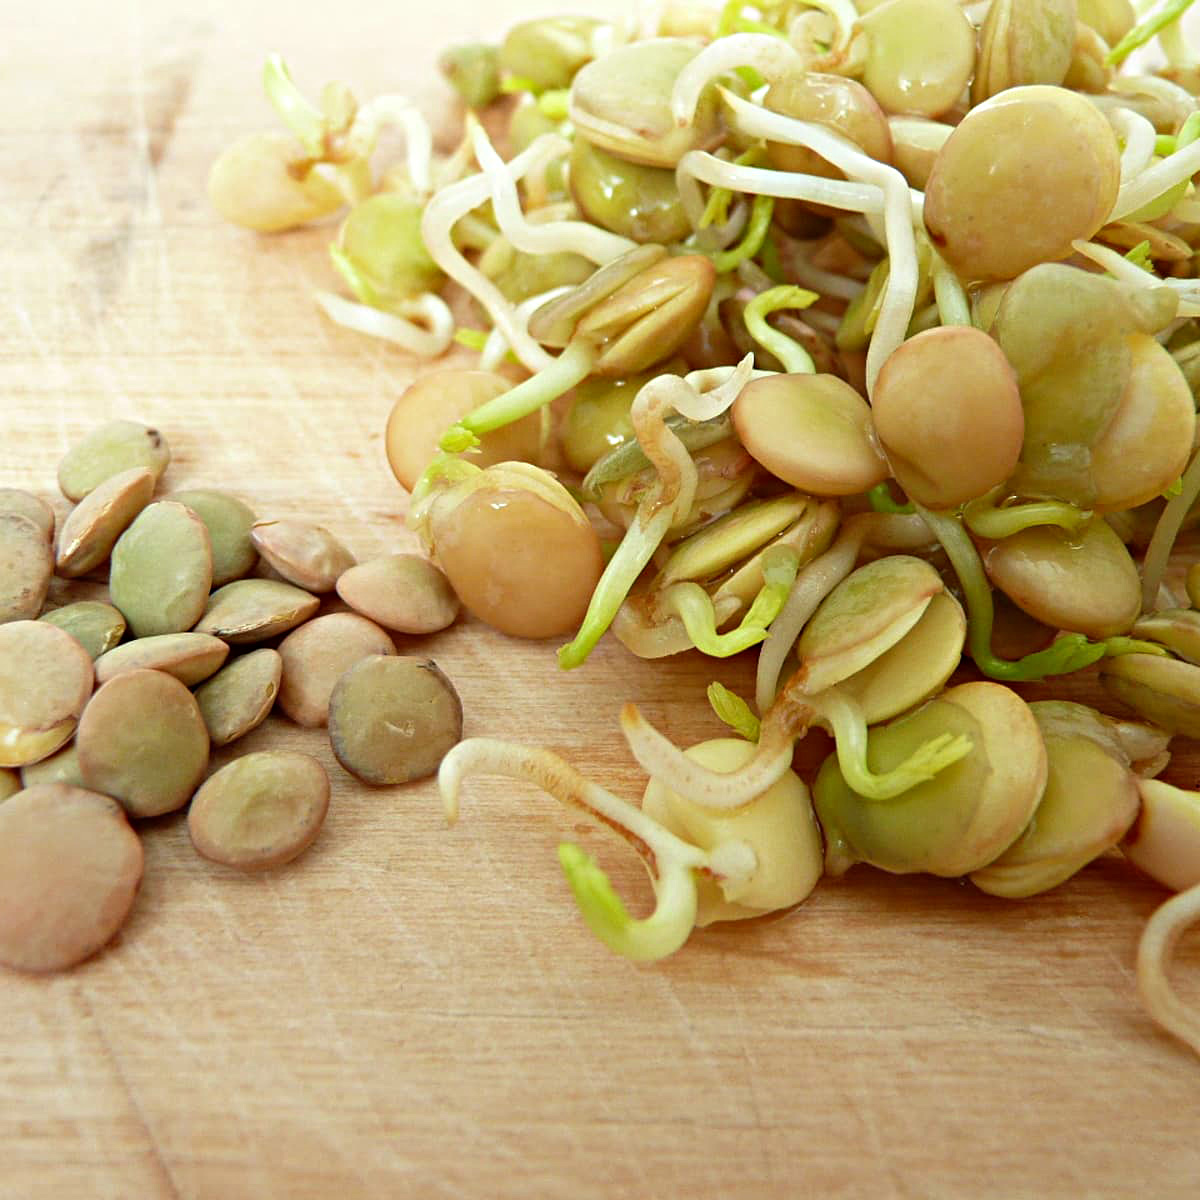
5. Wait and Monitor: Germination usually begins within 24-48 hours, although it may take longer depending on the lentil variety and environmental conditions. Monitor the lentils daily, looking for signs of sprouting, such as tiny white tips emerging from the lentils.
6. Continue Rinsing: Throughout the germination process, continue rinsing the lentils twice a day to maintain their moisture levels and promote a clean environment for sprouting. Gently rinse them under cool water, ensuring thorough drainage after each rinse.
As you continue to care for the germinating lentils, you’ll witness the growth and development of the sprouts. In the next step, Step 6, we will guide you on how to monitor the germination process and ensure successful sprout growth. Stay tuned!
Step 6: Monitoring the Germination Process
As the lentils continue to germinate and sprout, it’s important to closely monitor the process to ensure successful growth and prevent any issues that may arise. Follow these guidelines to effectively monitor the germination process:
1. Daily Observation: Check on the lentils daily to observe their progress. Look for signs of sprouting, such as the emergence of tiny roots and shoots. Take note of the growth rate and any changes in appearance.
2. Maintain Moisture: Continue to mist or sprinkle water on the lentils twice a day to keep them moist. Adjust the frequency of watering based on the moisture levels in the jar. You want to strike a balance between keeping them hydrated and avoiding excessive moisture that can lead to mold growth.
3. Assess Sprout Length: Keep an eye on the length of the sprouts. Lentil sprouts typically reach their peak length of 1-2 inches within 3-5 days. If the sprouts become too long, they may become leggy and lose their flavor. Harvest them promptly to enjoy the best taste and texture.
4. Check for Mold or Spoilage: Watch out for any signs of mold or spoilage. If you notice a foul odor, discoloration, or sliminess on the lentils, it may indicate bacterial or fungal growth. If this occurs, it’s best to discard the batch and start over with fresh lentils.
5. Adjust Sprouting Conditions: If you find that the lentils are not sprouting as expected, assess the environmental conditions. Ensure that they are kept in a dark place away from direct sunlight, and maintain proper moisture levels. Adjusting these factors may help stimulate sprouting.
By closely monitoring the germination process, you can ensure the healthy and successful growth of your lentil sprouts. In the next step, Step 7, we will guide you on how to harvest the sprouts and enjoy the fruits of your labor. Stay tuned!
Step 7: Harvesting the Sprouts
Congratulations, you’ve reached the exciting stage of harvesting your lentil sprouts! Once the sprouts have reached your desired length, it’s time to harvest and enjoy the fresh, crunchy goodness. Here’s how to harvest the sprouts:
1. Assess Sprout Length: Take a close look at the sprouts and determine the desired length for harvesting. Lentil sprouts typically reach their peak length of 1-2 inches within 3-5 days of germination.
2. Cut or Snip the Sprouts: Using clean scissors or a sharp knife, gently cut or snip the sprouts just above the level of the lentils. Be careful not to damage the other sprouts or disturb the lentils at the bottom of the jar.
3. Collect the Harvested Sprouts: As you harvest the sprouts, collect them in a clean bowl or container. Remove any loose hulls or lentil skins that may have fallen off during the process.
4. Rinse and Drain the Sprouts: Give the harvested sprouts a gentle rinse under cool water to remove any residual hulls or debris. Drain them thoroughly to remove excess water.
5. Enjoy the Fresh Sprouts: Your harvested lentil sprouts are now ready to be enjoyed! Add them to salads, sandwiches, stir-fries, or any other dish that could benefit from their crisp texture and nutty flavor.
Remember, sprouts are highly perishable, so it’s best to consume them within a few days of harvesting for optimal freshness and nutrition. If you have more sprouts than you can consume at once, you can store them in the refrigerator for a short period of time.
In the next step, Step 8, we will guide you on how to properly store the sprouts to maintain their quality and freshness. Let’s dive in!
Read more: How To Store Cooked Lentils
Step 8: Storing the Sprouts
After harvesting your lentil sprouts, it’s important to store them properly to maintain their freshness and quality. Here’s how to store sprouts:
1. Rinse and Drain: Before storing the sprouts, give them a final rinse under cool water to ensure they are clean. Allow them to drain thoroughly to remove any excess water.
2. Pat Dry: Gently pat the sprouts dry using a clean kitchen towel or paper towels. Excess moisture can contribute to spoilage, so it’s important to remove as much water as possible.
3. Store in an Airtight Container: Transfer the sprouts to an airtight container or a resealable plastic bag. Make sure the container is clean and dry before adding the sprouts. Press out any excess air before sealing to help retain freshness.
4. Refrigerate Immediately: Place the container of sprouts in the refrigerator as soon as possible. Sprouts are perishable and can spoil quickly, so it’s important to refrigerate them promptly to extend their shelf life.
5. Use within a Few Days: Lentil sprouts are best consumed within 2-3 days of harvesting. While they may retain their crispness for a bit longer, their flavor and nutritional content start to decline after a few days.
6. Check for Freshness: Before using the sprouts, always check for freshness. Discard any sprouts that appear slimy, discolored, or have an off smell. It’s better to be safe than sorry when it comes to consuming sprouts.
By following these storage tips, you can enjoy the sprouts for a few more days while ensuring their quality and taste. As a general rule, it’s best to harvest and sprout small batches of lentils as needed to maximize freshness.
Now that you know how to properly store your sprouts, you can enjoy them in various dishes, adding a nutritious and flavorful touch. Congratulations on successfully completing the lentil sprouting process!
Let’s wrap up this guide with some final tips and tricks to enhance your sprouting experience.
Tips and Tricks
As you embark on your lentil sprouting journey, here are some additional tips and tricks to enhance your experience:
1. Quality Lentils: Start with high-quality lentils for the best sprouting results. Look for organic lentils that are fresh and free from damage or mold.
2. Rinse Thoroughly: Ensure you rinse the lentils well before soaking to remove any dirt or debris that may hinder the sprouting process.
3. Soaking Time: Most lentils require 8-12 hours of soaking, but some varieties may need less time. Adjust the soaking period based on the specific type of lentils you are sprouting.
4. Water Quality: Use filtered or distilled water for soaking and rinsing to avoid any chemicals that may be present in tap water and hinder germination.
5. Consistent Moisture: Water the lentils regularly to maintain consistent moisture levels. Avoid overwatering, as excessive moisture can lead to mold growth.
6. Optimal Temperature: Lentils sprout best in a temperature range of 65-75°F (18-24°C). Ensure the sprouting environment remains within this range for optimal growth.
7. Gentle Handling: Be gentle when rinsing or handling the sprouts to avoid damaging the delicate roots and shoots.
8. Experiment with Varieties: Explore different varieties of lentils to discover their unique flavors and textures. Each variety offers a slightly different taste profile.
9. Pay Attention to Sprout Length: Harvest the sprouts when they reach your desired length to maintain their best taste and texture. Avoid letting them grow too long and become leggy.
10. Enjoy Freshly Harvested Sprouts: The flavor and nutritional content of sprouts are at their peak right after harvesting. Enjoy them in salads, sandwiches, wraps, or as a crunchy topping for various dishes.
Remember, sprouting lentils at home not only provides you with fresh and nutritious food but also connects you to the fascinating process of plant growth. Enjoy the satisfaction of growing your own sprouts and experimenting with different recipes to incorporate them into your meals.
Now that you’re armed with these tips and tricks, go ahead and let your lentils sprout into vibrant, healthy sprouts! Happy sprouting!
For any other gardening queries or insights, feel free to ask!
Sources:
– National Sprout Growers Association
– University of Minnesota Extension
Conclusion
Congratulations on completing your journey to germinate dried lentils and grow your very own fresh sprouts! By following the steps outlined in this guide, you’ve learned how to select lentils, prepare them, soak, germinate, and harvest the sprouts. This process has allowed you to experience the joy of gardening, even on a small scale.
Germinating dried lentils not only provides you with a delicious and nutritious addition to your meals but also offers a sense of fulfillment as you witness the transformation from a simple seed to vibrant sprouts teeming with life. Additionally, sprouting lentils increases their nutritional value, making them easier to digest and enriching your diet with vitamins, minerals, and enzymes.
Throughout this journey, you’ve learned the importance of using quality lentils, rinsing them thoroughly, soaking them for the right amount of time, and maintaining consistent moisture levels during germination. By being attentive and following the tips and tricks provided, you’ve ensured successful sprout growth and enjoyed freshly harvested sprouts.
Remember, sprouting lentils is just the beginning of your gardening adventures. You can further explore the world of gardening by trying other varieties of sprouts, such as mung beans, alfalfa, or broccoli. Each offers its own unique flavors and benefits.
Now that you have the knowledge to germinate dried lentils and grow sprouts, it’s time to embark on this journey and enjoy the fruits of your labor. Incorporate these flavorful sprouts into your favorite dishes, share them with friends and family, and savor the freshness and nutritional benefits they provide.
Thank you for joining us on this gardening adventure. Should you have any further questions or if you need assistance with any other gardening topics, feel free to reach out. Happy sprouting!
Sources:
– National Sprout Growers Association
– University of Minnesota Extension
Frequently Asked Questions about How To Germinate Dried Lentils
Was this page helpful?
At Storables.com, we guarantee accurate and reliable information. Our content, validated by Expert Board Contributors, is crafted following stringent Editorial Policies. We're committed to providing you with well-researched, expert-backed insights for all your informational needs.


0 thoughts on “How To Germinate Dried Lentils”