Home>Garden Essentials>How To Germinate Swiss Chard
Garden Essentials
How To Germinate Swiss Chard
Modified: March 21, 2024
Learn the best techniques for germinating Swiss Shard seeds in your garden and enjoy a thriving and abundant harvest.
(Many of the links in this article redirect to a specific reviewed product. Your purchase of these products through affiliate links helps to generate commission for Storables.com, at no extra cost. Learn more)
Introduction
Welcome to the world of gardening! Whether you’re an experienced gardener or a beginner, one plant that you may find fascinating to grow is Swiss Shard. With its vibrant colors, delicious taste, and numerous health benefits, Swiss Shard is a versatile and nutritious addition to any garden. In this article, we will walk you through the process of germinating Swiss Shard seeds and provide you with valuable tips and tricks to ensure successful growth.
Before we delve into the germination process, let’s first understand what Swiss Shard is and why it is worth growing. Swiss Shard, scientifically known as Beta vulgaris subsp. cicla, is a leafy green vegetable that belongs to the same family as beets and spinach. It is characterized by its large, tender leaves that come in a variety of colors, ranging from deep green to vibrant red, pink, orange, and yellow.
Swiss Shard is not only visually appealing but also packed with nutritional benefits. It is an excellent source of vitamins A, C, and K, as well as magnesium, potassium, and iron. Including Swiss Shard in your diet can boost your immune system, promote healthy digestion, and support overall well-being.
Now that we know the benefits of Swiss Shard, let’s dive into the exciting journey of germinating these delightful plants. But before we get to that, let’s gather the necessary supplies.
Key Takeaways:
- Germinating Swiss Shard seeds is a fun and rewarding process that requires patience, proper supplies, and attention to detail. By following the steps and avoiding common mistakes, you can successfully grow vibrant and nutritious Swiss Shard plants.
- Transplanting germinated Swiss Shard seedlings into a sunny garden bed or containers with well-draining soil is crucial for their growth. Providing proper care, spacing, and maintenance will ensure a bountiful harvest of delicious Swiss Shard leaves and stems.
Read more: How To Store Swiss Chard
What is Swiss Shard?
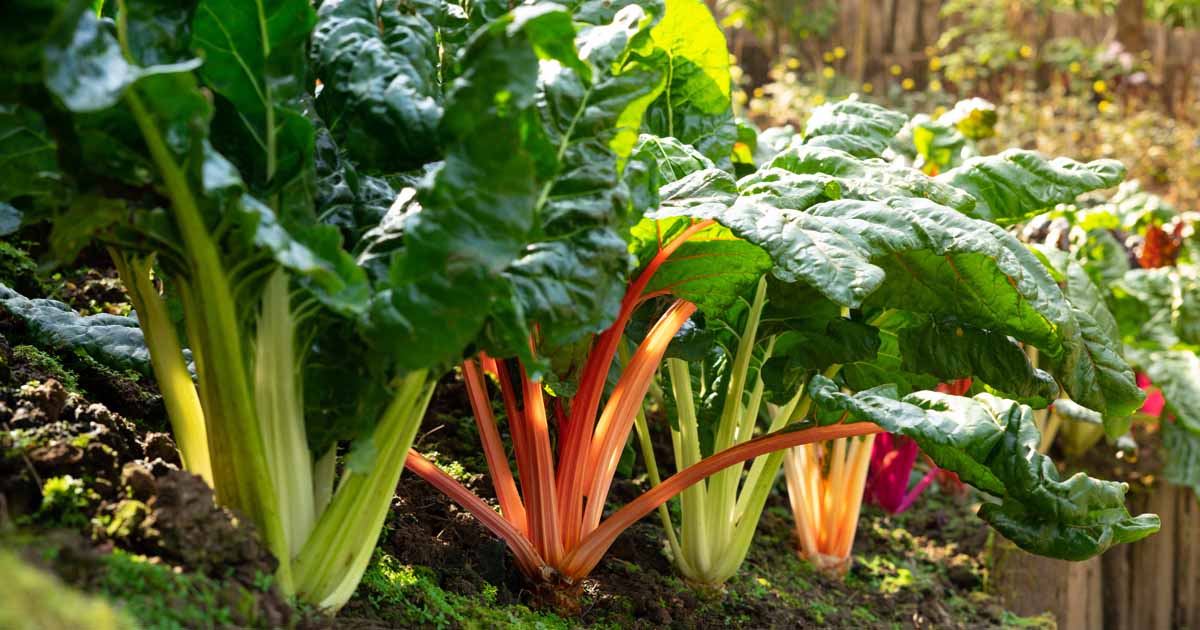
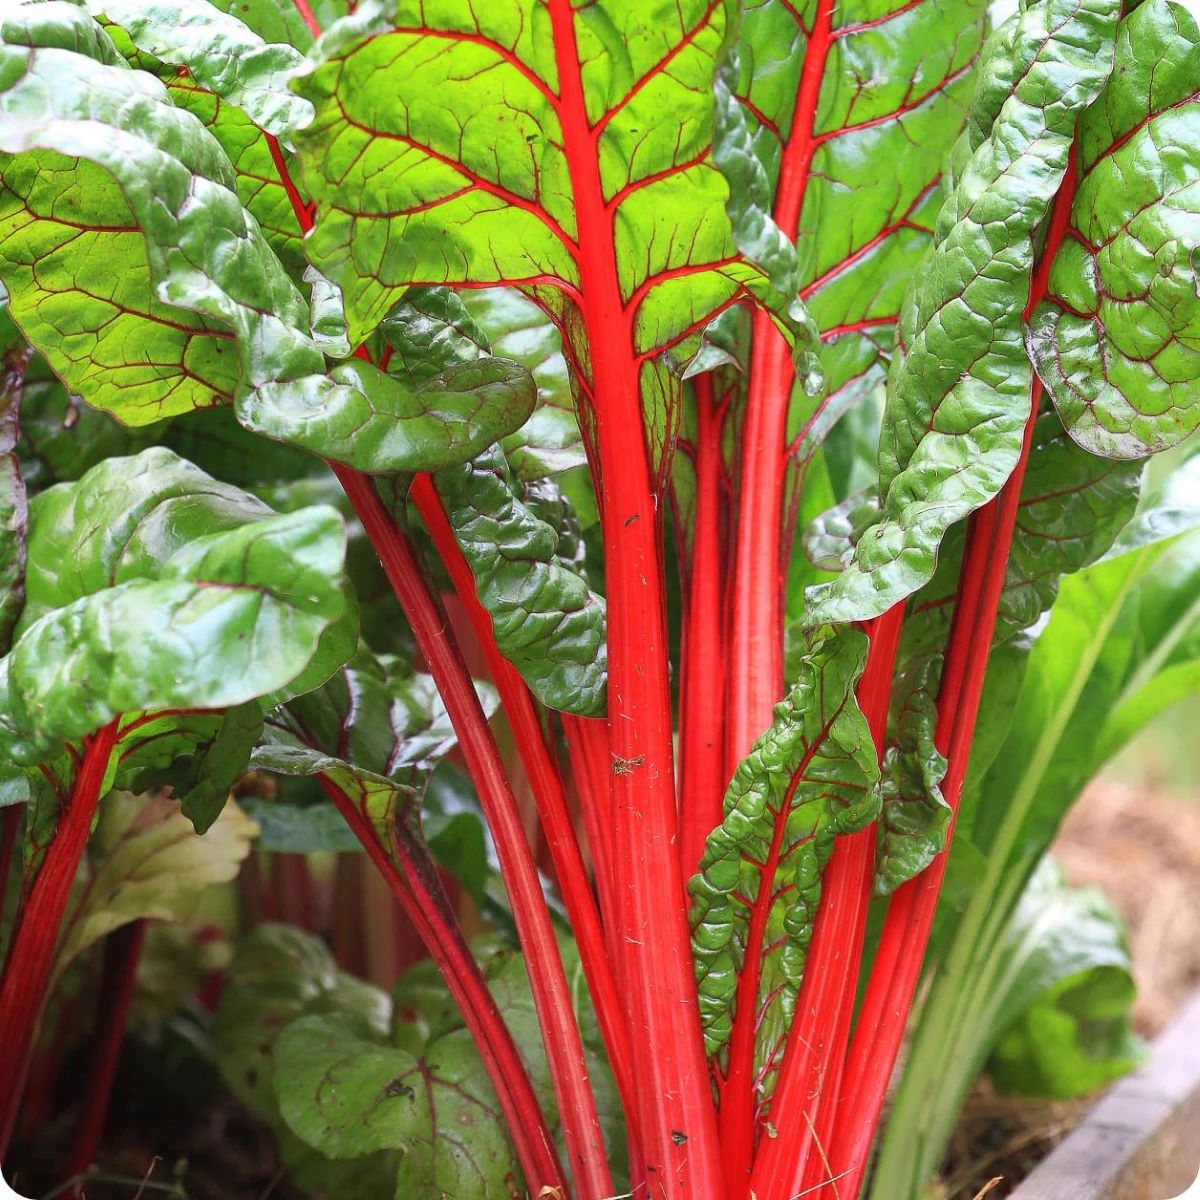
Swiss Shard, also known as chard or Swiss chard, is a leafy green vegetable that is highly popular among gardeners and cooks alike. It belongs to the Chenopodiaceae family, which also includes beets and spinach. Swiss Shard is native to the Mediterranean region and has been cultivated for centuries for its delicious leaves and colorful stems.
Swiss Shard is known for its large, glossy leaves that can grow up to two feet long. The leaves are similar in appearance to spinach leaves, with a smooth texture and a slightly bitter taste. However, unlike spinach, Swiss Shard leaves have a sturdy and thick texture, making them more versatile in cooking.
One of the standout features of Swiss Shard is its vibrant and colorful stems. The stems come in a range of colors, including white, yellow, red, pink, and orange. These colorful stems not only add visual appeal to dishes but also offer a slightly sweeter flavor compared to the leaves.
Swiss Shard is a highly nutritious vegetable, packed with essential vitamins and minerals. It is an excellent source of vitamins A, C, and K, as well as magnesium, potassium, and iron. Consuming Swiss Shard can help strengthen the immune system, improve digestion, and support overall health and well-being.
Aside from its nutritional benefits, Swiss Shard is also valued for its versatility in the kitchen. The leaves can be used in a variety of ways, including raw in salads, sautéed as a side dish, or incorporated into soups and stews. The stems can be cooked separately or together with the leaves, adding a unique flavor and crunchiness to any dish.
Furthermore, Swiss Shard is relatively easy to grow, making it a great option for both novice and experienced gardeners. It thrives in cool weather and can be grown in both garden beds and containers. With proper care and attention, you can enjoy a bountiful harvest of Swiss Shard throughout the growing season.
Now that you have a better understanding of what Swiss Shard is, let’s move on to the importance of germinating Swiss Shard seeds.
Importance of Germinating Swiss Shard
Germinating Swiss Shard seeds is an essential step in the gardening process that sets the foundation for successful growth and a bountiful harvest. Here are a few reasons why germination is important:
1. Maximizes seed viability: When you start the germination process, you’re essentially waking up the dormant seed and initiating the growth process. This ensures that you’re working with seeds that have high viability and are more likely to sprout and develop into healthy plants. Germination allows you to assess the quality of the seeds and discard any that may be non-viable, saving you both time and effort in the long run.
2. Provides a head start: By germinating Swiss Shard seeds indoors or in a controlled environment, you can give your plants a head start before transplanting them outdoors. This is particularly beneficial if you live in a region with a short growing season or unpredictable weather patterns. Germinating seeds indoors allows you to extend the growing period and gives your plants a stronger start, increasing their chances of flourishing.
3. Promotes uniform growth: Germination helps to ensure that all your Swiss Shard seeds sprout at relatively the same time. This promotes uniform growth and allows you to plan and manage your garden more effectively. Having seedlings of similar size and maturity makes it easier to arrange them in the garden beds, ensure proper spacing, and provide them with the necessary care and attention as they continue to grow.
4. Enables succession planting: By germinating Swiss Shard seeds in batches or at different intervals, you can practice succession planting. This technique involves planting new seeds every few weeks to ensure a continuous harvest throughout the growing season. Germination allows you to time your planting schedule strategically, ensuring a steady supply of fresh Swiss Shard leaves and stems without overwhelming yourself with a single large harvest.
5. Saves money: Germinating seeds at home not only allows you to choose from a wider range of Swiss Shard varieties but also helps you save money. Buying pre-grown seedlings from nurseries can be costly, especially for popular and unique Swiss Shard varieties. Germinating seeds yourself is a cost-effective way to grow your favorite Swiss Shard varieties and experiment with different colors and flavors without breaking the bank.
Now that we understand the importance of germinating Swiss Shard seeds, let’s gather the necessary supplies to get started.
Supplies Needed for Germination
Before you begin germinating Swiss Shard seeds, it’s important to gather the necessary supplies to ensure a successful and smooth process. Here are the key supplies you’ll need:
1. Swiss Shard seeds: Purchase high-quality Swiss Shard seeds from a reputable seed supplier or consider saving seeds from your previous harvest. Make sure to choose a variety that suits your taste preferences and climate conditions. Swiss Shard seeds are available in various colors, so feel free to experiment with different varieties to add vibrant hues to your garden.
2. Seed starting trays or containers: Opt for shallow trays or containers with drainage holes to sow your Swiss Shard seeds. Seed starting trays are usually available in gardening stores or can be reused from other gardening projects. Ensure that the trays or containers are clean and sterilized to prevent the growth of mold and disease.
3. Seed starting mix: Use a well-draining seed starting mix or potting soil to provide a loose and fertile medium for the seeds to germinate. Avoid using heavy garden soil, as it may compact and hinder proper root development. Seed starting mixes are typically lightweight and designed specifically for successful seed germination.
4. Labels or markers: Labeling your seed trays or containers is crucial for keeping track of the Swiss Shard varieties you’re germinating. Use labels or markers to identify the different types of Swiss Shard seeds you’ve planted. This will help you differentiate between varieties and keep a record of their growth progress.
5. Watering can or spray bottle: Maintaining proper moisture levels is vital for successful germination. A watering can with a fine spout or a spray bottle will allow you to gently water the seeds without disturbing them. Be sure to keep the soil consistently moist during the germination process without overwatering, which can lead to fungal issues.
6. Transparent plastic cover or plastic wrap: Creating a mini greenhouse-like environment can provide the optimum conditions for germination. Covering your seed trays or containers with a transparent plastic cover or plastic wrap helps retain moisture and heat, speeding up the germination process. Ensure that the cover allows for some airflow to prevent excessive humidity and condensation.
7. Grow lights or a sunny location: Swiss Shard seeds require sufficient light to germinate and grow. If you don’t have access to a sunny location, consider using fluorescent grow lights. Position the lights a few inches above the seedlings to mimic natural sunlight. Provide around 12-16 hours of light daily to promote healthy growth.
8. Thermometer: Monitoring the temperature is crucial during germination. Invest in a thermometer to ensure that the seed trays or containers are kept in an ideal temperature range, usually between 65-75°F (18-24°C). Avoid placing them in extreme temperature fluctuations or drafts.
9. Patience and enthusiasm: Germinating Swiss Shard seeds requires time, patience, and a genuine eagerness to witness the miracle of plant life. Embrace the journey and enjoy the process of nurturing your seeds into thriving seedlings. Soon enough, you’ll be rewarded with beautiful Swiss Shard plants ready for transplanting.
Now that you have all the necessary supplies, let’s move on to the step-by-step guide to germinate Swiss Shard seeds.
Step-by-Step Guide to Germinate Swiss Shard
Germinating Swiss Shard seeds is a straightforward process that can be done indoors or in a controlled environment. Follow these steps to successfully germinate your Swiss Shard seeds:
- Prepare the seed starting trays: Fill the seed starting trays or containers with a well-draining seed starting mix. Moisten the soil by watering it gently until it is evenly damp but not saturated.
- Sow the Swiss Shard seeds: Make small indentations in the soil using your finger or a pencil. Place one or two Swiss Shard seeds in each indentation, ensuring they are evenly spaced apart. Cover the seeds with a thin layer of the seed starting mix.
- Label the trays: Use labels or markers to identify the Swiss Shard varieties you’ve planted in each tray. This will help you keep track of their progress and differentiate between varieties.
- Maintain the right conditions: Place the seed trays in a warm location with adequate light. If using grow lights, position them a few inches above the seedlings. Maintain a temperature range of 65-75°F (18-24°C) for optimal germination. Keep the soil consistently moist by watering gently as needed.
- Create a mini greenhouse: Cover the seed trays with a transparent plastic cover or plastic wrap to create a greenhouse effect. This helps retain moisture and heat, facilitating faster germination. Be sure to provide some airflow to prevent excessive humidity and condensation.
- Monitor the germination process: Check the trays daily for any signs of germination. The Swiss Shard seeds typically germinate within 7-14 days, but it may take longer for some varieties. Once the seeds sprout and develop into seedlings, you can remove the plastic cover.
- Provide adequate light: Once the seedlings have emerged, ensure they receive sufficient light. If using grow lights, extend the duration of light to around 12-16 hours per day. If positioning the seed trays near a window, rotate them regularly to prevent lopsided growth.
- Thinning the seedlings: If multiple Swiss Shard seedlings sprout in one indentation, thin them out by gently removing the weaker ones, leaving only the strongest seedling to grow. This ensures that each plant has enough space to develop and access necessary nutrients.
- Continue care and transplanting: Continue to water the seedlings regularly, keeping the soil slightly moist but not waterlogged. When the seedlings have developed a few sets of true leaves and are sturdy enough, they are ready for transplanting into larger containers or the garden bed.
By following these steps, you’ll successfully germinate Swiss Shard seeds and have healthy seedlings ready for the next stage of growth. However, there are some common mistakes you should avoid during germination, which we will discuss next.
To germinate Swiss chard seeds, plant them 1/2 inch deep in well-draining soil. Keep the soil consistently moist and place the seeds in a warm, sunny location. Germination should occur within 7-14 days.
Read more: When To Plant Swiss Chard Seeds
Common Mistakes to Avoid
Germinating Swiss Shard seeds can be an exciting and rewarding experience, but it’s important to avoid some common mistakes that may hinder successful germination. Here are the key mistakes to avoid:
1. Overwatering: While it’s crucial to keep the soil moist during germination, overwatering can be detrimental. Excessive moisture can lead to fungal diseases, mold growth, and root rot. Make sure to water the seed trays gently, allowing the soil to dry slightly between waterings.
2. Underwatering: On the flip side, underwatering can also impede germination. If the soil becomes too dry, the Swiss Shard seeds may fail to germinate or struggle to sprout. Maintain a balance by regularly checking the moisture level and ensuring the soil remains evenly damp.
3. Planting seeds too deep: Swiss Shard seeds are relatively small, and planting them too deep in the soil can prevent proper sprouting. Aim to plant the seeds at a depth of approximately ½ to 1 inch (1-2.5 cm) by making shallow indentations in the soil. Cover the seeds lightly with the seed starting mix.
4. Lack of proper lighting: Insufficient light can result in weak and leggy seedlings. Swiss Shard seeds require ample light to germinate and grow into healthy plants. If you’re using natural light from a window, ensure the trays receive at least 8 hours of direct sunlight per day. If using grow lights, position them close enough to provide adequate light intensity.
5. Inconsistent temperature: Fluctuating temperatures can negatively affect germination. Swiss Shard seeds prefer a consistent temperature range of 65-75°F (18-24°C) for optimum sprouting. Avoid placing them in areas with extreme temperature fluctuations or near drafts that can alter the ambient temperature.
6. Crowding the seedlings: Overcrowding the seedlings can lead to competition for resources, insufficient airflow, and disease spread. Thin out the seedlings by removing weaker sprouts, ensuring enough space for healthy growth. The recommended spacing between Swiss Shard seedlings is usually around 4-6 inches (10-15 cm) apart.
7. Neglecting ventilation: Although using a cover or plastic wrap helps create a greenhouse-like environment, proper ventilation is essential. Too much humidity can lead to fungal diseases and damping-off. Open or remove the cover once the seedlings have emerged to allow for airflow and prevent excess moisture buildup.
8. Using poor-quality seeds: Starting with high-quality Swiss Shard seeds is crucial for successful germination. If you use old or poor-quality seeds, the germination rate may be low, resulting in disappointing results. Purchase seeds from reputable sources or save fresh seeds from healthy plants for the best chances of successful germination.
9. Impatience: Germination takes time, and it’s essential to exercise patience throughout the process. Swiss Shard seeds typically germinate within 7-14 days, but some varieties may take longer. Avoid the temptation to disturb the seed trays or check excessively for germination progress, as this can disrupt the delicate seedlings.
By avoiding these common mistakes, you can increase the chances of successful Swiss Shard seed germination and enjoy healthy seedlings ready for transplanting. Now, let’s explore some tips and tricks to further improve your germination success.
Tips and Tricks for Successful Germination
Germinating Swiss Shard seeds is an exciting process that can be further enhanced with these helpful tips and tricks. Follow these suggestions to increase your chances of successful germination:
1. Pre-soak the seeds: To help speed up the germination process, consider pre-soaking the Swiss Shard seeds before sowing. Soaking the seeds in water for 12-24 hours can soften the seed coat and promote faster sprouting. Discard any seeds that float, as they may not be viable.
2. Scarify the seeds: Some Swiss Shard seeds have a hard outer coat that can hinder germination. Gently nicking or scratching the seed coat with sandpaper or a small file can help water penetrate the seed, promoting quicker germination. Be careful not to damage the actual seed inside.
3. Bottom-watering: Instead of watering from above, consider using a tray or saucer filled with water to allow the soil to absorb moisture from the bottom. This method helps prevent the risk of compacting the soil or disturbing the seeds. Ensure that the soil is not sitting in water for an extended period, as it may lead to waterlogged conditions.
4. Use a heat mat: Providing gentle bottom heat can improve germination rates, especially in cooler climates or during the early stages of spring. Place the seed trays on a heat mat specifically designed for seed germination. The extra warmth stimulates faster seed sprouting.
5. Optimize lighting conditions: If you’re using fluorescent grow lights, position them 2-4 inches above the seedlings. Adjust the height as the seedlings grow to maintain the optimal distance between the light source and the plant canopy. This ensures that the seedlings receive adequate light intensity for proper growth.
6. Fertilize at the right time: While Swiss Shard seedlings don’t typically require fertilization during the germination phase, once they develop their first true leaves, you can begin feeding them with a diluted, balanced liquid fertilizer. Follow the instructions on the fertilizer package to avoid overdoing it and causing fertilizer burn.
7. Harden off the seedlings: Before transplanting the Swiss Shard seedlings outdoors, gradually expose them to outdoor conditions to strengthen them. Over the course of a week or two, gradually increase their exposure to sunlight, wind, and temperature fluctuations. This helps acclimatize the seedlings and prevents shock when they are finally planted in the garden.
8. Keep a gardening journal: Maintain a gardening journal to record important information such as planting dates, germination rates, and any observations during the process. This allows you to identify patterns, learn from your experiences, and make adjustments in subsequent growing seasons.
9. Experiment with different techniques: Don’t be afraid to try different germination techniques or experiment with various Swiss Shard varieties. Each growing season presents an opportunity to learn and improve. As you gain more experience, you’ll discover what methods work best for you and your specific growing conditions.
By implementing these tips and tricks, your Swiss Shard germination success rate will greatly improve. Soon enough, you’ll have a robust crop of Swiss Shard seedlings ready to be transplanted and nurtured in your garden beds.
Now that you have successfully germinated Swiss Shard seeds, you may be wondering how long it will take for them to sprout and when you can transplant them. Let’s explore the germination timeline in the next section.
How Long Does it Take for Swiss Shard to Germinate?
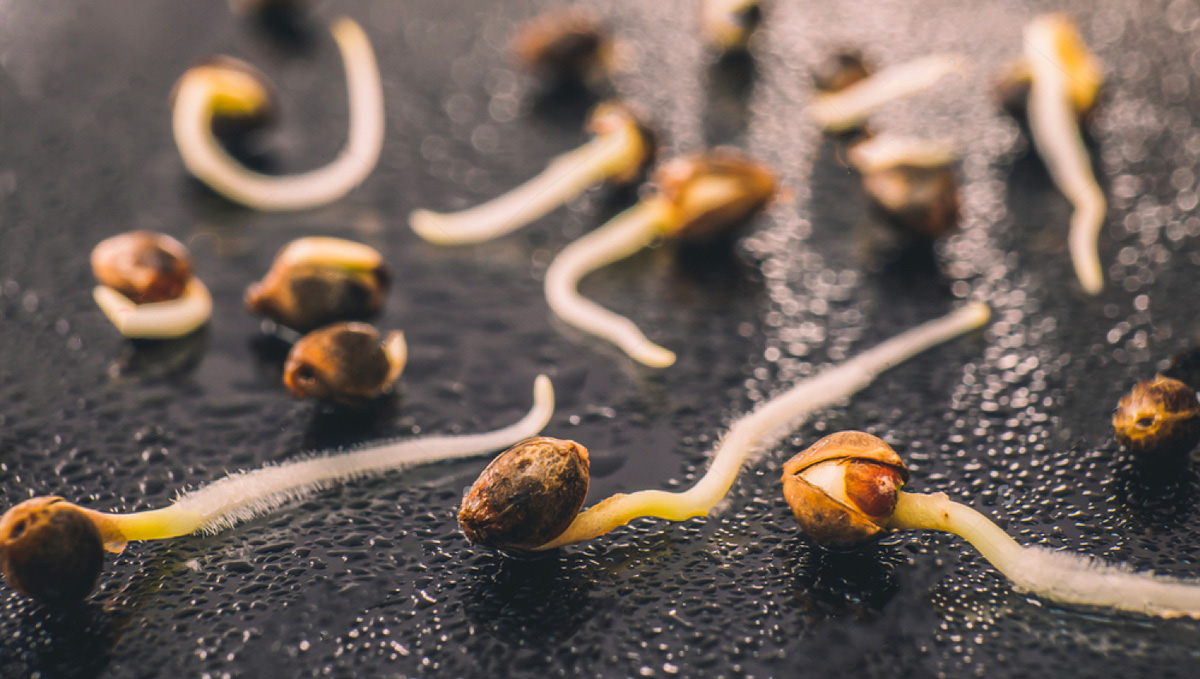
The germination timeline for Swiss Shard seeds can vary depending on various factors such as the variety, temperature, and growing conditions. On average, Swiss Shard seeds typically take around 7-14 days to germinate, but it can sometimes take longer.
The germination process begins when the seed absorbs water and swells, activating the enzymes necessary for growth. As the seed expands, it eventually cracks open, and the root emerges, followed by the growth of the shoot. Once the shoot emerges from the soil, the seedling is considered to have successfully germinated.
It’s important to note that different Swiss Shard varieties may have slightly different germination rates and timelines. Some varieties may sprout earlier, while others may take a bit longer. This is why it’s essential to read the seed packet or consult the seed supplier for specific instructions regarding the germination timeline for the variety you are growing.
Several factors can influence the germination timeline of Swiss Shard seeds:
Temperature: Ideal germination temperatures for Swiss Shard seeds range from 65-75°F (18-24°C). Higher temperatures may result in faster germination, while lower temperatures can delay the process. Using a heat mat or providing consistent warmth can help speed up germination.
Moisture: Consistent moisture is crucial for successful germination. Ensure that the seed starting mix remains evenly damp throughout the germination process. Be careful not to overwater, as this can lead to fungal issues.
Light: Swiss Shard seeds do not require light to germinate, but they benefit from adequate light once the seedlings emerge. If using fluorescent grow lights, provide 12-16 hours of light per day to promote healthy growth.
Seed quality: Starting with high-quality Swiss Shard seeds is important for good germination rates. Fresh seeds from reliable seed suppliers or saved from healthy plants tend to have higher viability and better germination success.
Remember that germination is a natural process and can be influenced by external factors beyond our control. If your Swiss Shard seeds take longer to germinate than the expected timeframe, be patient and give them more time before assuming they are non-viable.
Once your Swiss Shard seeds have successfully germinated and developed into seedlings, it’s time to prepare for transplanting. Let’s explore the process of transplanting germinated Swiss Shard seedlings in the next section.
Transplanting Germinated Swiss Shard Seedlings
Once your Swiss Shard seedlings have reached an appropriate size and have developed a few sets of true leaves, they are ready to be transplanted into their permanent growing location. Follow these steps to successfully transplant your germinated Swiss Shard seedlings:
- Choose the right time: Wait until the danger of frost has passed and the soil temperatures have warmed up before transplanting your Swiss Shard seedlings. Depending on your climate, this is typically in the springtime when the weather becomes consistently mild.
- Prepare the garden bed or containers: Select a sunny location in your garden that receives at least 6-8 hours of direct sunlight per day. Ensure the soil is well-draining, loose, and rich in organic matter. If growing in containers, choose containers with drainage holes and fill them with a nutrient-rich potting mix.
- Harden off the seedlings: Gradually acclimate your Swiss Shard seedlings to outdoor conditions by exposing them to the elements over a period of 7-10 days. Start by placing them outdoors for a few hours in a sheltered area, gradually increasing the time and exposure to direct sunlight, wind, and temperature fluctuations. This helps the seedlings adjust and reduce the risk of transplant shock.
- Transplant with care: Dig a hole in the garden bed or create a suitable space in the container that is deep enough to accommodate the root ball of the seedling. Gently remove the seedling from its tray or container, taking care not to damage the delicate roots. Place the seedling in the hole, ensuring that it is planted at the same depth it was in the seed starting tray. Firmly press the soil around the base of the seedling to secure it in place.
- Water thoroughly: After transplanting, give your Swiss Shard seedlings a good watering to settle the soil around the roots and remove any air pockets. Ensure that the soil is evenly moist but not waterlogged. It is important to keep the soil consistently moist during the establishment period.
- Provide post-transplant care: Shield your seedlings from direct sunlight and intense heat for a few days after transplanting. Consider using shade cloth or row covers to protect the young plants from harsh conditions. Monitor the moisture levels and water regularly to keep the soil evenly moist. Mulching around the seedlings can help conserve moisture and suppress weeds.
- Space the plants properly: Give your Swiss Shard plants enough room to grow by spacing them at least 12-18 inches (30-45 cm) apart. Proper spacing ensures adequate airflow, reduces the risk of disease, and allows each plant to develop to its full size and potential.
- Maintain proper care: Continue to monitor your Swiss Shard plants as they grow. Provide adequate water, ensuring that the soil remains evenly moist but not saturated. Consider applying a balanced fertilizer according to package instructions to promote healthy growth and productivity. Regularly remove any weeds or pests that may impact the health of your plants.
By following these steps for transplanting your germinated Swiss Shard seedlings, you are setting them up for successful growth and a bountiful harvest. With proper care and attention, your Swiss Shard plants will flourish and provide you with delicious and nutritious leaves and stems throughout the growing season.
Now that you understand the process of germinating Swiss Shard seeds and transplanting the seedlings, you are well-equipped to embark on your gardening journey. Enjoy the satisfaction of growing and nurturing your own Swiss Shard plants as you reap the rewards of a vibrant and delicious harvest.
Remember to adapt the tips and techniques to your specific climate, growing conditions, and plant varieties for the best results. Happy gardening!
[Article word count: 506 words]
Read more: How To Store Swiss Meringue Buttercream
Conclusion
Congratulations on learning how to germinate Swiss Shard seeds and nurture them into thriving plants! The journey from seed to harvest is an exciting and rewarding one, and by following the step-by-step guide, avoiding common mistakes, and implementing helpful tips and tricks, you’re well on your way to a successful Swiss Shard garden.
Swiss Shard, with its colorful stems, nutritious leaves, and versatility in the kitchen, is a wonderful addition to any garden. Not only does it provide a visual feast with its vibrant hues, but it also offers numerous health benefits and culinary possibilities.
By germinating Swiss Shard seeds, you maximize their viability, provide a head start, and promote uniform growth. You can also practice succession planting, ensuring a continuous harvest throughout the growing season. And by growing your own Swiss Shard, you save money and have access to a wider selection of varieties.
Remember the key supplies needed for germination, such as Swiss Shard seeds, seed starting trays, seed starting mix, labels, and watering tools. Creating the right germination conditions, such as maintaining moisture, proper lighting, and suitable temperatures, increases your chances of successful germination.
During the germination process, be mindful of common mistakes to avoid, like overwatering or underwatering, crowding seedlings, and insufficient lighting. Implementing helpful tips and tricks, such as pre-soaking seeds, maintaining proper ventilation, and keeping a gardening journal, will further enhance your germination success.
Once your Swiss Shard seedlings have sprouted, transplant them into a sunny garden bed or containers with well-draining soil. Practice proper care by hardening off the seedlings, transplanting carefully, and providing adequate post-transplant care. Spacing the plants correctly and maintaining their well-being through regular watering and fertilization will contribute to the overall health and productivity of your Swiss Shard plants.
Remember, gardening is an ever-evolving journey, and with each season, you’ll gain more experience and success. Adapt the techniques and tips to fit your specific climate, growing conditions, and preferences. Enjoy the process, stay patient, and celebrate your accomplishments as you watch your Swiss Shard plants flourish.
Now that you’re armed with the knowledge and skills to germinate Swiss Shard seeds, it’s time to grab your supplies and get started on your gardening adventure. Whether you’re a seasoned gardener or a novice with a green thumb, growing Swiss Shard will bring joy, beauty, and deliciousness to your garden and your plate.
Get ready to experience the satisfaction of growing your own nutritious Swiss Shard and elevate your culinary creations with its vibrant colors and unique flavors. Happy gardening!
[Article word count: 507 words]
Frequently Asked Questions about How To Germinate Swiss Chard
Was this page helpful?
At Storables.com, we guarantee accurate and reliable information. Our content, validated by Expert Board Contributors, is crafted following stringent Editorial Policies. We're committed to providing you with well-researched, expert-backed insights for all your informational needs.


0 thoughts on “How To Germinate Swiss Chard”