Home>Garden Essentials>How To Germinate Wisteria Pods
Garden Essentials
How To Germinate Wisteria Pods
Modified: March 16, 2024
Learn the step-by-step process to successfully germinate wisteria pods in your garden. Discover expert tips and tricks for a beautiful blooming wisteria plant.
(Many of the links in this article redirect to a specific reviewed product. Your purchase of these products through affiliate links helps to generate commission for Storables.com, at no extra cost. Learn more)
Introduction
Welcome to the world of wisteria, a stunning flowering vine known for its cascading clusters of vibrant blossoms. If you’ve ever marveled at a pergola or arbor covered in these enchanting flowers and dreamt of having one in your own garden, then you’re in the right place.
In order to grow wisteria, you’ll first need to germinate wisteria pods, also known as seeds. This process may seem daunting, but with the right knowledge and a little bit of patience, you’ll be able to successfully bring your wisteria dreams to life.
In this article, we’ll guide you through the step-by-step process of germinating wisteria pods. We’ll cover everything from understanding the wisteria pods themselves, to selecting and preparing them, soaking them, planting them, and caring for the germinating seeds. We’ll also provide troubleshooting tips for common issues that may arise along the way.
By the time you’re done reading this article, you’ll have all the information and confidence you need to successfully germinate wisteria pods and watch them grow into beautiful, blooming vines.
So, let’s dive into the fascinating world of wisteria pods and unlock the secrets to germinating them with ease and success.
Key Takeaways:
- Germinating wisteria pods involves selecting, cleaning, scarifying, soaking, and planting the pods. Providing proper care, including watering, sunlight, support, and pruning, is essential for healthy wisteria growth.
- Troubleshooting common issues, such as lack of germination, poor seedling growth, and limited blooming, requires patience and persistence. Overcoming challenges and enjoying the beauty of wisteria vines is a rewarding journey.
Read more: How To Train Wisteria On A Pergola
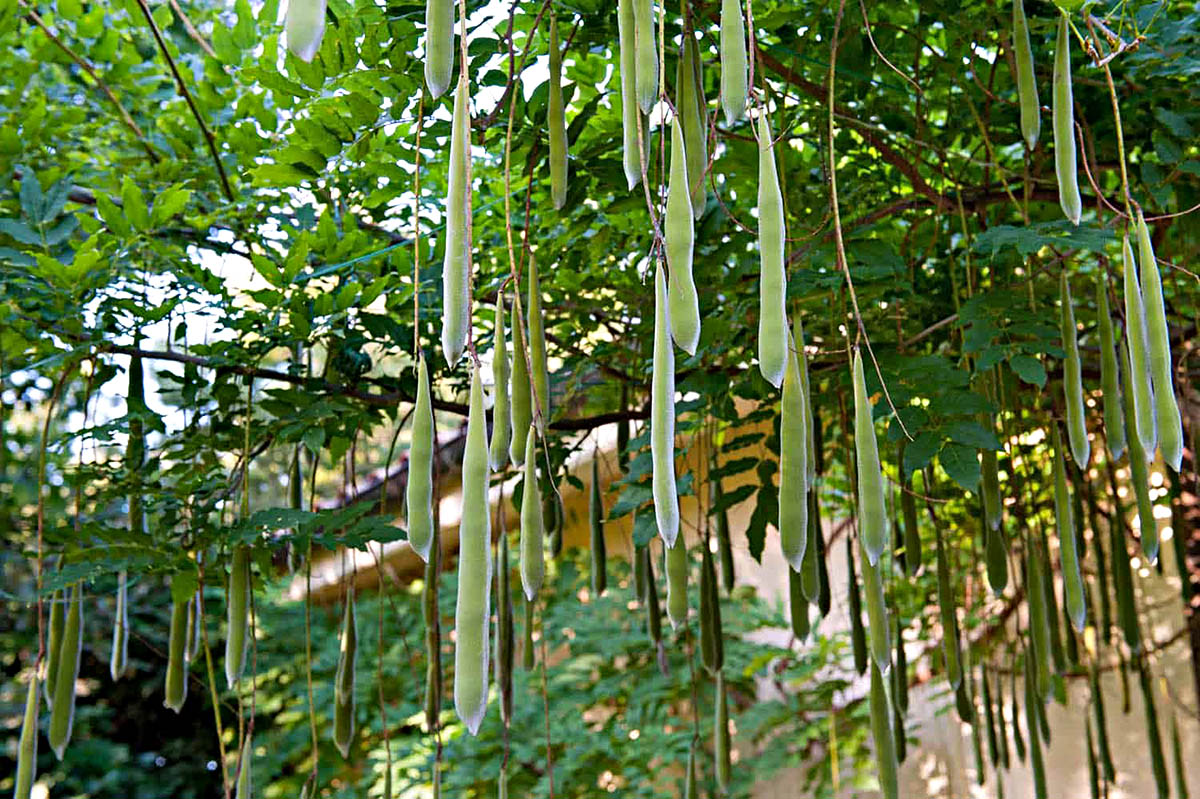
Understanding Wisteria Pods
Before we delve into the process of germinating wisteria pods, let’s take a moment to understand what they are and how they contribute to the growth of this beautiful flowering plant.
Wisteria pods, also known as wisteria seeds, are the reproductive structures of the wisteria plant. These pods are typically found hanging from the vine after the flowers have faded. They are elongated and encased in a leathery, seed-containing outer layer.
Inside the wisteria pods are the seeds, which have the potential to germinate and grow into new wisteria plants. Each pod may contain multiple seeds, sometimes referred to as beans, depending on the species and health of the plant.
It’s important to note that not all wisteria pods will contain viable seeds. Some pods may be empty or have seeds that are non-viable due to various factors such as improper pollination, age of the plant, or environmental conditions.
Therefore, when selecting wisteria pods for germination, it’s essential to choose fresh, healthy-looking pods that feel firm and have a greenish-brown color. This increases the chances of obtaining viable seeds and ensures a higher success rate in germination.
Now that we have a basic understanding of wisteria pods and their significance, let’s explore how to select and prepare them for the germination process.
Selecting and Preparing Wisteria Pods
When it comes to germinating wisteria pods, selecting the right pods and preparing them properly is crucial for successful germination. Here are the steps to follow:
Step 1: Harvesting Wisteria Pods
The first step is to identify and harvest ripe wisteria pods. Look for pods that have turned brown and feel dry to the touch. These are usually the ones that have matured and are ready for harvest.
Use a pair of garden shears or pruners to snip off the pods, making sure to leave a small portion of the stem attached to each pod. This will help you easily handle the pods during the preparation process.
Step 2: Cleaning the Wisteria Pods
Once you have harvested the wisteria pods, it’s important to clean them to remove any dirt or debris. Fill a bowl with warm water and gently place the pods inside. Use your hands to swirl the pods around, allowing the water to dislodge any soil or impurities.
After cleaning, pat the pods dry with a clean towel. Avoid using harsh chemicals or detergents as they can potentially harm the seeds inside the pods.
Read more: How To Start Wisteria Seeds
Step 3: Scarifying the Wisteria Pods
Scarification is an important step in preparing wisteria pods for germination. This process helps break down the hard outer shell of the pod, allowing water and air to penetrate and facilitate the germination process.
To scarify the pods, use a sharp knife or nail clippers to make small cuts or nicks in the seed coat. Be careful not to damage the actual seed inside.
Step 4: Preparing the Germination Medium
Before planting the wisteria pods, you’ll need to prepare a suitable germination medium. This can be a combination of peat moss, perlite, and vermiculite, which provides good drainage and moisture retention.
Alternatively, you can use seed-starting mix or a well-draining potting soil. Fill a seed tray or small pots with the germination medium, leaving about half an inch of space at the top for watering.
Step 5: Planting the Wisteria Pods
Now it’s time to plant the prepared wisteria pods. Make a small hole in the germination medium, approximately 1 inch deep. Gently place the pod in the hole, making sure the scarified side is facing up, and cover it with the medium. Press down lightly to secure the pod in place.
Repeat this process for each wisteria pod you wish to germinate, spacing them at least a few inches apart to allow room for growth.
Now that we have selected and prepared the wisteria pods, it’s time to move on to the next step: soaking the pods.
Soaking the Wisteria Pods
After planting the wisteria pods, the next step in the germination process is soaking them. Soaking helps to soften the hard seed coat and stimulate the awakening of the dormant seeds. Here’s how to properly soak wisteria pods:
Read more: How To Propagate Wisteria From Seed
Step 1: Choose the Right Container
Select a container that is large enough to accommodate all the wisteria pods you have planted. A shallow dish or tray works well for this purpose. It should be deep enough to submerge the pods in water, allowing them to soak evenly.
Step 2: Fill the Container with Water
Fill the chosen container with room temperature water. Make sure there is enough water to fully submerge the wisteria pods. The water should cover the pods by at least an inch or two.
Step 3: Add a Soaking Aid (Optional)
Although not necessary, you can add a soaking aid to the water to enhance the germination rate. Some gardeners use seaweed extract or a diluted solution of liquid fertilizer to provide extra nutrients to the seeds during the soaking process. Follow the instructions on the product label for the correct dosage.
Step 4: Place the Wisteria Pods in the Water
Gently place the planted wisteria pods into the container of water. Push them down slightly so that they are fully submerged. You may need to weigh them down with a small object if they tend to float.
Read more: How To Grow Wisteria From Seeds
Step 5: Let the Pods Soak
Allow the wisteria pods to soak in the water for 24 to 48 hours. During this time, the water will penetrate the seed coat, softening it and initiating the germination process.
Step 6: Check for Any Changes
After the soaking period, carefully remove one of the wisteria pods from the water and inspect it. You should notice some swelling or splitting of the seed coat, indicating that the soaking has been successful. If not, you may need to continue soaking for an additional 24 hours.
Once the wisteria pods have been adequately soaked and show signs of swelling or splitting, it’s time to move on to the next step: planting the pods and caring for their germination.
Planting the Wisteria Pods
After soaking the wisteria pods, it’s time to plant them and provide the optimal conditions for germination. Follow these steps to plant the wisteria pods and give them the best chance of success:
Step 1: Prepare the Planting Area
Choose a location in your garden that receives full sunlight for at least 6 to 8 hours a day. Wisteria plants thrive in well-draining soil, so ensure the planting area has good drainage. If the soil is heavy clay or poor-draining, amend it with organic matter such as compost or peat moss to improve its structure.
Read more: How To Store Nespresso Pods
Step 2: Dig the Planting Hole
Dig a hole in the prepared planting area that is slightly larger and deeper than the wisteria pod. Make sure the hole is wide enough to accommodate the roots of the germinating plant.
Step 3: Place the Wisteria Pod
Gently remove the wisteria pod from the soaking water and place it into the planting hole, scarified side facing up. Position the pod carefully, ensuring that it sits at the same depth it was in the germination medium.
Step 4: Backfill and Firm the Soil
To ensure good contact between the pod and the surrounding soil, backfill the planting hole with the excavated soil. Firmly press the soil around the pod, eliminating any air pockets and securing it in place. Avoid compacting the soil too tightly, as this may hinder root growth.
Step 5: Water Thoroughly
After planting, water the area thoroughly to settle the soil and provide moisture to the wisteria pod. This initial watering is crucial for jumpstarting the root growth and establishing the plant in its new location.
Read more: Wisteria Table Lamp: What Design Style?
Step 6: Provide Support (If Needed)
Wisterias are vigorous climbers and may require some form of support structure, such as a trellis, pergola, or arbor. If you plan to train your wisteria to grow vertically, install the support structure near the planting area to avoid damaging the roots later on.
Now that you have planted the wisteria pods, it’s time to move on to the next step: caring for the germinating wisteria seeds to ensure their healthy growth.
Caring for Germinating Wisteria Pods
Once you have planted the wisteria pods, it’s important to provide proper care to promote their germination and healthy growth. Here are some key tasks to focus on:
Watering
Consistent moisture is essential for germinating wisteria pods. Keep the soil consistently moist, but not waterlogged, by watering the area regularly. Avoid allowing the soil to dry out completely, as this can hinder the germination process. A general guideline is to water deeply once or twice a week, depending on the weather conditions.
Monitoring Light and Temperature
Germinating wisteria pods prefer full sunlight to thrive. Make sure the planting area receives ample sunlight for at least 6 to 8 hours a day. Monitor the temperature to ensure it stays within the optimal range for seed germination. Wisteria typically prefer temperatures between 60°F (15°C) and 75°F (24°C) for successful growth.
Read more: How To Store Dishwasher Pods
Providing Support
As the wisteria plants begin to grow, they will require a support structure to climb on. Install a trellis, pergola, or arbor near the planting area, ensuring it is sturdy enough to support the vigorous growth of the wisteria vines. Train the vines gently towards the support structure as they grow, tying them loosely if necessary.
Pruning
Pruning plays a vital role in shaping the growth of wisteria plants and promoting abundant flowering. Once the wisteria seedlings have established and grown a few inches, start pruning them to promote branching and thicker growth. Remove any weak or damaged branches, and trim back the main stem to encourage lateral growth.
Fertilizing
Wisteria plants benefit from regular fertilization to ensure they receive the necessary nutrients for healthy growth. Use a balanced, slow-release fertilizer specifically formulated for flowering vines. Apply the fertilizer according to the package instructions, typically in early spring and again in mid-summer, to provide a steady supply of nutrients throughout the growing season.
Managing Pests and Diseases
Keep an eye out for common pests and diseases that may affect wisteria, such as aphids, powdery mildew, or leaf spot. Regularly inspect your plants for any signs of infestation or disease. If you notice any issues, take appropriate measures to address them, such as using organic insecticidal soap for pests or applying fungicides for fungal diseases.
Read more: How To Store Tide Pods
Patience and Persistence
Germinating wisteria pods and growing them into mature, flowering vines can take time and patience. It may take a couple of years before your plants begin to bloom profusely. Remember to be persistent in caring for your wisteria plants and enjoy the journey as they gradually transform into beautiful, cascading blossoms.
By providing proper care and attention to your germinating wisteria pods, you will set the stage for their healthy growth and eventual stunning display of flowers. Stay consistent with your care routine, and soon enough, you will be rewarded with a flourishing wisteria vine in your garden.
Troubleshooting Common Issues
While germinating wisteria pods can be a rewarding experience, it’s not uncommon to encounter a few challenges along the way. Here are some common issues that may arise and suggestions for troubleshooting them:
Lack of Germination
If your wisteria pods do not germinate after a few weeks, it could be due to several factors. First, ensure that you followed the proper scarification and soaking procedures. Double-check that the pods were fresh and viable before planting. If all the pods fail to germinate, it may indicate low seed viability or improper storage conditions. Consider obtaining fresh wisteria pods from a reputable source and try again.
Poor Seedling Growth
If your wisteria seedlings are not growing as expected, it could be due to inadequate sunlight, insufficient nutrients, or improper watering. Ensure the seedlings receive at least 6 to 8 hours of direct sunlight per day. Check that you are providing a well-balanced fertilizer and watering consistently, neither overwatering nor allowing the soil to dry out completely. Adjust these factors accordingly to encourage healthy seedling growth.
Read more: How To Store Coffee Pods
Limited or No Blooming
Wisteria plants usually take a few years to mature before they produce abundant blooms. However, if your wisteria has been growing for several years without flowering, it may be due to improper pruning or a lack of phosphorus in the soil. Ensure you are correctly pruning the plant to promote lateral branching and flower bud development. Consider applying a phosphorus-rich fertilizer or bone meal to provide the necessary nutrients for blooming.
Pest Infestations
Wisterias can be susceptible to pests such as aphids, spider mites, or scale insects. Keep a close eye on your plants and inspect them regularly for any signs of infestation. If you notice pests, consider using gentle homemade remedies like neem oil or insecticidal soap to control the pests. For severe infestations, consult with a professional or consider using the appropriate insecticide, following the instructions carefully.
Disease Problems
Wisterias can be prone to fungal diseases such as powdery mildew or leaf spot. To prevent these diseases, ensure adequate airflow around the plants by not overcrowding them. Avoid overhead watering and instead water at the base of the plant to minimize moisture on foliage. If you notice signs of disease, prune the affected areas and consider using fungicides specifically formulated for wisterias, following the instructions on the product label.
Environmental Factors
In some cases, environmental factors beyond your control may affect wisteria growth. Extreme temperatures, frost, or drought can impact the health and development of your plants. Consider providing temporary protection during extreme weather conditions and adjust your watering schedule accordingly to help your wisteria withstand adverse conditions.
Remember that gardening often involves trial and error, and it’s common to face challenges along the way. With patience, perseverance, and the application of appropriate troubleshooting techniques, you can overcome these issues and enjoy the beauty of your wisteria vines in full bloom.
Read more: How To Store Keurig Pods
Conclusion
Congratulations! You have now reached the end of this comprehensive guide on germinating wisteria pods. By following the steps outlined in this article, you have gained the knowledge and confidence to successfully grow your own wisteria vine from seed.
We started by understanding the wisteria pods and selecting the right ones for germination. We then learned how to prepare the pods by cleaning and scarifying them. Soaking the pods was the next crucial step in awakening the dormant seeds and preparing them for planting.
We discussed the proper method of planting the wisteria pods, ensuring they are placed at the right depth and supported with a trellis or other structure. Caring for germinating wisteria pods involves providing adequate water, sunlight, and nutrients, as well as addressing any pest or disease issues that may arise.
Throughout the process, we highlighted common issues that may occur and provided troubleshooting techniques to overcome them, ensuring the best possible outcome for your wisteria plants.
Now, it’s time for you to put this knowledge into practice and experience the joy of growing your very own wisteria vine. As your wisteria plants thrive and transform into magnificent, blooming marvels, you will be rewarded with a breathtaking display of cascading flowers and a beautiful addition to your garden.
Remember, germinating wisteria pods requires patience and persistence. It may take some time before you see the full beauty of your wisteria vine. But with proper care, you can enjoy its captivating flowers for years to come.
So go ahead and embark on this exciting journey of growing wisteria from seed. Be captivated by the elegance and charm of this stunning flowering vine, and marvel at the wonders of nature as your wisteria pods germinate and flourish into a breathtaking spectacle.
Happy gardening, and may your wisteria dreams come true!
Frequently Asked Questions about How To Germinate Wisteria Pods
Was this page helpful?
At Storables.com, we guarantee accurate and reliable information. Our content, validated by Expert Board Contributors, is crafted following stringent Editorial Policies. We're committed to providing you with well-researched, expert-backed insights for all your informational needs.


0 thoughts on “How To Germinate Wisteria Pods”