Home>Garden Essentials>How To Grow Crape Myrtle From Seeds
Garden Essentials
How To Grow Crape Myrtle From Seeds
Modified: August 25, 2024
Learn how to grow beautiful crape myrtle plants from seeds in your very own garden. Discover expert tips and tricks for successful cultivation.
(Many of the links in this article redirect to a specific reviewed product. Your purchase of these products through affiliate links helps to generate commission for Storables.com, at no extra cost. Learn more)
Introduction
Are you a garden enthusiast looking to add a touch of beauty to your landscape? Why not consider growing crape myrtle from seeds? Crape myrtle, also known as Lagerstroemia, is a stunning flowering plant that dazzles with vibrant colors during the summer months. It’s a versatile plant that comes in a variety of sizes and colors, making it a popular choice for gardens, parks, and even city streets.
In this comprehensive guide, we will take you through the step-by-step process of growing crape myrtle from seeds. From collecting the seeds to caring for the seedlings and ultimately transplanting them, we’ll cover all the essential tips and techniques to ensure success in your crape myrtle growing journey.
But why grow crape myrtle from seeds instead of purchasing nursery-grown plants? Well, growing from seeds can be a rewarding experience, allowing you to witness the entire lifecycle of the plant and exercise full control over its growth. Additionally, growing from seeds is often more cost-effective compared to buying mature plants.
Before we dive into the details, it’s important to note that crape myrtle seeds can take some time to germinate and grow into established plants. However, with patience, dedication, and the right techniques, you can successfully grow your own beautiful, blooming crape myrtle plants.
So, let’s get started on this exciting journey of growing crape myrtle from seeds!
Key Takeaways:
- Growing crape myrtle from seeds is a rewarding journey that allows you to witness the entire lifecycle of the plant, from collecting seeds to nurturing seedlings and enjoying beautiful blooms.
- Proper care, including watering, fertilizing, and pruning, is essential for the healthy growth of crape myrtle plants. Patience and attention to detail will be rewarded with stunning, vibrant blooms.
Read more: How To Grow Okra From Seed
Step 1: Collecting Crape Myrtle Seeds
The first step in growing crape myrtle from seeds is to collect the seeds from mature crape myrtle plants. It’s important to gather the seeds at the right time to ensure successful germination. Here’s how you can collect crape myrtle seeds:
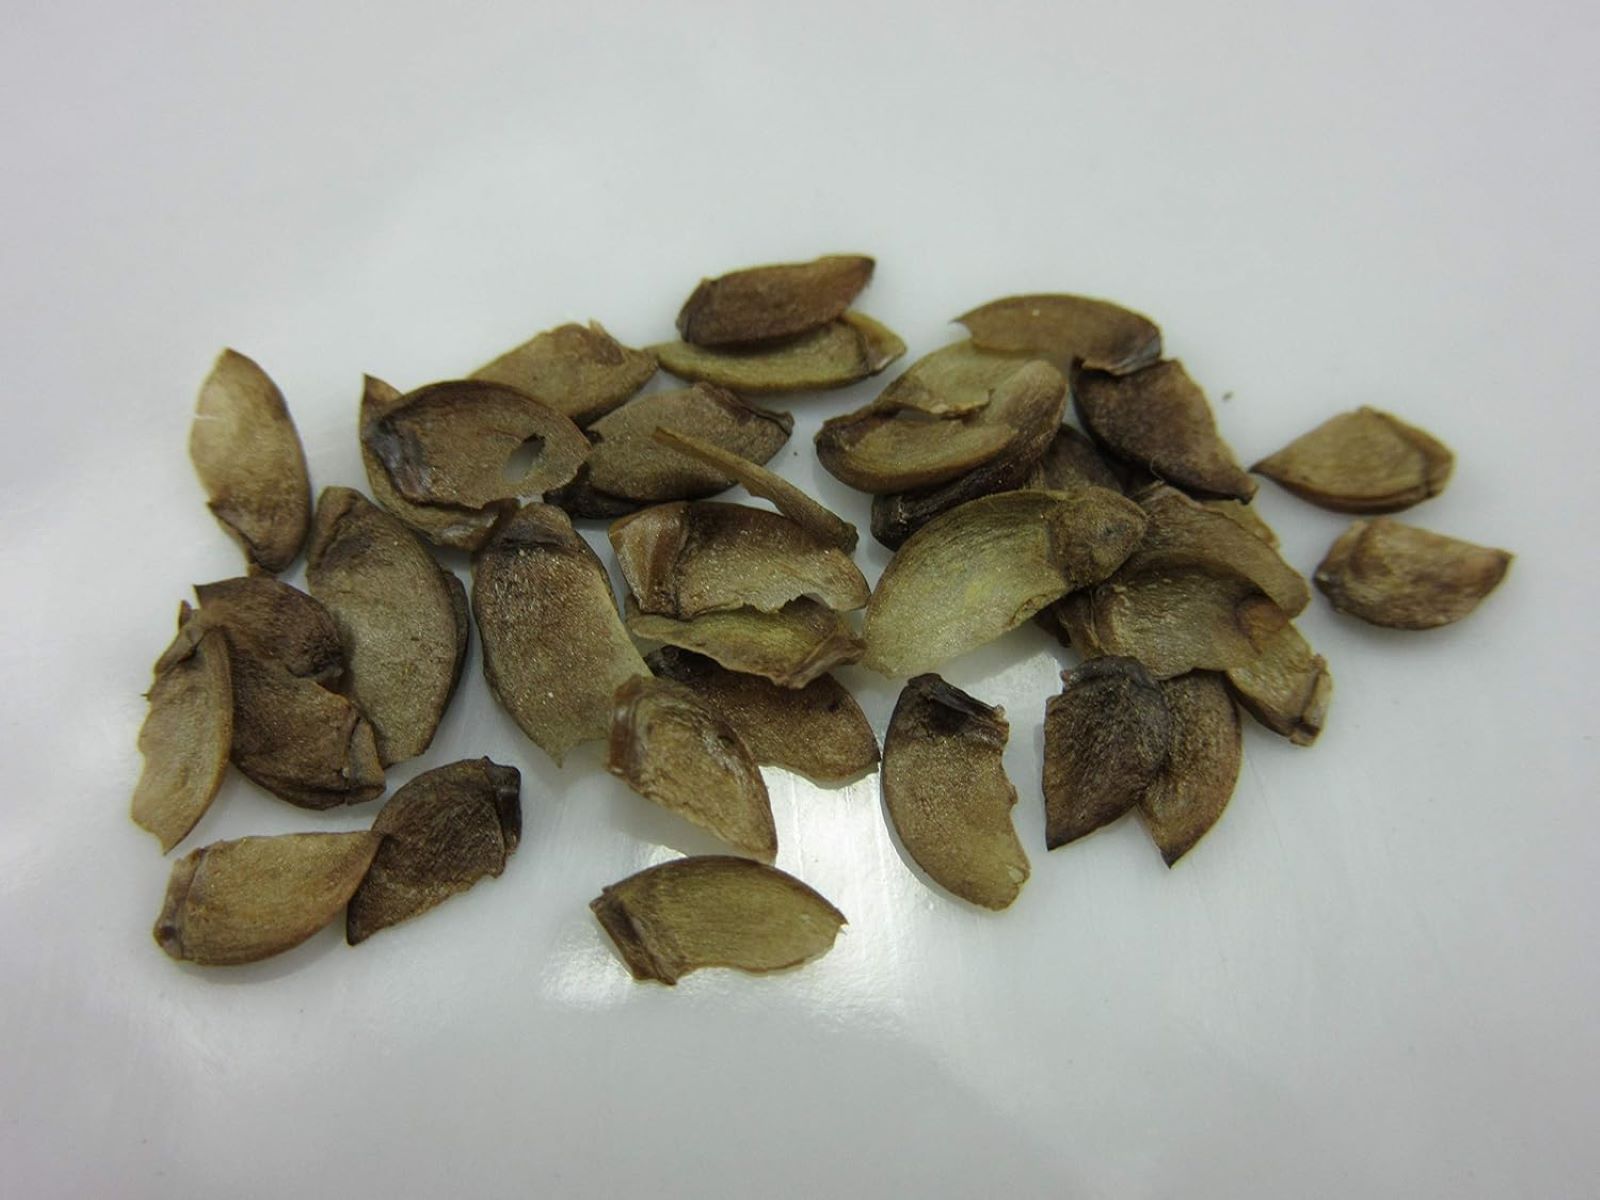
- Timing: Wait until late summer or early fall to collect crape myrtle seeds. This is when the seed pods have fully matured and turned brown or black in color. Avoid collecting seeds from pods that are still green or not fully developed.
- Identify the seed pods: Crape myrtle seeds are contained within small capsules or pods that form after the flowers fade away. These pods are typically hard and woody, and they can be found clustered on the branches of the crape myrtle plant.
- Harvest the seed pods: Use a pair of pruning shears or sharp scissors to carefully cut the seed pods from the crape myrtle branches. Place the harvested seed pods in a clean and dry container, such as a paper bag or a plastic container with ventilation holes.
- Drying the seed pods: Allow the seed pods to dry naturally for a few weeks. This will help the pods split open, making it easier to extract the seeds. Make sure to store the drying seed pods in a cool, dry location away from direct sunlight.
- Extracting the seeds: Once the seed pods have dried and split open, gently shake or tap the pods to release the seeds. Alternatively, you can use your fingers or a small tool to carefully pry open the pods and extract the seeds. Collect the seeds in a clean container and discard any debris or empty pods.
- Storing the seeds: It’s crucial to store the collected crape myrtle seeds properly to maintain their viability. Place the seeds in a labeled envelope or a sealed plastic bag, and store them in a cool, dry place, such as a refrigerator. The seeds can be stored for several months until you’re ready to plant them.
Now that you’ve successfully collected your crape myrtle seeds, you’re ready to move on to the next step: preparing the seeds for planting.
Step 2: Preparing the Seeds for Planting
After collecting the crape myrtle seeds, it’s important to properly prepare them for planting. Preparing the seeds will help increase their germination rate and ensure successful growth. Follow these steps to prepare your crape myrtle seeds:
- Soaking the seeds: Crape myrtle seeds have a hard outer shell that can sometimes inhibit germination. To improve germination rates, soak the seeds in warm water for 24 hours. This process, known as scarification, helps soften the seed coat and promotes better seed viability.
- Cleaning the seeds: After soaking, carefully rinse the seeds to remove any debris or residue. Use a fine-mesh sieve or a strainer to wash the seeds under running water. This step ensures that only clean and viable seeds are used for planting.
- Stratification (optional): Depending on the variety of crape myrtle seeds you’re planting, they may benefit from a period of stratification. Stratification involves exposing the seeds to a period of cold treatment, simulating natural winter conditions. This process helps break seed dormancy and promotes more consistent germination. To stratify the seeds, place them in a sealed plastic bag with a moistened paper towel and refrigerate them for 4-6 weeks.
- Inspecting for viability: Before proceeding with planting, inspect the soaked and cleaned seeds for viability. Look for seeds that are plump, firm, and show no signs of damage or rot. Discard any seeds that appear shriveled, discolored, or compromised in any way. Healthy seeds have a better chance of germinating and growing into robust crape myrtle plants.
- Labeling and organizing: It’s essential to keep track of the different crape myrtle seed varieties you’ve collected. Label each set of seeds with their corresponding names and colors. This will ensure that you can differentiate them when it’s time to plant and grow them. Additionally, keep your seeds organized in separate containers or envelopes to prevent mix-ups.
By following these steps, you’ve prepared your crape myrtle seeds for optimal growth. Now, let’s move on to the exciting part: planting the crape myrtle seeds!
Step 3: Planting the Crape Myrtle Seeds
Now that you have prepared your crape myrtle seeds, it’s time to plant them and get the growing process started. Follow these steps to plant your crape myrtle seeds:
- Choose the right planting location: Crape myrtle plants thrive in well-draining soil and full sun, so select a location that receives at least 6-8 hours of sunlight per day. Ensure that the soil is rich in organic matter and has good drainage to prevent waterlogging.
- Prepare the planting site: Dig a hole that is twice the size of the crape myrtle seed. Loosen the soil and remove any weeds or debris from the area. Incorporate compost or well-aged manure into the soil to improve its fertility and texture.
- Plant the seeds: Place the crape myrtle seeds in the prepared hole at a depth of about ¼ to ½ inch. Gently cover the seeds with soil and lightly press down to ensure good seed-to-soil contact. Space the seeds at least 6-12 inches apart to allow for proper root development.
- Water the seeds: After planting, thoroughly water the area to moisten the soil around the seeds. However, be careful not to overwater, as excessive moisture can lead to rotting. Maintain a consistent moisture level by providing water whenever the top inch of soil feels dry.
- Protect the seeds: Cover the planted area with a layer of mulch to help retain moisture and regulate the soil temperature. Avoid placing the mulch directly against the seeds to prevent rotting. Mulch also acts as a barrier against weed growth, which can compete with the young crape myrtle seedlings for nutrients and water.
- Monitor and care for the seedlings: Keep a close eye on the planted seeds and monitor their growth. Seedlings should start emerging within a few weeks, but it can take up to several months for germination to occur. During this time, continue to provide adequate water and ensure that the soil remains moist but not waterlogged.
Remember, crape myrtle seeds may have varying germination rates and timelines. Some seeds may germinate earlier than others. Be patient and give the seeds sufficient time to sprout and establish themselves. With proper care and attention, the seedlings will soon begin to grow into beautiful crape myrtle plants.
Now that your crape myrtle seeds are planted, let’s move on to the next step: caring for the seedlings.
Step 4: Caring for the Seedlings
As your crape myrtle seedlings begin to emerge and grow, it’s crucial to provide them with proper care and attention to ensure their healthy development. Follow these essential tips to care for your crape myrtle seedlings:
- Watering: Water the seedlings regularly, keeping the soil consistently moist but not waterlogged. Aim to provide a deep watering session once a week, ensuring that the water reaches the root zone. Adjust the frequency of watering based on the weather conditions and the moisture level of the soil.
- Fertilizing: After the seedlings have established a few true leaves, you can start fertilizing them. Use a balanced, slow-release fertilizer or incorporate compost into the soil around the seedlings. Follow the instructions on the fertilizer package to determine the appropriate amount and frequency of application.
- Protecting from pests: Keep an eye out for common garden pests, such as aphids or caterpillars, and take appropriate measures to protect your crape myrtle seedlings. Regularly inspect the leaves and stems for any signs of pest damage, such as chewed leaves or distorted growth. If necessary, use organic pest control methods or consult with a local garden center for suitable remedies.
- Providing support: As the seedlings grow taller, they may require support to prevent bending or breaking. Place stakes near the base of the seedlings and gently tie them for support. This will help the seedlings establish a strong and upright growth habit.
- Pruning: It is not necessary to prune the crape myrtle seedlings during their early stages of growth. Allow the seedlings to develop a strong root system and establish themselves before considering any pruning. Pruning can be done in the following seasons to shape and control the size of the mature crape myrtle plants.
- Providing adequate space: As the crape myrtle seedlings grow, make sure to provide adequate space between them to allow for proper air circulation and reduce competition for resources. Transplant or thin out the seedlings if they become overcrowded, ensuring a spacing of at least 3-6 feet between each plant.
By providing proper care and nurturing, your crape myrtle seedlings will continue to thrive and grow into healthy plants. Remember to monitor their progress regularly, addressing any issues that may arise promptly.
Now that you’ve learned how to care for the crape myrtle seedlings, let’s move on to the next step: transplanting them into containers or the ground.
After collecting crape myrtle seeds in the fall, store them in a cool, dry place until spring. Then, plant the seeds in well-draining soil and keep them consistently moist until they germinate.
Read more: How To Grow A Tree From A Seed
Step 5: Transplanting the Seedlings into Containers or the Ground
Once your crape myrtle seedlings have grown stronger and more established, it’s time to consider transplanting them into their permanent growing location. Whether you choose containers or the ground, follow these steps to successfully transplant your crape myrtle seedlings:
- Choosing the location: Select a location that provides full sun exposure and has well-draining soil. Consider the mature size of the crape myrtle plants and ensure they have enough space to grow without being crowded by other plants or structures.
- Preparing the soil: If transplanting into the ground, prepare the planting hole by loosening the soil and incorporating organic matter, such as compost or aged manure. This will help improve soil fertility and drainage.
- Container selection (if applicable): If transplanting into containers, choose containers that are at least 12-16 inches in diameter and have drainage holes at the bottom. Use a high-quality potting mix that provides good drainage and nutrient retention.
- Transplanting the seedlings: Gently remove the crape myrtle seedlings from their original planting location, taking care not to damage the roots. If the roots are tightly packed, carefully loosen them before transplanting. Place the seedling in the prepared hole or container, ensuring that the soil level matches the level of the seedling’s original planting depth.
- Backfilling and watering: Fill the hole or container with soil, gently pressing it down to eliminate air pockets around the roots. Give the transplanted seedlings a thorough watering to settle the soil and ensure good root-to-soil contact.
- Mulching and staking (if necessary): Apply a layer of mulch around the base of the crape myrtle plants, keeping it a few inches away from the main stem. Mulch helps retain moisture, suppresses weed growth, and regulates soil temperature. If the plants appear top-heavy or prone to bending, provide additional support by staking them.
- Watering and post-transplant care: After transplanting, provide regular watering to help the seedlings establish themselves in their new location. Monitor the moisture level of the soil and adjust the frequency of watering as needed. Continue to provide ongoing care, including regular fertilization, pest control, and pruning when necessary.
Remember, transplant shock may occur initially, but with proper care and attention, the crape myrtle seedlings will adapt and continue to grow. Keep a close eye on their progress and address any issues promptly to ensure their successful transition into their new home.
Now that you’ve transplanted your crape myrtle seedlings, let’s move on to the next step: maintaining and pruning the crape myrtle plants.
Step 6: Maintaining and Pruning the Crape Myrtle Plants
Maintaining and pruning your crape myrtle plants is crucial for their overall health, shape, and blooming potential. Regular maintenance and pruning help promote vigorous growth, enhance flowering, and maintain a desired size and shape. Follow these guidelines to effectively maintain and prune your crape myrtle plants:
- Watering: Established crape myrtle plants have moderate water requirements. Water deeply and infrequently, allowing the soil to dry out slightly between waterings. Avoid overwatering, as it can lead to root rot and other issues. Monitor the moisture level of the soil, especially during hot and dry periods, and adjust watering accordingly.
- Fertilizing: Feed your crape myrtle plants with a balanced, slow-release fertilizer in early spring before new growth begins. Apply the fertilizer according to the manufacturer’s instructions, and water thoroughly afterward to ensure proper absorption. Avoid fertilizing in late summer or fall, as it can stimulate late-season growth that may be susceptible to winter damage.
- Pruning for shape and size: Pruning crape myrtle plants is essential to control their size and shape and to promote proper branching and blooming. Conduct major pruning during late winter or early spring while the plants are still dormant. Remove any dead, damaged, or diseased branches, as well as crossed or crowded branches. Trim back any suckers or unwanted growth at the base of the plant.
- Pruning to enhance flowering: To encourage abundant flowering, selectively prune off the previous year’s old flower clusters, also known as seed heads, during late winter or early spring. This will redirect the plant’s energy towards new growth and flower production. Remove the spent flower clusters by cutting them back to the nearest healthy bud or lateral branch.
- Avoid “crape murder”: It’s important to note that severe pruning, often referred to as “crape murder,” is not recommended for crape myrtle plants. Avoid excessively cutting back branches to stubs, as it can weaken the plant, reduce flower production, and create an unnatural and unattractive appearance.
- Monitoring and pest control: Regularly monitor your crape myrtle plants for any signs of pests or diseases, such as aphids, powdery mildew, or sooty mold. If pests or diseases are detected, take appropriate measures for control, such as using organic insecticides or consulting with a professional for guidance.
- Winter protection (in colder regions): In regions with harsh winters, provide winter protection for your crape myrtle plants. Apply a layer of mulch around the base of the plant to help insulate the roots and protect them from freezing temperatures. Additionally, consider wrapping the plant with burlap or applying a protective covering to shield it from winter winds.
By maintaining proper care and pruning routines, your crape myrtle plants will stay healthy, vibrant, and beautiful year after year. Regular maintenance, including watering, fertilizing, and pruning, is key to ensuring their long-term success and optimum performance.
Now that you have learned how to maintain and prune your crape myrtle plants, let’s move on to the final step: harvesting crape myrtle seeds for future plantings.
Step 7: Harvesting Crape Myrtle Seeds for Future Plantings
Harvesting and saving crape myrtle seeds allows you to propagate new plants and continue to enjoy their beauty and vibrant blooms in your garden. Follow these steps to harvest and store crape myrtle seeds for future plantings:
- Timing: Wait for the crape myrtle seed pods to fully mature and turn brown or black. This is usually during late summer or early fall. The seeds inside the pods should be dark brown and hard.
- Harvesting: Use pruning shears or sharp scissors to carefully remove the seed pods from the crape myrtle branches. Place the seed pods in a container or bag to collect them.
- Drying: Allow the harvested seed pods to dry completely in a well-ventilated area for a few weeks. This helps the pods split open, making it easier to extract the seeds.
- Extracting the seeds: Once the seed pods are dry, gently break them open to extract the seeds. Remove any debris or empty pods, collect the seeds, and discard the remaining pod material.
- Labeling and storing: Label and store the crape myrtle seeds in a cool, dry place in a labeled envelope or a sealed container. Make sure to include the date and the variety of the seeds to keep track of their origin and characteristics.
- Length of viability: Crape myrtle seeds can remain viable for several months to a few years if stored properly. However, it’s recommended to use the seeds within the first year for the best germination rates.
- Testing viability (optional): If you’re unsure about the viability of older crape myrtle seeds, you can perform a germination test before planting them. Place a few seeds on a moist paper towel, seal them in a plastic bag, and keep the bag in a warm location. Check the seeds after a couple of weeks to see if they have germinated.
By harvesting and storing crape myrtle seeds, you can continue to propagate and plant these beautiful flowering trees in your garden or share them with fellow gardening enthusiasts. Just remember to collect seeds from healthy and well-performing crape myrtle plants to ensure the best results.
Now that you’ve learned how to harvest and save crape myrtle seeds, you have all the knowledge and skills to successfully grow crape myrtle from seeds and enjoy their stunning blooms for years to come.
Happy gardening!
Conclusion
Congratulations! You have reached the end of our comprehensive guide on growing crape myrtle from seeds. By following the steps outlined in this article, you have learned how to collect, prepare, plant, care for, and even harvest crape myrtle seeds for future plantings.
Growing crape myrtle from seeds can be a rewarding and fulfilling experience. Watching the seeds sprout, nurturing the seedlings, witnessing their growth, and eventually enjoying the beautiful blooms is a journey that connects you closely with nature.
Remember to be patient throughout the process. Crape myrtle seeds can take time to germinate and establish themselves. However, with proper care, attention, and the right growing conditions, your efforts will be rewarded with stunning crape myrtle plants that bring color, beauty, and vibrancy to your garden.
As you embark on your crape myrtle growing journey, always maintain regular maintenance routines, including watering, fertilizing, pruning, and pest control. Pay attention to the specific needs of your crape myrtle variety and adjust your care accordingly.
Additionally, don’t forget to enjoy the beauty of the crape myrtle blooms and take some time to sit back, relax, and marvel at their stunning display. Whether you choose common varieties like Natchez, Dynamite, or Tuscarora, or opt for more unique cultivars, crape myrtle plants will undoubtedly bring joy and visual delight to your outdoor space.
Now that you have the knowledge and confidence to grow crape myrtle from seeds, it’s time to roll up your sleeves and start your gardening adventure. Get ready to witness the magic and enchantment of these magnificent flowering trees as they grace your landscape and create an ambiance of natural beauty.
Happy gardening!
Frequently Asked Questions about How To Grow Crape Myrtle From Seeds
Was this page helpful?
At Storables.com, we guarantee accurate and reliable information. Our content, validated by Expert Board Contributors, is crafted following stringent Editorial Policies. We're committed to providing you with well-researched, expert-backed insights for all your informational needs.


0 thoughts on “How To Grow Crape Myrtle From Seeds”