Home>Gardening & Outdoor>Garden Tools & Equipment>How To Test A Lawnmower Coil
Garden Tools & Equipment
How To Test A Lawnmower Coil
Published: January 21, 2024
Learn how to test a lawnmower coil for optimal performance with our comprehensive guide. Keep your garden tools and equipment in top shape.
(Many of the links in this article redirect to a specific reviewed product. Your purchase of these products through affiliate links helps to generate commission for Storables.com, at no extra cost. Learn more)
Introduction
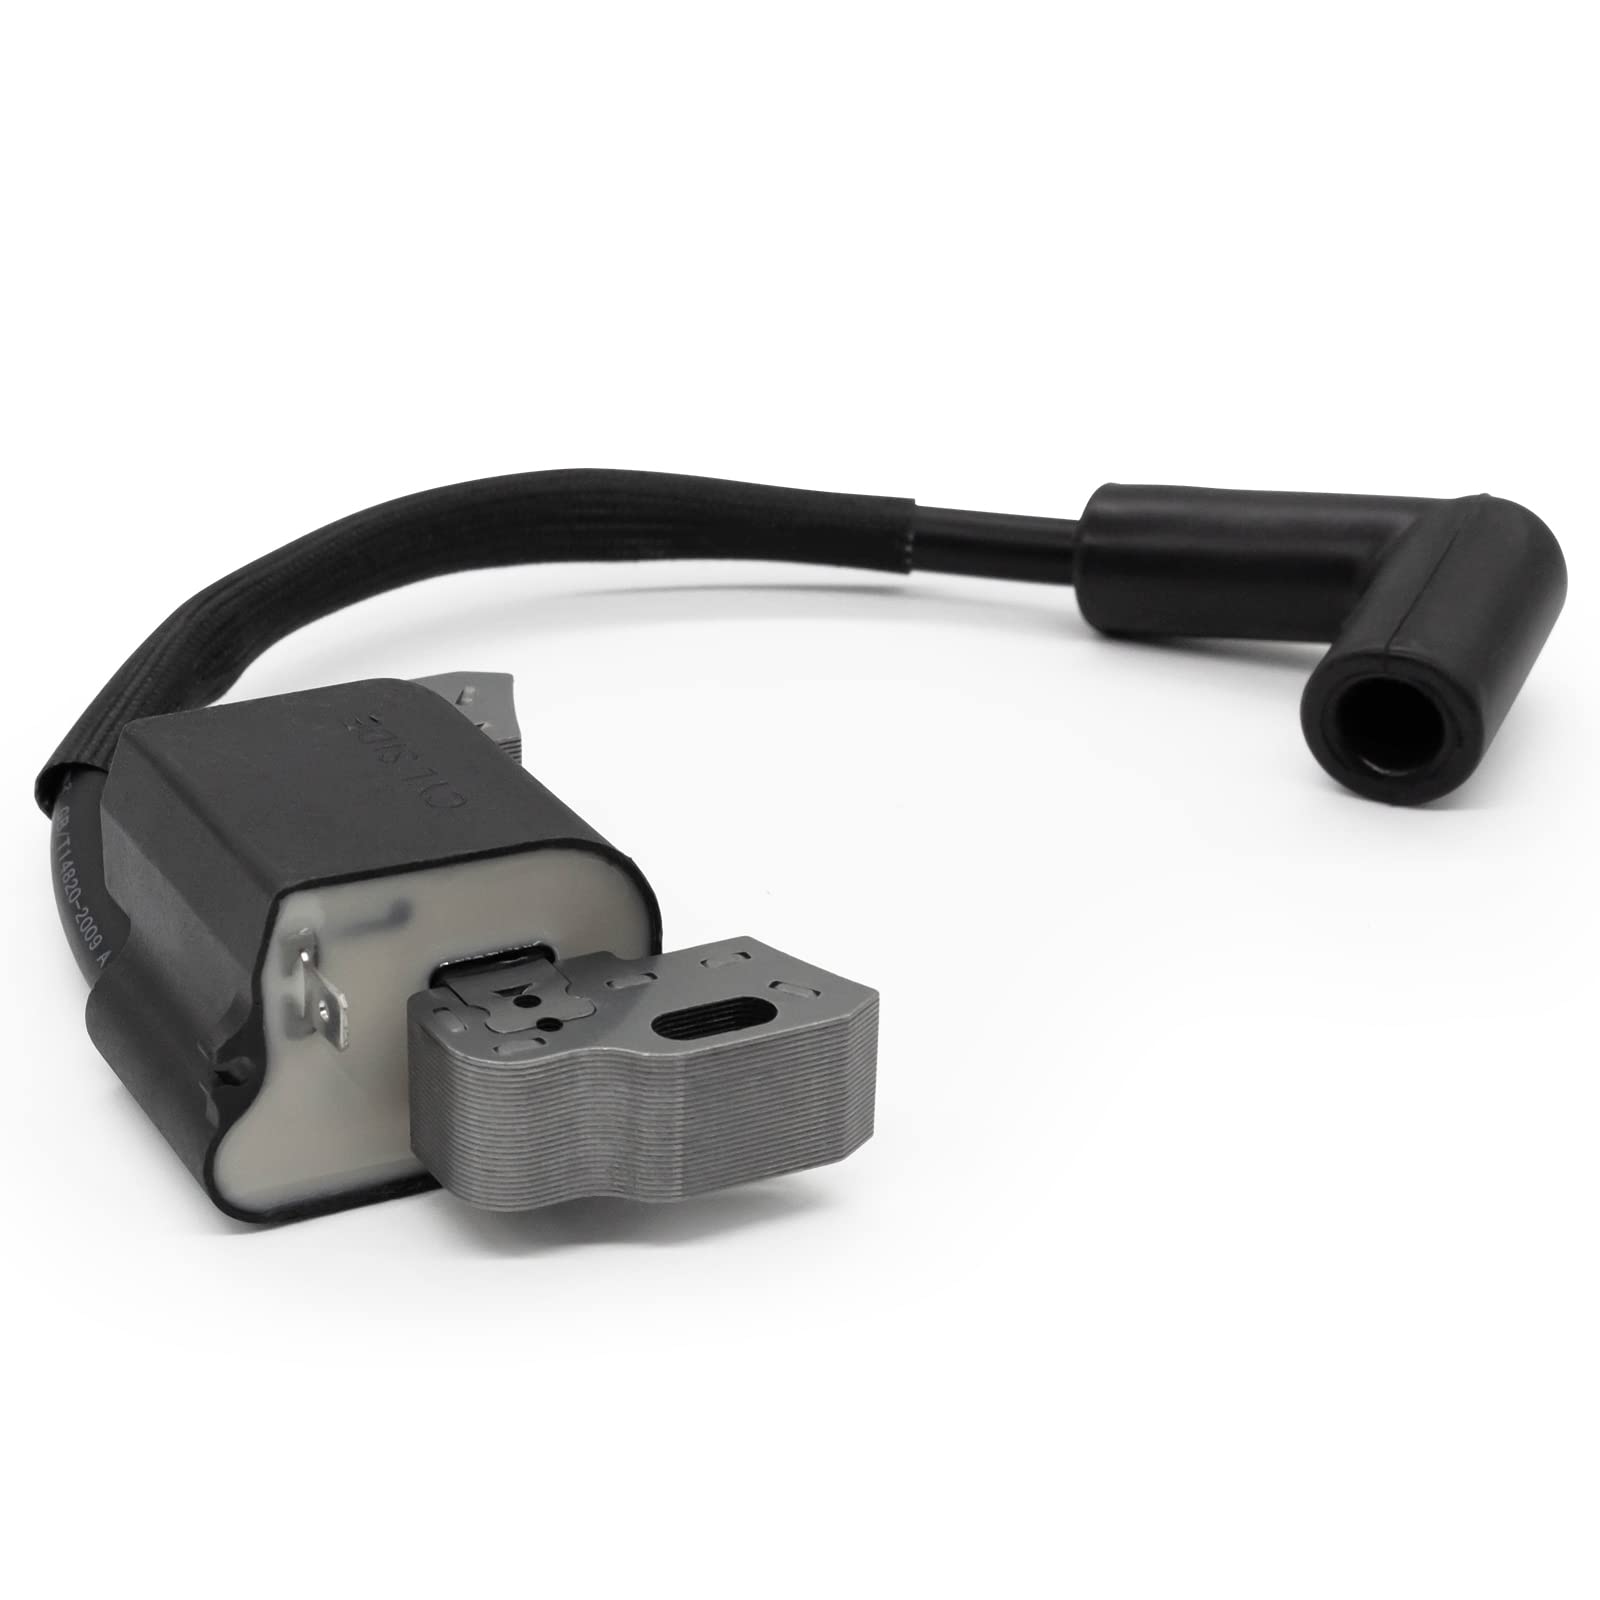
Welcome to the essential guide on how to test a lawnmower coil. The ignition coil is a critical component of a lawnmower's ignition system, responsible for producing the high voltage needed to ignite the fuel-air mixture in the engine's combustion chamber. Over time, the ignition coil can deteriorate, leading to issues such as difficulty starting the lawnmower, intermittent misfiring, or even a complete failure to start. Testing the ignition coil is a crucial diagnostic step in determining whether it is functioning correctly or needs replacement.
In this comprehensive guide, we will walk you through the step-by-step process of testing a lawnmower ignition coil. By following these instructions, you will gain the knowledge and confidence to assess the condition of the ignition coil and take appropriate action to ensure your lawnmower's optimal performance. Before we dive into the testing procedure, it's important to highlight the significance of adhering to safety precautions to prevent any potential mishaps during the testing process. Let's get started on this enlightening journey of lawnmower maintenance and troubleshooting!
Key Takeaways:
- Safety First!
Before testing a lawnmower coil, always prioritize safety by disconnecting the spark plug wire, working in a well-ventilated area, and wearing protective gear to prevent accidents and ensure a secure testing environment. - DIY Diagnostic Power
By following the step-by-step process to test and potentially replace a lawnmower ignition coil, you can gain valuable insights into maintaining a healthy ignition system and ensure the consistent performance of your lawnmower.
Read more: How To Test A Lawnmower Battery
Safety Precautions
Prior to initiating any maintenance or diagnostic procedures on your lawnmower, it is crucial to prioritize safety. The following safety precautions should be strictly observed to minimize the risk of accidents and ensure a secure testing environment:
- Ensure the lawnmower is turned off and the spark plug wire is disconnected to prevent accidental engine ignition during the testing process.
- Work in a well-ventilated area to avoid exposure to exhaust fumes and ensure proper airflow while performing the ignition coil test.
- Wear appropriate personal protective equipment, including safety goggles and gloves, to safeguard against potential contact with sharp edges, hot surfaces, or electrical components.
- Keep flammable materials, such as gasoline or other fuels, away from the testing area to prevent fire hazards.
- Exercise caution when handling electrical components and tools, and avoid contact with moving parts of the lawnmower to prevent injuries.
- If the lawnmower has been in operation prior to the test, allow it to cool down sufficiently to avoid burns from hot engine components.
By adhering to these safety precautions, you can create a secure working environment and mitigate the risk of accidents while testing the lawnmower ignition coil. Safety should always be the top priority when performing maintenance tasks on any power equipment.
Tools and Materials Required
Before embarking on the testing and potential replacement of the lawnmower ignition coil, it is essential to gather the necessary tools and materials to facilitate a smooth and efficient diagnostic process. Here’s a comprehensive list of the items you will need:
Tools:
- Socket wrench set
- Screwdriver set (flathead and Phillips)
- Multimeter or ohmmeter for electrical testing
- Insulated pliers
- Wire brush for cleaning electrical contacts
- Safety goggles for eye protection
- Protective gloves
Materials:
- Replacement ignition coil (if testing indicates a faulty coil)
- Clean cloth for wiping dirt and debris
- Electronic contact cleaner (if cleaning electrical contacts is necessary)
- Rag or shop towels for general cleanup
Having these tools and materials readily available will empower you to perform the ignition coil test with precision and address any maintenance requirements effectively. It’s important to ensure that the tools are in good condition, and the testing equipment, such as the multimeter, is functioning properly to obtain accurate diagnostic results. With these essentials at your disposal, you are well-equipped to proceed with confidence through the testing and potential replacement procedures for the lawnmower ignition coil.
Read more: How To Test Ignition Coil On A Leaf Blower
Step 1: Preparation
Prior to testing the lawnmower ignition coil, it is essential to prepare the work area and the lawnmower itself to ensure a systematic and safe diagnostic process. Follow these steps to set the stage for the ignition coil test:
- Work in a Well-Ventilated Area: Choose a spacious and well-ventilated location for conducting the diagnostic procedure. Adequate ventilation helps disperse any potential exhaust fumes and provides a comfortable working environment.
- Disconnect the Spark Plug Wire: Locate the spark plug wire connected to the spark plug and carefully disconnect it. This step prevents the engine from accidentally starting during the test and ensures your safety throughout the diagnostic process.
- Allow the Engine to Cool: If the lawnmower has been in operation before the test, allow it to cool down completely. This precaution minimizes the risk of burns from hot engine components and ensures safe handling during the diagnostic procedure.
- Gather the Necessary Tools and Materials: Ensure that all the required tools and materials, as mentioned in the previous section, are readily available. Having everything at hand will streamline the testing process and prevent unnecessary interruptions.
- Inspect the Ignition System Components: Before proceeding with the test, visually inspect the ignition system components, including the ignition coil, spark plug wire, and spark plug, for any visible signs of damage, wear, or corrosion. Address any issues found before initiating the diagnostic procedure.
By meticulously preparing the work area and the lawnmower, you establish a conducive environment for conducting the ignition coil test. These preparatory measures prioritize safety and efficiency, setting the stage for a successful diagnostic process and potential resolution of any ignition system issues.
Step 2: Accessing the Ignition Coil
Accessing the ignition coil is a pivotal step in the process of testing and, if necessary, replacing the component. The ignition coil is typically located near the engine and is connected to the spark plug wire. Follow these steps to access the ignition coil:
- Locate the Ignition Coil: Refer to the lawnmower’s manual or service guide to identify the exact location of the ignition coil. In most cases, it is situated adjacent to the engine and may be secured with bolts or screws.
- Remove the Engine Cover: If the ignition coil is concealed beneath an engine cover, carefully remove the cover by unscrewing or unclasping it. Take note of the positioning of any components or wires as you expose the engine area.
- Identify the Ignition Coil Mounting: Once the ignition coil is visible, identify the method of its mounting. It may be secured in place with bolts, screws, or clips. Use the appropriate tools, such as a socket wrench or screwdriver, to loosen and remove any fasteners holding the ignition coil.
- Disconnect the Spark Plug Wire: With the ignition coil accessible, disconnect the spark plug wire from the coil. Gently grasp the boot of the spark plug wire and carefully pull it away from the ignition coil’s terminal. Ensure that the wire is fully detached to allow for accurate testing of the ignition coil.
- Extract the Ignition Coil: Once the spark plug wire is disconnected, carefully extract the ignition coil from its mounting. Exercise caution to avoid damaging the coil or its electrical connections during removal.
By successfully accessing the ignition coil, you have positioned yourself to proceed with the critical phase of testing the component. Accessing the coil allows for a thorough examination and evaluation, enabling you to make informed decisions regarding its functionality and potential replacement, if required.
When testing a lawnmower coil, use a multimeter to check for continuity between the coil’s terminals. If there is no continuity, the coil may be faulty and in need of replacement.
Step 3: Testing the Ignition Coil
Testing the lawnmower ignition coil is a fundamental diagnostic procedure that involves assessing the coil’s electrical integrity and its ability to generate the high-voltage spark required for ignition. The following steps outline the process of testing the ignition coil using a multimeter or ohmmeter:
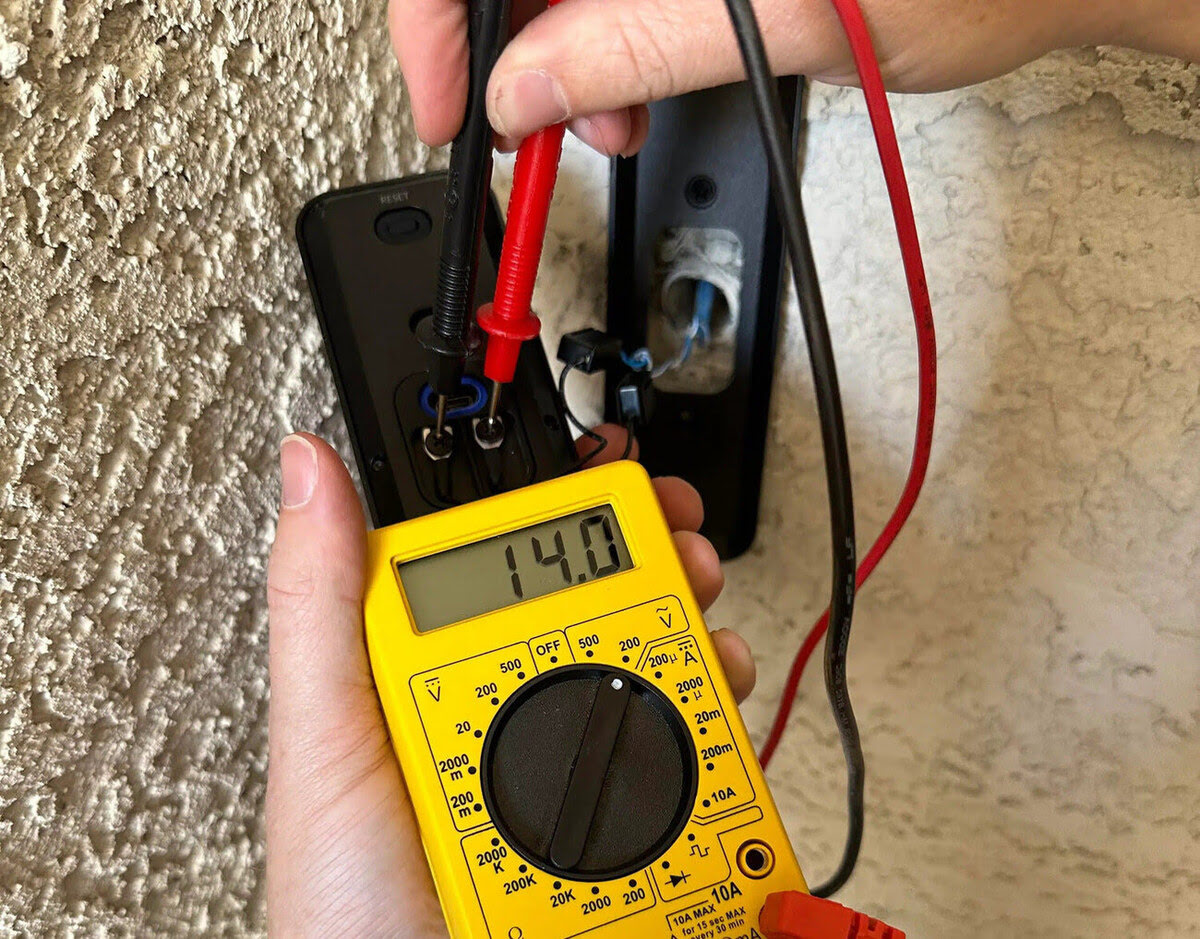
- Set the Multimeter: Begin by setting the multimeter to the resistance or ohms function. Consult the multimeter’s manual for specific instructions on selecting the appropriate setting for resistance testing.
- Identify the Coil Terminals: Locate the terminals on the ignition coil where the spark plug wire and the electrical connectors are attached. These terminals are integral to the coil’s function and will be the points of contact for the multimeter probes during testing.
- Connect the Multimeter Probes: With the multimeter set to the resistance function, carefully connect the multimeter probes to the corresponding terminals on the ignition coil. Ensure that the probes make secure contact with the terminals to obtain accurate resistance readings.
- Observe the Multimeter Reading: Once the probes are in place, observe the multimeter’s reading. A healthy ignition coil typically exhibits a resistance reading within a specified range, as indicated by the lawnmower’s manual or service guide. Compare the obtained reading to the manufacturer’s specifications to assess the coil’s condition.
- Interpret the Test Results: Based on the resistance reading obtained from the ignition coil, determine whether it falls within the acceptable range. A reading outside the specified range may indicate a faulty ignition coil that requires replacement. Consult the manufacturer’s guidelines for the exact resistance values deemed acceptable for the specific coil model.
By meticulously conducting the ignition coil test, you gain valuable insights into the component’s functionality and can make informed decisions regarding its maintenance or replacement. The test results provide a clear indication of the ignition coil’s condition, guiding you towards the appropriate course of action to ensure the lawnmower’s optimal performance.
Step 4: Replacing the Ignition Coil
If the testing process indicates that the lawnmower’s ignition coil is faulty and requires replacement, follow these steps to seamlessly install a new ignition coil and restore the ignition system’s functionality:
- Purchase the Correct Replacement Coil: Obtain a replacement ignition coil that is compatible with your lawnmower’s make and model. Refer to the lawnmower’s manual or seek guidance from a reputable supplier to ensure the correct part is acquired.
- Position the New Ignition Coil: Align the new ignition coil with the mounting location from which the old coil was removed. Ensure that the coil’s electrical connectors and terminals are oriented correctly for seamless installation.
- Secure the Ignition Coil: Using the appropriate fasteners, secure the new ignition coil in place, ensuring a firm and stable mounting. Tighten the bolts or screws to the manufacturer’s recommended torque specifications to prevent any loosening during operation.
- Connect the Spark Plug Wire: Reattach the spark plug wire to the terminal on the new ignition coil. Ensure that the connection is secure and that the boot of the spark plug wire fits snugly onto the coil’s terminal to facilitate efficient spark transmission.
- Reassemble Engine Components: If any engine covers or protective panels were removed to access the ignition coil, carefully reassemble these components. Verify that all fasteners are tightened securely to prevent any potential rattling or displacement during lawnmower operation.
- Test the Ignition System: With the new ignition coil in place, reconnect the spark plug wire to the spark plug and conduct a test start of the lawnmower. Observe the engine’s response and verify that the ignition system functions as expected with the new coil installed.
By conscientiously replacing the faulty ignition coil with a compatible and reliable replacement, you ensure the restoration of the lawnmower’s ignition system to optimal working condition. With the new ignition coil seamlessly integrated, the lawnmower is poised to deliver consistent and efficient performance, enabling you to tackle lawn maintenance tasks with confidence and ease.
Conclusion
Congratulations on successfully navigating the process of testing and potentially replacing the ignition coil in your lawnmower. By following the steps outlined in this guide, you have gained valuable insights into the diagnostic procedures essential for maintaining a healthy ignition system. Whether you’ve confirmed the proper functioning of your current ignition coil or installed a new one, your proactive approach to lawnmower maintenance is commendable.
Understanding the significance of the ignition coil in generating the high-voltage spark required for engine ignition empowers you to address potential issues and ensure the consistent performance of your lawnmower. By adhering to safety precautions, meticulously preparing the work area, accessing the ignition coil, conducting the testing process, and, if necessary, replacing the component, you’ve demonstrated a commitment to the effective maintenance of your valuable equipment.
Remember that regular inspection and maintenance of the ignition system, including the ignition coil, contribute to the longevity and reliability of your lawnmower. By staying attuned to the condition of essential components and promptly addressing any concerns, you can enjoy a seamless lawn mowing experience and maximize the efficiency of your equipment.
Should you encounter further challenges or require additional guidance in maintaining your lawnmower or other power equipment, don’t hesitate to consult reliable resources, seek professional assistance, or explore comprehensive maintenance guides. Your dedication to upholding the performance and functionality of your lawnmower reflects a proactive and responsible approach to equipment ownership.
With a well-maintained ignition system and a thorough understanding of the testing and replacement procedures, you are well-equipped to tackle future maintenance tasks and ensure the enduring performance of your lawnmower. Your commitment to proactive maintenance sets the stage for a seamless and gratifying lawn care experience, allowing you to revel in the beauty of a well-manicured lawn with confidence and ease.
Frequently Asked Questions about How To Test A Lawnmower Coil
Was this page helpful?
At Storables.com, we guarantee accurate and reliable information. Our content, validated by Expert Board Contributors, is crafted following stringent Editorial Policies. We're committed to providing you with well-researched, expert-backed insights for all your informational needs.


0 thoughts on “How To Test A Lawnmower Coil”