Home>Gardening & Outdoor>Garden Tools & Equipment>How To Test A Lawnmower Battery

Garden Tools & Equipment
How To Test A Lawnmower Battery
Modified: February 18, 2024
Learn how to test a lawnmower battery with our comprehensive guide. Ensure your garden tools and equipment are always ready for use.
(Many of the links in this article redirect to a specific reviewed product. Your purchase of these products through affiliate links helps to generate commission for Storables.com, at no extra cost. Learn more)
Introduction
Welcome to the world of lawn care, where the hum of a lawnmower and the smell of freshly cut grass signal the arrival of warmer days. Whether you're a seasoned gardener or just getting started, maintaining your lawn equipment is crucial for a well-kept yard. One essential component of a lawnmower is its battery, as it provides the necessary power to start the engine and keep it running smoothly.
In this guide, we'll delve into the vital task of testing a lawnmower battery. A well-maintained battery ensures that your lawnmower starts reliably and operates efficiently, allowing you to tackle your lawn with ease. We'll explore the safety precautions to observe, the tools and materials needed for the task, and the step-by-step process of testing and potentially replacing the battery. By the end of this guide, you'll feel confident in your ability to assess and maintain your lawnmower's battery, keeping your yard in top condition throughout the mowing season. Let's dive in and ensure your lawnmower is always ready to roar to life!
Key Takeaways:
- Regularly testing and maintaining your lawnmower battery is essential for a reliable and efficient lawn care routine. By following safety precautions and using the right tools, you can prolong the battery’s lifespan and ensure consistent performance.
- When replacing a lawnmower battery, ensure you select a compatible replacement and follow proper installation steps. Regular maintenance and proactive battery care contribute to a well-kept lawn and a reliable lawnmower ready for each mowing session.
Read more: How To Test A Lawnmower Coil
Safety Precautions
Before embarking on any maintenance task, including testing a lawnmower battery, it’s crucial to prioritize safety. Working with electrical components and potentially corrosive materials requires careful attention to prevent accidents and injuries. Here are some essential safety precautions to observe:
- Turn off the lawnmower: Before inspecting the battery, make sure the lawnmower is turned off and the engine is cool. This prevents accidental starts and reduces the risk of burns.
- Wear protective gear: Equip yourself with safety goggles and gloves to shield your eyes and skin from potential battery acid exposure and debris.
- Work in a well-ventilated area: If the battery emits gas while being tested, ensure that you’re in an open or well-ventilated space to prevent the accumulation of hazardous fumes.
- Handle the battery with care: Batteries contain sulfuric acid, which can cause severe burns. Avoid tipping the battery and be cautious when handling it to prevent leaks or spills.
- Disconnect the battery: If you need to remove the battery for testing or replacement, disconnect the negative terminal first to minimize the risk of electrical shock or short circuits.
- Dispose of old batteries properly: If the battery needs to be replaced, ensure it is disposed of in accordance with local regulations. Many auto parts stores and recycling centers accept old batteries for proper disposal.
By adhering to these safety precautions, you can minimize the risks associated with testing and handling a lawnmower battery, allowing you to focus on maintaining your equipment effectively and safely.
Tools and Materials Needed
Before diving into the process of testing a lawnmower battery, it’s essential to gather the necessary tools and materials. Having the right equipment on hand will streamline the testing procedure and ensure that you can accurately assess the battery’s condition. Here’s what you’ll need:
- Safety gear: As mentioned in the safety precautions, ensure you have safety goggles and gloves to protect yourself from potential battery acid exposure and debris.
- Wrench or socket set: You’ll need a wrench or socket set to loosen and remove the battery terminals for testing or replacement.
- Baking soda and water: A mixture of baking soda and water serves as a handy solution for neutralizing any corrosive battery acid that may be present.
- Wire brush or battery terminal cleaner: To effectively clean the battery terminals and remove any corrosion, a wire brush or specialized battery terminal cleaner is essential.
- Multimeter: This crucial tool allows you to measure the voltage of the battery and assess its overall health. A multimeter is an indispensable device for diagnosing battery issues accurately.
- Replacement battery (if needed): If the battery fails the testing process or exhibits signs of significant wear, having a replacement battery on hand will enable you to promptly install a new one and keep your lawnmower operational.
By ensuring that you have these tools and materials at your disposal, you’ll be well-prepared to conduct a thorough assessment of your lawnmower battery. This proactive approach will empower you to address any issues promptly and maintain your equipment in prime working condition.
Testing the Battery Voltage
One of the initial steps in evaluating a lawnmower battery’s health is to test its voltage. This process provides valuable insight into the battery’s charge level and overall condition. Here’s a step-by-step guide to testing the battery voltage:
- Preparation: Ensure that the lawnmower is turned off, and you’re wearing the necessary safety gear, including gloves and safety goggles.
- Locate the battery: Identify the lawnmower’s battery, typically situated beneath the seat or in the engine compartment. If necessary, consult the lawnmower’s manual for specific instructions.
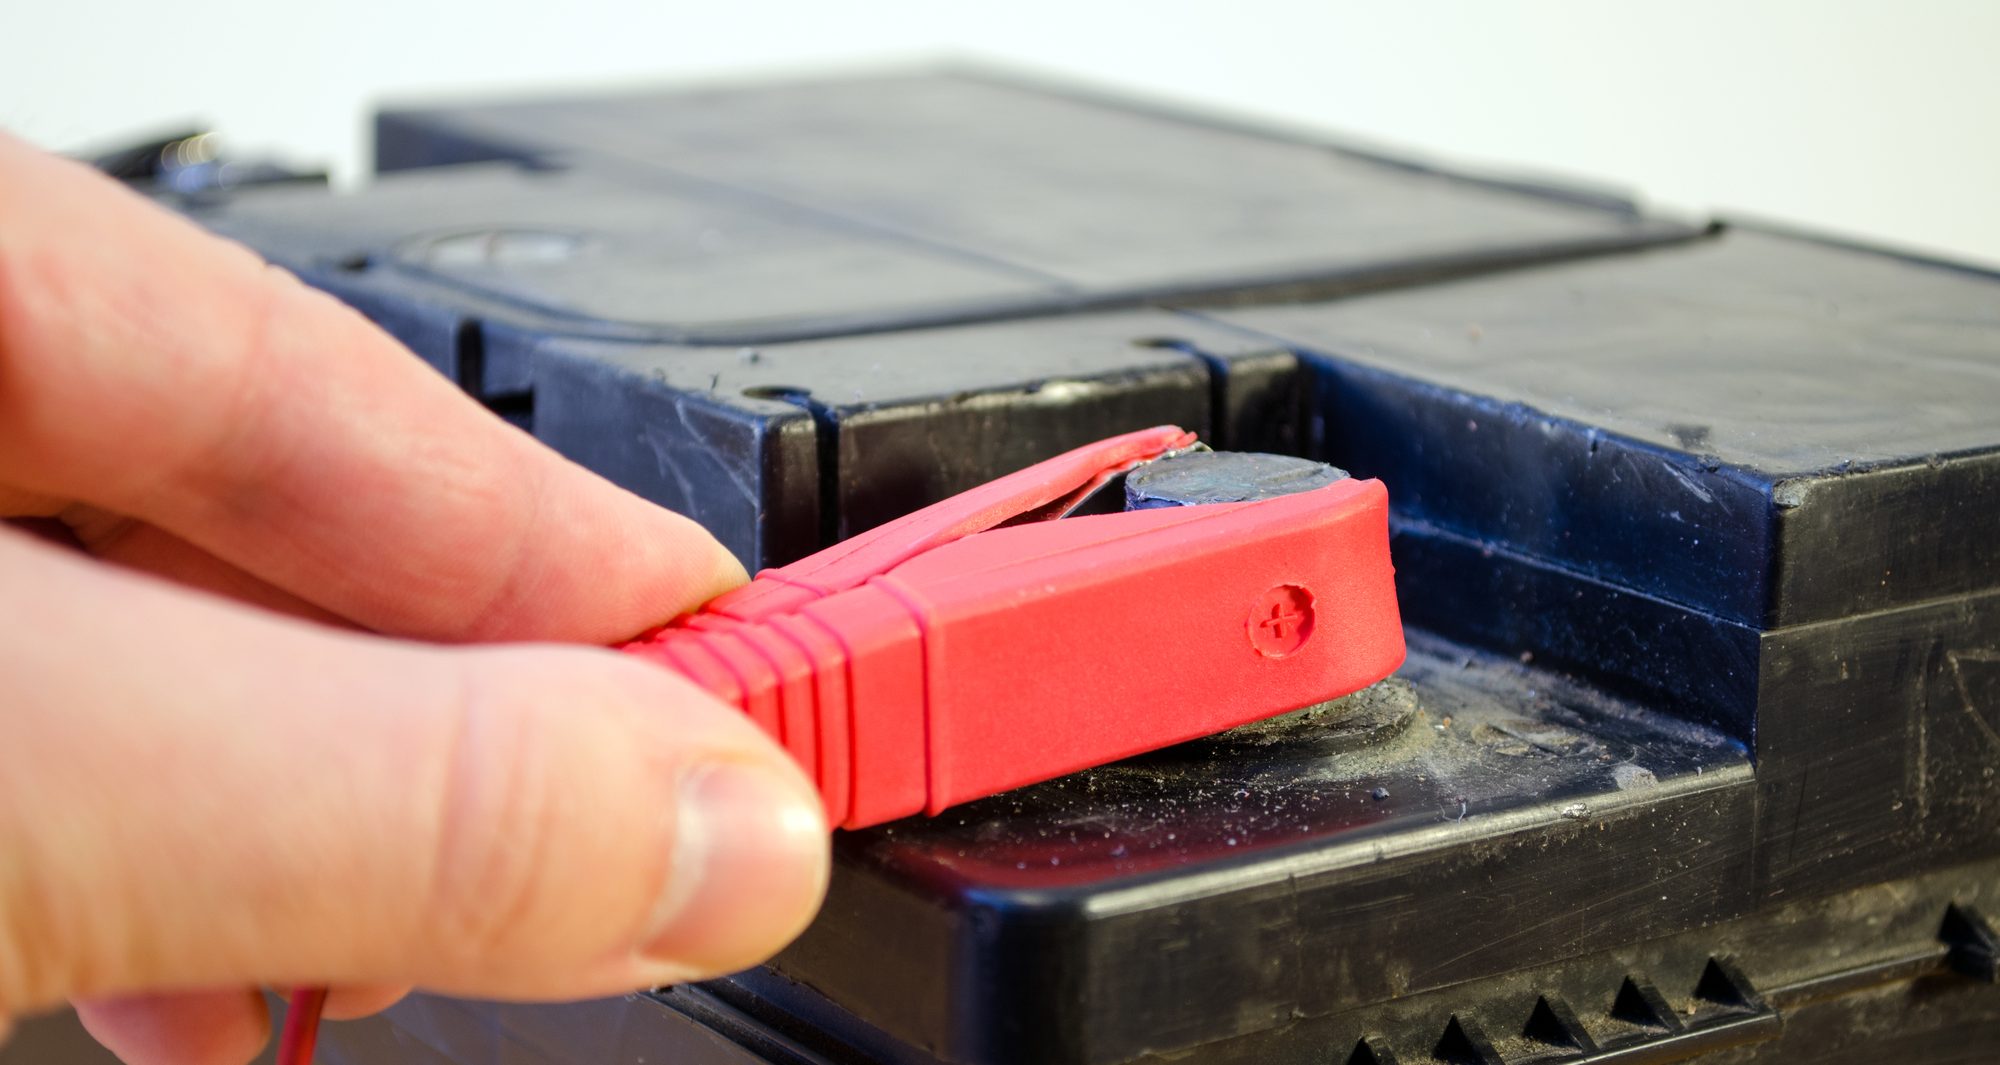
- Inspect the terminals: Check the battery terminals for any signs of corrosion or buildup. If corrosion is present, it should be addressed before proceeding with the voltage test.
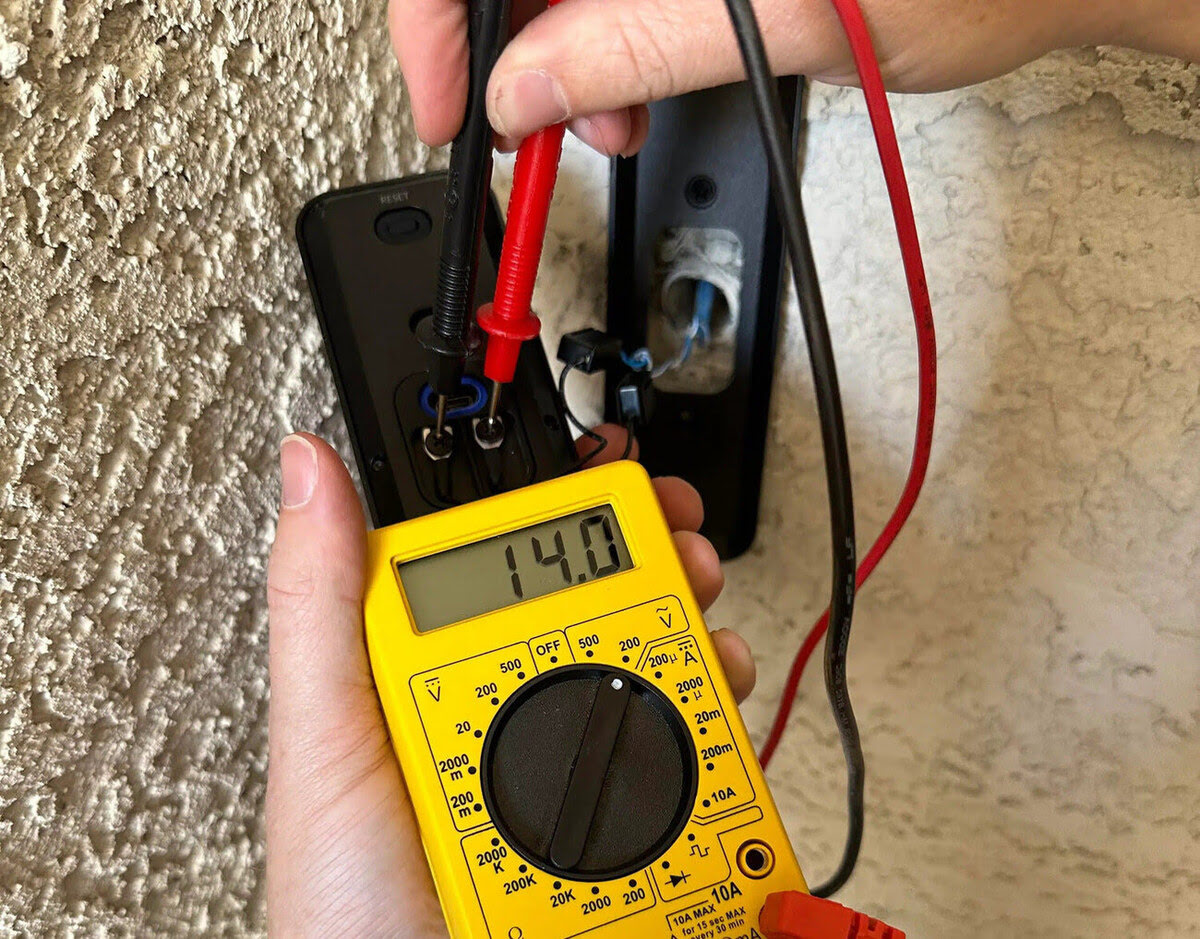
- Use a voltmeter: Set the voltmeter to the DC voltage setting. Connect the red probe to the positive terminal of the battery and the black probe to the negative terminal.
- Read the voltage: The voltmeter will display the battery’s voltage. A fully charged 12-volt battery typically reads around 12.6 to 12.8 volts. If the voltage is significantly lower, it may indicate that the battery requires charging or replacement.
- Interpret the results: Based on the voltage reading, you can assess the battery’s condition. If the voltage is within the expected range, the battery’s charge level is likely sufficient. However, a significantly lower voltage may indicate a depleted or failing battery.
By following these steps, you can effectively gauge the voltage of your lawnmower battery and determine whether it requires further attention. This initial assessment sets the stage for a more comprehensive evaluation of the battery’s performance and overall health.
When testing a lawnmower battery, use a multimeter to check the voltage. A fully charged battery should read around 12.6 volts. If it’s lower, it may need to be recharged or replaced.
Checking for Corrosion
Corrosion on a lawnmower battery’s terminals can impede the flow of electricity and hinder the battery’s performance. It’s essential to regularly inspect the terminals for any signs of corrosion and address the issue promptly. Here’s a detailed guide on checking for corrosion and effectively managing it:
- Visual inspection: Examine the battery terminals for any white, powdery residue or crusty buildup. Corrosion often manifests as a fuzzy or flaky substance on the terminals.
- Safety precautions: Before addressing the corrosion, ensure that you’re wearing safety goggles and gloves to protect yourself from potential exposure to battery acid and debris.
- Mix a cleaning solution: Create a mixture of baking soda and water, forming a paste-like consistency that can effectively neutralize the acidic corrosion. Use a small container to mix the solution.
- Apply the cleaning solution: Using a brush or cloth, apply the baking soda and water mixture to the corroded areas on the battery terminals. Ensure that the solution thoroughly covers the affected areas.
- Scrub the terminals: Gently scrub the terminals with a wire brush or a specialized battery terminal cleaner to remove the corrosion. Take care not to dislodge the terminals or cause damage to the surrounding components.
- Rinse and dry: After effectively removing the corrosion, rinse the terminals with clean water to eliminate any residual cleaning solution. Thoroughly dry the terminals with a clean cloth or towel.
- Apply a protective coating: To help prevent future corrosion, consider applying a thin layer of petroleum jelly or a commercial anti-corrosion terminal spray to the clean terminals. This protective coating helps inhibit the formation of new corrosion.
By routinely checking for corrosion and promptly addressing any buildup on the battery terminals, you can maintain optimal electrical conductivity and prolong the lifespan of your lawnmower battery. This proactive approach contributes to the overall reliability and performance of your equipment, ensuring smooth operation when it’s time to tackle your lawn.
Read more: How To Change A Lawnmower Battery
Testing the Battery with a Multimeter
When it comes to thoroughly assessing a lawnmower battery’s condition, a multimeter is an invaluable tool that provides precise measurements of voltage, current, and resistance. By utilizing a multimeter, you can gain comprehensive insights into the battery’s performance and make informed decisions regarding its maintenance or potential replacement. Here’s a step-by-step guide to testing the battery with a multimeter:
- Select the appropriate settings: Set the multimeter to the DC voltage setting, typically denoted by a “V” with a straight line above it. Ensure that the range is suitable for measuring the battery’s voltage, such as 0-20 volts for a 12-volt battery.
- Connect the probes: Attach the red probe to the positive terminal of the battery and the black probe to the negative terminal. Ensure that the probes make secure contact with the terminals to obtain accurate readings.
- Read the voltage: The multimeter will display the voltage of the battery. A healthy 12-volt battery typically registers around 12.6 to 12.8 volts when fully charged. A lower voltage reading may indicate a depleted or failing battery that requires attention.
- Assess the results: Based on the voltage reading, you can evaluate the battery’s charge level and overall health. Consistently low or fluctuating voltage readings may signify underlying issues that warrant further investigation or potential replacement.
- Measure the voltage under load (optional): If your multimeter offers a “voltage under load” or “cranking voltage” feature, consider testing the battery’s voltage while the engine is being started. This test provides insights into the battery’s ability to deliver power under load, which is crucial for starting the lawnmower’s engine reliably.
By employing a multimeter to test the lawnmower battery, you can gain a comprehensive understanding of its voltage and performance characteristics. This thorough assessment enables you to make informed decisions regarding the battery’s maintenance, charging, or replacement, ensuring that your lawnmower remains in optimal working condition.
Replacing the Battery
When a lawnmower battery shows signs of significant wear, fails the voltage test, or exhibits diminished performance, it may be time to consider replacing it with a new, reliable counterpart. Here’s a comprehensive guide to the process of replacing the lawnmower battery:
- Identify the correct replacement: Refer to the lawnmower’s manual or consult a reputable dealer to ensure that you select a compatible replacement battery with the appropriate voltage and dimensions for your specific lawnmower model.
- Prepare the work area: Turn off the lawnmower and ensure that the engine is cool. Position the lawnmower in a well-lit and spacious area, allowing ample room to access the battery compartment.
- Disconnect the old battery: Using a wrench or socket set, loosen and remove the battery terminals, starting with the negative (black) terminal followed by the positive (red) terminal. Carefully lift the old battery out of the compartment.
- Clean the battery compartment: If the battery compartment shows signs of corrosion or debris, use a brush and a mixture of baking soda and water to clean and neutralize any acidic residues. Ensure that the compartment is dry before installing the new battery.
- Install the new battery: Carefully place the new battery into the compartment, ensuring that the positive and negative terminals align with their respective cables. Securely attach the positive terminal first, followed by the negative terminal, using the appropriate wrench or socket.
- Test the new battery: After installing the new battery, perform a voltage test using a multimeter to confirm that the charge level is within the expected range. This ensures that the new battery is ready to power the lawnmower effectively.
- Dispose of the old battery: If the old battery is no longer serviceable, it should be disposed of properly in accordance with local regulations. Many auto parts stores and recycling centers accept old batteries for safe disposal and recycling.
By following these steps, you can seamlessly replace the lawnmower battery, ensuring that your equipment is equipped with a reliable power source for consistent and efficient operation. A new battery contributes to the overall reliability and performance of your lawnmower, allowing you to maintain your lawn with confidence and ease.
Conclusion
Testing and maintaining a lawnmower battery is a crucial aspect of ensuring that your lawn equipment operates reliably and efficiently. By adhering to safety precautions, routinely testing the battery’s voltage, and addressing issues such as corrosion, you can prolong the lifespan of the battery and optimize the performance of your lawnmower. Equipped with the right tools, including a multimeter and cleaning materials, you can confidently assess the battery’s condition and take appropriate measures to uphold its functionality.
Regular inspections and proactive maintenance not only contribute to the longevity of the lawnmower battery but also enhance the overall reliability of your equipment. Should the need arise, replacing the battery with a compatible and high-quality alternative ensures that your lawnmower remains ready to tackle your lawn with vigor and consistency.
By familiarizing yourself with the testing and maintenance procedures outlined in this guide, you empower yourself to effectively manage your lawnmower’s battery, thereby contributing to a well-kept and visually appealing lawn. Embracing a proactive approach to battery maintenance enables you to enjoy seamless mowing experiences and fosters a sense of confidence in the reliable performance of your lawnmower.
Ultimately, the diligence and care invested in testing and maintaining the lawnmower battery translate into a lush and immaculate lawn, reflecting the dedication and expertise you bring to your gardening endeavors. With a keen eye on battery health and a commitment to thorough maintenance, you can look forward to a thriving lawn and a lawnmower that stands ready to meet the demands of each mowing session.
Frequently Asked Questions about How To Test A Lawnmower Battery
Was this page helpful?
At Storables.com, we guarantee accurate and reliable information. Our content, validated by Expert Board Contributors, is crafted following stringent Editorial Policies. We're committed to providing you with well-researched, expert-backed insights for all your informational needs.


0 thoughts on “How To Test A Lawnmower Battery”