Home>Gardening & Outdoor>Outdoor Structures>How To Build A Shed On Blocks
Outdoor Structures
How To Build A Shed On Blocks
Modified: August 27, 2024
Learn how to build a sturdy shed on blocks for your outdoor space with our comprehensive guide. Discover expert tips and techniques for constructing durable outdoor structures.
(Many of the links in this article redirect to a specific reviewed product. Your purchase of these products through affiliate links helps to generate commission for Storables.com, at no extra cost. Learn more)
Introduction
So, you've decided to add a shed to your property. Whether you need extra storage space, a workshop, or a cozy retreat, a well-built shed can provide the perfect solution. Building a shed on blocks offers numerous benefits, including the ability to easily relocate it if necessary and the avoidance of complex excavation and concrete pouring. This article will guide you through the process of constructing a sturdy and functional shed on blocks, providing detailed steps and essential tips to ensure a successful project.
Constructing a shed on blocks is a versatile option that allows for flexibility in placement and ease of construction. By following this guide, you can create a durable and reliable structure that meets your specific needs. From planning and preparation to the finishing touches, each step will be outlined in detail, empowering you to take on this rewarding DIY project with confidence.
Throughout the construction process, you'll have the opportunity to unleash your creativity and personalize your shed to complement your property and lifestyle. Whether you envision a rustic barn-style shed or a modern, sleek design, the choices are endless. With careful planning and the right tools, you can bring your vision to life and create a space that enhances both the functionality and aesthetic appeal of your property.
Embarking on a shed-building project is an exciting endeavor that allows you to unleash your inner craftsman and create a practical yet visually appealing addition to your outdoor space. By the end of this guide, you'll be equipped with the knowledge and inspiration needed to embark on this fulfilling journey. So, roll up your sleeves, gather your tools, and let's dive into the essential steps for building a shed on blocks.
Key Takeaways:
- Building a shed on blocks allows for creative customization, practical functionality, and personal expression, enhancing your property with a versatile and personalized addition.
- By carefully planning, learning new skills, and embracing creativity, you can build a shed that reflects your individuality and serves as a valuable and enjoyable outdoor space.
Read more: How To Use Deck Blocks For A Shed
Planning and Preparation
Before diving into the construction of your shed, thorough planning and preparation are essential for a smooth and successful project. Start by determining the purpose of your shed. Will it be used for storage, as a workshop, or as a recreational space? Understanding its intended use will guide the design and size of the structure.
Next, check with your local building department to determine if there are any regulations or permits required for constructing a shed on your property. It’s crucial to comply with any zoning laws and building codes to avoid potential issues in the future.
Once you have a clear understanding of your shed’s purpose and any regulatory requirements, it’s time to select a suitable location. Consider factors such as sun exposure, drainage, and accessibility when choosing the placement of your shed. Additionally, ensure that there is ample space around the shed for maintenance and future expansion if needed.
With the location in mind, sketch out a rough design for your shed, including its dimensions and layout. This will serve as a visual guide and help you determine the amount of materials needed for the project. Consider the type of foundation you’ll use, as well as the style of the shed, whether it’s a traditional gable roof or a sleek modern design.
Once the design is finalized, create a detailed materials list and gather all the necessary tools for the construction. Common materials for building a shed on blocks include pressure-treated lumber for the foundation, framing lumber for the walls and roof, and exterior-grade plywood for the sheathing. Essential tools may include a circular saw, hammer, level, and power drill, among others.
Finally, consider any additional features you’d like to incorporate into your shed, such as windows, skylights, or shelving. These details should be factored into the design and material list to ensure a cohesive and functional end result.
By meticulously planning and preparing for your shed construction project, you’ll set the stage for a seamless and enjoyable building process. With a clear vision, a well-thought-out design, and the necessary materials and tools at your disposal, you’ll be ready to move on to the next phase: building the foundation for your shed on blocks.
Choosing a Suitable Location
When it comes to building a shed on blocks, selecting the right location is a critical decision that can significantly impact the functionality and longevity of your structure. Consider the following factors to ensure you choose a suitable spot for your shed:
- Sun Exposure: Assess the sun’s movement throughout the day to determine the ideal orientation for your shed. Depending on its purpose, you may want to maximize or minimize sun exposure inside the shed.
- Drainage: Ensure that the chosen location has proper drainage to prevent water from accumulating around the shed. Poor drainage can lead to moisture issues and potential damage to the structure.
- Accessibility: Consider how easily you can access the shed from your home or other frequently used areas of your property. A convenient location will enhance the shed’s usability.
- Property Boundaries: Check local regulations and property lines to ensure that your shed will be situated within the allowable area. Avoid encroaching on neighboring properties or easements.
- Landscaping and Aesthetics: Integrate the shed into your property’s landscaping and overall aesthetic. Consider how the shed will complement the existing features and enhance the visual appeal of your outdoor space.
Once you’ve evaluated these factors, mark the chosen location for your shed using stakes or spray paint. This will provide a visual reference as you proceed with the construction process.
Keep in mind that the location of your shed should also allow for future maintenance and potential expansion. Having adequate space around the shed will make it easier to perform upkeep tasks and accommodate any modifications or additions in the future.
By carefully considering these aspects and selecting a suitable location for your shed, you’ll lay the groundwork for a successful and functional addition to your property. With the location finalized, you can move on to the next steps in the construction process, such as gathering materials and tools and building the foundation for your shed on blocks.
Gathering Materials and Tools
With the location chosen and the design finalized, it’s time to gather the materials and tools necessary for building your shed on blocks. Here’s a comprehensive list of essential items you’ll need for the project:
Materials:
- Pressure-Treated Lumber: This will be used for constructing the foundation, ensuring durability and resistance to moisture and decay.
- Framing Lumber: Choose high-quality lumber for the walls, roof, and internal framework of the shed.
- Exterior-Grade Plywood: Select plywood suitable for exterior use to sheath the walls and roof of the shed.
- Concrete Blocks: These will provide a stable and level base for your shed, supporting the pressure-treated lumber foundation.
- Roofing Materials: Depending on your design preferences, this may include shingles, metal roofing panels, or other suitable roofing materials.
- Siding: Choose from a variety of siding options such as wood, vinyl, or metal to clad the exterior walls of the shed.
- Fasteners and Hardware: Stock up on nails, screws, brackets, and other hardware needed for assembly and structural integrity.
Read more: How To Build A Block Chimney
Tools:
- Circular Saw: Essential for cutting lumber and plywood to the required dimensions.
- Hammer and Nails: A classic combination for fastening framing members and sheathing.
- Level: Ensure the accuracy and alignment of your shed's components during construction.
- Power Drill: Useful for driving screws and drilling pilot holes, among other tasks.
- Tape Measure: An indispensable tool for taking precise measurements and ensuring the shed's components fit together accurately.
- Work Gloves and Safety Gear: Prioritize safety by equipping yourself with gloves, safety glasses, and other protective gear.
Before purchasing materials, review your shed’s design and materials list to ensure you have everything you need. Consider factors such as the climate in your area and the specific requirements of your shed’s design when selecting materials.
By gathering the right materials and tools, you’ll be well-prepared to begin the construction process and bring your vision of a functional and stylish shed on blocks to fruition. With everything in place, you can move on to the next phase: building the foundation for your shed.
Building the Foundation
The foundation serves as the anchor of your shed, providing stability and support for the entire structure. When building a shed on blocks, the foundation plays a crucial role in distributing the weight of the shed and ensuring it remains level and secure. Here are the essential steps for constructing the foundation:
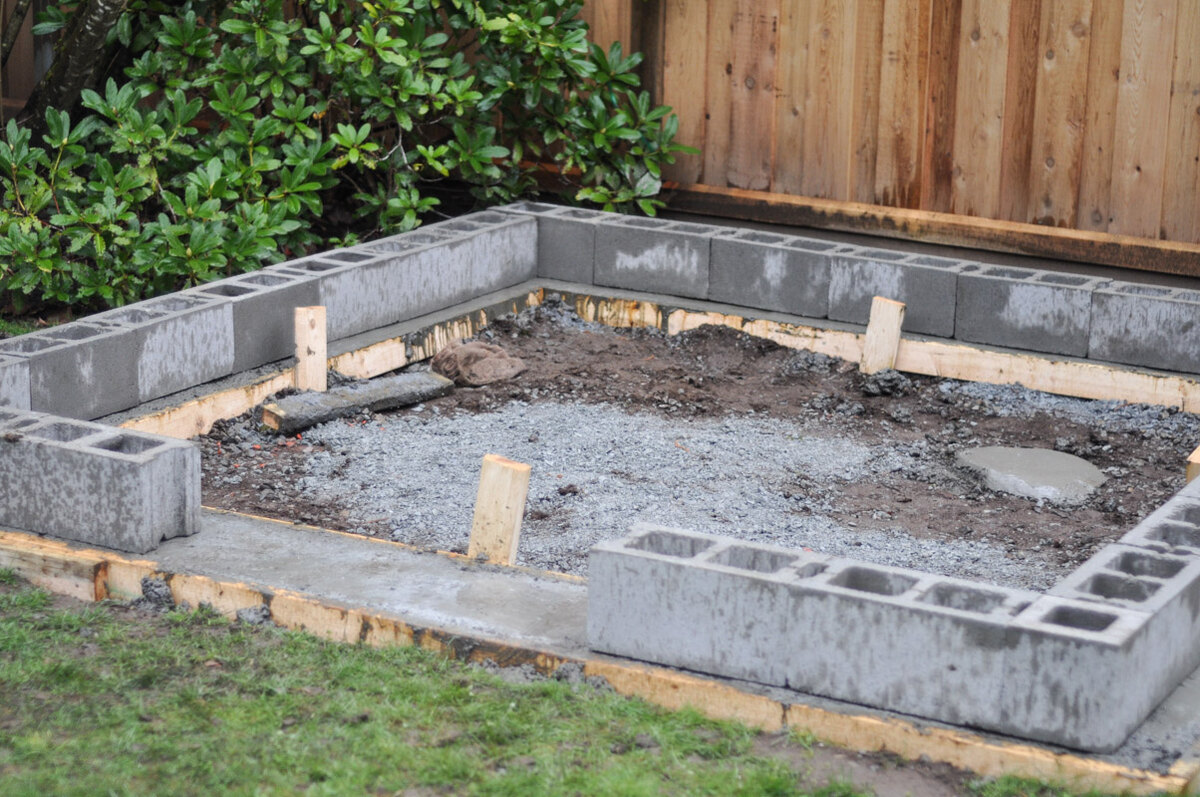
1. Site Preparation:
Begin by clearing and leveling the ground where the shed will be placed. Remove any vegetation, rocks, or debris, and use a shovel and rake to create a smooth and even surface. It’s important to ensure that the site is well-drained to prevent water accumulation around the foundation.
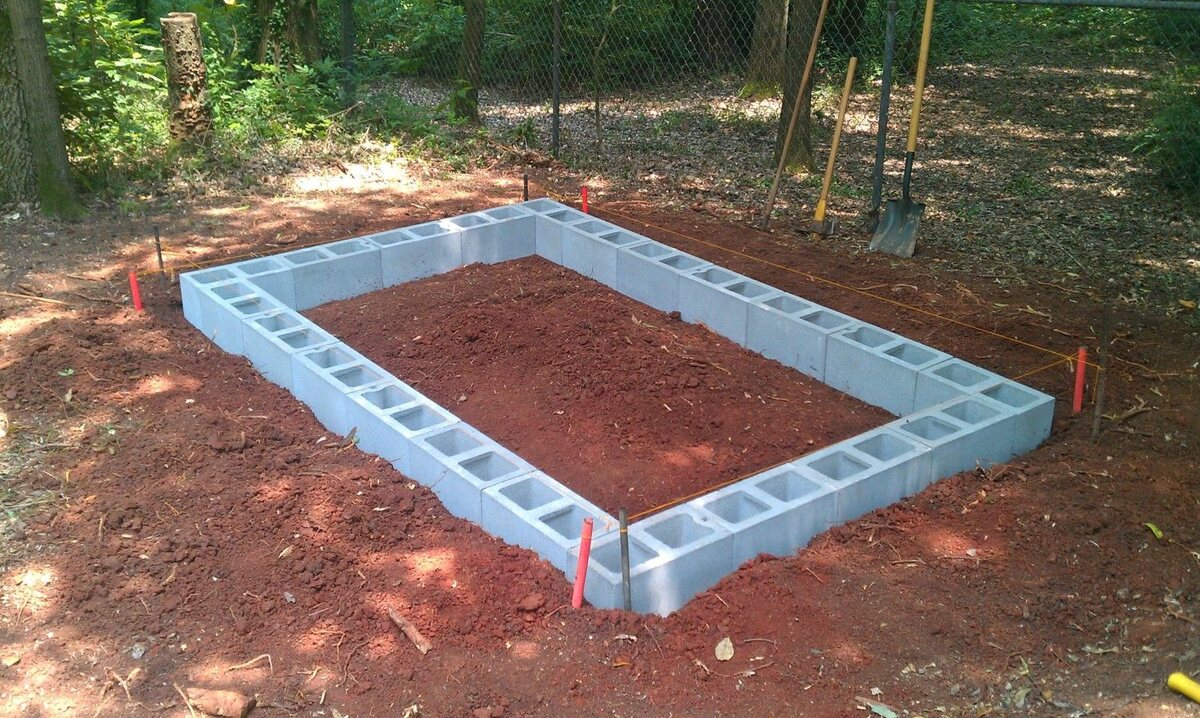
2. Positioning the Blocks:
Place concrete blocks at strategic intervals to support the pressure-treated lumber that will form the foundation. The number of blocks required will depend on the shed’s size and the spacing needed to adequately distribute the weight. Use a level to ensure that the blocks are positioned evenly and are at the correct height to establish a level foundation.
Read more: How Build A Shed
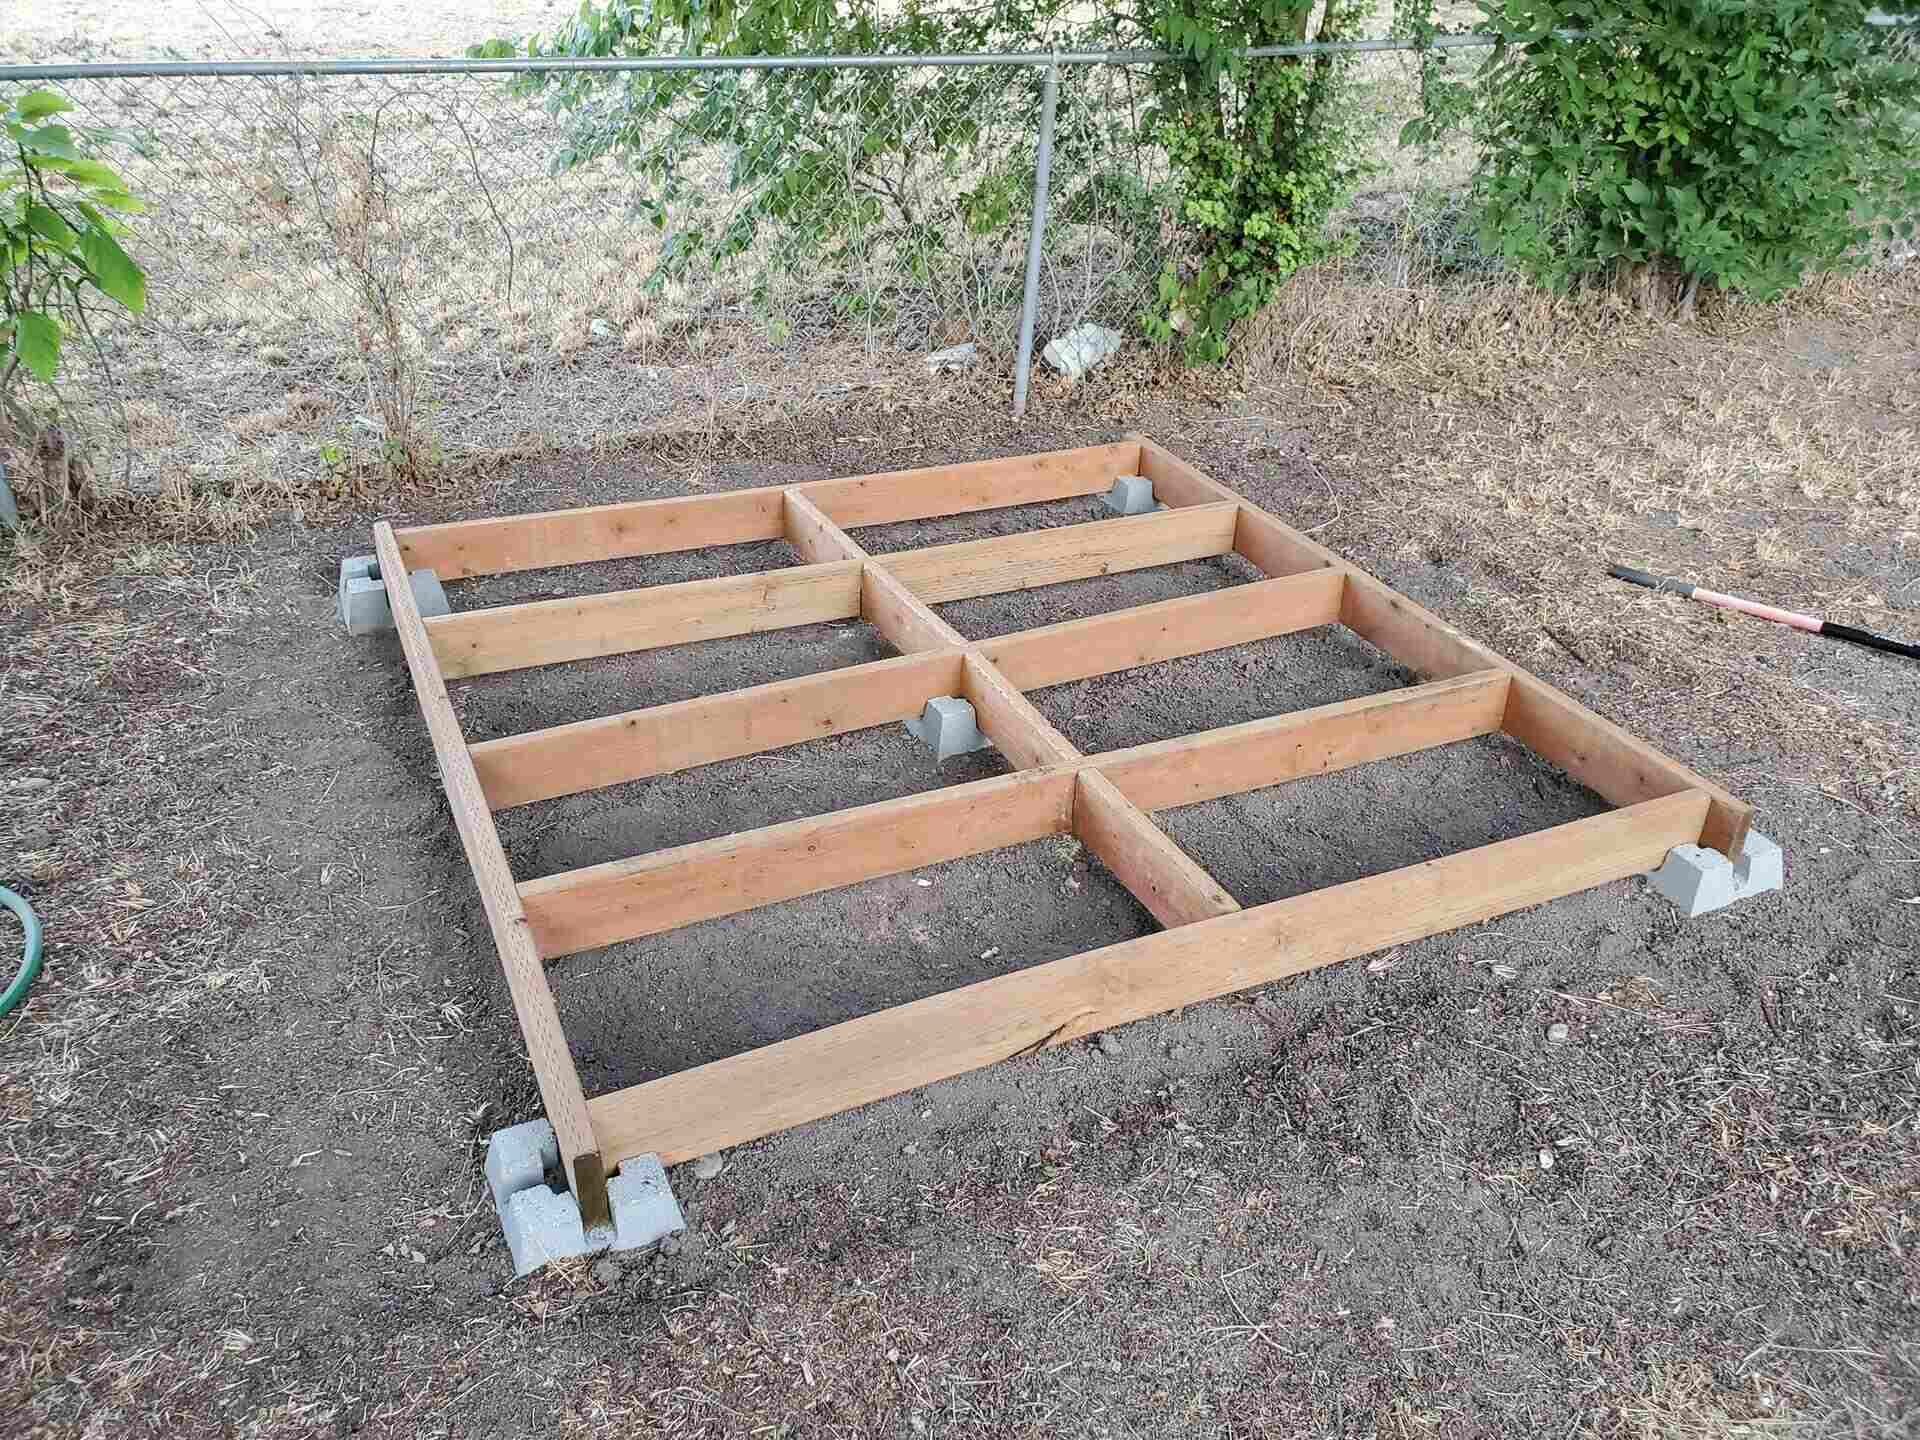
3. Installing the Pressure-Treated Lumber:
Place pressure-treated lumber beams across the concrete blocks, ensuring they are level and well-supported. These beams will serve as the base for the shed’s floor framing. Use a level to check the horizontal alignment of the beams, making any necessary adjustments to achieve a level foundation.
4. Adding Floor Joists:
With the pressure-treated lumber in place, install floor joists perpendicular to the beams, providing the framework for the shed’s floor. Secure the joists to the beams using appropriate fasteners, ensuring a sturdy and reliable connection.
5. Sheathing the Floor:
Once the floor framing is complete, cover the joists with exterior-grade plywood to create a solid and stable shed floor. Secure the plywood to the joists using screws or nails, ensuring a secure and even surface.
By following these steps, you’ll establish a robust and level foundation for your shed on blocks, setting the stage for the next phase of construction. With the foundation in place, you can proceed to assemble the shed’s frame, bringing your vision of a functional and stylish outdoor structure closer to reality.
Assembling the Shed Frame
With the foundation securely in place, it’s time to move on to assembling the frame of your shed. The frame provides the structural skeleton of the shed, supporting the walls, roof, and doors. Here’s a step-by-step guide to assembling the shed frame:
Read more: How To Build A Shed
1. Wall Framing:
Begin by constructing the walls of the shed. Measure and cut the framing lumber to the required dimensions, taking into account any door and window openings. Assemble the wall frames on the shed floor, ensuring they are square and plumb. Secure the framing members together using nails or screws, creating sturdy and stable wall sections.
2. Wall Erection:
Once the wall frames are assembled, enlist the help of others to raise them into position on the foundation. Use temporary bracing to hold the walls upright and ensure they are aligned correctly. Secure the walls to each other and to the foundation, creating a solid and stable structure.
3. Roof Trusses or Rafters:
Depending on your shed’s design, install prefabricated roof trusses or cut and assemble individual rafters. Position the trusses or rafters on top of the walls, ensuring they are evenly spaced and aligned. Secure them in place, providing the framework for the shed’s roof.
4. Roof Sheathing:
Once the trusses or rafters are in position, cover the roof framing with exterior-grade plywood or oriented strand board (OSB). Secure the sheathing to the roof framing, creating a stable and weather-resistant surface for the roof covering.
Read more: How To Build A Bar Shed
5. Bracing and Reinforcement:
Install diagonal bracing or additional framing members as needed to reinforce the shed frame and ensure its stability. Pay special attention to corners and areas where walls and roof sections intersect, providing additional support where necessary.
By following these steps, you’ll assemble a robust and reliable frame for your shed, bringing it one step closer to completion. With the frame in place, you can proceed to add siding and roofing, transforming the frame into a fully enclosed and weather-resistant structure.
Adding Siding and Roofing
With the shed frame securely in place, it’s time to add the siding and roofing to enclose and protect the structure from the elements. This phase of the construction process will transform the frame into a fully functional and weather-resistant shed. Here’s how to add siding and roofing to your shed:
1. Siding Installation:
Select the type of siding that best suits your shed’s design and the climate in your area. Common options include wood, vinyl, metal, or composite siding. Begin by installing the siding on the walls, starting from the bottom and working your way up. Follow the manufacturer’s instructions for proper installation, ensuring each piece is securely fastened and properly aligned. Pay attention to corner and edge details to create a professional and polished appearance.
2. Roofing Installation:
Choose the roofing material that best suits your shed’s design and provides adequate protection from the elements. Options may include asphalt shingles, metal roofing panels, or other suitable roofing materials. Install the roofing material according to the manufacturer’s guidelines, ensuring proper overlap and secure fastening. Pay attention to details such as flashing around roof penetrations and edges to prevent water infiltration and ensure a watertight seal.
Read more: How To Build A Tuff Shed
3. Trim and Detailing:
Add trim and detailing to the shed’s exterior to enhance its visual appeal and provide a finished look. This may include corner trim, fascia boards, and soffit panels. Pay attention to the finer details to create a cohesive and aesthetically pleasing exterior for your shed.
4. Weatherproofing and Sealing:
Once the siding and roofing are in place, take the necessary steps to weatherproof and seal the shed’s exterior. This may involve applying caulk or sealant around windows, doors, and other openings to prevent water infiltration and ensure airtightness. Proper weatherproofing will enhance the shed’s durability and protect its interior from the elements.
By adding siding and roofing to your shed, you’ll complete the enclosure of the structure and provide it with protection from the elements. With the exterior finished, you can move on to the next phase of construction, which involves installing doors and windows to make the shed accessible and functional.
Installing Doors and Windows
As you near the completion of your shed construction, installing doors and windows is a crucial step that adds functionality, natural light, and accessibility to the structure. Here’s a guide to installing doors and windows in your shed:
1. Door Installation:
Choose a door that suits your shed’s design and meets your functional needs. Common options include single or double-hinged doors, sliding doors, or roll-up doors, depending on the shed’s purpose. Ensure the door frame is square and level before installing the door. Secure the door in place, making sure it operates smoothly and securely latches when closed. Consider adding weather-stripping to create a tight seal and prevent drafts.
Read more: How To Build Rafters For A Shed
2. Window Installation:
Select windows that provide adequate ventilation and natural light for your shed. Common options include sliding windows, awning windows, or fixed-pane windows. Install the windows in the framed openings, ensuring they are securely fastened and properly sealed. Consider adding window trim to enhance the appearance and weatherproofing of the openings.
3. Hardware and Accessories:
Install door handles, locks, and any additional hardware needed to ensure the doors are functional and secure. For windows, add latches or locks as necessary to provide security and peace of mind. Consider adding window screens to allow for ventilation while keeping insects out of the shed.
4. Sealing and Insulation:
After installing the doors and windows, take the necessary steps to seal and insulate around the openings. Use caulk or weather-stripping to create a tight seal, preventing air and water infiltration. Proper sealing and insulation will enhance the shed’s energy efficiency and comfort.
By installing doors and windows, you’ll transform your shed into a functional and inviting space that meets your specific needs. With the shed now accessible and well-lit, you can move on to the final phase of construction, adding finishing touches to enhance the shed’s appearance and functionality.
Finishing Touches
As you approach the final stages of your shed construction, adding finishing touches will elevate the appearance, functionality, and overall appeal of the structure. These details will enhance the shed’s usability and visual appeal, creating a polished and inviting outdoor space. Here are the key finishing touches to consider:
Read more: How To Build A Roof For A Shed
1. Interior Finishing:
Consider adding interior finishes such as insulation, wall paneling, and a finished floor to create a comfortable and functional interior space. Insulation will help regulate the shed’s temperature, while wall paneling and a finished floor will enhance its appearance and comfort. Depending on your shed’s purpose, you may also want to add shelving, workbenches, or storage solutions to maximize its functionality.
2. Paint or Stain:
Apply a coat of paint or stain to the exterior of the shed to protect the siding and enhance its visual appeal. Choose a color that complements your property’s aesthetic and blends seamlessly with the surroundings. Properly finishing the exterior will prolong the life of the shed and contribute to its overall attractiveness.
3. Landscaping and Exterior Décor:
Integrate the shed into your property’s landscaping by adding pathways, plantings, or exterior lighting around the structure. Consider incorporating exterior décor such as flower boxes, shutters, or decorative accents to enhance the shed’s visual appeal and create a cohesive outdoor environment.
4. Utility Hookups and Accessories:
If your shed will be used as a workshop or hobby space, consider adding utility hookups for electricity, lighting, and possibly water, depending on your needs. Install lighting fixtures, power outlets, and any necessary accessories to make the shed a fully functional and comfortable space for your activities.
Read more: How To Build Garden Shed
5. Security and Accessibility:
Ensure the shed is secure and easily accessible by adding locks, security lighting, and pathways leading to the entrance. Consider installing a ramp if needed for easy entry and exit, especially if you plan to store heavy or bulky items in the shed.
By adding these finishing touches, you’ll transform your shed into a fully realized and inviting outdoor space that complements your property and meets your specific needs. With the construction process complete, you can now enjoy the rewards of your hard work and creativity, embracing the functionality and beauty of your newly built shed on blocks.
Conclusion
Congratulations! You’ve successfully navigated the process of building a shed on blocks, transforming your vision into a tangible and functional outdoor structure. Throughout this journey, you’ve embraced the opportunity to unleash your creativity, hone your DIY skills, and enhance your property with a versatile and personalized addition. As you reflect on the completion of your shed, consider the following key takeaways:
Unleashing Creativity:
Building a shed on blocks allowed you to explore various design options, customize the structure to your preferences, and integrate it seamlessly into your property. Whether you opted for a traditional or modern design, the shed now stands as a testament to your creativity and craftsmanship.
Practical Functionality:
Your shed serves a practical purpose, providing valuable storage space, a dedicated workshop, or a versatile retreat. By carefully planning the shed’s layout and features, you’ve created a space that enhances the functionality and organization of your property.
Read more: How To Build A Concrete Block Foundation
Personalized Expression:
The finishing touches, from landscaping to interior details, have allowed you to infuse the shed with your personal style and preferences. The shed now harmoniously complements your property, adding to its aesthetic appeal and reflecting your individuality.
Learning and Growth:
Throughout the construction process, you’ve expanded your skills, tackled new challenges, and gained valuable insights into the world of DIY construction. The knowledge and experience gained from building your shed will undoubtedly serve you well in future projects and endeavors.
Enjoying the Fruits of Labor:
As you step back and admire the completed shed, take pride in the dedication and effort invested in bringing your vision to life. Embrace the opportunities for relaxation, productivity, and enjoyment that your new outdoor space affords.
With your shed now standing as a testament to your ingenuity and determination, take a moment to savor the satisfaction of a job well done. Whether you’re storing tools, pursuing hobbies, or simply enjoying a tranquil retreat, your shed on blocks stands as a testament to your creativity and resourcefulness.
Celebrate this achievement and the boundless potential of your newly built shed as it becomes an integral part of your outdoor living experience.
Frequently Asked Questions about How To Build A Shed On Blocks
Was this page helpful?
At Storables.com, we guarantee accurate and reliable information. Our content, validated by Expert Board Contributors, is crafted following stringent Editorial Policies. We're committed to providing you with well-researched, expert-backed insights for all your informational needs.


0 thoughts on “How To Build A Shed On Blocks”