Home>Gardening & Outdoor>Outdoor Structures>How To Build A Loft In A Shed
Outdoor Structures
How To Build A Loft In A Shed
Modified: August 31, 2024
Learn how to create additional space by building a loft in your shed with our outdoor structures guide. Maximize storage and functionality with these expert tips.
(Many of the links in this article redirect to a specific reviewed product. Your purchase of these products through affiliate links helps to generate commission for Storables.com, at no extra cost. Learn more)
Introduction
So, you've got a shed in your backyard, and you're thinking about maximizing its space by adding a loft. This is a fantastic idea! A loft not only provides extra storage space but also offers a cozy and functional area for various activities. Whether you dream of creating a peaceful reading nook, a mini art studio, or simply need more room to store your outdoor gear, a loft can be the perfect solution.
In this comprehensive guide, we'll walk you through the step-by-step process of building a loft in your shed. From assessing the shed's structural integrity to designing the loft, gathering materials, and executing the construction, we've got you covered. By the time you finish reading this guide, you'll have the confidence and know-how to embark on this exciting DIY project.
So, roll up your sleeves, grab your tools, and let's dive into the rewarding journey of transforming your simple shed into a versatile and efficient space with a custom-built loft!
Key Takeaways:
- Maximize your shed’s space and create a cozy retreat by adding a loft. It’s a DIY accomplishment that reflects your style and enhances your shed’s functionality.
- Enjoy a personalized loft retreat in your shed, perfect for relaxation, hobbies, or work. Embrace the DIY journey and continue to maintain and enjoy your transformed outdoor space.
Read more: How To Build A Ladder For A Loft
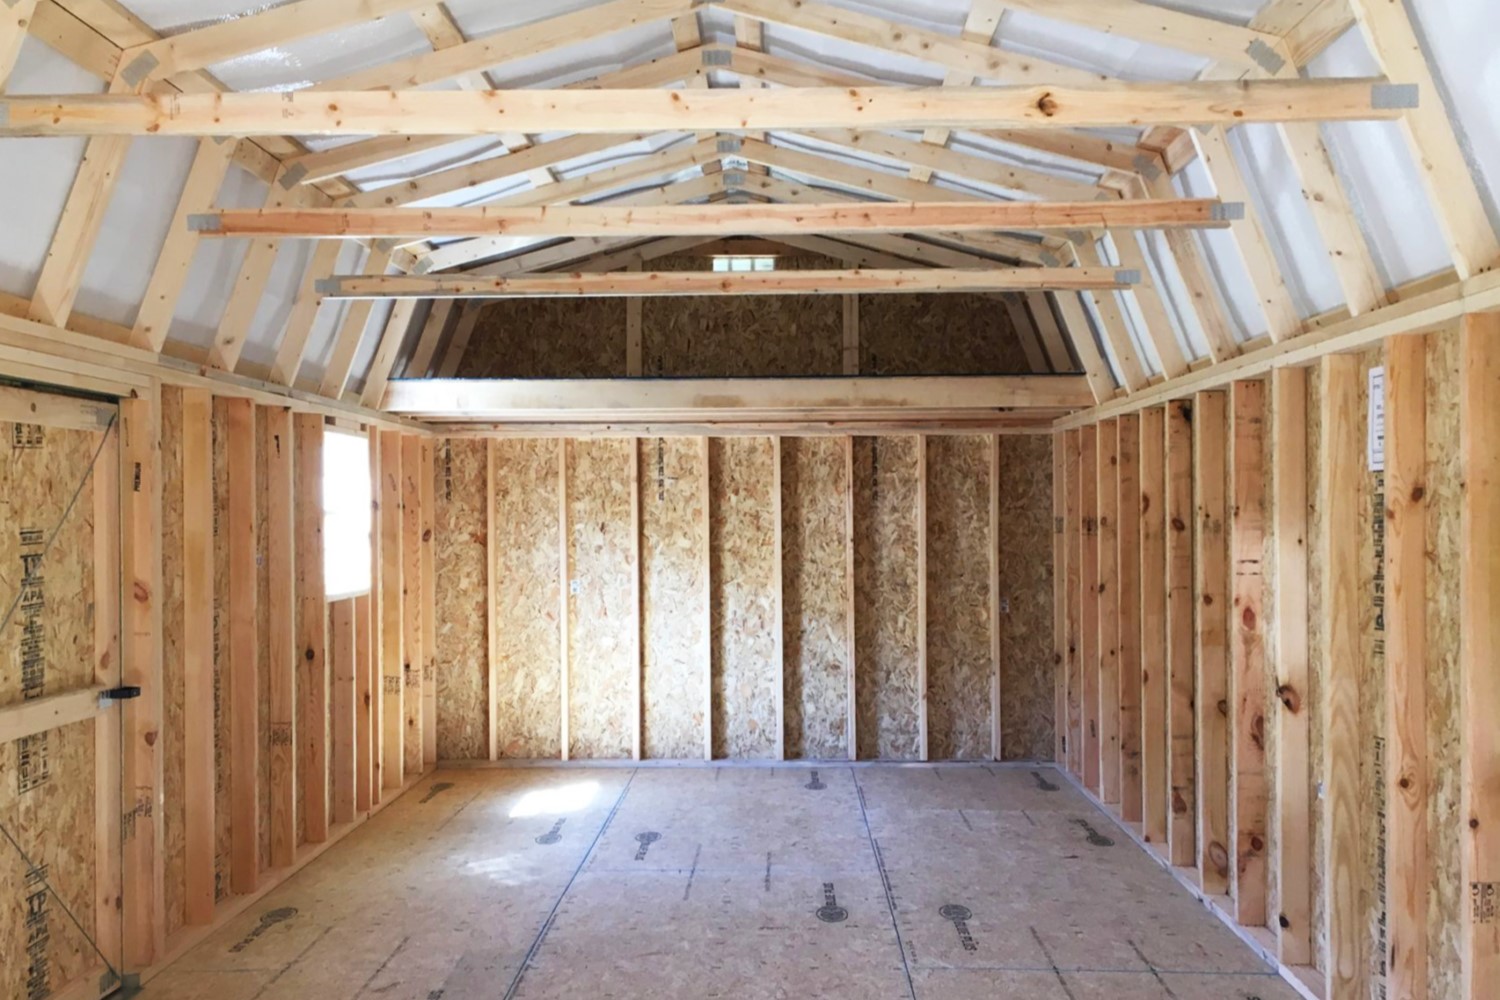
Assessing the Shed
Before diving into the construction of a loft, it’s crucial to assess the shed’s structural integrity and available space. Start by examining the shed’s walls, floor, and roof to ensure they are sturdy enough to support the additional weight of a loft. Look for signs of water damage, rot, or pest infestations, as addressing these issues is essential before proceeding with the loft construction.
Next, measure the dimensions of the shed to determine the available space for the loft. Consider the height of the shed, as this will dictate the headroom clearance for the loft area. Ideally, you’ll want at least 7-8 feet of vertical space to ensure a comfortable and functional loft.
Additionally, assess the shed’s foundation and flooring. If the shed is built on a concrete slab or sturdy footings, it is likely suitable for a loft. However, if the shed has a basic wooden floor, you may need to reinforce it to support the added weight of the loft structure and occupants.
Finally, consider the shed’s access points. Will you need to install a new entryway or modify an existing one to accommodate access to the loft? This is an important aspect to address during the planning phase to ensure seamless entry and exit from the loft space.
By thoroughly assessing the shed, you’ll gain a clear understanding of its suitability for a loft and identify any necessary modifications or repairs needed to prepare the space for construction. Taking the time to evaluate these factors will set the stage for a successful and safe loft-building project.
Designing the Loft
Designing the loft is an exciting phase that allows you to unleash your creativity while considering the practical aspects of the space. Start by envisioning how you intend to use the loft. Will it serve as a storage area, a cozy retreat, a home office, or a combination of these functions? This vision will guide the design process and help determine the loft’s layout and features.
Consider the layout of the shed and how the loft will integrate with the existing space. Will the loft span the entire shed, or will it occupy a specific section, leaving room for other activities below? Visualizing the loft’s placement and size in relation to the shed will provide a clear roadmap for the construction phase.
When it comes to the loft’s design, think about practical elements such as headroom, lighting, and ventilation. Aim for a ceiling height that allows comfortable movement within the loft space, and plan for windows or skylights to bring in natural light. Adequate ventilation is essential to prevent the loft from feeling stuffy, especially during warmer months.
Furthermore, consider the access to the loft. Will you install a sturdy ladder, space-saving stairs, or a pull-down attic ladder? The choice of access will depend on the loft’s purpose and the available space within the shed.
Once you have a clear vision of the loft’s purpose, layout, and essential features, sketch out a detailed plan that includes measurements, material requirements, and any additional structural considerations. This plan will serve as a valuable reference during the construction phase and ensure that your vision for the loft is brought to life with precision and functionality.
By dedicating time to thoughtful design, you’ll set the stage for a well-executed loft that seamlessly integrates with your shed, serving as a valuable and versatile addition to your outdoor space.
Gathering Materials
As you prepare to embark on the construction of a loft in your shed, gathering the necessary materials is a critical step that sets the foundation for a successful project. The specific materials required will depend on the design and size of the loft, as well as the existing structure of the shed. Here’s a comprehensive list of materials you may need:
- Pressure-treated lumber for framing
- Plywood or oriented strand board (OSB) for the loft floor
- Wood screws, nails, and construction adhesive
- Joist hangers and hurricane ties for structural support
- Ladder, attic stairs, or spiral staircase for loft access
- Insulation and vapor barrier, if climate control is desired
- Drywall, paint, and trim for finishing the loft interior
- Windows, skylights, or ventilation fans for airflow and natural light
- Safety equipment, including goggles, gloves, and a dust mask
- Tools such as a circular saw, drill, level, and measuring tape
Prior to purchasing materials, carefully review your loft design plans and take accurate measurements to determine the quantity of lumber, plywood, and other essential components. Consider consulting with a local hardware store or lumberyard to ensure you select the appropriate materials for your specific project requirements.
When selecting lumber, prioritize quality and durability, especially for load-bearing components such as joists and beams. Pressure-treated lumber is an excellent choice for framing, offering resistance to decay and moisture, making it well-suited for the shed environment.
Additionally, consider the finishing materials that will transform the loft into a functional and inviting space. Whether you opt for a cozy, rustic aesthetic or a sleek, modern finish, choosing the right materials for insulation, drywall, and interior finishes will contribute to the comfort and visual appeal of the loft.
By diligently gathering the necessary materials, you’ll ensure a smooth and efficient construction process, setting the stage for a well-equipped and structurally sound loft that meets your functional and aesthetic expectations.
Building the Loft Frame
Building the loft frame is a pivotal phase in the construction process, laying the groundwork for the structural integrity and stability of the loft. The frame serves as the skeleton of the loft, providing support for the floor and creating a secure platform within the shed. Here’s a step-by-step guide to building the loft frame:
- Measure and Mark: Begin by measuring and marking the locations for the loft frame on the shed walls. Use a level to ensure the markings are straight and aligned with the shed’s dimensions.
- Assemble the Lumber: Cut the pressure-treated lumber to the required lengths for the loft frame components, including the joists, beams, and support posts. Ensure precise measurements to guarantee a snug and secure fit.
- Install the Beams: Secure the beams to the shed walls using heavy-duty lag screws or through-bolts. These beams will provide the primary support for the loft structure, distributing the weight evenly and ensuring stability.
- Attach the Joists: Install the joists perpendicular to the beams, spacing them according to your design plans and local building codes. Utilize joist hangers for secure attachment and added structural reinforcement.
- Reinforce the Connections: Use hurricane ties and additional bracing to reinforce the connections between the beams, joists, and shed walls. This step is crucial for enhancing the loft frame’s resilience and resistance to lateral forces.
Throughout the construction of the loft frame, prioritize precision and attention to detail to ensure a level and sturdy foundation for the loft structure. Regularly check the squareness and alignment of the frame components to maintain structural integrity and prevent potential issues during subsequent construction phases.
It’s important to adhere to local building codes and regulations when constructing the loft frame, especially regarding load-bearing structures and safety standards. If you’re uncertain about specific requirements, consider consulting with a professional contractor or building inspector to ensure compliance and safety.
By methodically building the loft frame with meticulous attention to detail, you’ll establish a solid and reliable foundation for the loft, setting the stage for the next phase of construction and bringing your vision for the loft to fruition with confidence and structural soundness.
Read more: How To Build Loft Bed Stairs
Installing the Loft Floor
With the loft frame in place, the next crucial step is to install the loft floor, creating a stable and functional surface that forms the foundation of the loft space. The loft floor not only provides a platform for various activities but also contributes to the structural integrity of the loft. Here’s a detailed guide to installing the loft floor:
- Prepare the Subfloor: If the shed floor is not already covered with plywood or OSB, begin by laying down a layer of subfloor material to create a smooth and level surface for the loft floor installation.
- Cut and Fit the Flooring Material: Measure and cut the plywood or OSB panels to fit the dimensions of the loft frame, ensuring precise cuts for a snug and seamless fit. Consider using tongue-and-groove panels for added stability and support.
- Secure the Flooring: Use wood screws to secure the flooring material to the joists, ensuring even spacing and a secure attachment. Pay attention to the edges and corners to prevent any potential movement or instability in the loft floor.
- Consider Insulation: If climate control is a priority for the loft space, consider adding insulation between the floor joists before installing the loft floor. This will help regulate temperature and enhance the comfort of the loft.
- Seal Gaps and Edges: Seal any gaps or joints in the loft floor with construction adhesive or caulk to prevent air leakage and enhance the floor’s integrity. This step is crucial for maintaining a well-insulated and secure loft space.
Throughout the installation process, prioritize precision and attention to detail to ensure a level and durable loft floor. Regularly check for any signs of warping, unevenness, or movement in the flooring material, making adjustments as needed to maintain a stable and secure surface.
After completing the loft floor installation, take the opportunity to assess the overall stability and integrity of the loft structure. Walk across the loft floor to test for any signs of flexing or instability, addressing any potential issues before proceeding with the next phases of construction.
By methodically installing the loft floor with meticulous attention to detail, you’ll create a solid and reliable foundation for the loft, setting the stage for the subsequent steps of transforming the space into a functional and inviting area within your shed.
Adding Stairs or Ladder
When it comes to accessing the loft, the choice between stairs and a ladder is a crucial decision that impacts the loft’s functionality, accessibility, and overall aesthetic. Consider the following steps when adding stairs or a ladder to your loft:
Stairs:
If space and budget allow, installing a staircase provides a permanent and user-friendly access point to the loft. Here’s a general outline for adding stairs:
- Design Considerations: Determine the location and design of the staircase, ensuring it complements the overall layout and aesthetics of the shed and loft. Consider space-saving options such as spiral staircases or compact designs tailored to the available space.
- Materials and Construction: Select high-quality lumber or pre-fabricated staircase components that align with the loft’s design and structural requirements. Construct the staircase with precision, ensuring secure attachment to the loft structure and a comfortable incline for safe and easy access.
- Finishing Touches: Apply a durable finish to the staircase, considering the shed’s environmental conditions and the desired aesthetic. Ensure that the handrails and balusters comply with safety standards and provide reliable support for individuals using the staircase.
Ladder:
If space or budget constraints make stairs impractical, a ladder can provide a functional and space-efficient means of accessing the loft. Here’s a guide to adding a ladder:
- Ladder Type: Choose a ladder style that suits the loft’s purpose and the available space within the shed. Options include fixed ladders, retractable attic ladders, or compact library ladders that can be easily stowed when not in use.
- Installation: Securely attach the ladder to the loft entrance, ensuring it is positioned at a safe and convenient angle for ascending and descending. Test the ladder’s stability and weight-bearing capacity to guarantee its suitability for regular use.
- Safety Measures: Consider adding handrails or guardrails around the loft entrance to enhance safety when using the ladder. Ensure that the ladder is free from any defects and complies with safety standards for residential access ladders.
Regardless of whether you choose stairs or a ladder, prioritize safety, comfort, and ease of use when implementing the access point to the loft. Regularly inspect and maintain the stairs or ladder to ensure their continued reliability and safety for all occupants accessing the loft space.
By thoughtfully integrating stairs or a ladder into the loft design, you’ll enhance the functionality and accessibility of the loft, creating a seamless transition between the shed and the elevated space above.
Read more: How To Build A Storage Loft In A Garage
Finishing Touches
As the construction of the loft nears completion, attention to the finishing touches will elevate the space, transforming it into a functional and inviting area within your shed. Here are essential steps to consider when adding the finishing touches to your loft:
Interior Finishes:
Consider the aesthetic and functional aspects of the loft’s interior, aiming to create a welcoming and versatile space. Here are key considerations for interior finishes:
- Insulation and Climate Control: If the shed experiences temperature extremes, consider adding insulation to the loft walls and ceiling to maintain a comfortable environment. Additionally, explore options for climate control, such as a portable heater or fan, to enhance the loft’s usability throughout the year.
- Wall Finishes: Apply a coat of paint or stain to the loft walls, choosing colors that complement the shed’s interior and create a cohesive aesthetic. Consider utilizing durable and washable finishes that withstand the demands of the shed environment.
- Lighting: Install adequate lighting fixtures to illuminate the loft space, ensuring visibility for various activities and creating a welcoming ambiance. Explore options such as overhead lighting, wall sconces, or task lighting tailored to specific areas within the loft.
- Storage Solutions: Incorporate storage solutions such as shelves, hooks, and storage bins to optimize the loft’s functionality and organization. Customized storage options can maximize the utility of the space while keeping it clutter-free.
Aesthetic Enhancements:
Adding aesthetic elements to the loft will enhance its visual appeal and create a personalized atmosphere. Consider the following enhancements:
- Decor and Furnishings: Select furnishings and decor that align with the loft’s purpose, whether it’s a reading nook, an art studio, or a relaxation space. Incorporate comfortable seating, rugs, and decorative accents to infuse personality and comfort into the loft.
- Window Treatments: Install window treatments such as blinds, curtains, or shades to control natural light and privacy within the loft. Choose materials that complement the shed’s aesthetic while providing practical functionality.
- Personal Touches: Add personal touches such as artwork, plants, and meaningful decor items that reflect your style and interests, creating a space that feels uniquely yours.
By focusing on interior finishes and aesthetic enhancements, you’ll bring the loft to life as a versatile and welcoming space within your shed. These thoughtful details will contribute to the loft’s functionality, comfort, and visual appeal, making it a valuable and enjoyable addition to your outdoor environment.
Conclusion
Congratulations on completing the construction of a loft in your shed! This transformative project has not only expanded the functionality of your outdoor space but has also provided a personalized retreat that complements your lifestyle and interests. As you reflect on the journey of building the loft, consider the following key takeaways:
Read more: How Build A Shed
Enhanced Utilization of Space:
By adding a loft to your shed, you’ve maximized the available vertical space, creating a versatile area for storage, relaxation, hobbies, or work. The loft serves as a valuable extension of your shed, offering a dedicated space for various activities while optimizing the use of your outdoor environment.
DIY Accomplishment:
Embarking on the construction of a loft is a significant DIY achievement that showcases your creativity, craftsmanship, and problem-solving skills. Your dedication to this project has resulted in a custom-built space that reflects your vision and enhances the functionality of your shed.
Personalized Retreat:
With the finishing touches in place, the loft has evolved into a personalized retreat that aligns with your preferences and lifestyle. Whether it’s a cozy reading nook, a creative studio, or a serene relaxation space, the loft embodies your unique style and provides a sanctuary within your outdoor setting.
Continued Maintenance and Enjoyment:
As you move forward, continue to maintain the loft with regular inspections, cleaning, and upkeep to ensure its longevity and safety. Embrace the opportunities to enjoy the space for relaxation, creative pursuits, or simply unwinding amidst the tranquility of your outdoor environment.
As you bask in the satisfaction of completing this project, consider sharing your experience with others who may be inspired to embark on similar endeavors. Your journey in constructing a loft in your shed serves as a testament to the transformative power of DIY projects and the rewarding outcomes they bring.
With the loft as a testament to your ingenuity and determination, may it continue to enrich your outdoor living experience and inspire future creative ventures. Cheers to the successful completion of your shed loft project!
Now that you've got the hang of loft-building, why not tackle more hands-on tasks? If you're curious about the benefits of creating things yourself, our article on why DIY projects are rewarding will surely inspire you. For those who love working with wood, our guide to the best woodworking practices for the upcoming year offers a wealth of ideas and techniques to elevate your crafting game. Both pieces are packed with practical advice to help you make the most of your creative endeavors.
Frequently Asked Questions about How To Build A Loft In A Shed
Was this page helpful?
At Storables.com, we guarantee accurate and reliable information. Our content, validated by Expert Board Contributors, is crafted following stringent Editorial Policies. We're committed to providing you with well-researched, expert-backed insights for all your informational needs.


0 thoughts on “How To Build A Loft In A Shed”