Home>Gardening & Outdoor>Outdoor Structures>How To Build Shelves For A Shed
Outdoor Structures
How To Build Shelves For A Shed
Modified: October 20, 2024
Learn how to build sturdy and functional shelves for your outdoor shed with our step-by-step guide. Create organized storage space for all your outdoor structures.
(Many of the links in this article redirect to a specific reviewed product. Your purchase of these products through affiliate links helps to generate commission for Storables.com, at no extra cost. Learn more)
Introduction
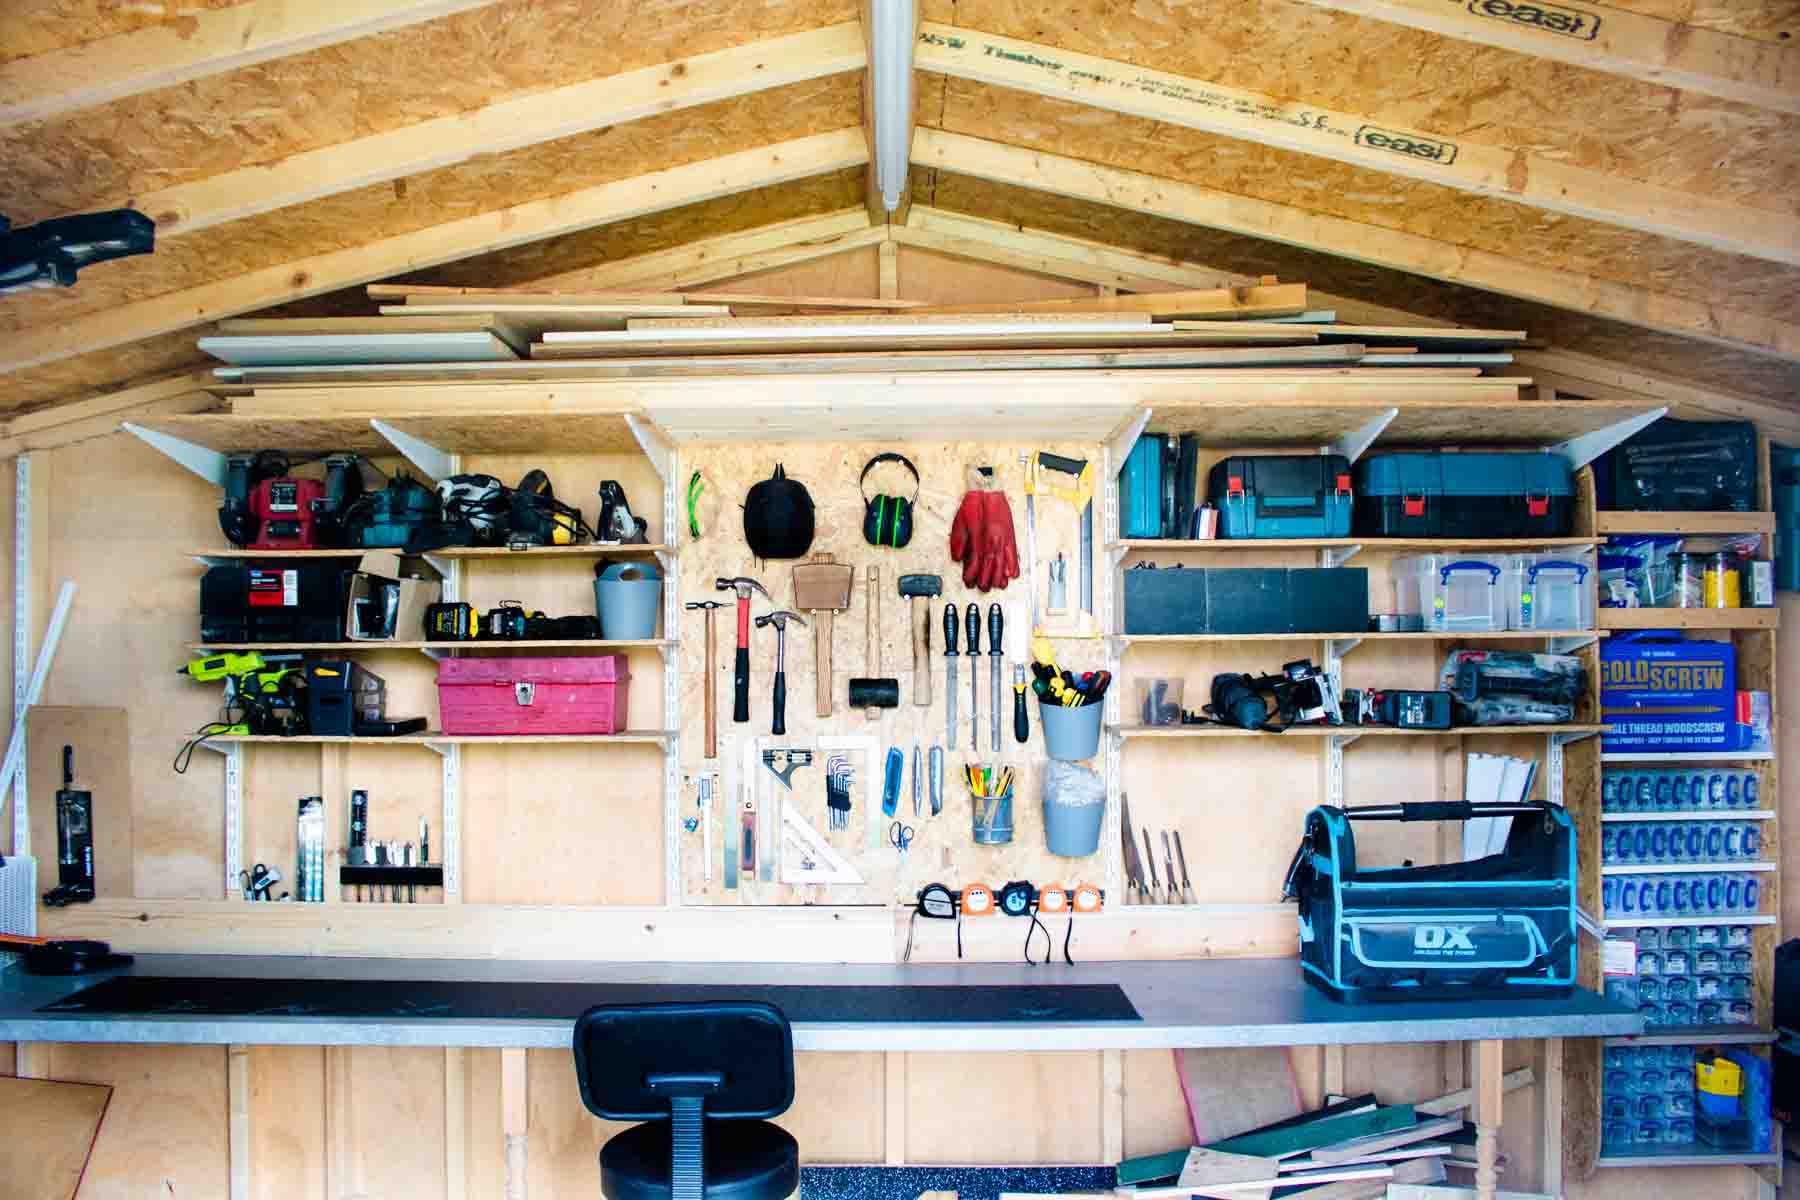
Building shelves for a shed is a fantastic way to maximize storage space and keep your outdoor structure organized. Whether you use your shed for gardening tools, outdoor equipment, or as a workshop, adding shelves can significantly enhance its functionality. In this guide, we'll walk you through the process of building sturdy and practical shelves for your shed. From planning and preparation to choosing the right materials and assembling the shelves, we'll cover everything you need to know to complete this rewarding DIY project.
Shed shelves not only provide a designated spot for your belongings but also contribute to a tidier and more efficient workspace. By customizing the shelves to fit your specific needs, you can create a storage solution that maximizes the available space and keeps everything easily accessible. Additionally, building your own shed shelves allows you to tailor the design to complement the existing layout and aesthetic of your shed, adding a personal touch to the space.
Whether you're an experienced DIY enthusiast or a novice looking to tackle your first woodworking project, building shelves for your shed can be a highly rewarding endeavor. Not only will you gain valuable storage space, but you'll also develop new skills and have the satisfaction of creating a practical and customized storage solution. So, roll up your sleeves, gather your tools, and let's dive into the process of building shelves for your shed.
Key Takeaways:
- Maximize shed storage by building custom shelves. Plan, measure, and choose materials carefully for a rewarding DIY project that enhances shed organization and functionality.
- Tailor-made shed shelves optimize space and accessibility. Precision in measuring, cutting, and assembling ensures a well-organized and efficient storage solution for tools and equipment.
Read more: How To Build Shelves For A Tool Shed
Planning and Preparation
Before diving into the construction of your shed shelves, it’s crucial to start with a well-thought-out plan. Begin by assessing the items you intend to store on the shelves. This evaluation will help you determine the dimensions and load-bearing capacity required for the shelves. Consider the varying sizes and weights of the items to ensure that the shelves can accommodate everything securely.
Next, take precise measurements of the available space in your shed. Assess the height, width, and depth where the shelves will be installed. It’s essential to leave enough clearance for larger items while maximizing the vertical space to increase storage capacity.
Once you have a clear understanding of your storage needs and the space available, sketch a rough design of the shelves. Consider the number of shelves required and their spacing based on the items you’ll be storing. This design will serve as a valuable reference during the construction phase.
After finalizing the design, make a list of the materials and tools needed for the project. This may include lumber, screws, a saw, a drill, a level, and measuring tape, among other items. Ensuring that you have all the necessary materials on hand before starting the construction will streamline the process and prevent unnecessary delays.
Additionally, it’s important to choose a suitable location for the shelves within the shed. Consider factors such as accessibility, visibility, and the layout of the space. You want the shelves to be conveniently located while complementing the overall organization of the shed.
By thoroughly planning and preparing for the construction of your shed shelves, you’ll set the stage for a smooth and successful building process. Taking the time to assess your storage needs, measure the space, design the shelves, and gather the required materials will ensure that the project progresses efficiently and results in functional and well-crafted storage solutions.
Choosing the Right Materials
When it comes to building shelves for your shed, selecting the right materials is essential for ensuring the durability and longevity of the storage units. The choice of materials will depend on factors such as the weight of the items to be stored, the environmental conditions in the shed, and your personal preferences.
One of the most common and versatile materials for shed shelves is plywood. Plywood offers a balance of strength and affordability, making it an excellent choice for constructing sturdy shelves. Look for high-quality plywood that is smooth, free of warping, and of the appropriate thickness to support the intended load.
If you prefer a more rustic or natural look, you might consider using solid wood boards for your shelves. Hardwoods such as oak, maple, or cherry are known for their strength and aesthetic appeal. Keep in mind that solid wood shelves may require additional finishing to protect them from moisture and wear, especially in a shed environment.
For a more industrial and heavy-duty option, metal shelving units can be a practical choice. Metal shelves are resistant to moisture, easy to clean, and offer exceptional load-bearing capacity. They are particularly suitable for storing heavy tools, equipment, and containers in a shed.
Regardless of the material you choose, it’s important to select appropriate fasteners and hardware to assemble the shelves securely. High-quality screws or bolts, as well as sturdy brackets or supports, are crucial for ensuring the stability and safety of the shelves.
Consider the environmental conditions in your shed when choosing materials. If the shed is prone to temperature and humidity fluctuations, opt for materials that are resistant to warping, rot, and corrosion. Additionally, if you plan to paint or finish the shelves, select materials that are conducive to the desired aesthetic treatment.
By carefully considering the weight capacity, durability, aesthetic appeal, and environmental suitability of the materials, you can ensure that the shelves you build for your shed are not only functional but also resilient and visually pleasing.
Measuring and Cutting
Accurate measurements and precise cuts are fundamental to the successful construction of sturdy and well-fitted shelves for your shed. Whether you’re working with plywood, solid wood boards, or metal shelving components, the following steps will guide you through the crucial process of measuring and cutting the materials.
Begin by measuring the dimensions of the space where the shelves will be installed. Use a tape measure to determine the height, width, and depth available for the shelves. Take into account any obstructions or irregularities in the walls or floor that may impact the shelf installation.
Once you have the exact measurements, transfer them to the material you’ll be using for the shelves. If you’re working with plywood or solid wood, use a straight edge and a pencil to mark the cutting lines. Take care to ensure that the lines are straight and parallel to avoid inaccuracies in the cuts.
When cutting the material, whether with a circular saw, table saw, or handsaw, follow the marked lines precisely. If you’re not experienced with power tools, consider seeking guidance or assistance to ensure safe and accurate cutting. Remember to wear appropriate safety gear, such as goggles and ear protection, when operating power tools.
If you’re using metal shelving components, such as steel or aluminum, you may need specialized cutting tools, such as a metal cutting saw or angle grinder. Be sure to use the appropriate cutting methods and safety precautions when working with metal materials.
After cutting the shelves to the required dimensions, it’s essential to sand the edges and surfaces to remove any roughness or splinters. This step not only enhances the appearance of the shelves but also prevents potential injuries and damage to the items placed on the shelves.
By meticulously measuring and cutting the materials for your shed shelves, you’ll lay the groundwork for a precise and professional-looking installation. Taking the time to ensure accuracy at this stage will result in shelves that fit snugly and securely within the shed, providing a reliable storage solution for your belongings.
When building shelves for a shed, make sure to use sturdy materials such as pressure-treated lumber to prevent warping and rotting. Also, consider adding diagonal braces for extra support.
Assembling the Shelves
With the materials cut to size, it’s time to assemble the components into functional and robust shelves for your shed. The assembly process will vary depending on the type of material you’re working with, but the following general guidelines will help you navigate this crucial phase of the project.
If you’re using plywood or solid wood boards, begin by laying out the individual shelf pieces in the designated order. Ensure that the edges are aligned and the corners are square before proceeding with the assembly. Depending on your design, you may need to attach support brackets or cleats to the walls of the shed to provide additional stability for the shelves.
Using a power drill and appropriate screws or nails, attach the shelves to the support brackets or directly to the shed walls. Be mindful of weight distribution and load-bearing capacity as you secure the shelves in place. It’s important to follow the recommended spacing and quantity of fasteners to ensure the structural integrity of the shelves.
If you’ve opted for metal shelving components, follow the manufacturer’s instructions for assembling the shelves. This may involve connecting upright posts, attaching crossbars or braces, and securing the shelf panels or grids in place. Pay close attention to the recommended weight limits and assembly techniques provided by the manufacturer to ensure the safe and effective installation of the metal shelves.
Throughout the assembly process, use a level to confirm that the shelves are installed evenly and horizontally. This step is crucial for both the functionality and visual appeal of the shelves, as it ensures that items placed on the shelves remain stable and that the overall appearance is aesthetically pleasing.
If you’re building multiple shelves within the shed, maintain consistent spacing between the shelves to accommodate various items and facilitate easy access. This uniformity contributes to a well-organized and efficient storage setup.
By carefully and methodically assembling the shelves according to your design and the specific requirements of the materials, you’ll create a reliable storage solution that enhances the functionality and organization of your shed.
Read more: How To Build Basement Shelves
Installing the Shelves
Once the shelves are assembled, the final step is to install them securely within your shed. Proper installation is crucial for ensuring that the shelves are stable, level, and capable of supporting the intended load. The following steps will guide you through the process of installing the shelves to create a well-organized and efficient storage space.
Before installing the shelves, take the time to clean and prepare the area where they will be placed. Clear any debris or obstructions to ensure a smooth and level surface for the shelves. If necessary, use a stud finder to locate and mark the positions of wall studs for anchoring the shelves securely.
If your shelves are designed to sit on support brackets or cleats, carefully position them on the designated mounting points. Use a level to ensure that the shelves are perfectly horizontal and adjust the placement as needed. Once the shelves are in position, secure them by driving screws or nails through the shelf supports into the wall studs. This step is essential for preventing the shelves from shifting or becoming unstable over time.
For metal shelving units, follow the manufacturer’s recommendations for anchoring or securing the shelves to the shed walls or floor. Some metal shelves may require additional hardware or brackets for stability, especially if they are intended to bear heavy loads. Be sure to adhere to the weight-bearing guidelines provided by the manufacturer to prevent overloading the shelves.
If you’re installing freestanding shelves within the shed, ensure that they are positioned securely and are not at risk of tipping over. This is particularly important for tall or multi-tiered shelving units. Consider using adjustable feet or shims to level the shelves on uneven surfaces and prevent wobbling.
Once the shelves are installed, test their stability by gently placing a few items on them to ensure that they can support the weight without sagging or shifting. Periodically check the shelves for any signs of loosening or instability, especially if they are frequently loaded and unloaded with heavy items.
By following these guidelines for installing the shelves in your shed, you’ll create a well-organized and functional storage space that enhances the efficiency and usability of your outdoor structure.
Conclusion
Building shelves for your shed is a rewarding endeavor that not only enhances the storage capacity of the space but also allows you to customize the organization to suit your specific needs. By following the steps outlined in this guide, you can create sturdy, well-designed shelves that optimize the functionality of your shed.
Through careful planning and preparation, you lay the groundwork for a successful project. Assessing your storage needs, measuring the available space, and designing the shelves ensure that the end result meets your requirements and complements the layout of the shed.
Choosing the right materials is essential for constructing durable and resilient shelves. Whether you opt for plywood, solid wood, or metal components, selecting materials that align with your storage needs and environmental considerations is crucial for the longevity and effectiveness of the shelves.
Measuring and cutting the materials with precision is fundamental to achieving well-fitted and aesthetically pleasing shelves. Taking the time to ensure accurate dimensions and clean cuts sets the stage for a professional-looking installation.
Assembling and installing the shelves requires attention to detail and a focus on stability and functionality. Whether you’re working with wood or metal shelves, following the recommended assembly techniques and securing the shelves properly within the shed is essential for creating a reliable storage solution.
Upon completing the installation, you’ll have transformed your shed into a well-organized and efficient space for storing tools, equipment, and other items. The newly added shelves not only contribute to a tidier environment but also facilitate easy access to your belongings, enhancing the overall usability of the shed.
Building shelves for your shed is a testament to your DIY skills and creativity, and the results will undoubtedly have a positive impact on your outdoor storage needs. With the knowledge and guidance provided in this guide, you’re well-equipped to embark on this rewarding project and create a more functional and organized shed space tailored to your specific requirements.
So, roll up your sleeves, gather your materials, and get ready to transform your shed into a well-organized and efficient storage space with custom-built shelves.
Frequently Asked Questions about How To Build Shelves For A Shed
Was this page helpful?
At Storables.com, we guarantee accurate and reliable information. Our content, validated by Expert Board Contributors, is crafted following stringent Editorial Policies. We're committed to providing you with well-researched, expert-backed insights for all your informational needs.


0 thoughts on “How To Build Shelves For A Shed”