Home>Home Appliances>Home Automation Appliances>How To Fix A Thermostat In A Car
Home Automation Appliances
How To Fix A Thermostat In A Car
Modified: February 18, 2024
Learn how to fix a thermostat in a car with our comprehensive guide. Get expert tips and troubleshooting advice for home automation appliances.
(Many of the links in this article redirect to a specific reviewed product. Your purchase of these products through affiliate links helps to generate commission for Storables.com, at no extra cost. Learn more)
Introduction
Welcome to the ultimate guide on how to fix a thermostat in a car! If you've noticed your car overheating, or the temperature gauge fluctuating erratically, a faulty thermostat could be the culprit. Fear not, as this comprehensive article will equip you with the knowledge and step-by-step instructions to tackle this issue like a pro.
The thermostat in your car plays a crucial role in regulating the engine's operating temperature. When it malfunctions, it can lead to a host of problems, including reduced fuel efficiency, engine damage, and overall poor performance. By understanding the signs of a faulty thermostat and learning how to address the issue, you'll not only save money on potential repairs but also ensure your vehicle runs smoothly and efficiently.
In the following sections, we'll delve into the inner workings of a car's thermostat, explore the telltale signs of a malfunctioning unit, and provide a detailed guide on fixing it. Additionally, we'll outline the essential tools and materials you'll need for the task, ensuring you're well-prepared to tackle the job with confidence.
So, whether you're a seasoned DIY enthusiast or a novice looking to expand your automotive knowledge, this guide is tailored to empower you with the skills to diagnose, fix, and test a car's thermostat. Let's dive in and unravel the mysteries of thermostat maintenance and repair, ensuring your vehicle remains in optimal condition for the road ahead.
Key Takeaways:
- A car’s thermostat regulates engine temperature. Signs of a faulty thermostat include overheating, poor fuel efficiency, and erratic temperature gauge readings. Prompt replacement and testing are crucial for optimal engine performance.
- To fix a car’s thermostat, prepare with the right tools and materials. Follow a step-by-step guide to replace the thermostat, then test its functionality. Regular maintenance ensures a smooth and trouble-free driving experience.
Understanding the Thermostat in a Car
Before delving into the process of fixing a car’s thermostat, it’s essential to grasp its fundamental role within the vehicle’s cooling system. The thermostat serves as a gatekeeper, regulating the flow of coolant through the engine to maintain the optimal operating temperature. Typically located between the engine and the radiator, the thermostat remains closed during the initial stages of engine warm-up, allowing it to reach the ideal temperature for efficient combustion and reduced emissions.
Once the engine reaches the designated temperature, the thermostat gradually opens, enabling the circulation of coolant to dissipate excess heat. This process ensures that the engine operates within the optimal temperature range, promoting fuel efficiency and preventing overheating. The proper functioning of the thermostat is critical to the overall performance and longevity of the engine.
Modern thermostats are designed to remain closed when the engine is cold, allowing it to warm up quickly for optimal efficiency. Conversely, in warmer conditions, the thermostat opens wider to facilitate enhanced cooling. This adaptive mechanism ensures that the engine operates within the ideal temperature range across varying environmental conditions.
Understanding the thermostat’s role in the cooling system is pivotal in diagnosing potential issues. A malfunctioning thermostat can disrupt the engine’s temperature regulation, leading to overheating, reduced fuel efficiency, and potential engine damage. By familiarizing yourself with the functions of this critical component, you’ll be better equipped to identify symptoms of a faulty thermostat and take proactive measures to address the issue.
Now that we’ve established the significance of the thermostat within a car’s cooling system, let’s explore the common signs that indicate a malfunctioning unit. Recognizing these symptoms early on can help prevent further damage and ensure the continued smooth operation of your vehicle.
Signs of a Faulty Thermostat
Identifying the telltale signs of a faulty thermostat is crucial in preempting potential issues and ensuring the smooth operation of your vehicle. Here are some common symptoms that may indicate a malfunctioning thermostat:
- Engine Overheating: One of the primary indicators of a faulty thermostat is engine overheating. If your temperature gauge consistently shows higher-than-normal readings or if you notice steam emanating from the engine, it’s likely that the thermostat is failing to regulate the coolant flow effectively.
- Temperature Fluctuations: A malfunctioning thermostat can cause erratic temperature fluctuations on the dashboard gauge. If you observe abrupt and inconsistent changes in the temperature reading, it may signify a problem with the thermostat.
- Poor Fuel Efficiency: A faulty thermostat can lead to reduced fuel efficiency as the engine operates at suboptimal temperatures. If you notice a sudden decline in miles per gallon, it could be attributed to the thermostat’s inability to maintain the ideal engine temperature.
- Heater Malfunction: In some cases, a malfunctioning thermostat can impact the interior climate control system. If you experience inadequate heat output from the vents, especially during idle or low-speed driving, the thermostat may be the culprit.
- Check Engine Light: A failing thermostat can trigger the check engine light on the dashboard. Modern vehicles are equipped with onboard diagnostic systems that can detect irregularities in the engine’s temperature regulation, prompting the illumination of the check engine light.
Recognizing these symptoms early on can prevent potential engine damage and costly repairs. If you notice any of these indicators, it’s advisable to address the thermostat issue promptly to maintain the optimal performance of your vehicle.
Now that we’ve identified the common signs of a faulty thermostat, it’s essential to prepare for the task of fixing it. Let’s explore the tools and materials you’ll need to effectively address the thermostat issue in your car.
Tools and Materials Needed
Before embarking on the task of fixing a thermostat in your car, it’s essential to ensure you have the necessary tools and materials at your disposal. Here’s a comprehensive list of items you’ll need to effectively address the thermostat issue:
- Replacement Thermostat: Ensure you have a compatible replacement thermostat specific to your vehicle’s make and model. It’s crucial to acquire the correct part to guarantee optimal fit and functionality.
- Coolant: Have an adequate supply of the recommended coolant for your vehicle. This will be essential for refilling the cooling system after the thermostat replacement.
- Socket Set: A set of sockets and ratchets will be necessary for accessing and removing components within the engine compartment, including the thermostat housing.
- Screwdrivers: Both flathead and Phillips screwdrivers may be required for removing fasteners and accessing components during the thermostat replacement process.
- Pliers: A pair of pliers will be useful for handling and securing hose clamps and other components during the replacement procedure.
- Gasket Sealant: Depending on the specific thermostat housing design, gasket sealant may be necessary to ensure a proper seal and prevent coolant leaks after the replacement.
- Shop Rags: It’s advisable to have a supply of clean shop rags or paper towels for wiping surfaces and cleaning any spilled coolant during the procedure.
- Container for Coolant Drainage: A suitable container for capturing and disposing of the drained coolant is essential to prevent environmental contamination and ensure safe disposal.
- Work Gloves: Protect your hands with a pair of work gloves to shield them from potential sharp edges and hot components within the engine compartment.
By ensuring you have these tools and materials on hand, you’ll be well-prepared to tackle the task of replacing the thermostat in your car. With the necessary components and safety precautions in place, you can proceed with confidence, knowing you have the resources required to complete the job effectively and efficiently.
Now that we’ve covered the essential tools and materials, let’s delve into the step-by-step guide for fixing the thermostat in your car.
If your car’s thermostat is not working properly, try replacing it with a new one. This can help regulate the engine temperature and prevent overheating.
Step-by-Step Guide to Fixing a Thermostat in a Car
Now that you’re equipped with the necessary tools and materials, it’s time to embark on the process of fixing the thermostat in your car. Follow these step-by-step instructions to address the issue effectively:
- Prepare the Vehicle: Ensure the engine is cool before beginning the procedure. Park the car on a level surface and engage the parking brake for added safety.
- Locate the Thermostat Housing: Refer to your vehicle’s service manual to locate the thermostat housing within the engine compartment. It is typically situated near the engine block and connected to the upper radiator hose.
- Drain the Coolant: Place a suitable container beneath the radiator drain valve and carefully open it to drain the coolant. This step is crucial to prevent spillage and environmental contamination.
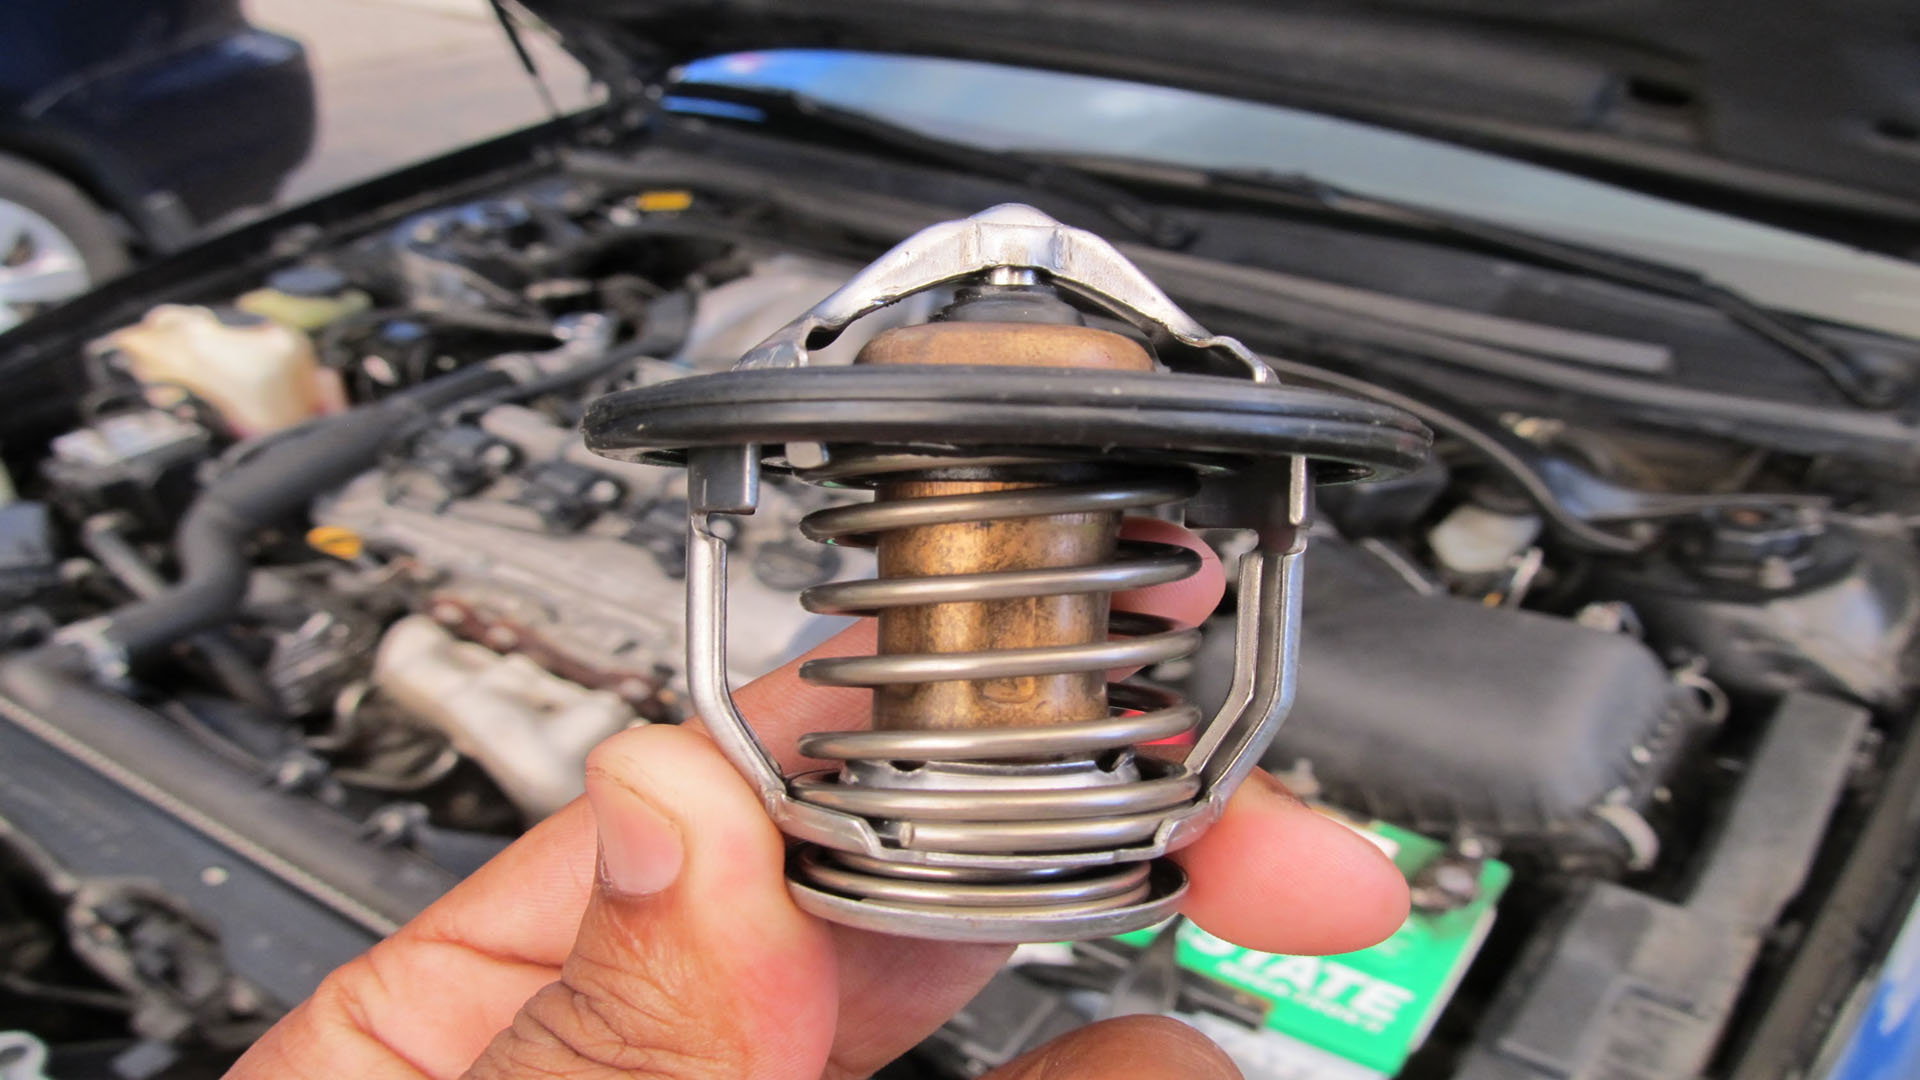
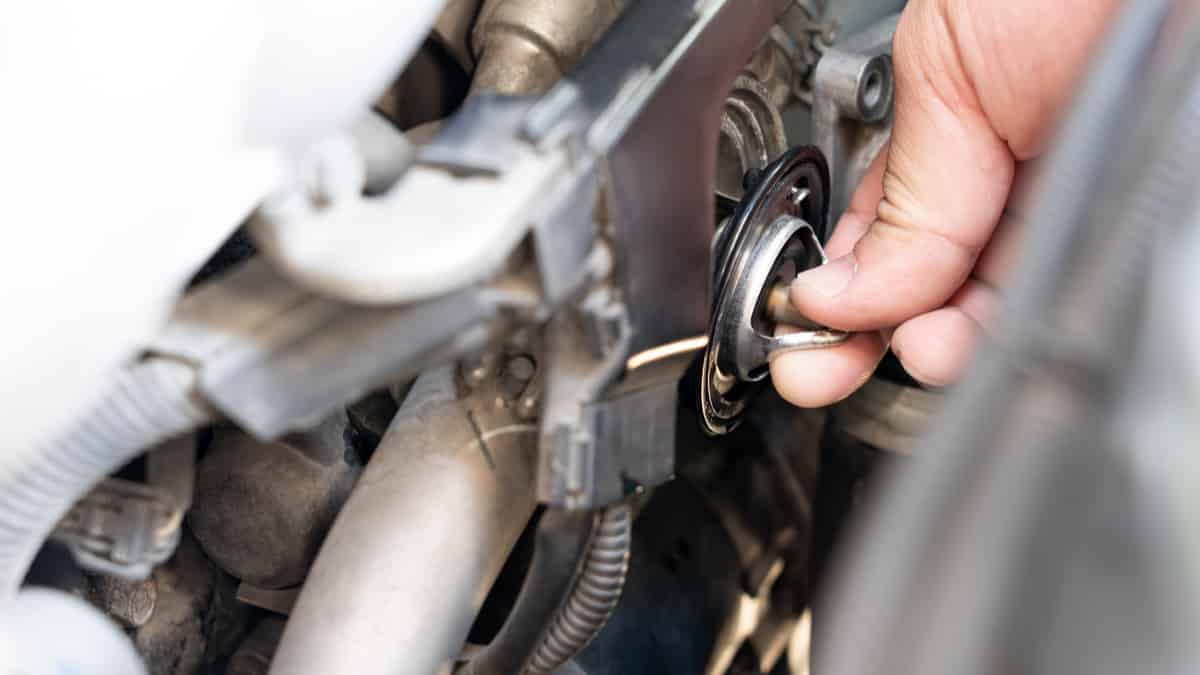
- Remove the Thermostat Housing: Using the appropriate socket and ratchet, carefully remove the fasteners securing the thermostat housing. Once detached, carefully extract the old thermostat from the housing.
- Clean and Inspect: Thoroughly clean the mating surfaces of the thermostat housing and engine block. Inspect the housing for any signs of damage or corrosion that may necessitate replacement.
- Install the New Thermostat: Place the new thermostat into the housing with the spring-side facing into the engine. Ensure it is positioned correctly to facilitate proper coolant flow and engine temperature regulation.
- Reassemble the Components: Carefully reattach the thermostat housing and secure it with the appropriate fasteners. Take care not to overtighten the bolts to avoid damaging the housing or causing leaks.
- Refill the Coolant: Using the recommended coolant, refill the radiator and the coolant reservoir to the appropriate levels. Follow the manufacturer’s guidelines for the correct coolant mixture and capacity.
- Bleed the Cooling System: Start the engine and allow it to reach operating temperature while monitoring the coolant level. Squeeze the upper radiator hose to expel any trapped air from the system.
- Check for Leaks: After the engine has reached operating temperature, inspect the thermostat housing and surrounding components for any signs of coolant leaks. Address any leaks promptly to prevent coolant loss and potential overheating.
By following these steps meticulously, you can effectively replace the thermostat in your car, ensuring optimal engine temperature regulation and performance. Once the thermostat is successfully replaced, it’s essential to test its functionality to verify that the issue has been resolved. Let’s explore the process of testing the thermostat to confirm its proper operation.
Read more: How Often To Change A Car Thermostat
Testing the Thermostat
After replacing the thermostat in your car, it’s crucial to verify its functionality to ensure that the cooling system operates optimally. Here’s a straightforward process for testing the thermostat:
- Allow the Engine to Reach Operating Temperature: Start the vehicle and allow the engine to warm up to its normal operating temperature. This typically takes several minutes of idling.
- Monitor the Temperature Gauge: Keep an eye on the temperature gauge on the dashboard. As the engine warms up, the gauge should gradually rise, indicating that the thermostat is allowing the proper flow of coolant.
- Observe Coolant Flow: If accessible, visually inspect the flow of coolant through the radiator or the upper radiator hose. Once the thermostat opens, coolant should circulate, indicating that the thermostat is functioning as intended.
- Check Heater Performance: Test the vehicle’s interior heater to ensure that it produces warm air once the engine reaches operating temperature. Proper heater performance signifies that the thermostat is facilitating the circulation of heated coolant through the system.
- Verify Consistent Temperature: As the engine continues to run, the temperature gauge should stabilize within the normal operating range. Any erratic fluctuations or prolonged high temperatures may indicate an issue with the new thermostat or other cooling system components.
By performing these simple tests, you can confirm that the newly installed thermostat is functioning correctly and effectively regulating the engine’s temperature. If you observe any irregularities during the testing process, it’s advisable to reinspect the thermostat installation and address any potential issues promptly.
With the thermostat successfully replaced and tested, you can rest assured that your vehicle’s cooling system is in optimal working condition. By taking proactive measures to address a faulty thermostat, you’ve ensured the continued efficiency and performance of your car’s engine.
As we conclude this guide, it’s essential to emphasize the significance of regular maintenance and attentive monitoring of your vehicle’s cooling system. By remaining vigilant and addressing potential issues promptly, you can safeguard your car’s engine and enjoy a smooth and trouble-free driving experience.
Conclusion
Congratulations on completing the journey of fixing a thermostat in your car! By familiarizing yourself with the thermostat’s role in the cooling system, identifying signs of a faulty unit, and following the step-by-step replacement process, you’ve taken proactive steps to maintain the optimal performance of your vehicle. Understanding the critical role of the thermostat and addressing potential issues promptly are key components of responsible vehicle ownership and maintenance.
As a proactive car owner, you’ve equipped yourself with the knowledge and skills to diagnose and address a malfunctioning thermostat, ultimately safeguarding your engine from potential damage and ensuring its longevity. By adhering to the testing process, you’ve verified the proper functionality of the new thermostat, providing peace of mind and confidence in your vehicle’s cooling system.
It’s important to recognize that regular maintenance and attentive monitoring of your car’s cooling system are essential practices to uphold. By staying attuned to potential signs of thermostat issues and promptly addressing them, you contribute to the overall health and efficiency of your vehicle.
Remember, the successful replacement of a thermostat is a testament to your dedication to maintaining your car’s optimal performance. By following the comprehensive steps outlined in this guide, you’ve demonstrated a proactive approach to vehicle maintenance and repair, setting a precedent for responsible and informed car ownership.
As you continue your automotive journey, may this knowledge serve as a valuable resource, empowering you to tackle future maintenance tasks with confidence and expertise. Whether you’re a seasoned DIY enthusiast or a novice exploring the intricacies of car maintenance, the knowledge gained from this guide will undoubtedly contribute to a fulfilling and rewarding automotive experience.
With a well-functioning thermostat and a keen understanding of your car’s cooling system, you’re poised to embark on countless adventures with the assurance of a smoothly operating vehicle. Here’s to safe travels and the continued joy of being a proactive and informed car owner!
Frequently Asked Questions about How To Fix A Thermostat In A Car
Was this page helpful?
At Storables.com, we guarantee accurate and reliable information. Our content, validated by Expert Board Contributors, is crafted following stringent Editorial Policies. We're committed to providing you with well-researched, expert-backed insights for all your informational needs.


0 thoughts on “How To Fix A Thermostat In A Car”