Home>Home Maintenance>How To Install A Downdraft Ventilation System Into An Island
Home Maintenance
How To Install A Downdraft Ventilation System Into An Island
Modified: March 6, 2024
Learn how to install a downdraft ventilation system into your island with this comprehensive home maintenance guide. Enhance your kitchen's functionality and keep the air clean!
(Many of the links in this article redirect to a specific reviewed product. Your purchase of these products through affiliate links helps to generate commission for Storables.com, at no extra cost. Learn more)
Introduction
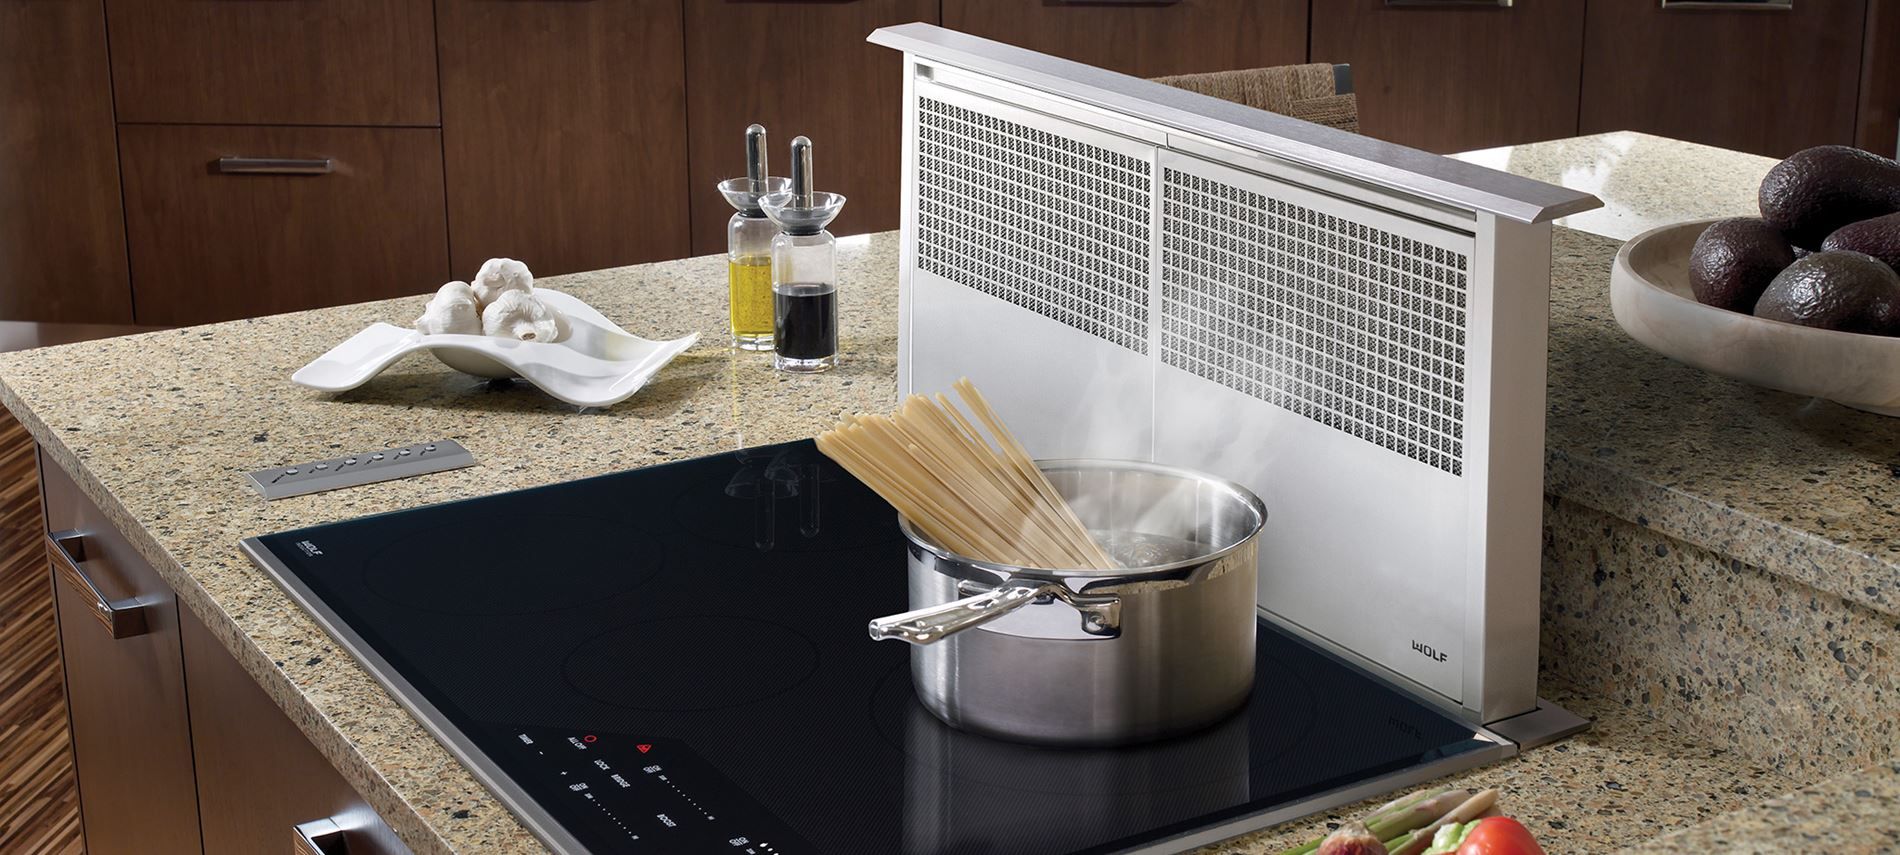
Welcome to the ultimate guide on how to install a downdraft ventilation system into an island! If you have a kitchen island and are looking for a sleek and efficient way to keep your kitchen smelling fresh and smoke-free, a downdraft ventilation system is the perfect solution.
Downdraft ventilation systems are designed to draw smoke, steam, and odors downward, directly from the source, and efficiently exhaust them outside your home. Unlike traditional range hoods, downdraft systems are installed into the countertop rather than mounted on the wall, providing a seamless and unobtrusive appearance.
In this step-by-step guide, we will walk you through the entire installation process, ensuring a successful and professional-looking result. But before we dive into the nitty-gritty details, let’s take a moment to gather all the necessary tools and materials.
Key Takeaways:
- Installing a downdraft ventilation system into your kitchen island is a step-by-step process that involves measuring, cutting, securing, and testing. It’s important to gather the right tools and materials and ensure a snug fit for optimal performance.
- After installation, it’s crucial to test the ventilation system to ensure it effectively removes smoke and odors. Sealing and finishing the installation adds a professional touch and keeps your kitchen fresh and clean.
Read more: How To Install Island Range Hood
Step 1: Gather Necessary Tools and Materials
Before you begin the installation process, it’s essential to gather all the tools and materials you’ll need. This ensures that you have everything on hand and eliminates any unnecessary delays. Here’s a list of the items you’ll need:
- Measuring tape
- Marker or pencil
- Power drill
- Hole saw bit
- Screwdriver
- Adjustable wrench
- Tin snips
- Level
- Plumber’s tape
- Ductwork
- Elbow joints
- Clamps
- Screws
- Caulk or sealant
It’s important to ensure that all the tools and materials are of good quality and in proper working condition. This will make the installation process smoother and provide a more reliable end result. Now that you have everything you need, let’s move on to the next step: measuring and marking the installation area.
Step 2: Measure and Mark the Installation Area
Now that you have gathered all the necessary tools and materials, it’s time to measure and mark the installation area for your downdraft ventilation system. This step is crucial to ensure proper fitting and alignment of the system within your kitchen island.
Start by locating the center of your kitchen island where you want the downdraft ventilation system to be installed. Use a measuring tape to determine the dimensions of the unit, including its width, depth, and height. Take note of these measurements as they will guide you in preparing the installation area.
Using a marker or pencil, mark the exact location where the ventilation system will be placed on the countertop. Make sure you take into account any surrounding cabinets or appliances that may interfere with the installation. Double-check your measurements and markings to ensure accuracy.
Next, use a power drill fitted with a hole saw bit to create an opening in the countertop, following the marked dimensions. Take your time and work slowly to prevent any damage to the countertop. If you have a stone or granite countertop, consider consulting a professional to avoid any mishaps.
Once the opening is cut, remove any debris or leftover materials from the countertop. Use a level to ensure that the opening is perfectly horizontal and aligned with the surrounding surface. Make any necessary adjustments to achieve a level and even opening.
With the installation area properly marked and prepared, you are now ready to move on to the next step: installing the ventilation system housing. Stay tuned!
Step 3: Cut an Opening in the Island Countertop
Now that you have measured and marked the installation area for your downdraft ventilation system, it’s time to cut an opening in the island countertop. This step is crucial to provide a secure and properly fitted space for the ventilation system housing.
Before you begin, ensure that you have the necessary safety equipment, such as safety goggles and gloves, to protect yourself during the cutting process. Safety should always be a top priority when working with power tools.
First, double-check the measurements and markings you made in the previous step. Use a power drill fitted with a hole saw bit that matches the dimensions of the ventilation system housing. Start by drilling a pilot hole in the center of the marked area.
Slowly and steadily guide the hole saw bit along the marked outline, applying gentle pressure. Take your time during this process to ensure a clean and precise cut. It’s essential to work carefully to avoid any potential damage to the countertop or surrounding area.
As you cut, periodically check the depth of the hole using a tape measure or the housing of the ventilation system as a reference. Be mindful not to cut beyond the required depth to prevent compromising the structural integrity of the countertop.
Once you have completed the cut, carefully remove any debris or dust from the opening. Use a file or sandpaper to smooth out any rough edges around the cut. This will ensure a clean and professional finish.
After cutting the opening, take a moment to double-check that the ventilation system housing fits snugly within the hole. It should be flush with the countertop, with no gaps or misalignment. If necessary, make any minor adjustments to achieve a perfect fit.
With the opening cut and the ventilation system housing properly fitted, you are now ready to move on to the next step: installing the ventilation system housing. Keep reading for more information!
Step 4: Install the Ventilation System Housing
Now that you have cut the opening in the island countertop, it’s time to install the ventilation system housing. This is a crucial step as it ensures that the downdraft system is securely and properly mounted in place.
Start by carefully positioning the ventilation system housing into the cutout opening. Ensure that it fits snugly and aligns with the surrounding countertop. Use a level to double-check that the housing is perfectly horizontal. This step is important to ensure proper functionality and an aesthetically pleasing appearance.
Once the housing is properly positioned, mark the mounting holes on the countertop using a pencil or marker. These marks will guide you during the installation process and ensure accurate placement of screws or mounting brackets.
Next, using a power drill and the appropriate screwdriver bit, carefully create pilot holes at the marked locations. These pilot holes will facilitate the screwing in of the screws or mounting brackets without damaging the countertop.
Now, secure the ventilation system housing in place by either screwing in the provided screws or attaching the mounting brackets. Ensure that they are tightened securely but be careful not to overtighten as it may cause damage to the housing or countertop.
Double-check that the housing is level and aligned with the surrounding countertop. Make any necessary adjustments to ensure a perfect fit. This will ensure that the downdraft system functions optimally and maintains a seamless appearance in your kitchen island.
Once the ventilation system housing is securely installed, take a moment to admire your progress! You have successfully completed the installation of the housing unit. Now it’s time to move on to the next step: connecting the ventilation ductwork. Stay tuned for more information!
When installing a downdraft ventilation system into an island, make sure to carefully measure and plan the placement to ensure it fits properly and efficiently removes smoke and odors.
Read more: What Is A Downdraft Range Hood
Step 5: Connect the Ventilation Ductwork
Connecting the ventilation ductwork is a crucial step in the installation process of your downdraft ventilation system. It ensures that the air, smoke, and odors are effectively directed outside your home, keeping your kitchen fresh and odor-free.
Before you begin, gather the necessary ductwork, elbow joints, clamps, and screws. Ensure that the ductwork is properly sized for your downdraft ventilation system and the available space in your kitchen island.
Start by connecting the elbow joints to the ventilation system housing. These elbow joints will help direct the airflow downwards and towards the ductwork. Use clamps to secure the joints in place, ensuring a tight and secure connection.
Next, measure and cut the required lengths of ductwork to connect the ventilation system housing to an exterior wall or designated exhaust area. Use tin snips to cut the ductwork accurately, ensuring a clean and precise fit.
Attach the cut sections of ductwork to the elbow joints, securing them with clamps. Make sure that the ductwork is properly aligned and straight to maintain optimal airflow. Use screws to secure the clamps tightly, ensuring a secure and leak-free connection.
As you install the ductwork, it’s important to minimize any bends or turns to maintain efficient airflow. However, if it’s necessary to navigate around obstacles or create a more direct path, use additional elbow joints to ensure smooth airflow.
Double-check all the connections to ensure that they are secure and tight. Pay close attention to any potential gaps or leaks that may compromise the performance of the ventilation system. Use foil tape or duct sealant to seal any gaps or joints, eliminating any potential air leaks.
Once the ventilation ductwork is securely connected, you are one step closer to enjoying the benefits of your downdraft ventilation system. Stay tuned for the next step: securing the ventilation system in place.
Step 6: Secure the Ventilation System in Place
Now that the ventilation ductwork is connected, it’s time to ensure that the downdraft ventilation system is securely in place. This step is crucial to prevent any movement or instability during operation and maintain the effectiveness of the system.
Start by checking the tightness of all screws and clamps that hold the ventilation system housing and ductwork together. Tighten any loose screws or clamps to ensure a secure connection. This will prevent any vibrations or movement that may arise during operation.
Next, inspect the ventilation system housing itself. Check for any components or parts that may need additional securing. For example, if there are grilles or covers on the housing, ensure they are attached securely and not loose.
Additionally, examine the underside of the island countertop where the ventilation system housing is installed. If there are any openings or gaps, use caulk or sealant to seal them. This step helps prevent air leakage and ensures that the airflow is directed properly through the ventilation system.
If your downdraft ventilation system has additional features, such as a fan or filter, make sure they are properly installed and functioning correctly. Follow the manufacturer’s instructions for proper installation and maintenance of these components.
Finally, test the ventilation system by turning it on and observing its operation. Listen for any unusual noises or vibrations that may indicate a loose or improperly secured component. Monitor the airflow and check if it is effectively removing smoke, steam, and odors from your kitchen.
If you notice any issues during the testing phase, it’s important to address them promptly. Double-check all connections, screws, and clamps to ensure everything is properly secured. Make any necessary adjustments or tightening as needed to achieve a stable and effective ventilation system.
Congratulations! You have successfully secured the downdraft ventilation system in place. Now it’s time for the final step: testing the ventilation system to ensure its proper functioning. Let’s dive in!
Step 7: Test the Ventilation System
Testing the ventilation system is a crucial step to ensure that it is functioning properly and effectively removing smoke, steam, and odors from your kitchen. By conducting a thorough test, you can identify any issues and make necessary adjustments before regular use.
Before you begin testing, ensure that the downdraft ventilation system is properly installed, the ductwork is connected securely, and all components are in place. Double-check that the system is powered and all controls are functioning as intended.
To conduct the test, follow these steps:
- Turn on the downdraft ventilation system and set it to its highest power setting. This will allow you to evaluate its maximum performance.
- Observe the airflow. Check if the system is effectively drawing air, smoke, and odors downward and into the ductwork. Ensure that the system is pulling air uniformly and evenly across the cooking surface.
- Use a smoke test to assess the system’s effectiveness. Light a small piece of paper or a match and hold it near the ventilation system. Observe if the smoke is effectively drawn downward and into the system. If there is any smoke escaping or lingering, it may indicate a problem that needs to be addressed.
- Monitor the noise level of the system. While some noise is expected during operation, excessive or unusual noises may indicate a loose component or a malfunctioning part. If you notice any concerning sounds, it’s important to investigate further and address the issue accordingly.
- Check the functioning of any additional features or settings, such as different fan speeds or lighting options. Ensure that all features are working as intended and provide the desired functionality.
- Ensure that the ventilation system effectively exhausts the air outside your home without causing any backdrafts or odors to linger. Check the area outside your home for any strange smells or excess moisture, which may indicate a ventilation problem.
During the testing phase, it’s important to take note of any issues or areas for improvement. If you identify any problems, such as inadequate airflow or unusual noises, consult the manufacturer’s documentation or seek professional assistance to rectify the issue.
By thoroughly testing the downdraft ventilation system, you can be confident in its functionality and reliability. Once you are satisfied with the results of the test, you can proceed to the final step: sealing and finishing the installation.
Step 8: Seal and Finish the Installation
After successfully testing the downdraft ventilation system, it’s time to seal and finish the installation to ensure a polished and professional look. Proper sealing not only enhances the aesthetic appeal of the system but also prevents any air leaks or damage to the surrounding area.
Here are the steps to seal and finish the installation:
- Inspect the area around the ventilation system housing and ductwork for any gaps or openings. Ensure that there are no exposed areas that may allow air to escape or debris to accumulate.
- Apply a bead of caulk or sealant around the edges of the ventilation system housing. This helps create a tight seal between the housing and the countertop, preventing any air leaks.
- If there are any visible gaps between the ductwork and the surrounding area, use foil tape or duct sealant to seal them. This ensures that the airflow is directed properly through the ventilation system and minimizes any potential air leaks.
- Clean the exterior of the ventilation system housing and remove any debris, fingerprints, or smudges. Use a damp cloth or suitable cleaning solution to maintain a clean and attractive appearance.
- Inspect the surrounding area for any installation remnants or leftover materials. Make sure to remove these debris and clean the area to provide a neat and tidy finish.
- Double-check all screws, clamps, and connections to ensure they are tight and secure. This includes inspecting the mounting screws or brackets on the ventilation system housing and the clamps securing the ductwork.
- Once all finishing touches are done, step back and admire your work. Take a moment to appreciate the seamless integration of the downdraft ventilation system into your kitchen island.
By sealing and finishing the installation, you not only enhance the functionality of the ventilation system but also add a professional and aesthetically pleasing touch to your kitchen.
Congratulations! You have successfully completed the installation of a downdraft ventilation system into your kitchen island. Enjoy the benefits of a clean and odor-free kitchen, thanks to your newly installed ventilation system.
Remember to refer to the manufacturer’s instructions for any specific care and maintenance requirements to keep your downdraft ventilation system operating optimally for years to come.
Read also: 9 Amazing Island Mount Range Hood For 2025
Conclusion
Congratulations on successfully installing a downdraft ventilation system into your kitchen island! By following this comprehensive guide, you have not only improved the air quality in your kitchen but also enhanced the overall aesthetic appeal of your space.
We started by gathering the necessary tools and materials, ensuring that you had everything you needed for the installation process. Then, we measured and marked the installation area, ensuring precision and accuracy in cutting the opening in the island countertop.
Next, we moved on to installing the ventilation system housing, securing it in place, and connecting the ventilation ductwork. By paying attention to detail and ensuring proper alignment and tight connections, you have created an efficient and effective ventilation system.
After securing the ventilation system in place, we conducted a thorough test to guarantee that it is functioning properly. Through the testing phase, any issues or adjustments that were needed were identified and addressed.
Finally, we sealed and finished the installation, ensuring a polished and professional look. By sealing any gaps or openings and cleaning the area, you have achieved a seamless integration of the downdraft ventilation system into your kitchen island.
Now, you can enjoy a fresh and odor-free kitchen, knowing that your downdraft ventilation system is working efficiently to remove smoke, steam, and odors from your cooking space.
Remember to follow the manufacturer’s instructions for regular maintenance and cleaning of your ventilation system to ensure its longevity and continued performance.
Thank you for following this guide, and we hope this installation has been a rewarding and successful project for you. Enjoy the benefits of your newly installed downdraft ventilation system and happy cooking!
Frequently Asked Questions about How To Install A Downdraft Ventilation System Into An Island
Was this page helpful?
At Storables.com, we guarantee accurate and reliable information. Our content, validated by Expert Board Contributors, is crafted following stringent Editorial Policies. We're committed to providing you with well-researched, expert-backed insights for all your informational needs.


0 thoughts on “How To Install A Downdraft Ventilation System Into An Island”