Home>Home Maintenance>How To Set Up Drainage For A Garden In A Plastic Container
Home Maintenance
How To Set Up Drainage For A Garden In A Plastic Container
Modified: March 7, 2024
Learn how to properly plan and set up drainage for a garden in a plastic container to ensure optimal home maintenance.
(Many of the links in this article redirect to a specific reviewed product. Your purchase of these products through affiliate links helps to generate commission for Storables.com, at no extra cost. Learn more)
Introduction
Welcome to the world of gardening! Whether you have a spacious backyard or a small balcony, a garden in a plastic container is a versatile and convenient option for home maintenance enthusiasts. However, to ensure the health and vitality of your plants, it is crucial to have proper drainage in your garden containers.
Proper drainage plays a vital role in preventing waterlogged soil, stagnant water, and the risk of root rot, which can ultimately lead to the demise of your plants. In this article, we will explore the importance of proper drainage in plastic garden containers, factors to consider for drainage, and various methods to ensure optimal drainage. So let’s dive in and discover how to create an ideal environment for your garden in a plastic container.
Key Takeaways:
- Proper drainage in plastic garden containers is crucial to prevent waterlogged soil, root rot, and promote healthy plant growth.
- Factors like container size, drainage holes, soil mix, and additional methods play a key role in ensuring optimal drainage for your garden in plastic containers.
Importance of Proper Drainage in Garden Containers
Proper drainage is essential for the long-term health and success of your garden in plastic containers. Without adequate drainage, excess water can accumulate in the container, saturating the soil and suffocating the roots of your plants. This can lead to a myriad of problems, including root rot, nutrient deficiencies, and even plant death.
One of the main reasons why drainage is crucial is to prevent waterlogged soil. When water cannot properly drain from the container, it creates a stagnant environment that promotes the growth of harmful bacteria and fungi. These pathogens can attack the roots of your plants, compromising their ability to take up water and nutrients. As a result, your plants become weak and vulnerable to diseases.
In addition to preventing waterlogged soil, proper drainage also helps maintain the right balance of moisture in the container. It allows excess water to escape, preventing the soil from becoming overly saturated, which could drown the roots. On the other hand, it also helps prevent the soil from drying out too quickly, ensuring that your plants have consistent access to the water they need to thrive.
Proper drainage also promotes healthy root development. When water is able to freely flow through the soil and out of the drainage holes, it encourages the roots to grow strong and deep. This allows them to access oxygen, which is crucial for their respiration and overall health. Furthermore, adequate drainage prevents the roots from sitting in stagnant water, which can lead to root rot and other diseases.
Overall, having proper drainage in your garden containers is fundamental for the overall health and success of your plants. It helps prevent waterlogged soil, provides the right balance of moisture, promotes healthy root development, and reduces the risk of diseases. By ensuring proper drainage, you are creating an optimal growing environment that will allow your plants to flourish.
Factors to Consider for Drainage in Plastic Garden Containers
When it comes to creating proper drainage in plastic garden containers, several factors need to be taken into consideration. These factors will help ensure that water drains effectively and prevents any potential problems with waterlogged soil or poor root development.
1. Container size: The size of the plastic garden container plays a significant role in drainage. Smaller containers tend to have less room for water to escape, leading to poor drainage. Choose a container that is appropriately sized for the type of plants you are growing, ensuring it has enough volume to accommodate both the root system and adequate drainage.
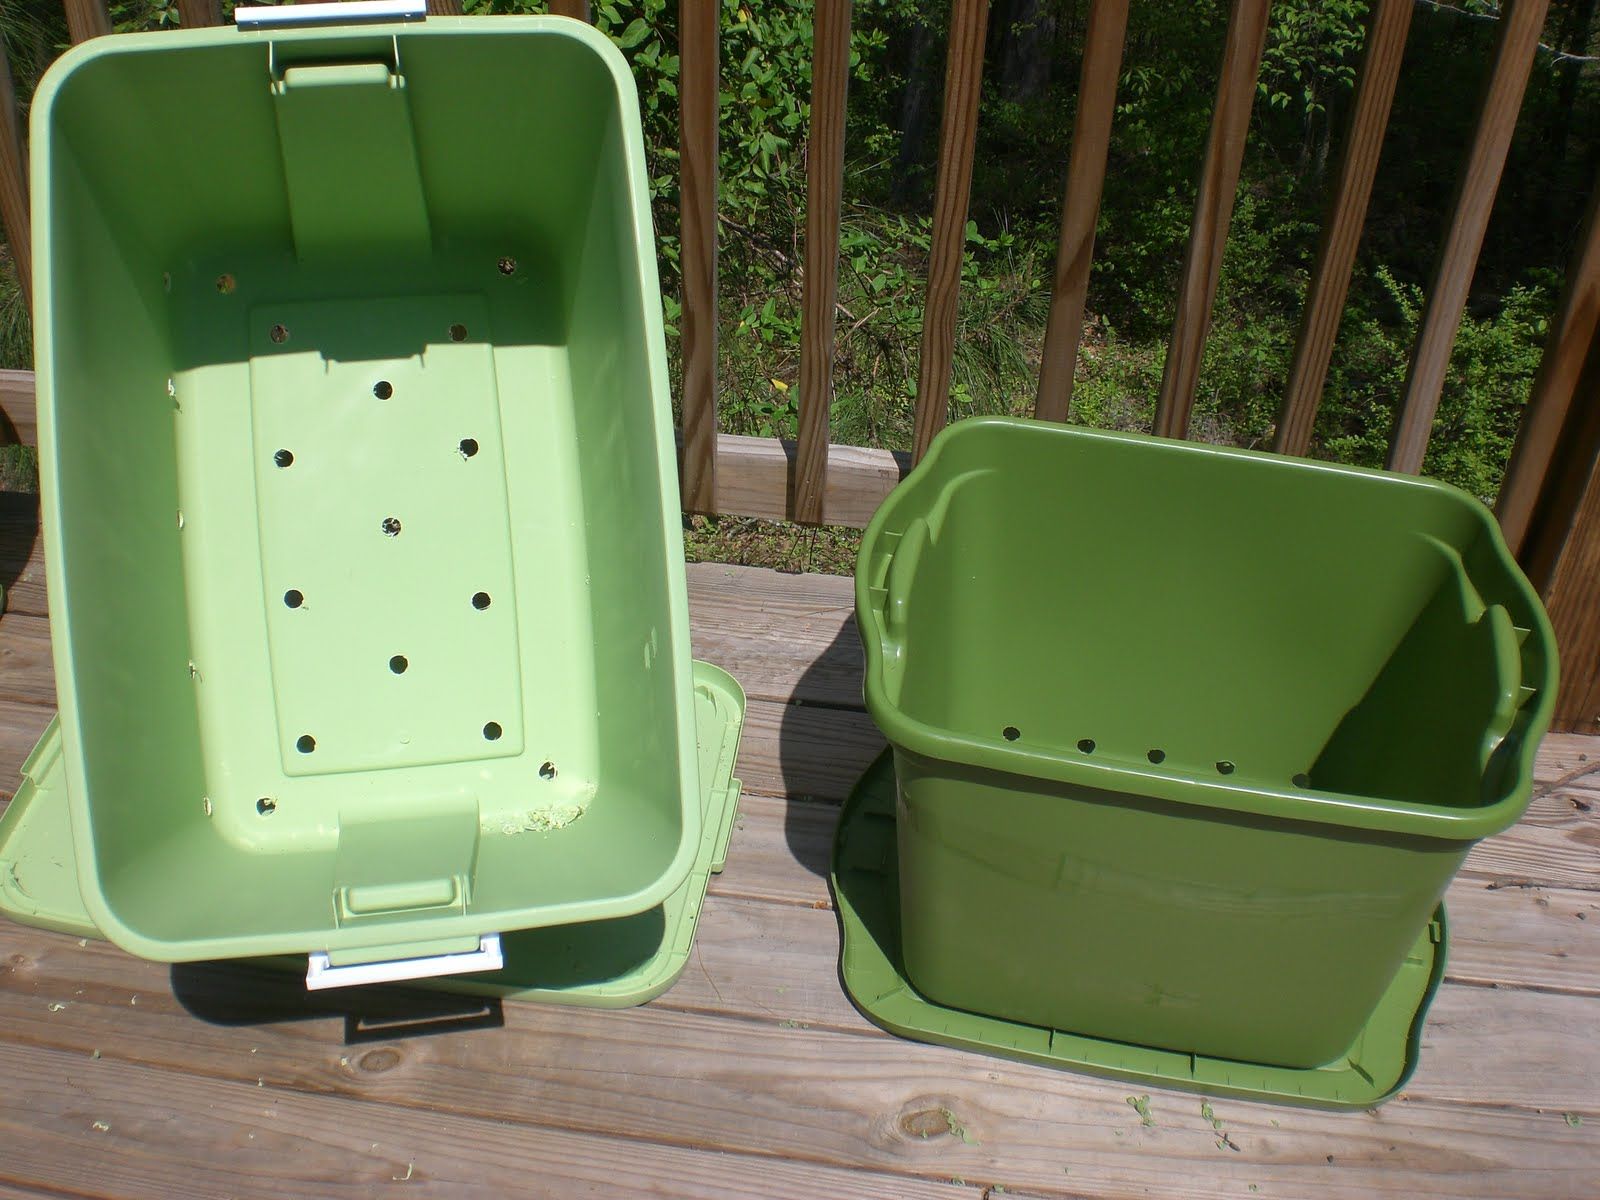
2. Drainage holes: The number and size of drainage holes are vital for proper water drainage. Ideally, there should be multiple drainage holes in the bottom of the container to allow water to escape freely. These holes should be large enough to facilitate efficient water flow but small enough to prevent soil from falling through.
3. Potting mix composition: The type of potting mix you use in your plastic garden container greatly impacts drainage. Opt for a well-draining mix that consists of a combination of organic matter, such as compost or peat moss, and coarse materials like perlite or vermiculite. This will ensure proper aeration and drainage, allowing excess water to escape.
4. Soil moisture levels: It’s important to maintain appropriate soil moisture levels for optimal drainage. Over-watering can lead to waterlogged soil, while under-watering can cause the soil to become too dry. Regularly check the moisture levels by inserting your finger into the soil about an inch deep. If it feels moist, hold off on watering until it dries out slightly.
5. Container placement: The location of your plastic garden container also affects drainage. Ensure that the container is placed on a stable and level surface to prevent water from pooling. If the container is on a slope, it may lead to uneven drainage, with water collecting at the lower end of the container.
By considering these factors and making the necessary adjustments, you can create an ideal drainage system for your plastic garden containers. This will ensure the health and longevity of your plants by preventing waterlogged soil and promoting robust root development.
Choosing the Right Soil Mix for Proper Drainage
Choosing the appropriate soil mix is essential for ensuring proper drainage in your plastic garden containers. The right balance of organic matter and coarse materials will facilitate water flow and prevent waterlogged soil. Here are some factors to consider when selecting the soil mix:
1. Organic matter: Organic matter, such as compost or peat moss, helps retain moisture while allowing excess water to drain. It also improves soil structure and provides essential nutrients for plant growth. Aim for a soil mix that consists of about 30% organic matter.
2. Coarse materials: Incorporating coarse materials like perlite, vermiculite, or coarse sand into the soil mix promotes aeration and drainage. These materials create air pockets and channels, allowing water to flow easily through the soil. Aim for about 30% to 50% coarse materials in the soil mix.
3. High-quality soil: Using a high-quality potting soil as the base of your mix ensures proper nutrient availability and drainage. Avoid using heavy garden soil, as it can become compacted and hinder drainage. Look for a well-draining potting soil specifically formulated for containers.
4. pH level: Consider the pH level requirements of the plants you will be growing. Different plants thrive in different pH levels. Most plants prefer slightly acidic to neutral soils with a pH range of 6 to 7. Adjust the pH of the soil mix if necessary to accommodate the specific needs of your plants.
5. Moisture retention: While proper drainage is important, it’s also crucial to ensure that the soil mix has sufficient moisture retention ability. This will prevent the soil from drying out too quickly. A balance of organic matter and coarse materials will help strike the right balance between drainage and moisture retention.
When creating your soil mix, combine the organic matter, coarse materials, and potting soil in a ratio that suits the needs of your plants. Mix them thoroughly to ensure an even distribution of the components. Test the drainage of the soil by watering it and observing how quickly the excess water flows out of the container.
Remember, choosing the right soil mix is crucial for maintaining proper drainage in your plastic garden containers. It provides the ideal balance between moisture retention and drainage, allowing your plants to thrive and preventing any potential problems caused by waterlogged soil.
Make sure your plastic container has drainage holes at the bottom to prevent waterlogging. Aim for at least 1-2 inches of gravel or small rocks at the bottom to improve drainage.
Ensuring Sufficient Drainage Holes in Plastic Garden Containers
Proper drainage is crucial for the health and overall success of your plants in plastic garden containers. One of the key aspects of ensuring good drainage is having sufficient drainage holes in the containers. Here are some guidelines to follow to ensure the right number and size of drainage holes:
1. Number of drainage holes: Depending on the size of the container, there should be multiple drainage holes in the bottom. This allows water to escape freely rather than pooling at the bottom. For smaller containers, two to three drainage holes should suffice, while larger containers may require four or more.
2. Hole placement: The drainage holes should be evenly spaced across the bottom of the container. This ensures that water can drain evenly throughout the soil. Avoid clustering the holes in one area, as it may lead to uneven drainage and create dry pockets in the soil.
3. Hole size: The size of the drainage holes is crucial to prevent soil from clogging them while allowing sufficient water drainage. The holes should be large enough to allow excess water to escape freely but small enough to prevent the potting mix from falling through. Aim for a hole size of around 1/4 to 1/2 inch in diameter.
4. Holes with mesh or screens: To further enhance drainage and prevent soil from blocking the holes, you can place a piece of mesh or screen material over the drainage holes. This will allow water to pass through while keeping the soil inside the container. Ensure that the mesh or screen material is fine enough to prevent soil particles from passing through.
5. Elevating containers: To provide even better drainage, you can elevate the plastic garden containers slightly above the ground using pot feet or similar objects. This allows excess water to escape more efficiently through the drainage holes, reducing the risk of waterlogged soil.
When creating drainage holes, use a drill equipped with a bit suitable for plastic to prevent cracking or damaging the container. Place the holes near the center of the container to avoid weakening the edges. After drilling the holes, gently tap the container to remove any loose debris.
Remember, ensuring sufficient drainage holes in your plastic garden containers is crucial for preventing waterlogged soil and maintaining the health of your plants. By following these guidelines and providing proper drainage, you are creating an optimal environment for your plants to thrive.
Additional Methods for Improving Drainage in Plastic Garden Containers
While ensuring sufficient drainage holes in your plastic garden containers is important, there are also additional methods you can employ to further improve drainage. These methods can help prevent waterlogged soil and promote healthy root development. Here are some additional techniques:
1. Layer of drainage material: Place a layer of drainage material at the bottom of the container before adding the soil mix. This can include small rocks, pebbles, or broken pottery pieces. The drainage material creates space for excess water to accumulate, allowing it to drain away from the soil and roots. Ensure the layer is about one to two inches thick.
2. Elevating the container: To enhance drainage, consider elevating the plastic garden container slightly. This can be done using pot feet, bricks, or wooden blocks. By raising the container, excess water can easily flow out of the drainage holes, reducing the risk of waterlogged soil.
3. Adding a drainage layer: Layering the soil mix with a material that enhances drainage is another effective method. Materials such as perlite, vermiculite, or coarse sand can be mixed into the bottom portion of the soil mix. These materials create air pockets and encourage water to flow freely through the soil.
4. Mulching with gravel or crushed stone: Applying a layer of gravel or crushed stone on the soil surface can improve surface drainage. This helps prevent water from pooling around the plant’s base and reduces the risk of soggy soil. It also helps to control weed growth and maintain a neat appearance in your garden containers.
5. Watering techniques: Proper watering techniques can also contribute to better drainage. Instead of drenching the entire container with water, water the plants at the base. This allows the water to directly reach the roots, preventing excessive moisture in the soil. Additionally, ensure that the soil has dried out slightly before watering again to avoid overwatering.
Remember to regularly inspect the drainage holes and ensure they are not blocked by roots or debris. If necessary, clean the holes using a toothpick or a tiny brush to maintain optimal drainage. And always monitor the moisture level in the soil to prevent waterlogging.
By implementing these additional methods, you can enhance the drainage in your plastic garden containers and create an ideal environment for your plants. Ensuring proper drainage is essential for healthy root development, preventing waterlogged soil, and promoting overall plant growth and vitality.
Potential Drainage Issues and Troubleshooting Tips
While taking measures to ensure proper drainage in your plastic garden containers, you may still encounter some drainage issues along the way. Here are some common problems and troubleshooting tips to help you overcome them:
1. Soil compacted or clogged drainage holes: Over time, the soil in your containers may become compacted, causing poor drainage. Additionally, the drainage holes can become clogged with roots or debris, impeding water flow. To fix this issue, gently loosen the soil with a hand tool or fork, ensuring that it is not packed tightly. If the drainage holes are clogged, clean them carefully using a toothpick or a tiny brush.
2. Waterlogged soil: If you notice the soil in your plastic garden containers staying excessively wet or waterlogged, it indicates poor drainage. To resolve this issue, examine the drainage holes to ensure they are not blocked. Adjust your watering routine to allow the soil to dry out slightly between waterings. You may also consider repotting your plant using a well-draining soil mix or adding a layer of drainage material at the bottom of the container.
3. Uneven water distribution: Sometimes, water may not distribute evenly throughout the container, causing dry or soggy pockets. This can be due to uneven soil moisture or inadequate drainage. To address this issue, make sure to water your plants evenly, saturating the entire soil surface. Consider using a watering can with a narrow spout to direct the water evenly across the container.
4. Insufficient drainage holes: If your plastic garden container has a limited number or small-sized drainage holes, it may impede proper drainage. In such cases, you can drill additional holes in the container’s bottom or enlarge the existing ones. Ensure the holes are evenly spaced for even water drainage. However, be careful not to compromise the structural integrity of the container.
5. Improper soil mix: If your soil mix is not adequately balanced in terms of organic matter and drainage materials, it can hinder proper drainage. Adjust the soil mix by incorporating more organic matter, like compost or peat moss, to improve water flow and aeration. Additionally, consider adding more coarse materials, such as perlite or vermiculite, to enhance drainage.
6. Container size mismatch: If your plant is struggling with drainage issues and showing signs of stress, it may be due to a mismatch between the container size and the plant’s root system. Transplant your plant into a larger container to provide ample space for the roots to grow and proper water drainage to occur.
Remember to regularly monitor the condition of your plastic garden containers and address any drainage issues promptly. Adequate drainage is crucial for the health and well-being of your plants and ensures their long-term success in container gardening.
Conclusion
Proper drainage is a fundamental aspect of maintaining a healthy and thriving garden in plastic containers. By ensuring that excess water can freely drain from the containers, you can prevent waterlogged soil, root rot, and other potential problems that can harm your plants.
Throughout this article, we have discussed the importance of proper drainage, factors to consider for drainage in plastic garden containers, choosing the right soil mix, ensuring sufficient drainage holes, and additional methods for improving drainage. These guidelines will help you create an optimal environment for your plants to grow and flourish.
Remember to select the appropriate container size, provide enough drainage holes, and use a well-draining soil mix consisting of organic matter and coarse materials. Additionally, employ techniques such as layering drainage material, elevating the containers, and mulching with gravel or crushed stone to further enhance drainage.
Be aware of potential drainage issues that may arise, such as compacted soil, clogged drainage holes, waterlogged soil, and uneven water distribution. By troubleshooting these problems promptly, you can maintain excellent drainage and keep your plants healthy.
In conclusion, proper drainage is essential for the success of your plastic container garden. It allows for the proper flow of water, oxygen, and nutrients to reach the roots, promoting healthy growth and preventing water-related issues. By following the guidelines outlined in this article, you can ensure that your plants thrive and create a beautiful and vibrant garden in your plastic containers.
Now, armed with the knowledge and understanding of proper drainage, go ahead and create your garden oasis in plastic containers. Enjoy the rewards of a flourishing garden while providing your plants with the optimal growing conditions they deserve!
Frequently Asked Questions about How To Set Up Drainage For A Garden In A Plastic Container
Was this page helpful?
At Storables.com, we guarantee accurate and reliable information. Our content, validated by Expert Board Contributors, is crafted following stringent Editorial Policies. We're committed to providing you with well-researched, expert-backed insights for all your informational needs.
0 thoughts on “How To Set Up Drainage For A Garden In A Plastic Container”