Home>Home Maintenance>How To Install Pop-Up Garden Drainage
Home Maintenance
How To Install Pop-Up Garden Drainage
Modified: May 6, 2024
Learn how to properly install a pop-up garden drainage system in your home. Enhance your home maintenance with this essential step-by-step guide.
(Many of the links in this article redirect to a specific reviewed product. Your purchase of these products through affiliate links helps to generate commission for Storables.com, at no extra cost. Learn more)
Introduction
Welcome to our comprehensive guide on how to install a pop-up garden drainage system. If you have ever experienced pooling water in your garden after heavy rainstorms or noticed water damage to your plants and lawn, a pop-up garden drainage system can be the perfect solution.
Proper drainage is essential for maintaining the health and beauty of your outdoor space. Excess water can cause soil erosion, waterlogging, and damage to plants, not to mention creating an unpleasant environment. By installing a pop-up garden drainage system, you can effectively direct and remove excess water, preventing these issues and creating a healthy and vibrant garden.
In this article, we will guide you through the process of understanding, planning, and installing a pop-up garden drainage system. We will also cover proper testing and maintenance to ensure its optimal functionality. So, let’s get started!
Key Takeaways:
- Installing a pop-up garden drainage system can prevent water damage and create a healthy garden. Proper planning, testing, and maintenance are crucial for optimal functionality and longevity.
- Regular inspection, cleaning, and troubleshooting are essential for maintaining an effective pop-up garden drainage system. Addressing common issues promptly ensures a vibrant and healthy garden.
Read more: How To Store A Pop Up Camper
Understanding Pop-Up Garden Drainage Systems
Before diving into the installation process, let’s take a closer look at what a pop-up garden drainage system actually is. These systems are designed to redirect and remove excess water from your garden, effectively preventing waterlogging and other related issues.
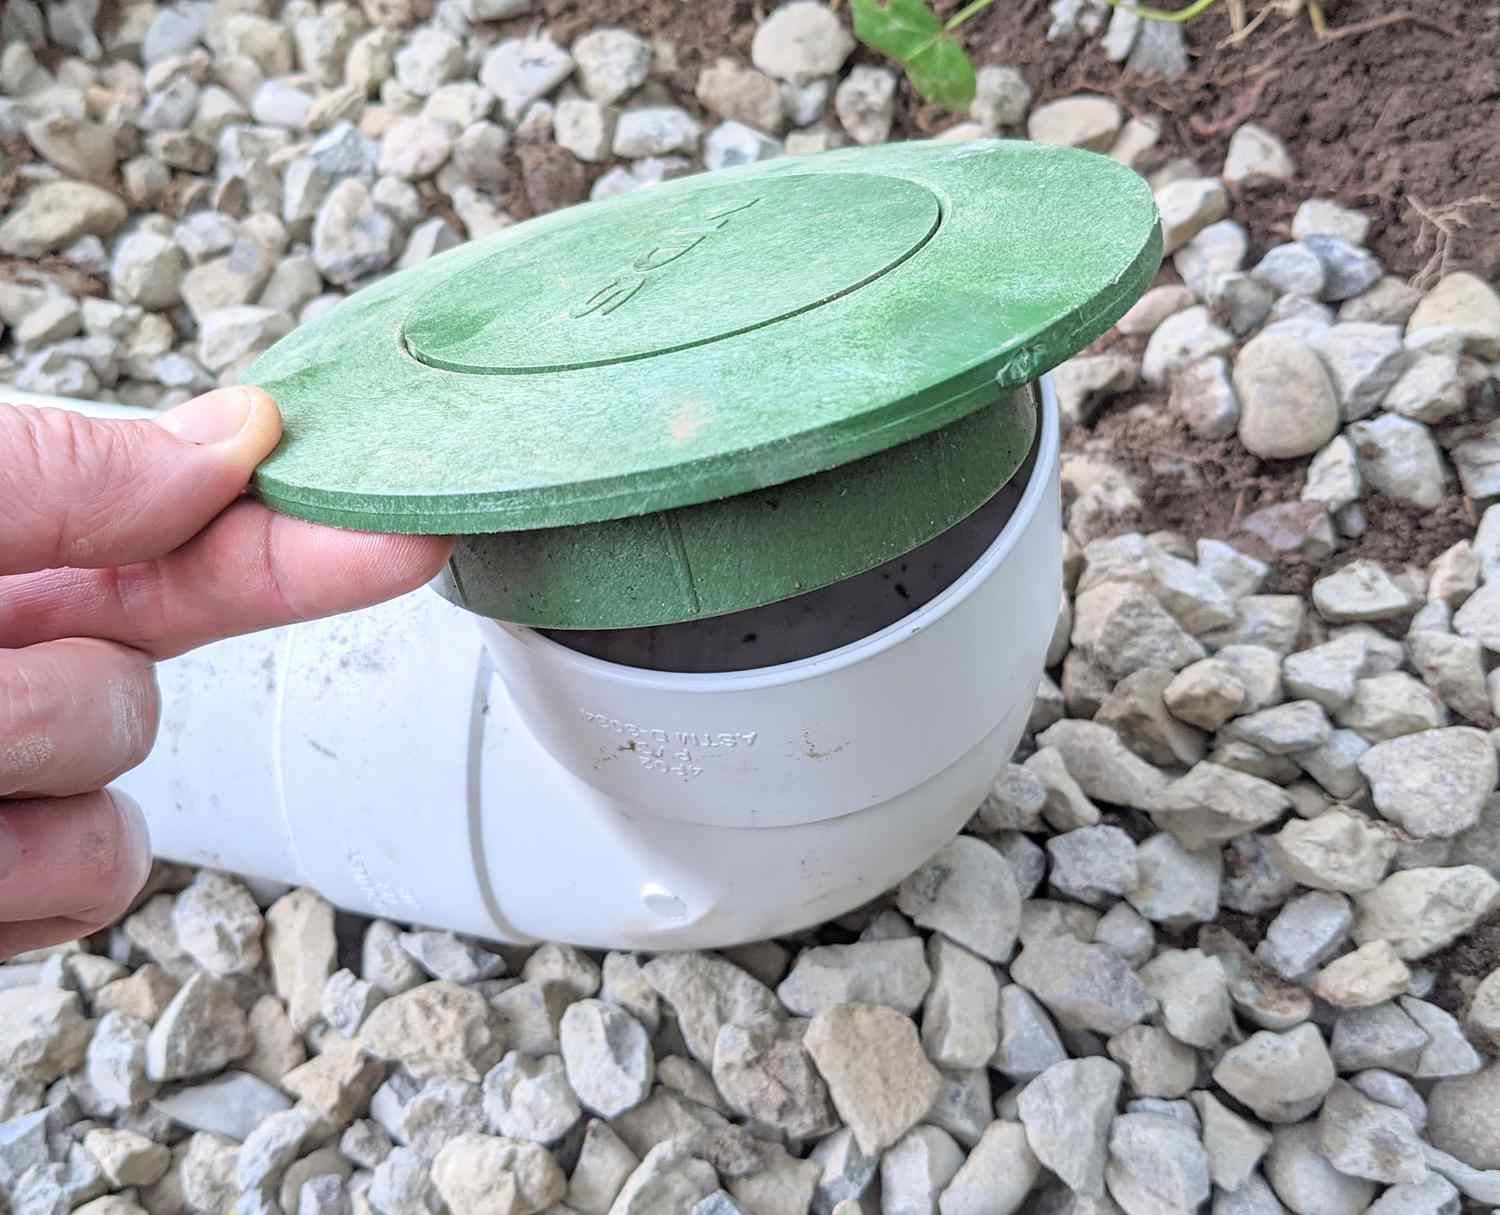
Pop-up drainage systems consist of a series of underground pipes with strategically placed pop-up emitters. The pipes are typically made of PVC or corrugated plastic and are buried beneath the surface of your garden. The emitters, which are usually made of plastic, are designed to remain closed during dry periods and open up when there is excess water pressure.
When heavy rain or irrigation causes water to accumulate, the pressure builds up in the underground pipes. This pressure forces the pop-up emitters to open, allowing the water to flow out and away from your garden. Once the water subsides, the emitters will close again, keeping debris and critters out of the pipes.
Pop-up garden drainage systems offer several advantages over other drainage methods. Firstly, they are discrete and aesthetically pleasing since the emitters remain hidden until they activate. Secondly, they provide reliable and efficient water removal, preventing soil erosion and water damage.
It is important to note that while pop-up drainage systems are effective for removing excess water, they are not suitable for handling large volumes of water or extremely wet areas. In cases where there is a significant amount of water or a consistently wet landscape, it may be necessary to consider alternative drainage solutions or consult with a professional.
Now that you have a better understanding of how pop-up garden drainage systems work, let’s move on to the planning and preparation phase of the installation process.
Planning for Installation
Before you begin installing your pop-up garden drainage system, it is essential to properly plan and prepare. Here are the key steps to follow during the planning phase:
- Assess Your Garden: Take a thorough look at your garden and identify the areas where excess water tends to accumulate. This could be low-lying areas, near downspouts, or anywhere that water tends to pool after rainfall or irrigation. Understanding these problem areas will help you determine the best locations for drainage pipes and emitters.
- Create a Drainage Plan: Once you have identified the problem areas, create a drainage plan. This plan should include the route for your drainage pipes and the desired locations for your pop-up emitters. Consider factors such as the slope of your garden, the proximity to existing structures, and the desired outlet for the water. Sketch out your plan on paper to visualize the layout before proceeding.
- Check Local Regulations: Before starting any installation, be sure to check with your local municipality or neighborhood association to ensure that you comply with any regulations or codes regarding drainage systems. In some areas, permits may be required for specific drainage projects. It is better to be informed and prepared to avoid any legal issues down the line.
- Gather the Necessary Tools and Materials: Make a list of the tools and materials you will need for the installation. This typically includes PVC or corrugated plastic pipes, pop-up emitters, connectors, adhesive glue, a shovel, a trenching tool, a tape measure, and a level. Ensure that you have all the required items before starting the installation to minimize interruptions.
- Allocate Sufficient Time: Installing a pop-up garden drainage system requires time and effort. Set aside a block of time where you can focus solely on the installation without rushing. Depending on the size and complexity of your project, it may take a few days to complete. Be patient and allow yourself plenty of time to complete the task.
By taking the time to plan and prepare properly, you will set yourself up for a smoother installation process. Once you have everything in order, you can begin gathering the required tools and materials and move on to the next steps in the installation process.
Tools and Materials Needed
Now that you have completed the planning phase for your pop-up garden drainage system, it’s time to gather the necessary tools and materials. Here’s a list of what you will need:
Tools:
- Shovel: A sturdy shovel will be essential for digging trenches to bury the pipes.
- Trenching Tool: A trenching tool or edger can help you create clean and straight trenches for laying the pipes.
- Tape Measure: You’ll need a tape measure to accurately measure the distances and dimensions of your garden.
- Level: A level will come in handy to ensure that your drainage pipes have a proper slope for water flow.
- Utility Knife: A sharp utility knife will be useful for cutting the pipes to the desired lengths.
- Hacksaw: If you are using PVC pipes, a hacksaw can be used to cut the pipes.
- Gloves and Safety Glasses: To protect your hands and eyes during the installation process, make sure to wear gloves and safety glasses.
Read more: How To Make An Awning For A Pop-Up Camper
Materials:
- PVC or Corrugated Plastic Pipes: Choose pipes that are appropriate for your garden’s needs. PVC pipes are sturdy and durable, while corrugated plastic pipes are more flexible and can accommodate uneven terrain.
- Pop-Up Emitters: Select high-quality pop-up emitters that will effectively handle the water flow and remain closed when not in use.
- Pipe Connectors: These will be needed to join the sections of pipe together. Opt for connectors that are compatible with your chosen pipe material.
- Adhesive Glue: If using PVC pipes, adhesive glue will be required to secure the pipe connectors.
- Gravel or Drainage Rock: This will be used to create a well-drained base within the trenches and around the pipes.
- Landscape Fabric: Optional, but using landscape fabric can help prevent soil and dirt from entering the drainage system.
Make sure to gather all the necessary tools and materials before starting the installation process. This will save you time and ensure that you have everything you need at your fingertips. With your tools and materials in hand, you’re now ready to move on to the step-by-step installation process.
Step-by-Step Installation Process
Now that you have gathered all the necessary tools and materials, it’s time to begin the installation process for your pop-up garden drainage system. Follow these step-by-step instructions:
Step 1: Mark the Layout
Using spray paint or landscaping flags, mark the desired route for your drainage pipes. Make sure to follow your drainage plan and mark the locations where the pop-up emitters will be installed.
Step 2: Dig Trenches
Using a shovel or trenching tool, dig trenches along the marked layout. The trenches should be deep enough to adequately bury the pipes. Ensure that the trenches have a slight slope for proper water flow. As a general guideline, the slope should be approximately ¼ inch per foot.
Step 3: Lay the Pipes
Start by laying the pipes in the trenches. Connect the sections of pipe using the appropriate connectors, according to the manufacturer’s instructions. If using PVC pipes, use adhesive glue to secure the connectors. Ensure that the pipes are straight and properly aligned.
Step 4: Install the Pop-Up Emitters
Place the pop-up emitters at the designated locations, ensuring they are level with the ground surface. Connect the emitters to the ends of the drainage pipes using the provided connectors. Ensure that the emitters are securely attached and in the closed position.
Step 5: Add Gravel
Fill the trenches with a layer of gravel or drainage rock, covering the pipes and emitters. This will aid in proper drainage and prevent the pipes from becoming clogged with sediment or debris.
Step 6: Test the System
Once the pipes and emitters are in place and covered with gravel, test the drainage system. Run a garden hose into one of the emitters and observe the water flow. Ensure that the water is effectively being redirected away from your garden and that no leaks or blockages are present. Make any necessary adjustments or repairs if needed.
Read more: How To Hang Curtains In A Pop Up Camper
Step 7: Fill the Trenches
After testing the system and ensuring its proper functionality, backfill the trenches with the excavated soil. Compact the soil gently to create a stable and level ground surface. If desired, add grass seed or re-sod the area to restore the aesthetics of your garden.
Congratulations! You have successfully installed a pop-up garden drainage system. Now, it’s time to move on to the next crucial step: testing and adjusting the drainage system to ensure its optimal performance.
Testing and Adjusting the Drainage System
After installing your pop-up garden drainage system, it is crucial to test and adjust its performance to ensure effective water removal and prevent any potential issues. Follow these steps to properly test and adjust your drainage system:
Step 1: Simulate Heavy Rainfall
To test the system, simulate heavy rainfall by either using a garden hose or waiting for a natural rainstorm. Allow water to flow into the pop-up emitters and observe how effectively the system handles the excess water. Pay attention to any signs of water pooling or any areas where the drainage seems inadequate.
Step 2: Check for Proper Water Flow
Once the system is activated, verify that the water is flowing smoothly through the drainage pipes and out of the pop-up emitters. Ensure that there are no blockages or restrictions that could impede the water flow. If you notice any issues, such as slow or inconsistent drainage, you may need to adjust the slope of the pipes or check for clogs.
Read more: How To Install A Driveway Drainage System
Step 3: Adjust Pop-Up Emitter Positions
If you find that the pop-up emitters are not effectively diverting water away from your garden, you may need to adjust their positions. Move the emitters to areas where water accumulates the most, ensuring they are properly aligned with the rest of the drainage system. This will help improve the overall effectiveness of your drainage system.
Step 4: Address Any Issues
If you encounter any issues during the testing process, such as leaks, blockages, or inconsistent water flow, take the necessary steps to address them. Fix any leaks by resealing connections or replacing damaged pipes. Clear any blockages by flushing the system with water or using a plumbing snake to remove debris. Ensuring the proper functionality of your drainage system is crucial for maintaining a healthy and functional garden.
Step 5: Regular Maintenance
Ongoing maintenance is essential to ensure the longevity and effectiveness of your pop-up garden drainage system. Regularly inspect the system for any signs of wear and tear and perform necessary repairs or replacements. Keep the emitters clean and free of debris to avoid clogs. Additionally, maintain the surrounding landscape by keeping the areas around the emitters clear of vegetation or obstructions.
By thoroughly testing and adjusting your drainage system and performing regular maintenance, you can ensure that your pop-up garden drainage system continues to function optimally and effectively removes excess water from your garden.
Maintaining Your Pop-Up Garden Drainage
Proper maintenance is essential to ensure the long-term functionality and effectiveness of your pop-up garden drainage system. By incorporating these maintenance practices into your routine, you can prevent potential issues and prolong the lifespan of your system:
Read also: 8 Best Pop Up Sprinklers For Lawns For 2025
1. Regular Inspection
Inspect your pop-up emitters and drainage pipes regularly to check for any signs of damage or blockages. Look for cracks, leaks, or clogged openings. Address any issues immediately to prevent further damage and maintain optimal water flow.
2. Clean the Emitters
Keep the pop-up emitters clean and free from debris. Periodically remove any dirt, leaves, or grass clippings that may accumulate on the emitters. This will prevent clogs and ensure that they can open and close properly during water flow.
3. Remove Vegetation and Obstructions
Regularly inspect the areas around the pop-up emitters and clear them of any vegetation or obstructions. Plants, weeds, or other objects can hinder the proper operation of the emitters. Be mindful of nearby trees and shrubs whose roots may grow into the drainage system and cause damage over time.
4. Maintain Proper Grading
Monitor the grading of your garden to ensure that it remains sloped away from your property. Over time, soil erosion or settling may cause the grading to change, which can impact the water flow of your drainage system. If necessary, regrade the area to maintain a proper slope and optimal drainage.
5. Check for Silt or Sediment Build-Up
Inspect the drainage pipes for any silt or sediment accumulation. Over time, particles carried by the water may settle in the pipes, potentially causing blockages. If you notice build-up, flush the system with water to remove the debris and restore proper flow.
6. Winter Preparations
Before winter arrives, take steps to protect your pop-up garden drainage system. Clear the system of any standing water, as freezing temperatures can cause damage to the pipes. Ensure that the emitters are closed securely to prevent debris or ice from entering the system. Consider insulating the pipes in colder climates to prevent freezing and potential pipe bursts.
By following these maintenance practices, you can ensure that your pop-up garden drainage system remains in excellent working condition. Regular inspections and proactive care will help prolong the lifespan of your system and allow it to effectively manage excess water in your garden.
Troubleshooting Common Issues
While pop-up garden drainage systems are generally reliable, there may be times when you encounter common issues that require troubleshooting. Here are some common issues you may come across and steps to resolve them:
1. Clogged Emitters
If your pop-up emitters are not opening fully or are not popping up at all, it may indicate a blockage. To resolve this issue, remove any debris or dirt that may be obstructing the emitters’ movement. Clean the emitters thoroughly and ensure that they can open and close properly.
2. Slow Drainage
If you notice that the water is not draining as quickly as it should, it may be due to a blockage in the pipes. Inspect the drainage pipes for any obstructions or sediment build-up. Use a plumbing snake or flush the pipes with water to remove any blockages and restore proper drainage.
3. Leaks in the Pipes
If you discover leaks in the pipes, it is crucial to address them promptly. Identify the source of the leak and patch it using appropriate repair methods. Replace any damaged sections of the pipes if necessary. Regularly inspect the pipes for any signs of wear or damage to prevent leaks from occurring.
4. Inadequate Water Flow
If you find that the water is not flowing evenly through the drainage system, it may indicate an issue with the pipe slope. Check the alignment and slope of the pipes, ensuring a downward gradient for proper water flow. Adjust the pipes as needed to create an optimal slope and improve water flow through the system.
5. Overflowing Pop-Up Emitters
If the pop-up emitters are consistently overflowing with water, it may indicate that your drainage system cannot handle the volume of water. In such cases, you may need to consider alternative drainage solutions or consult a professional for assistance. They can help determine if your existing system needs modifications or if a different approach is necessary.
Read more: How To Set Up An Indoor Garden
6. Damaged or Misaligned Emitters
If you notice that the pop-up emitters are damaged or not aligned properly with the ground surface, it is important to address this issue. Repair or replace any damaged emitters, ensuring they are securely attached to the drainage pipes. Proper alignment will allow them to function effectively and prevent potential damage.
By troubleshooting and addressing these common issues, you can ensure that your pop-up garden drainage system functions optimally and effectively manages excess water in your garden. Regular inspections and prompt resolutions will help maintain the efficiency and longevity of your drainage system.
Conclusion
Installing a pop-up garden drainage system is a smart investment that can significantly improve the health and appearance of your outdoor space. By effectively redirecting and removing excess water, you can prevent waterlogging, soil erosion, and damage to your plants and lawn. With proper planning, preparation, and installation, you can enjoy the benefits of a well-drained garden for years to come.
Throughout this guide, we have discussed the importance of understanding how pop-up garden drainage systems work and the steps involved in planning, installing, and maintaining them. By following the step-by-step installation process, testing and adjusting the system, and implementing regular maintenance practices, you can ensure the optimal functionality and longevity of your drainage system.
Remember to regularly inspect your pop-up emitters and drainage pipes, clean them from debris, and address any issues promptly. It is also important to maintain the proper grading of your garden, prevent vegetation and obstructions around the emitters, and prepare for winter by safeguarding your system from freezing temperatures.
If you encounter any common issues, such as clogged emitters, slow drainage, leaks, or inadequate water flow, refer to our troubleshooting section for guidance on resolving those problems. Remember, professional assistance may be necessary in certain situations, especially if you encounter persistent issues or require modifications to your drainage system.
By implementing proper installation, regular maintenance, and addressing any issues that arise, you can enjoy a vibrant and healthy garden all year round. So, take the necessary steps to install and maintain your pop-up garden drainage system, and say goodbye to waterlogged gardens and hello to a beautifully landscaped oasis.
Ready to spruce up your outdoor space further? If your newly installed pop-up garden drainage has you inspired, why not consider updating your garden fences too? For creative and appealing designs, our article on garden fence ideas offers fantastic landscaping inspiration that's sure to transform any outdoor area. Or perhaps you're keen on tackling more hands-on projects? Dive into our guide on DIY outdoor projects, perfect for boosting curb appeal and making your neighbors green with envy. Both guides are packed with actionable tips and striking ideas to elevate your home's exterior.
Frequently Asked Questions about How To Install Pop-Up Garden Drainage
Was this page helpful?
At Storables.com, we guarantee accurate and reliable information. Our content, validated by Expert Board Contributors, is crafted following stringent Editorial Policies. We're committed to providing you with well-researched, expert-backed insights for all your informational needs.

0 thoughts on “How To Install Pop-Up Garden Drainage”