Home>Home Maintenance>How To Test An Air Conditioning Capacitor
Home Maintenance
How To Test An Air Conditioning Capacitor
Modified: October 20, 2024
Learn how to test an air conditioning capacitor as part of your home maintenance routine. Ensure your AC unit is running efficiently with this simple step-by-step guide.
(Many of the links in this article redirect to a specific reviewed product. Your purchase of these products through affiliate links helps to generate commission for Storables.com, at no extra cost. Learn more)
Introduction
Welcome to the ultimate guide on how to test an air conditioning capacitor! If you’re experiencing issues with your air conditioner, such as not cooling properly or not turning on at all, a faulty capacitor could be the culprit. Understanding how to test and diagnose a capacitor can help you identify and resolve the problem, saving you time and money on repairs.
But first, let’s start with the basics – what exactly is an air conditioning capacitor?
An air conditioning capacitor is an essential component of your HVAC system. It acts as a kind of battery, storing and releasing electrical energy to help start the compressor and fans. Without a working capacitor, your air conditioner won’t be able to function properly.
Now, you may be wondering why it’s important to test the capacitor. Over time, capacitors can weaken and lose their ability to hold and release a charge effectively. A faulty capacitor can lead to a variety of issues, including reduced cooling performance, frequent system breakdowns, and even damage to other components of your air conditioner.
Testing your air conditioning capacitor is a straightforward process, and it can be done using a few different methods. In this guide, we’ll walk you through each method step-by-step, so you can confidently identify if your capacitor is faulty and take appropriate action.
Before we dive into the testing process, there are a few tools and equipment you’ll need to have on hand. These items will make the testing process much easier and safer:
Key Takeaways:
- Regularly testing your air conditioning capacitor is crucial to prevent breakdowns, ensure optimal cooling, and extend your HVAC system’s lifespan. It’s like giving your AC a check-up to keep it running smoothly.
- Signs of a faulty capacitor include hard starting, inconsistent cooling, and unusual noises. If you notice these, consult a professional technician to diagnose and resolve the issue promptly.
What is an air conditioning capacitor?
An air conditioning capacitor is an electrical device that stores and releases energy to help start the motors of your air conditioner’s compressor and fans. It is a crucial component of your HVAC system, as it provides the necessary electrical boost to kickstart the motor and keep it running smoothly.
Capacitors work by storing electrical energy in an electrostatic field. They consist of two metal plates separated by an insulating material called a dielectric. When voltage is applied to the capacitor, electrons gather on one of the metal plates, building up a charge. This charge is then released when the capacitor is connected to a circuit, providing the necessary jolt of electricity to start the motor.
There are two main types of capacitors used in air conditioning systems: start capacitors and run capacitors. Start capacitors are designed to provide the initial torque required to start the motor, while run capacitors help maintain a steady flow of electricity to keep the motor running efficiently.
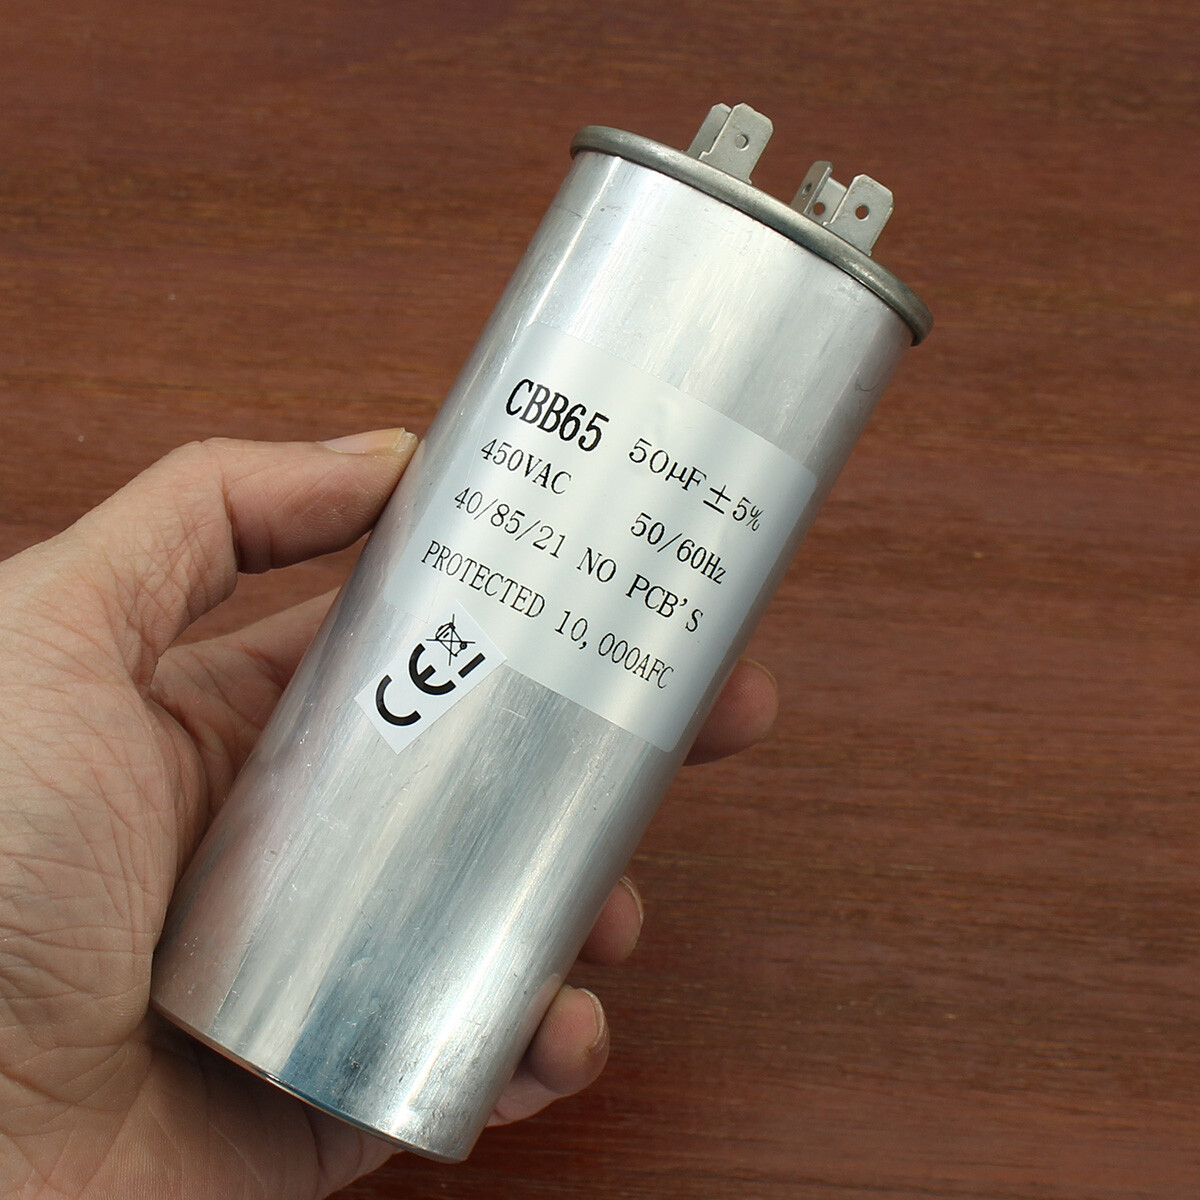
In most air conditioning systems, you will find both a start capacitor and a run capacitor. These capacitors are typically cylindrical in shape and are located in the outdoor condenser unit or within the indoor air handler. They are typically rated in microfarads (μF) and have a voltage rating that matches the requirements of your specific air conditioner model.
It’s important to note that air conditioning capacitors can degrade over time due to factors such as heat, age, and voltage fluctuations. When a capacitor weakens or fails, it can result in various problems, including difficulty starting the motor, reduced cooling capacity, and increased strain on other components of your air conditioner.
Now that you have a clear understanding of what an air conditioning capacitor is, why it’s important, and how it functions, let’s move on to the next step – learning how to test the capacitor to determine if it is faulty.
Why is it important to test the capacitor?
Testing your air conditioning capacitor is crucial for several reasons. A faulty capacitor can cause a range of issues that can impact the performance and lifespan of your air conditioner. By regularly testing the capacitor, you can identify any potential problems early on and take the necessary steps to address them before they escalate.
Here are some key reasons why testing the capacitor is important:
- Prevent system breakdowns: A faulty capacitor can lead to frequent system breakdowns, causing inconvenience and discomfort in your home. By regularly testing the capacitor, you can detect any signs of weakness or failure and replace it before it causes a complete system breakdown.
- Ensure optimal cooling performance: A capacitor that is in good working condition helps the compressor and fans start and run smoothly. If the capacitor is faulty, it can lead to reduced cooling capacity, uneven temperature distribution, or diminished airflow. Testing the capacitor allows you to identify and resolve any issues that may be affecting your air conditioner’s performance.
- Prolong the lifespan of your air conditioner: A well-maintained and properly functioning capacitor can extend the lifespan of your air conditioner. By testing and replacing any faulty capacitors, you reduce the strain on the compressor and other components, helping to protect your investment and avoid costly repairs or replacements.
- Identify potential issues: Testing the capacitor provides an opportunity to assess the overall health of your air conditioning system. If the capacitor is faulty, it could be a symptom of other underlying problems, such as electrical issues or motor damage. By addressing these issues early on, you can prevent further damage and ensure the long-term performance of your air conditioner.
- Save money on energy bills: A faulty capacitor can cause your air conditioner to work harder and consume more energy, leading to higher utility bills. By testing and replacing a faulty capacitor, you can restore your air conditioner’s efficiency and save money on energy costs.
Overall, testing the capacitor is an essential part of air conditioner maintenance. It allows you to detect and address any capacitor-related issues promptly, ensuring that your air conditioning system operates at its maximum efficiency and performance level.
Tools and equipment needed for testing
Before you begin testing an air conditioning capacitor, it’s important to gather the necessary tools and equipment. Having the right tools on hand will make the testing process easier and more accurate. Here’s a list of what you’ll need:
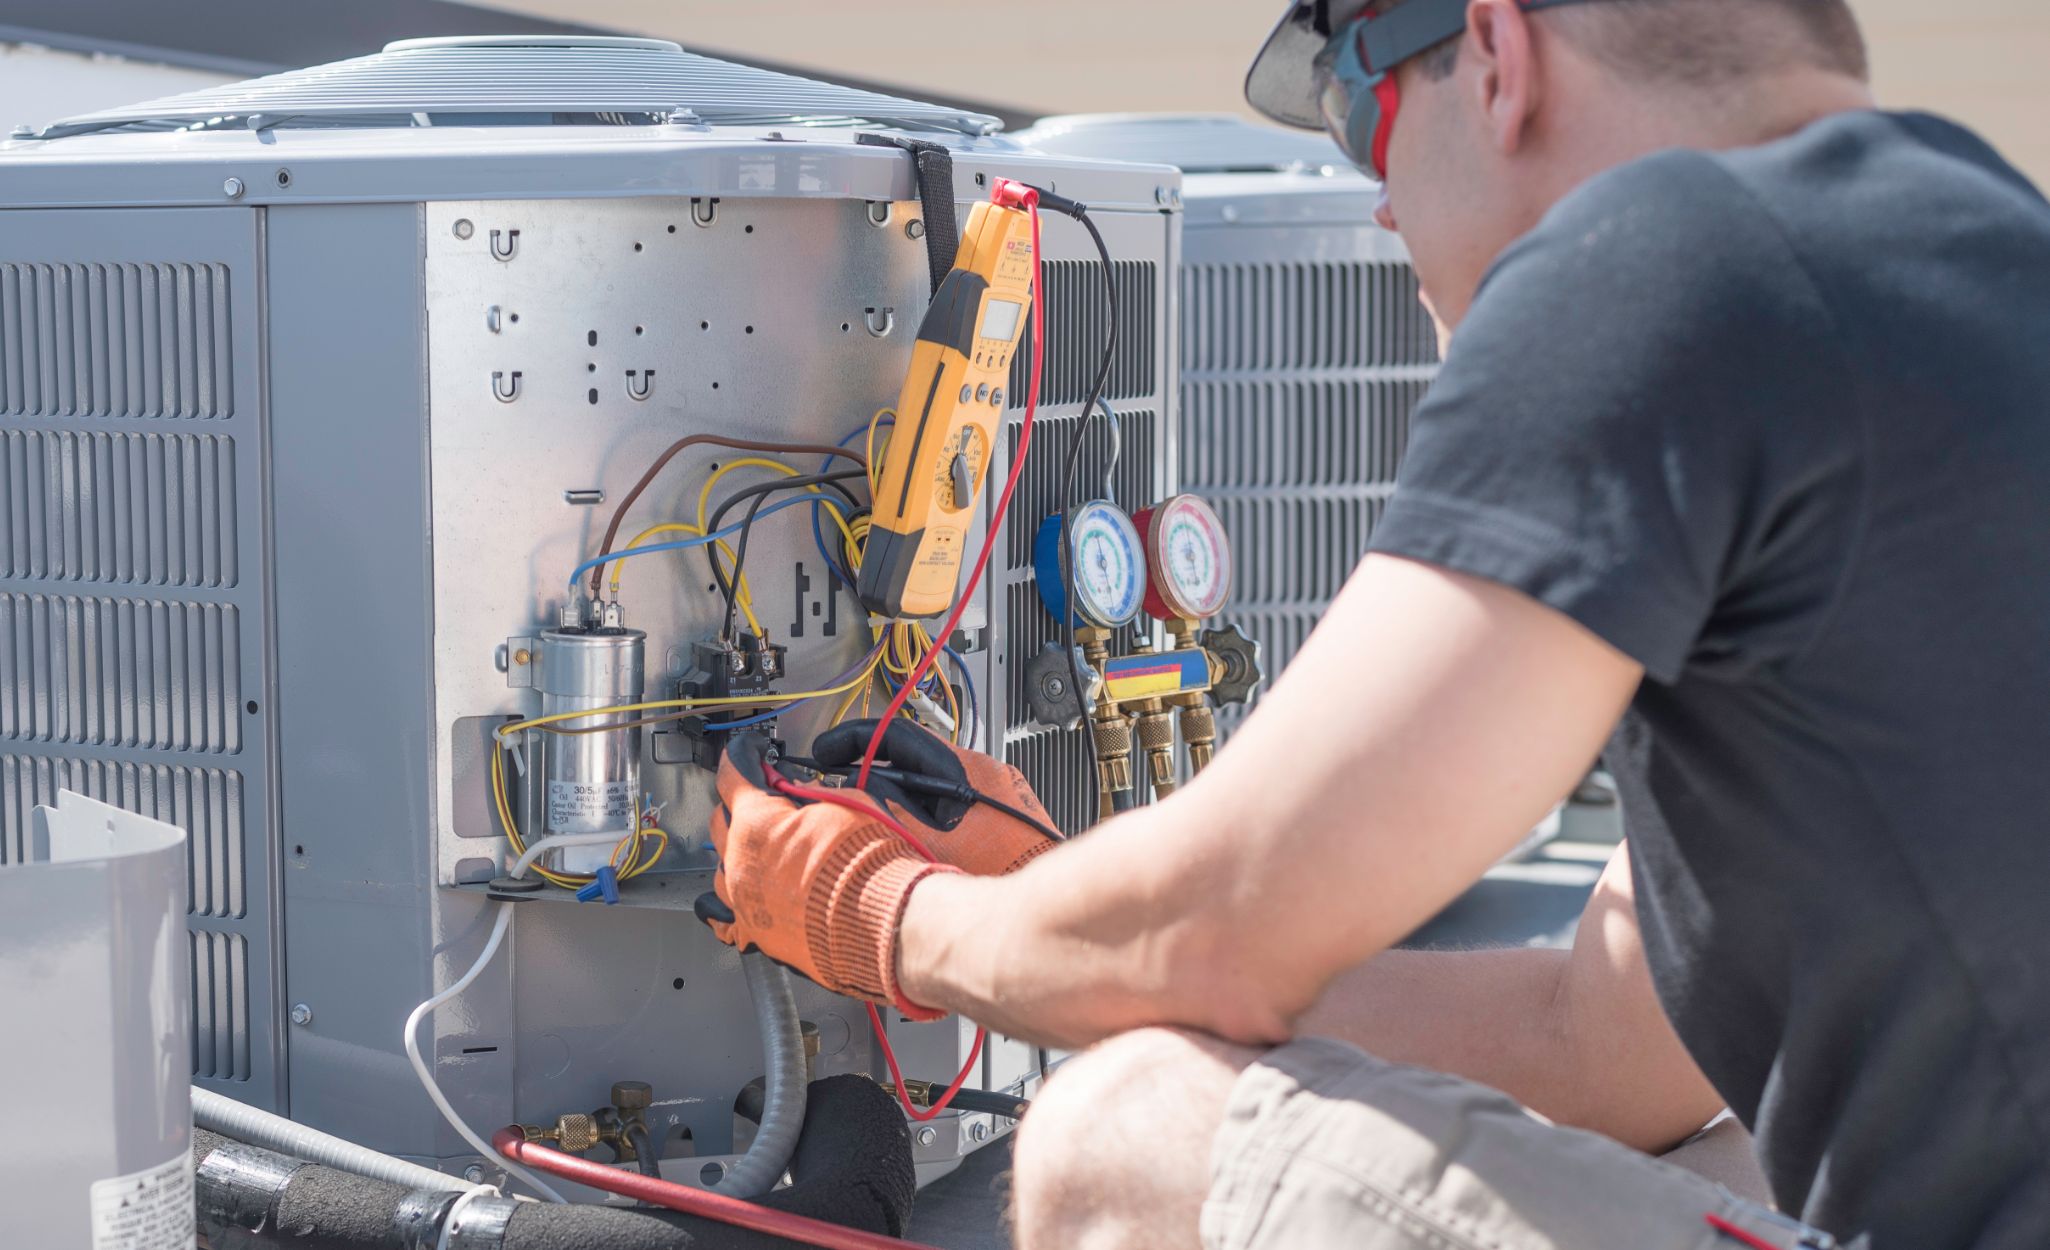
- Safety gloves and goggles: Working with electrical components can be dangerous, so it’s essential to protect yourself with safety gloves and goggles. These will shield you from any potential electrical shocks or debris.
- Multimeter: A multimeter is a versatile tool that measures electrical voltage, current, and resistance. It’s crucial for testing capacitors as it allows you to determine if the capacitor is holding a charge and functioning properly.
- Capacitor tester: A capacitor tester is a specialized device designed specifically for testing capacitors. Unlike a multimeter, a capacitor tester provides more accurate readings and can detect smaller capacitance changes.
- Screwdriver: Depending on your air conditioner model, you may need a screwdriver to access the capacitor. Choose the appropriate screwdriver type and size to remove any panels or covers that are obstructing the capacitor.
- Insulated wire or alligator clips: In some cases, you may need insulated wire or alligator clips to connect the capacitor to the multimeter or capacitor tester. These help establish the necessary electrical connections for testing.
- Notebook and pen: Keeping track of your testing process and results is essential. Have a notebook and pen handy to record the readings you get from the multimeter or capacitor tester.
It’s important to ensure that all your tools and equipment are in good working condition before starting the testing process. Worn-out or damaged tools can affect the accuracy of your readings and potentially pose a safety risk. If you’re unsure about using any of the tools mentioned above, consult a professional technician for guidance.
Now that you have all the necessary tools and equipment, you’re ready to move on to the step-by-step guide on how to test an air conditioning capacitor.
Step-by-step guide to testing an air conditioning capacitor
Testing your air conditioning capacitor is a relatively simple process that can be done using different methods. The most common methods include visual inspection, using a multimeter, or using a capacitor tester. Follow these step-by-step instructions to test your air conditioning capacitor effectively:
- Method 1: Visual inspection
- Turn off the power to your air conditioning system by switching off the circuit breaker or disconnecting the unit from the power source.
- Locate the capacitor in your air conditioner. It is typically located in the outdoor condensing unit or inside the indoor air handler.
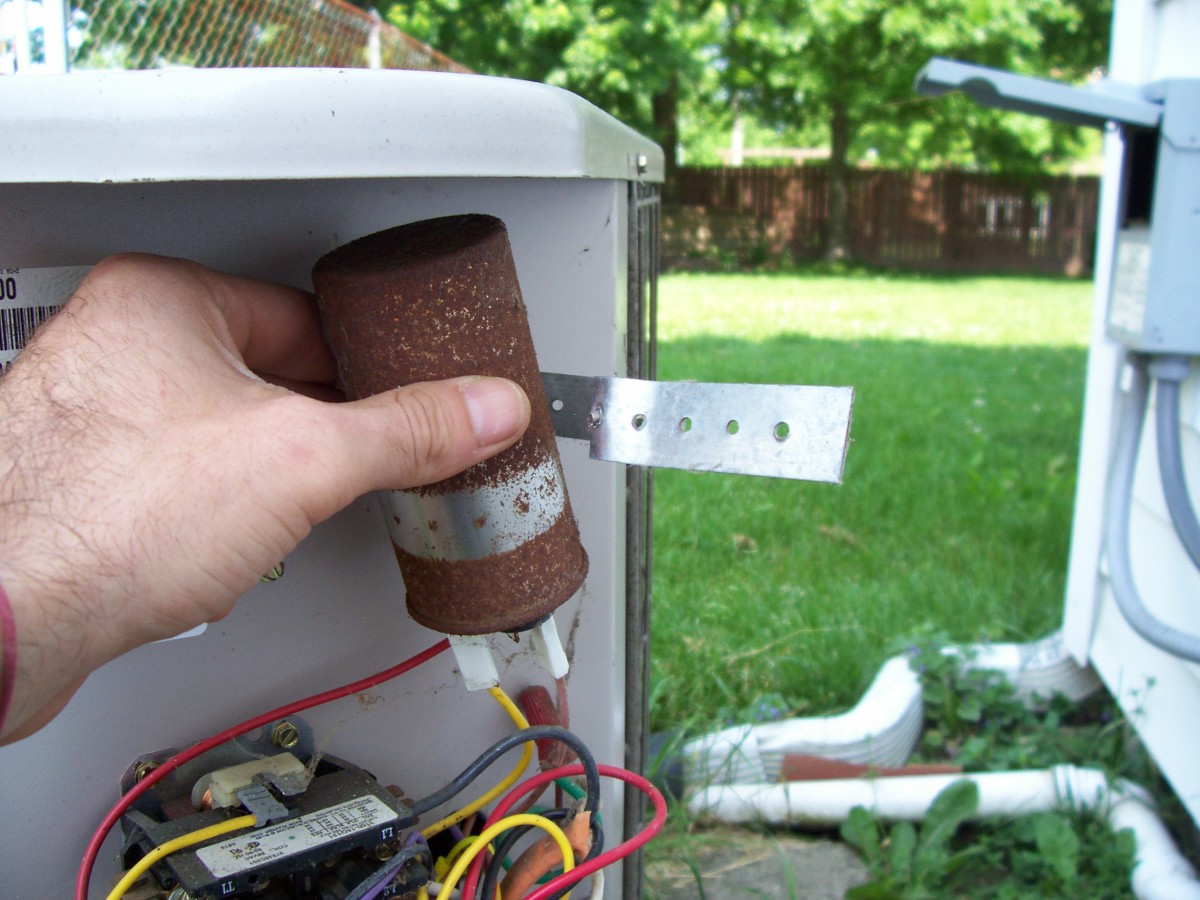
- Inspect the capacitor for any visible signs of damage, such as bulging, leaking, or a burnt smell. If you notice any of these signs, it is likely that the capacitor is faulty and needs to be replaced.
- Method 2: Using a multimeter
- Ensure that the power to your air conditioning system is turned off.
- Disconnect the wires connected to the capacitor. Take a picture or make note of the wire connections for future reference.
- Set your multimeter to the capacitance (μF) setting.
- Place the multimeter’s positive and negative leads on the corresponding terminals of the capacitor, observing the correct polarity.
- Read the display on the multimeter. If the reading is within 10% of the capacitor’s rated capacitance, the capacitor is functioning properly. If the reading is significantly lower or higher, the capacitor may be faulty and should be replaced.
- Method 3: Using a capacitor tester
- Make sure the power to your air conditioning system is turned off.
- Disconnect the wires connected to the capacitor, noting the wire connections for reference.
- Follow the instructions provided with the capacitor tester to set it up correctly.
- Connect the tester to the capacitor using the appropriate leads or clips. Pay attention to the polarity to ensure the correct connection.
- Activate the capacitor tester and allow it to complete the testing cycle.
- Review the results displayed on the tester. If the readings are within the acceptable range specified by the manufacturer, the capacitor is functioning properly. If the readings are outside the specified range, the capacitor is most likely faulty and should be replaced.
Remember, if you are unsure about any of the steps or if you are uncomfortable working with electrical components, it’s always best to seek guidance from a qualified HVAC technician. They have the expertise and experience to safely and accurately test and diagnose any issues with your air conditioning capacitor.
By following these step-by-step instructions and using the appropriate method, you can effectively test your air conditioning capacitor and determine if it is functioning properly or if it needs to be replaced.
Read more: How To Test HVAC Capacitor
Method 1: Visual inspection
Visual inspection is the first method you can use to test an air conditioning capacitor. It involves examining the capacitor for any visible signs of damage or wear. Although it may not provide conclusive evidence of a faulty capacitor, visual inspection can be a good initial indicator before proceeding to more advanced testing methods.
To perform a visual inspection, follow these steps:
- Start by ensuring that the power to your air conditioning system is turned off. This is crucial to avoid any risk of electrical shock.
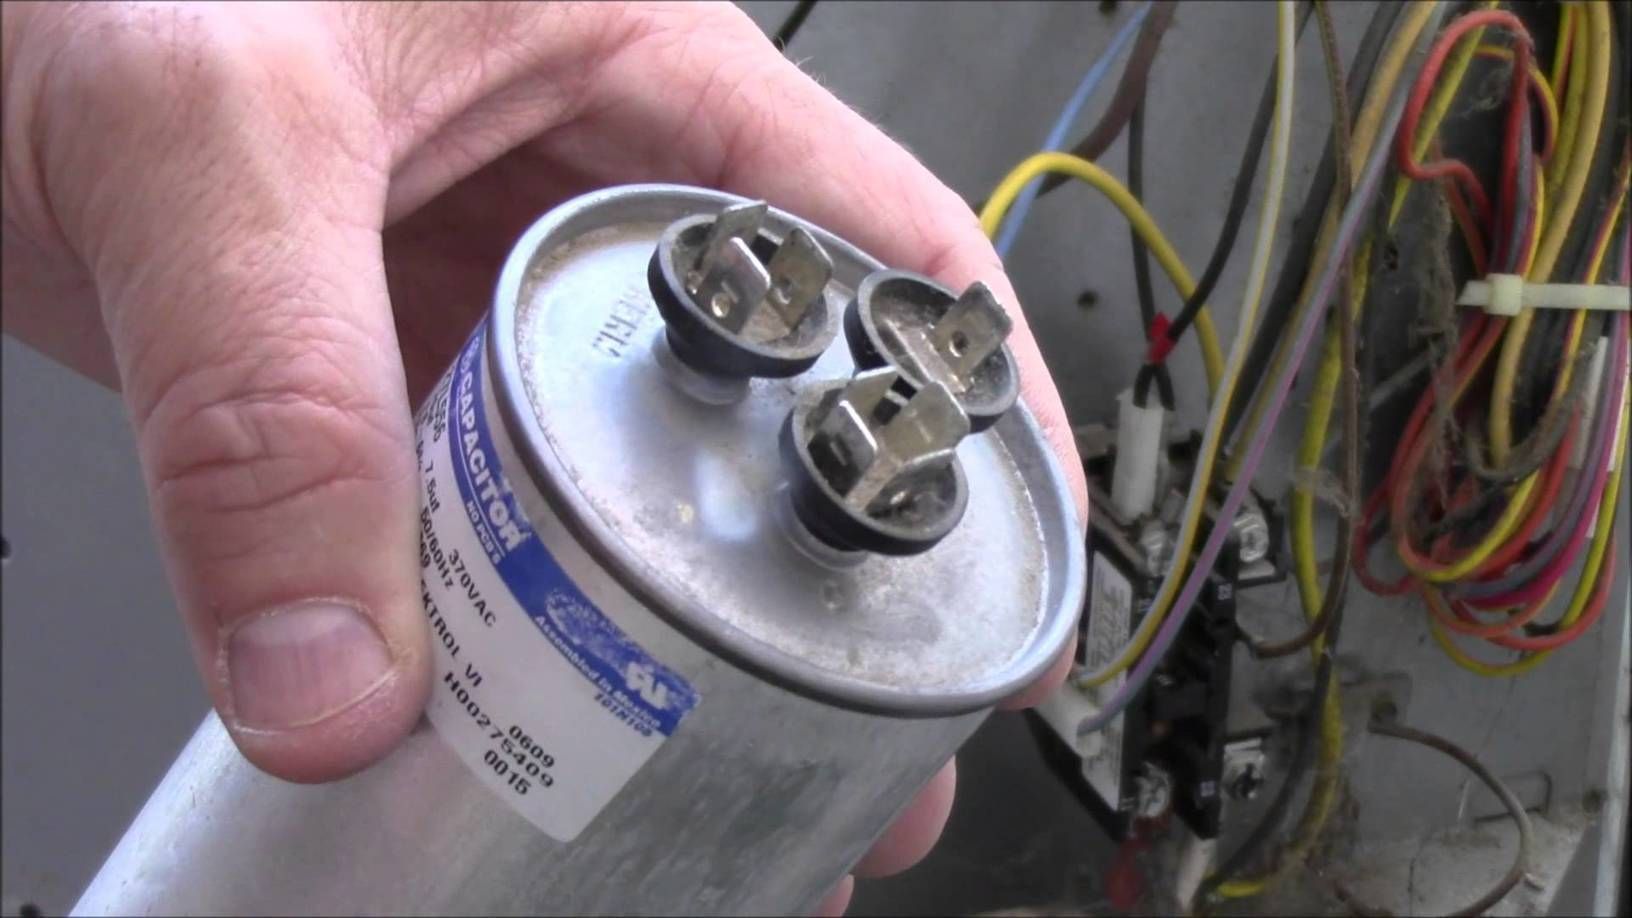
- Locate the capacitor in your air conditioner. In most cases, capacitors are cylindrical in shape and are housed in either the outdoor condensing unit or the indoor air handler.
- Examine the capacitor carefully. Look for any signs of physical damage, such as bulging, leaking, or cracks in the casing. Additionally, check for any signs of discoloration or a burnt smell.
- If you notice any of these signs, it is likely that the capacitor is faulty and needs to be replaced. A bulging or leaking capacitor indicates that it has become defective and cannot hold a charge properly.
- However, keep in mind that a visually intact capacitor does not guarantee that it is working perfectly. Some internal issues may not be visible, so it is always recommended to proceed with additional testing methods to confirm its functionality.
Performing a visual inspection is a quick and simple way to identify obvious physical damage or defects in the capacitor. If you notice any signs that indicate a faulty capacitor, it is best to replace it to avoid further complications and potential damage to other components of your air conditioning system.
Remember, if you are unsure about performing a visual inspection or any other testing methods, it is always recommended to consult with a professional HVAC technician. They have the expertise and knowledge to accurately diagnose and resolve issues with your air conditioning capacitor.
When testing an air conditioning capacitor, use a multimeter to check for continuity and measure the capacitance. If the readings are outside the specified range, the capacitor may need to be replaced.
Method 2: Using a multimeter
Using a multimeter is a common method for testing an air conditioning capacitor. It allows you to measure the capacitance of the capacitor and determine if it is functioning within the acceptable range. This method provides a more accurate assessment compared to visual inspection alone. Follow these steps to test your capacitor using a multimeter:
- Start by ensuring that the power to your air conditioning system is turned off. This is important to prevent any risk of electrical shock.
- Locate the capacitor in your air conditioner. It is usually cylindrical in shape and located in either the outdoor condensing unit or the indoor air handler.
- Disconnect the wires connected to the capacitor. Take a picture or make note of the wire connections for future reference.
- Set your multimeter to the capacitance (μF) setting. If your multimeter does not have a specific capacitance setting, select the highest value on the resistance (Ω) setting.
- Place the multimeter’s positive lead (red) on the positive terminal of the capacitor and the negative lead (black) on the negative terminal, following the correct polarity.
- Observe the reading displayed on the multimeter. The reading should be within 10% of the capacitor’s rated capacitance. If the reading deviates significantly from the nominal value, it indicates that the capacitor is faulty and needs to be replaced.
- If the multimeter reading shows as “OL” or infinite resistance, it indicates that the capacitor is open and has completely failed.
Testing the capacitor with a multimeter helps determine if it is holding a charge and functioning properly. However, keep in mind that a multimeter can only provide a basic assessment of the capacitor’s health. For a more accurate result, you may want to consider using a specialized capacitor tester.
Remember to consult the manufacturer’s specifications or the service manual for your specific air conditioning system to determine the appropriate capacitance rating for your capacitor.
If you are unsure about using a multimeter or interpreting the readings, it is advisable to seek assistance from a professional HVAC technician who can provide expert guidance and ensure accurate testing and diagnosis of your air conditioning capacitor.
Method 3: Using a capacitor tester
Using a capacitor tester is another effective method for testing an air conditioning capacitor. While a multimeter can provide basic readings, a capacitor tester is specifically designed to assess the capacitance and other parameters of a capacitor more accurately. Here are the steps to test your capacitor using a capacitor tester:
- Ensure that the power to your air conditioning system is turned off to prevent any electrical accidents.
- Disconnect the wires connected to the capacitor, taking note of the wire connections for reconnection later.
- Read and understand the instructions provided with the capacitor tester. Each tester may have specific setup requirements.
- Follow the instructions to set up the capacitor tester correctly, ensuring that it is compatible with your capacitor’s rating.
- Connect the tester leads or clips to the corresponding terminals on the capacitor, observing proper polarity.
- Activate the capacitor tester as per the instructions and allow it to complete the testing cycle.
- Review the results displayed on the tester. It should indicate the capacitance value as well as other parameters such as leakage, equivalent series resistance (ESR), and dissipation factor (DF).
- Compare the measurements with the manufacturer’s specifications or acceptable range for your specific capacitor. If the readings are within the prescribed limits, the capacitor is functioning properly. However, if the readings are significantly outside the expected range, it indicates a faulty capacitor that needs to be replaced.
Using a capacitor tester provides more accurate and detailed information about the condition of the capacitor compared to other testing methods. It allows you to assess additional factors like leakage and ESR, which can impact the capacitor’s performance.
Remember to refer to the manufacturer’s instructions for your specific capacitor tester, as the setup and testing process may vary slightly between different models.
If you are unsure about using a capacitor tester or interpreting the results, it is always recommended to consult with a professional HVAC technician. They have the expertise and specialized equipment to ensure accurate testing and diagnosis of your air conditioning capacitor.
By following these steps and utilizing a capacitor tester, you can effectively evaluate the health and functionality of your air conditioning capacitor and make informed decisions about any necessary repairs or replacements.
Common signs of a faulty capacitor
A faulty capacitor in your air conditioning system can lead to various issues that affect its performance and efficiency. Knowing the common signs of a faulty capacitor can help you identify problems early on and address them promptly. Here are some indications that your air conditioning capacitor may be faulty:
- Hard starting: If your air conditioner struggles to start or takes longer than usual to kick on, it could be a sign of a faulty capacitor. The capacitor provides the initial electrical boost to start the compressor and fans, so a weak or failed capacitor can result in difficulty starting the system.
- Inconsistent cooling: If you notice uneven cooling throughout your home or reduced airflow from the vents, a faulty capacitor may be to blame. The capacitor helps maintain a steady flow of electricity to the motor, so a malfunctioning capacitor can lead to reduced cooling performance.
- Frequent system breakdowns: A capacitor that is on the verge of failure may cause frequent breakdowns of your air conditioning system. If you find yourself repeatedly needing to reset or restart the system, it’s worth investigating the capacitor’s condition.
- Unusual noises: Faulty capacitors can cause motors to strain and make unusual sounds such as buzzing, humming, or clicking. If you hear any unfamiliar noises coming from your air conditioner, it could indicate capacitor issues.
- Overheating: A faulty capacitor may heat up excessively during operation. If you notice the capacitor becoming unusually hot to the touch or emitting a burning smell, it could be a sign of internal damage or wear.
- Leaking or bulging: In some cases, a faulty capacitor may exhibit visible signs of damage, such as leaking oil or electrolyte or bulging of the capacitor case. These physical deformities typically indicate capacitor failure and should be addressed immediately.
It’s important to note that these signs could also be indicative of other issues in your air conditioning system. Therefore, it’s essential to have a qualified HVAC technician perform a comprehensive diagnosis to accurately identify the cause of the problem.
If you experience any of these signs associated with a faulty capacitor, it is advisable to seek professional assistance promptly. An HVAC technician can assess the capacitor’s condition, perform testing, and recommend the appropriate steps for repair or replacement.
By being aware of these common signs, you can address capacitor issues early on, ensuring the smooth operation and longevity of your air conditioning system.
Read more: How To Test A Fan Capacitor
Precautions and safety measures
When working with your air conditioning system and testing the capacitor, it is important to prioritize your safety and take precautionary measures. Here are some essential precautions and safety measures to keep in mind:
- Turn off the power: Before beginning any work on your air conditioner, make sure to turn off the power to the unit. This can be done by switching off the circuit breaker or disconnecting the power supply. This step is vital to avoid any risk of electrical shock.
- Wear protective gear: Always wear safety gloves and goggles to protect yourself from potential electric shocks and debris. Capacitors can store electrical energy even when the power is off, so it is crucial to take proper precautions.
- Allow time for discharge: Capacitors hold an electrical charge even after power is disconnected. To prevent shocks, it is recommended to wait for at least 10-15 minutes after turning off the power before attempting to touch or handle the capacitor.
- Familiarize yourself with the system: Understand the layout and components of your air conditioning system before attempting any testing or repairs. Consult the manufacturer’s manual or seek professional guidance if needed.
- Use appropriate tools: Ensure that you have the proper tools, such as a multimeter or capacitor tester, to safely and accurately test the capacitor. Worn-out or damaged tools can affect the accuracy of your readings and pose safety risks.
- Follow manufacturer guidelines: It is important to consult the manufacturer guidelines and recommendations specific to your air conditioning unit and capacitor. This includes the appropriate capacitance rating, testing procedures, and any specific instructions for your model.
- Consult with a professional: If you are unsure about any aspect of testing or repairing the capacitor, it is always recommended to seek the assistance of a qualified HVAC technician. They have the expertise and experience to safely handle electrical components and perform accurate testing.
- Properly dispose of the capacitor: If you determine that your capacitor is faulty and needs replacement, follow local regulations for proper disposal. Capacitors may contain hazardous materials, so it’s important to dispose of them in accordance with environmental guidelines.
Remember, working on electrical components can be dangerous if proper precautions are not taken. If you have any doubts or concerns, it is best to consult a professional technician who can provide guidance and ensure the safety and effectiveness of all testing and repairs.
By following these precautions and safety measures, you can minimize the risks associated with working on your air conditioning capacitor and ensure a safe and successful testing process.
Conclusion
Testing an air conditioning capacitor is an essential part of maintaining the performance and efficiency of your HVAC system. By being able to diagnose and identify a faulty capacitor, you can address issues promptly, prevent system breakdowns, and potentially save on costly repairs.
In this comprehensive guide, we explored various methods for testing an air conditioning capacitor. Visual inspection, using a multimeter, and utilizing a capacitor tester are three common methods that can help determine the health and functionality of your capacitor.
However, it’s important to note that while these testing methods can provide valuable insights, if you are uncertain or uncomfortable performing the tests yourself, it is highly recommended to seek assistance from a qualified HVAC technician. They have the expertise and experience to safely and accurately diagnose capacitor issues and perform any necessary repairs or replacements.
Remember to prioritize safety throughout the testing process. Always turn off the power to your air conditioning system, wear appropriate protective gear, and allow sufficient time for the capacitor to discharge before handling it. It is also important to follow manufacturer guidelines and dispose of any faulty capacitors in accordance with local regulations.
By regularly testing your air conditioning capacitor, you can catch potential issues early, ensure optimal cooling performance, prevent system breakdowns, and extend the lifespan of your HVAC system. It is a valuable maintenance practice that contributes to the reliable and efficient operation of your air conditioner.
If you experience any of the common signs of a faulty capacitor, such as hard starting, inconsistent cooling, or frequent system breakdowns, don’t hesitate to take action. Consult with a professional technician who can accurately diagnose the problem and provide appropriate solutions.
By understanding how to test an air conditioning capacitor and taking proactive steps to address any issues, you can maintain a comfortable indoor environment and enjoy the reliability and efficiency of your air conditioning system for years to come.
Frequently Asked Questions about How To Test An Air Conditioning Capacitor
Was this page helpful?
At Storables.com, we guarantee accurate and reliable information. Our content, validated by Expert Board Contributors, is crafted following stringent Editorial Policies. We're committed to providing you with well-researched, expert-backed insights for all your informational needs.