Home>Home Maintenance>How To Wire A Thermostat For Air Conditioning
Home Maintenance
How To Wire A Thermostat For Air Conditioning
Modified: October 19, 2024
Learn how to wire a thermostat for air conditioning in your home with our step-by-step guide. Ensure proper home maintenance with this valuable DIY tutorial.
(Many of the links in this article redirect to a specific reviewed product. Your purchase of these products through affiliate links helps to generate commission for Storables.com, at no extra cost. Learn more)
Introduction
When it comes to keeping your home comfortable, having a properly functioning air conditioning system is essential. And at the heart of your cooling system is the thermostat. The thermostat is responsible for regulating the temperature in your home and ensuring that your air conditioner turns on and off as needed.
While many homeowners rely on professional HVAC technicians to handle thermostat installations, wiring a thermostat for air conditioning is actually a task that can be accomplished with the right tools and a little bit of knowledge. In this article, we will guide you through the process of wiring a thermostat for air conditioning, empowering you to take control of your home’s comfort.
Understanding the thermostat wiring process is important before you begin. Thermostat wires typically consist of different colored wires, each serving a specific function. It is crucial to correctly identify and connect these wires to ensure that your new thermostat functions properly.
Before you start, make sure you have the following tools and materials:
- Flathead and Phillips screwdrivers
- Wire strippers
- Electrical tape
- New thermostat
- Label stickers or masking tape
Now, let’s get started with the step-by-step process of wiring a thermostat for air conditioning.
Key Takeaways:
- Takeaway 1: Wiring a thermostat for air conditioning is a manageable DIY project with the right tools and knowledge. Understanding wire functions, labeling, and proper installation can bring enhanced comfort and energy efficiency to your home.
- Takeaway 2: Safety is a top priority when working with electrical components. Turning off the power, proper wire connections, and testing the system ensure a successful thermostat installation. Enjoy the cool comfort of your newly wired thermostat!
Read more: How To Wire 4-Wire Thermostat
Understanding Thermostat Wiring
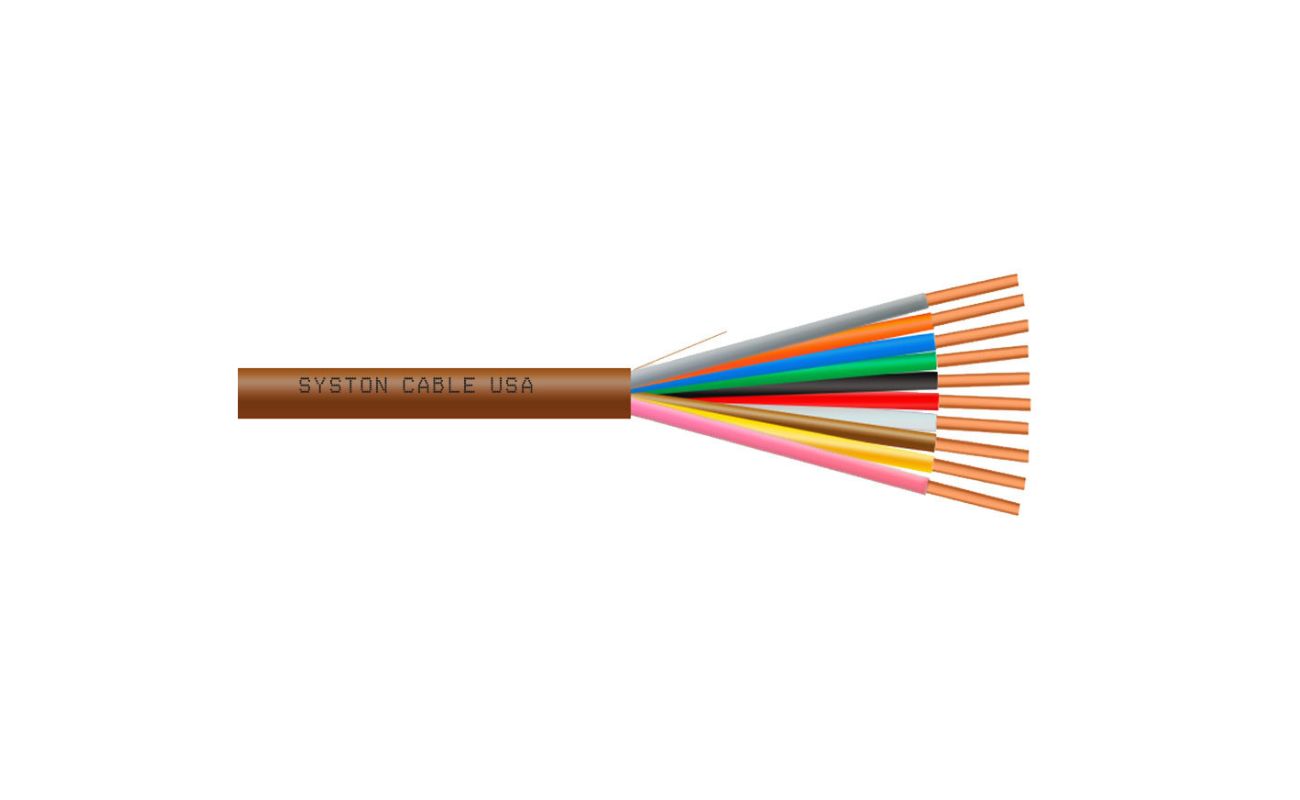
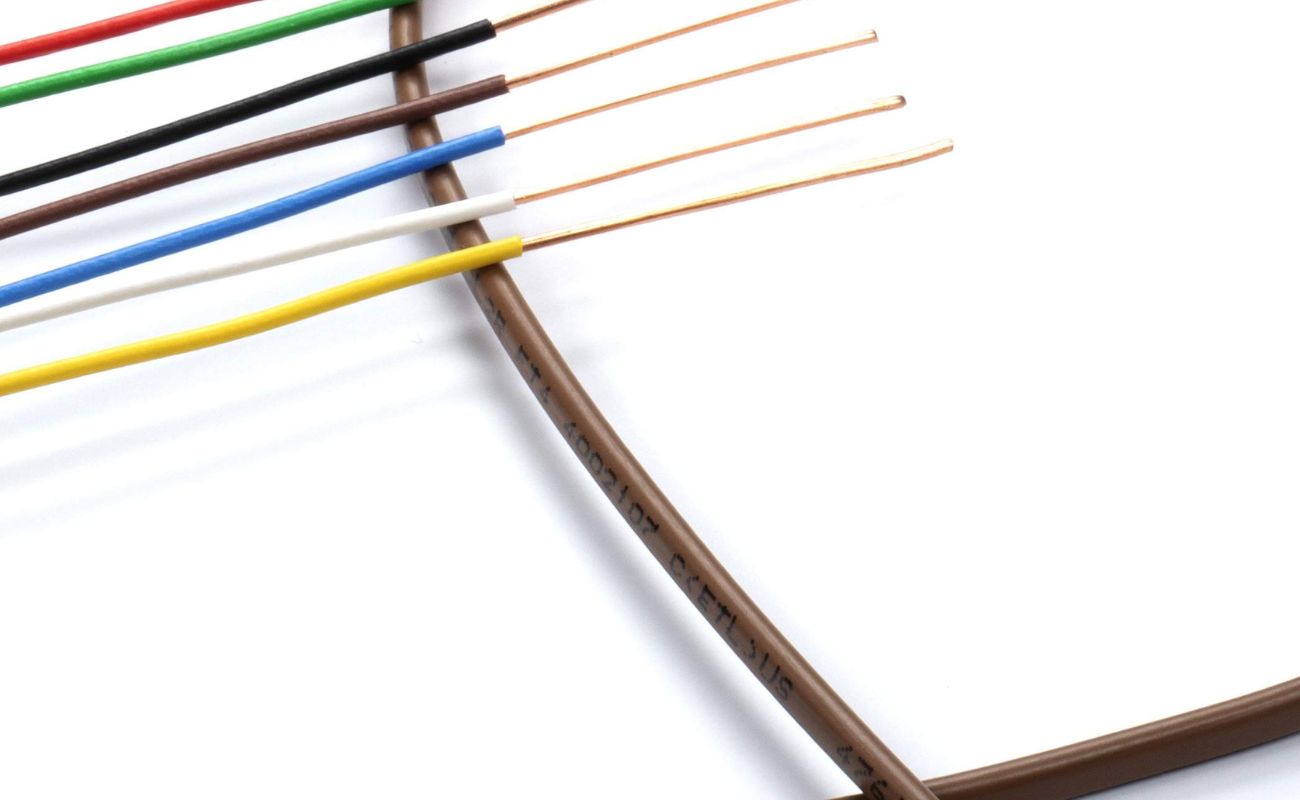
Before you dive into wiring your thermostat, it’s crucial to understand the different wires and their functions. While the specific colors of the wires may vary, the functions they serve remain relatively standard. Here are the common wires you might encounter:
- R or RC: This wire is responsible for delivering power to the thermostat and is usually the red wire. If you have separate heating and cooling systems, you may see both an R and RC wire.
- C: The C wire, or common wire, provides a continuous flow of power to the thermostat, ensuring proper functionality and avoiding power loss.
- W or W1: This wire is connected to the heating system and triggers the heat to turn on when the thermostat calls for it.
- Y or Y1: The Y wire connects to the cooling system and signals the air conditioner to turn on when cooling is needed.
- G: The G wire controls the fan, instructing it to turn on or off as needed for heating or cooling purposes.
- O/B: This wire is used in systems with heat pumps. It determines whether the system operates in heating (O) or cooling (B) mode.
- Aux or E: The auxiliary (Aux) or emergency (E) wire assists the primary heating system when additional heat is needed in colder climates.
Keep in mind that not all thermostats require all of these wires, as it depends on your specific HVAC system and its capabilities. It’s important to consult your thermostat’s manual or an HVAC professional if you’re uncertain about the specific wiring requirements for your system.
Now that you have a basic understanding of thermostat wiring and the different wires you might encounter, it’s time to gather your tools and materials and begin the installation process.
Tools and Materials Needed
Before you begin wiring your thermostat, it’s important to gather all the necessary tools and materials. Having these on hand will ensure a smooth and efficient installation process. Here’s what you’ll need:
- Flathead and Phillips screwdrivers: These tools will come in handy for removing the faceplate of your old thermostat and securing the wires to the new thermostat.
- Wire strippers: You’ll need wire strippers to remove the insulation from the ends of the thermostat wires, allowing for proper connections.
- Electrical tape: Electrical tape will help secure and protect the exposed wires, preventing any potential shorts or accidents.
- New thermostat: Ensure that you have a compatible thermostat that meets your cooling system’s requirements. Consider a programmable thermostat for improved energy efficiency and convenience.
- Label stickers or masking tape: To avoid confusion, label the wires with stickers or masking tape as you disconnect them from the old thermostat. This will make it easier to identify and connect the correct wires to the new thermostat.
By having these tools and materials ready, you’ll be well-prepared to tackle the thermostat wiring process.
Before moving on, it’s crucial to prioritize safety. Remember to turn off the power supply to your HVAC system before starting any electrical work. This will prevent any potential accidents and protect you from electric shock. If you’re unsure how to turn off the power, consult your HVAC system’s manual or contact a professional for guidance.
Now that you’re equipped with the necessary tools and materials, and aware of the importance of safety, you’re ready to proceed with the wiring process. Let’s move on to the first step: turning off the power.
Step 1: Turn Off the Power
Before you begin any electrical work, it’s essential to turn off the power to your HVAC system. This will ensure your safety and prevent any potential electrical accidents or damage. Follow these steps to turn off the power:
- Locate the main circuit breaker or fuse box in your home.
- Identify the circuit breaker or fuse that controls the power supply to your HVAC system. It is typically labeled as “HVAC” or “Air Conditioner.”
- Switch off the circuit breaker or remove the fuse to cut off the power supply.
- For added safety, use a non-contact voltage tester to confirm that the power is indeed turned off. This device will indicate if there is still electrical current flowing through the wires.
By following these steps, you can be confident that the power to your HVAC system is completely shut off, minimizing the risk of electrical shock during the wiring process.
Remember, if you’re unsure about any of these steps or feel uncomfortable working with electrical components, it’s always best to seek professional help. Now that you have turned off the power, it’s time to move on to the next step: removing the old thermostat.
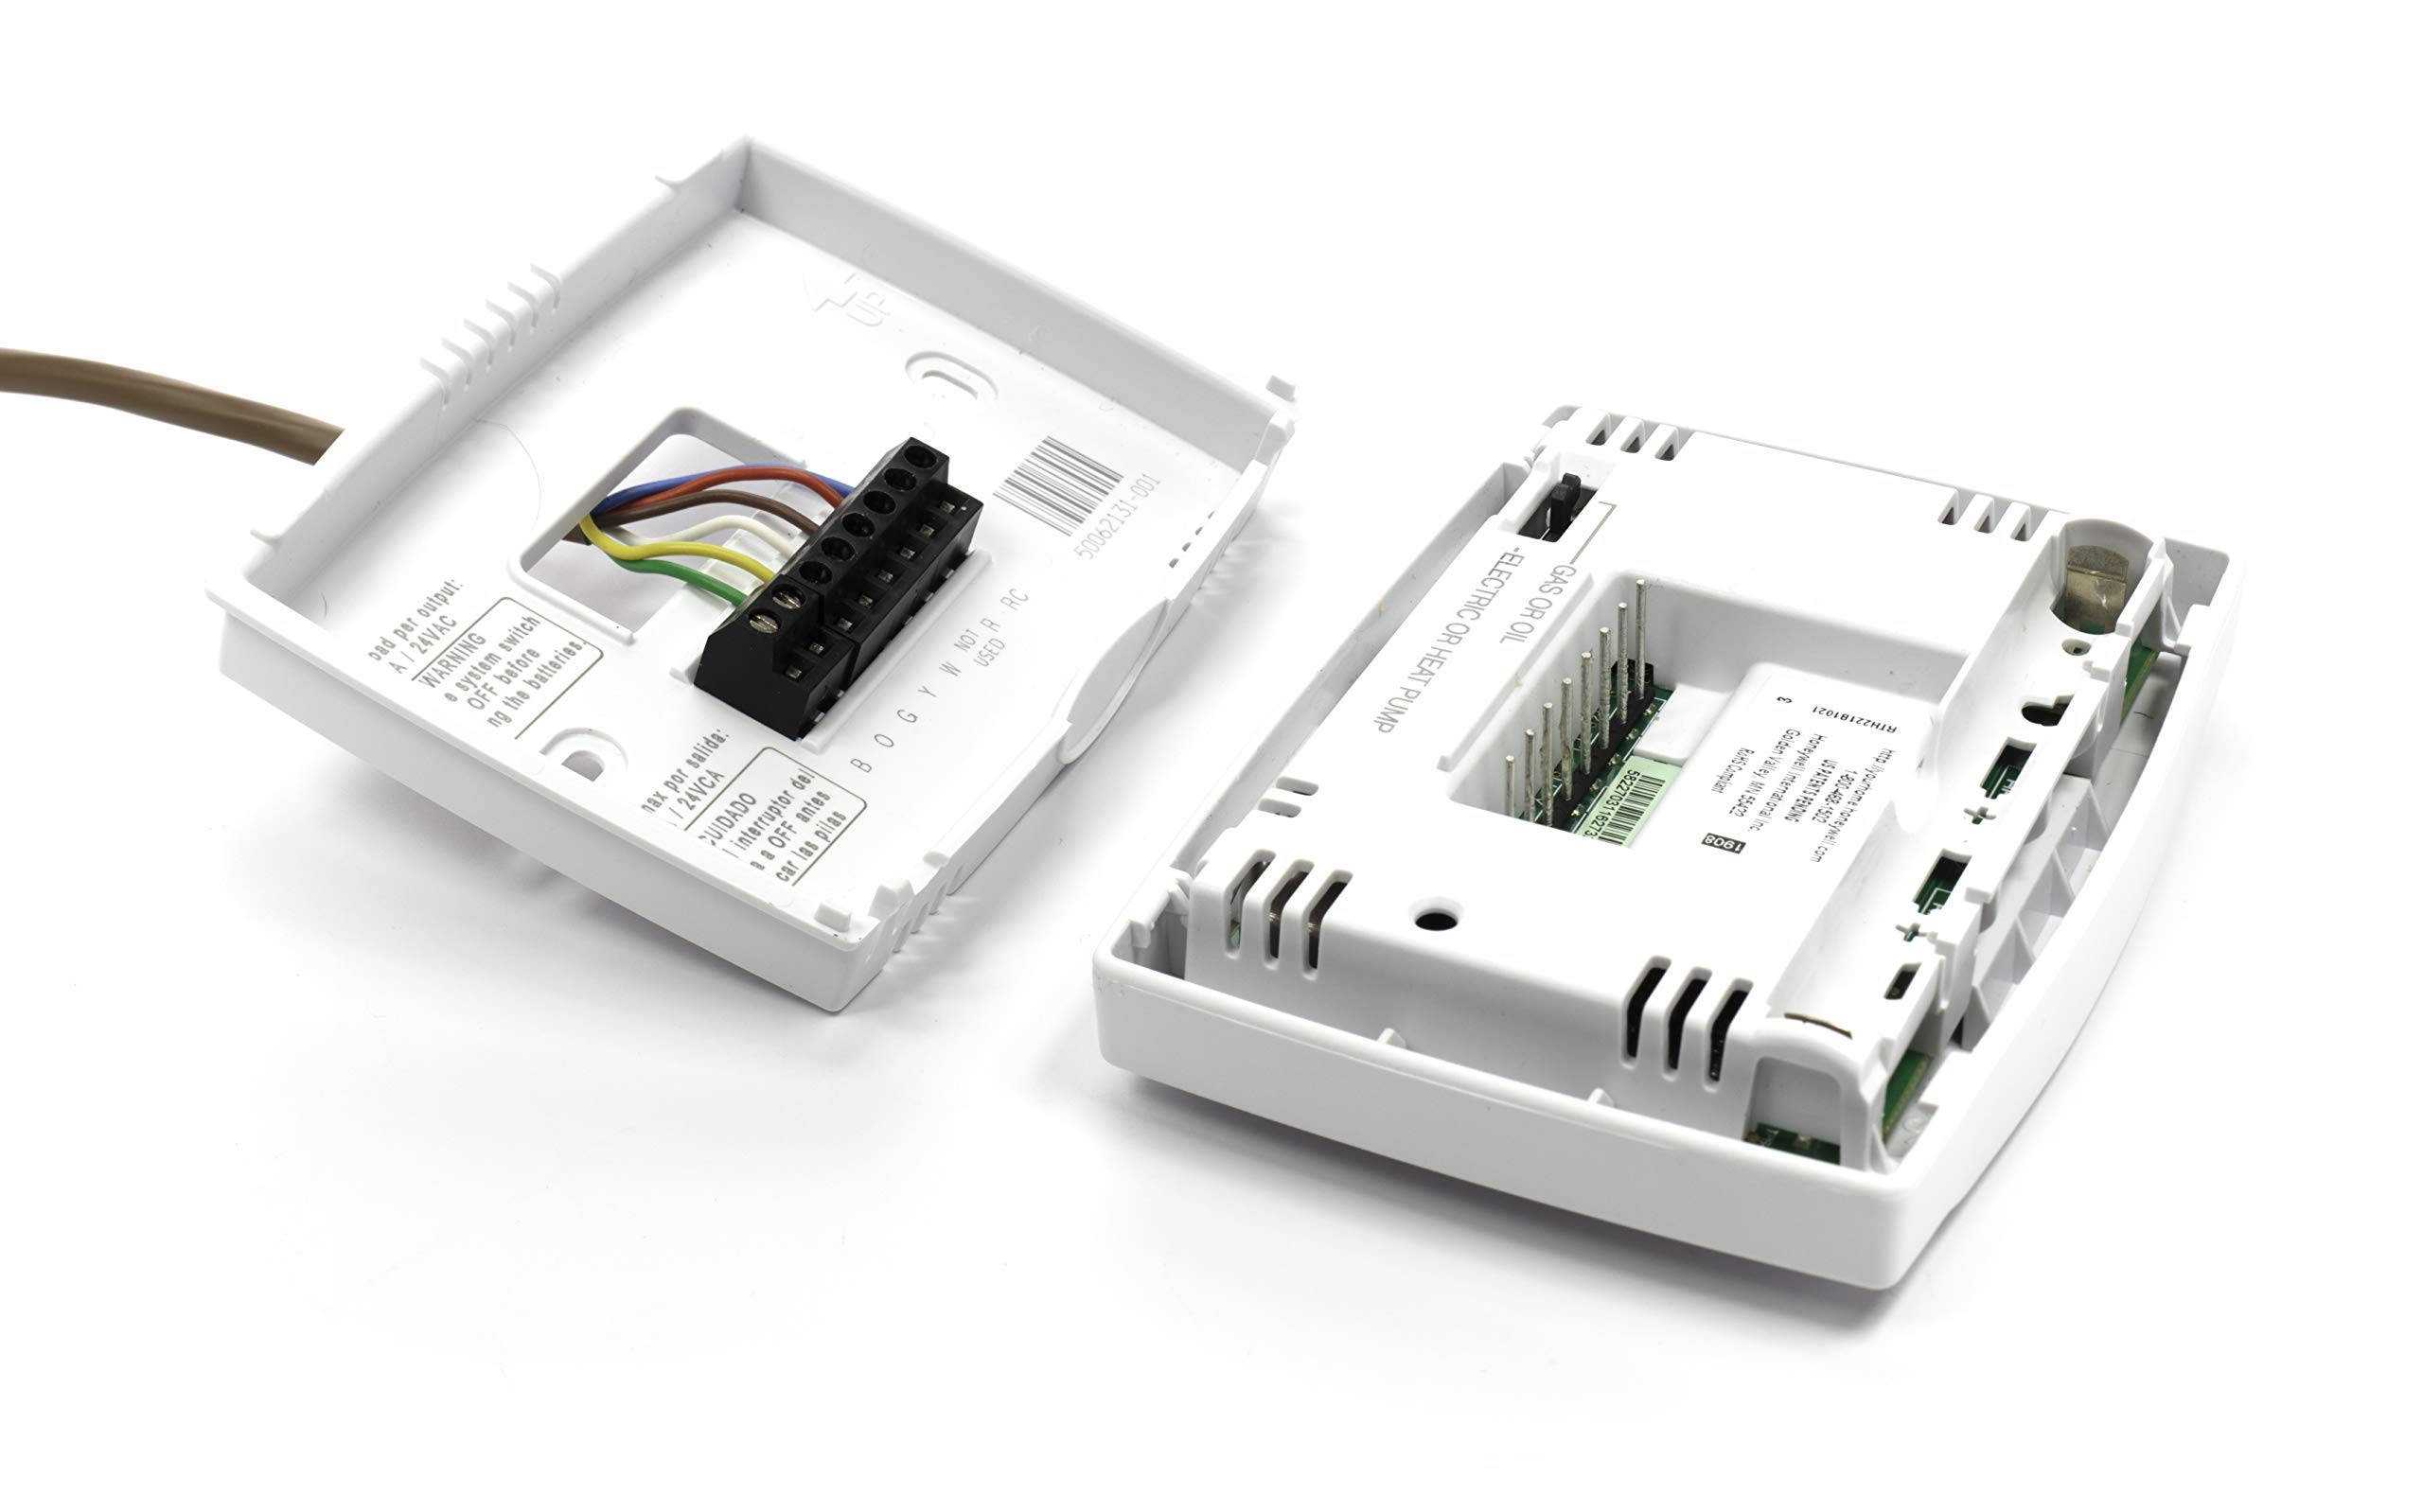
Step 2: Remove Old Thermostat
Now that the power is off, you can safely proceed with removing the old thermostat. Follow these steps:
- Gently remove the thermostat cover or faceplate by unscrewing it from the wall. Use a flathead or Phillips screwdriver for this task.
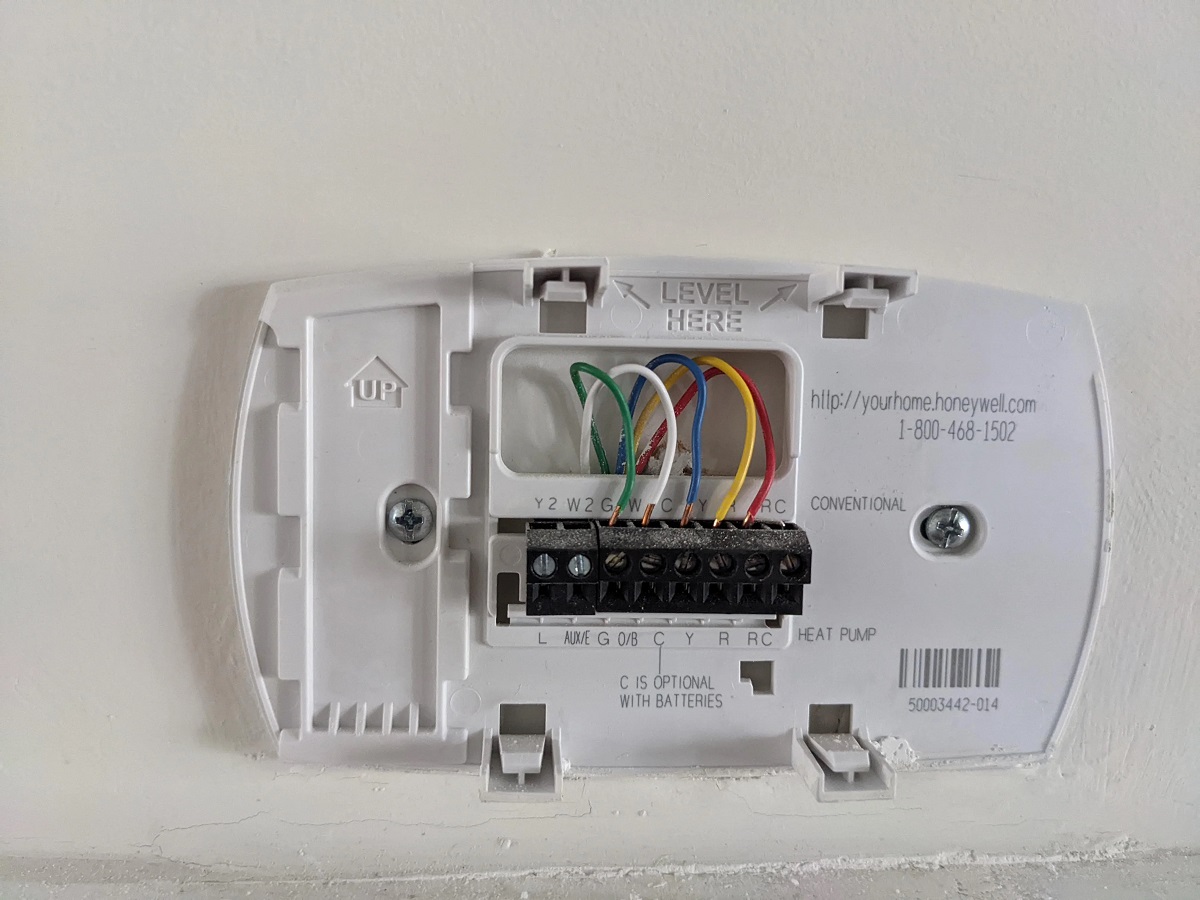
- Once the cover is removed, you will see the wiring connected to the thermostat base. Take note of the wire colors and their corresponding terminals.
- Using a Phillips screwdriver, unscrew the mounting screws that secure the thermostat base to the wall. Be careful not to damage or disconnect the wires while doing so.
- Once the screws are removed, carefully detach the thermostat base from the wall.
- If there are any adhesive remnants or debris from the old thermostat, clean the area with a soft cloth or mild cleaning solution.
By following these steps, you can successfully remove the old thermostat from your wall. It’s important to handle the thermostat and its wires with care to prevent any damage or accidental disconnection.
Keep in mind that different thermostats may have varying installation methods. If you’re unsure about any specific steps or techniques for removing your particular thermostat, consult the manufacturer’s instructions or seek professional assistance.
With the old thermostat removed, you’re now ready to move on to the next step: identifying the existing wiring. This step will help you understand the connections and prepare for the installation of your new thermostat.
Read more: How To Wire Up A Thermostat
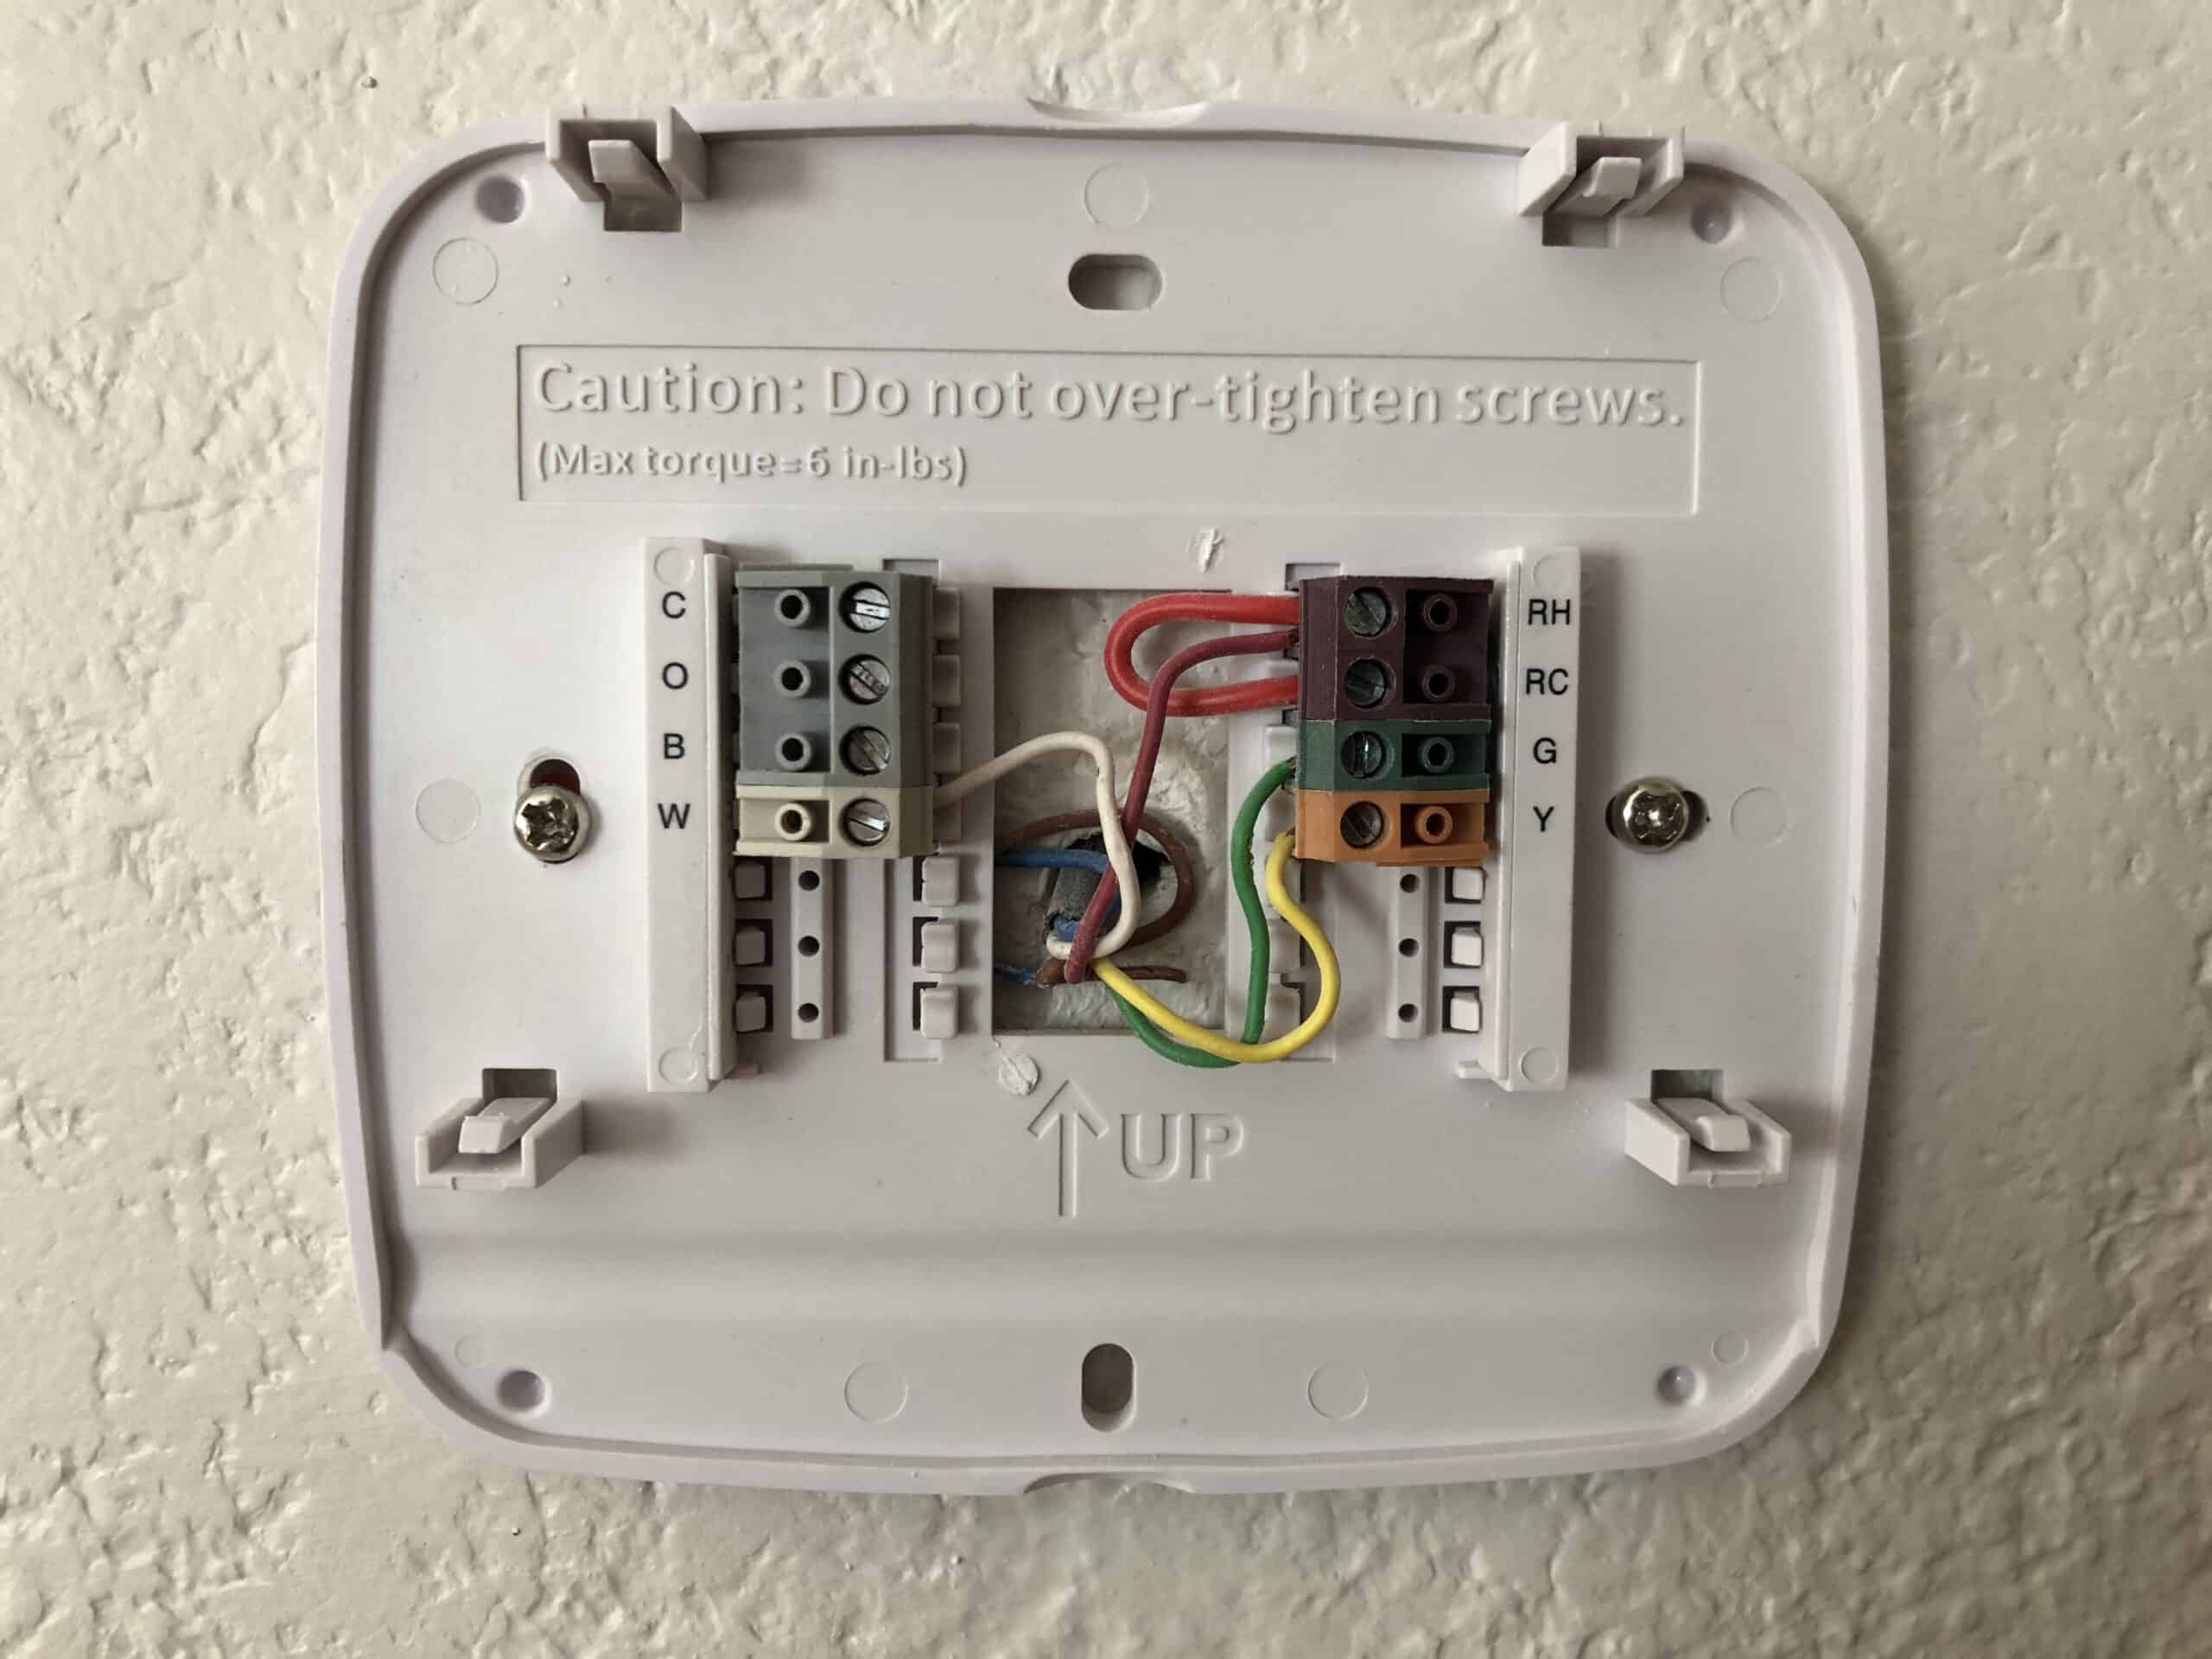
Step 3: Identify Existing Wiring
Before you can proceed with wiring the new thermostat, it’s important to identify the existing wiring and understand its functionality. This will help ensure a smooth and successful installation process. Follow these steps to identify the existing wiring:
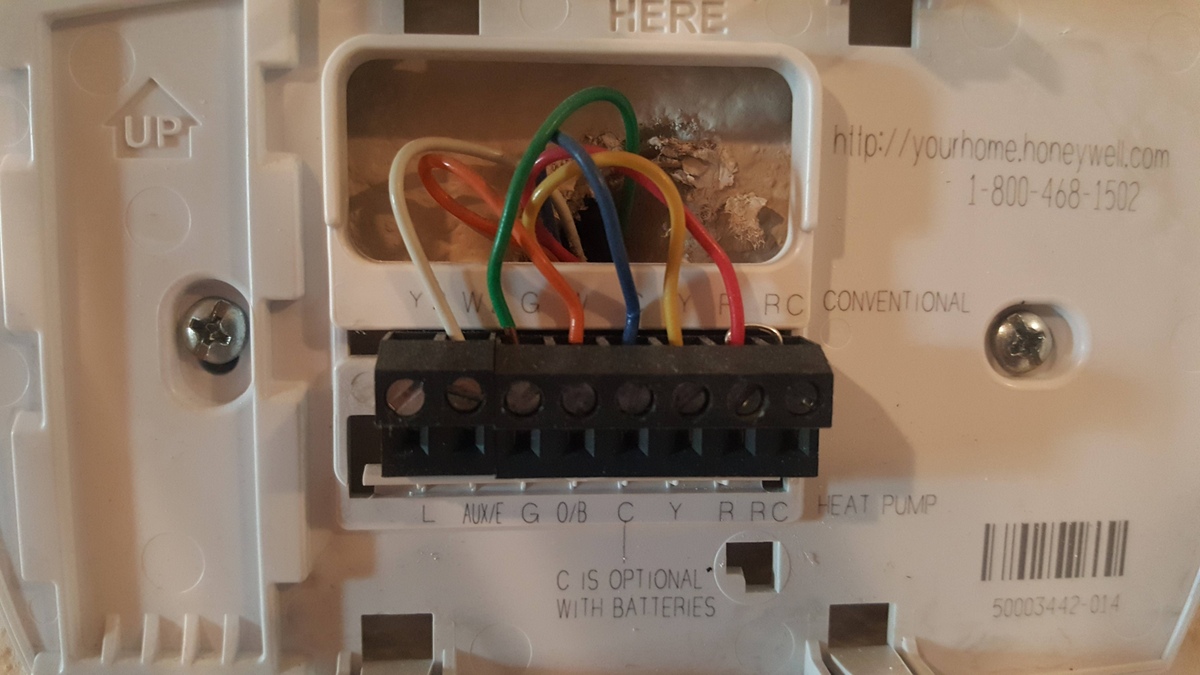
- Examine the wires that were connected to the old thermostat base. Take note of the wire colors and their corresponding terminals. It’s helpful to create a wiring diagram or take a photo for reference.
- If the wires are not clearly labeled, use a multimeter to determine which wire is connected to which terminal. Set the multimeter to the resistance or “ohms” setting and touch the probes to the corresponding wires and terminals at one end.
- Make a note of the wire color and its corresponding function based on the following standard conventions:
- R: Power wire (usually red)
- C: Common wire (usually blue)
- W or W1: Heating wire (usually white)
- Y or Y1: Cooling wire (usually yellow)
- G: Fan wire (usually green)
- O/B: Heat pump reversing valve wire (usually orange)
- Aux or E: Auxiliary or emergency heat wire (usually brown)
- Label each wire with masking tape or use label stickers to indicate its function. This will make it easier to connect the wires to the new thermostat later on.
By following these steps, you will have a clear understanding of the existing wiring in your thermostat setup. Properly identifying and labeling the wires will prevent confusion and ensure that you connect the wires correctly to your new thermostat.
Now that you have identified the existing wiring, you’re ready to move on to the next step: labeling the wires for easy installation.
When wiring a thermostat for air conditioning, make sure to turn off the power to the HVAC system before starting. Follow the manufacturer’s instructions and use a voltage tester to ensure safety.
Step 4: Label the Wires
Labels are crucial when it comes to correctly connecting the wires to the new thermostat. By labeling the wires, you can easily identify which wire corresponds to each terminal on the new thermostat. Follow these steps to label the wires:
- Using masking tape or label stickers, write down the corresponding function for each wire. For example, if the wire is responsible for heating, label it as “Heat” or “W1.”
- Attach the label next to the exposed end of each wire. Ensure that the labels are secure and won’t come off during installation.
- Double-check each label to ensure accuracy. It’s important to have clear and legible labels to avoid any confusion during the wiring process.
Labeling the wires will make it much easier to connect them correctly to the terminals of the new thermostat. This step saves you time and reduces the chances of making wiring mistakes.
If you’re uncertain about the function of any wire or have difficulty labeling them, consult the documentation for your HVAC system or seek professional assistance. It’s better to be safe and sure rather than risking improper connections.
With the wires labeled, you’re now ready to move on to the next step: installing the new thermostat base. This step brings you closer to having your new thermostat up and running.
Step 5: Install New Thermostat Base
The new thermostat base serves as the foundation for your new thermostat. It’s essential to install it properly to ensure a secure and stable connection. Follow these steps to install the new thermostat base:
- Position the new thermostat base on the wall in the desired location. Ensure that it is level and aligned properly.
- Using a pencil, mark the positions of the screw holes on the wall.
- Using a drill and the appropriate drill bit, create holes at the marked positions.
- Insert wall anchors into the drilled holes to provide additional support for the screws.
- Align the screw holes on the thermostat base with the drilled holes and wall anchors.
- Securely fasten the thermostat base to the wall using the provided screws and a screwdriver.
Make sure that the new thermostat base is tightly fastened to the wall to prevent it from coming loose. A secure and stable base is essential for proper functioning and accuracy of the thermostat.
Before proceeding to the next step, double-check the base installation to ensure that it is level and securely attached. Any adjustments or corrections should be made at this stage to avoid any future issues.
Now that the new thermostat base is installed, it’s time to move on to the next step: connecting the wires to the new thermostat. This step brings you closer to completing the installation and enjoying the benefits of your new thermostat.
Step 6: Connect Wires to New Thermostat
With the new thermostat base securely installed, it’s time to connect the labeled wires to the corresponding terminals on the new thermostat. Follow these steps to properly connect the wires:
- Refer to your labeled wires and the wiring diagram provided with your new thermostat to determine the correct connections.
- Remove a small portion of insulation from the end of each wire using wire strippers. This will expose the bare wire for proper connection.
- Match each labeled wire to its corresponding terminal on the new thermostat base. For example, connect the “Heat” or “W1” wire to the terminal labeled “W” or “W1”.
- Follow the manufacturer’s instructions for your specific thermostat model to properly secure each wire. This may involve tightening screws or inserting the wires into terminal slots.
- Gently tug on each wire to ensure a secure connection. If any wire feels loose, double-check the connection or consult the manufacturer’s instructions.
It’s crucial to make sure that each wire is connected to the correct terminal on the new thermostat. Proper connections will ensure that your air conditioning system functions correctly and that your thermostat accurately controls the temperature in your home.
If you encounter any difficulties or have questions about the wiring process, refer to the manual provided with your thermostat or consult a professional to ensure proper installation.
Now that the wires are securely connected to the new thermostat, it’s time to move on to the next step: mounting the new thermostat onto the base.
Read more: How To Wire An Emerson Thermostat
Step 7: Mount New Thermostat
With the wires properly connected to the new thermostat base, it’s time to mount the thermostat onto the base. This step ensures a secure and functional attachment. Follow these steps to mount the new thermostat:
- Align the new thermostat with the base, making sure that the pins or connectors on the back of the thermostat align with the corresponding slots on the base.
- Gently push the thermostat onto the base, applying even pressure until it clicks into place. You may need to use a slight twisting motion to ensure a secure connection.
- Once the thermostat is mounted, double-check that it is securely attached and properly aligned with the base.
Properly mounting the new thermostat onto the base is vital for maintaining a stable and accurate connection. It ensures that the thermostat remains securely attached and allows for smooth operation.
After completing this step, take a moment to review the connections and make sure there are no loose wires or visible signs of damage. It’s important to address any concerns or issues before proceeding to the final step.
Now that the new thermostat is securely mounted, it’s time to move on to the final step: restoring power and testing the system.
Step 8: Restore Power and Test
With the new thermostat installed and securely connected, it’s time to restore the power and test the system to ensure proper functionality. Follow these steps to complete the installation:
- Return to the circuit breaker or fuse box where the power supply to your HVAC system is located.
- Locate the circuit breaker or fuse that controls the power to your HVAC system and switch it back on or replace the fuse.
- Give the system a few moments to power up. You should hear the air conditioning system and fan kicking on.
- Set the desired temperature on your new thermostat and wait for the system to respond. You should feel cool air coming from the vents if the air conditioning is functioning correctly.
- Monitor the system for a while to ensure that it cycles on and off appropriately and maintains the desired temperature.
- Double-check that all the functions, such as heat, cool, and fan, are working correctly by adjusting the thermostat settings accordingly.
If the system is not functioning as expected or you encounter any issues during testing, refer to the troubleshooting section in your thermostat’s manual or contact a professional HVAC technician for assistance.
Congratulations! With the power restored and the system successfully tested, you have completed the installation process of wiring a thermostat for air conditioning. Enjoy the newfound comfort and control that your new thermostat brings to your home.
Remember, if you have any doubts or concerns about the installation process or handling electrical components, it’s always best to seek the assistance of a qualified professional.
Thank you for following this step-by-step guide, and we hope that it has empowered you to confidently wire a thermostat for air conditioning in your home.
Conclusion
Wiring a thermostat for air conditioning may seem intimidating at first, but with the right tools, knowledge, and careful attention to detail, it can be a manageable DIY project. By following the step-by-step guide outlined in this article, you can successfully install and wire a new thermostat, bringing enhanced comfort and energy efficiency to your home.
Understanding thermostat wiring and the functions of different wires is crucial before beginning the installation process. Properly identifying and labeling the existing wires will help ensure correct connections to the new thermostat.
By turning off the power, removing the old thermostat, and installing the new thermostat base, you set the foundation for a successful installation. Connecting the labeled wires to the corresponding terminals on the new thermostat ensures proper functionality.
With the new thermostat securely mounted to the base, you can restore power, test the system, and make any necessary adjustments to ensure everything is in working order. By monitoring the system and confirming that it cycles on and off as needed, you can have confidence in your installation.
Remember, safety should always be a priority when working with electrical components. If at any point you feel unsure or uncomfortable, it’s wise to seek the assistance of a professional HVAC technician.
With your new thermostat properly installed and wired, you can enjoy the benefits of improved comfort, energy efficiency, and control over your home’s cooling system. You have taken an important step towards creating a more comfortable and enjoyable living environment.
We hope that this comprehensive guide has equipped you with the knowledge and confidence to wire a thermostat for air conditioning in your home. Now, sit back, relax, and enjoy the cool comfort of your newly installed thermostat!
Just mastered wiring your thermostat and curious about what that mysterious L wire does? Don't stop now. Our detailed guide on thermostat wiring sheds light on the L wire's purpose and how it impacts your system's functionality. Whether upgrading or troubleshooting, understanding each wire's role is key to optimizing your home's climate control.
Frequently Asked Questions about How To Wire A Thermostat For Air Conditioning
Was this page helpful?
At Storables.com, we guarantee accurate and reliable information. Our content, validated by Expert Board Contributors, is crafted following stringent Editorial Policies. We're committed to providing you with well-researched, expert-backed insights for all your informational needs.