Home>Home Maintenance>Prep Your Home For Winter With Our Fall Maintenance Checklist
Home Maintenance
Prep Your Home For Winter With Our Fall Maintenance Checklist
Modified: September 2, 2024
Get your home ready for winter with our comprehensive fall maintenance checklist. Don't let the cold weather catch you unprepared - ensure your home is in top shape for the season with our expert tips and advice.
(Many of the links in this article redirect to a specific reviewed product. Your purchase of these products through affiliate links helps to generate commission for Storables.com, at no extra cost. Learn more)
Introduction
As the days get shorter and the temperatures start to drop, it’s important to start preparing your home for the winter season. The harsh cold weather can take a toll on your property, resulting in costly repairs and potential damage.
By conducting a thorough fall maintenance checklist, you can ensure that your home is ready to withstand the challenges of winter. From inspecting the exterior to checking the interior systems, there are crucial steps you can take to protect your home and keep it in top condition.
In this article, we will guide you through a comprehensive fall maintenance checklist, highlighting essential tasks to tackle before the winter arrives. By following these tips, you’ll be able to minimize potential issues and enjoy a cozy and well-maintained home throughout the colder months.
Key Takeaways:
- Prioritize fall maintenance to safeguard your home from winter’s harsh effects. From cleaning gutters to testing smoke detectors, these tasks ensure a safe, efficient, and cozy living environment.
- Prepare emergency kits and supplies to stay ready for unexpected situations. Stock up on essentials, create a communication plan, and regularly update your provisions for peace of mind during emergencies.
Exterior Maintenance
The exterior of your home is the first line of defense against the elements. It’s important to inspect and address any issues before winter sets in to prevent further damage. Here are some important tasks to include in your fall maintenance checklist:
- Inspect and clean gutters: Remove leaves, debris, and any blockages from your gutters and downspouts. This will ensure proper drainage and prevent water damage to your roof and foundation.
- Check and repair roof: Inspect your roof for any missing or damaged shingles. Replace or repair them to prevent leaks and moisture from seeping into your home.
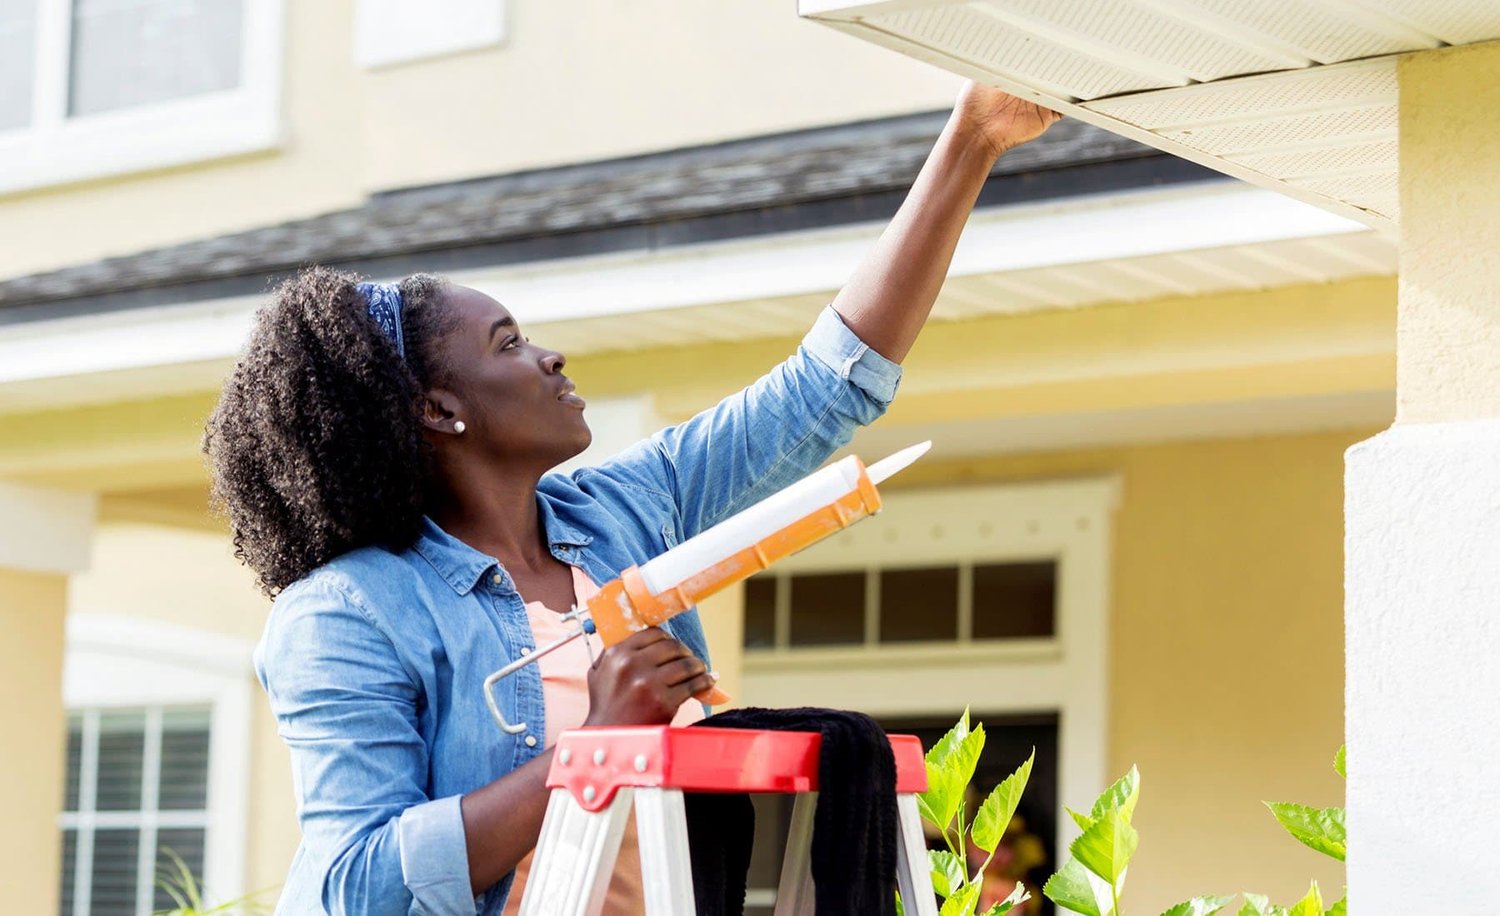
- Seal any gaps or cracks in windows and doors: Use weatherstripping or caulking to seal any gaps or cracks around windows and doors. This will prevent drafts and heat loss, helping to reduce energy costs.
- Clean and store outdoor furniture and equipment: Clean and store your outdoor furniture, grills, and other equipment to protect them from the harsh winter weather. Proper storage will prolong their lifespan and ensure they’re ready to be used again in the spring.
- Drain and turn off outdoor faucets: Disconnect hoses, drain any remaining water, and turn off the outdoor faucets. This will prevent freezing and potential pipe bursts during winter.
- Trim trees and bushes away from the house: Trim any overhanging branches or bushes near your house. This will prevent damage from falling debris during storms and reduce the risk of pests finding their way into your home.
By taking these proactive steps to maintain the exterior of your home, you can prevent costly repairs and ensure that your property is well-protected throughout the winter season. Now, let’s move on to the interior maintenance tasks.
Inspect and clean gutters
Gutters play a crucial role in directing rainwater away from your home’s foundation, preventing water damage and potential flooding. However, over time, debris such as leaves, twigs, and dirt can accumulate in the gutters, causing blockages and hindering proper drainage.
During your fall maintenance routine, take the time to inspect and clean your gutters thoroughly. Here’s how:
- Start by using a ladder to access your gutters safely. Ensure the ladder is stable, and have someone steady it for you if needed.
- Wear safety gloves and protective eyewear to protect yourself from debris and potential gutter sharp edges.
- Remove any large debris, such as leaves and twigs, by hand. Place the debris in a bucket or garbage bag for disposal.
- Use a small plastic scoop or a gutter trowel to scoop out the remaining dirt and smaller debris. Be careful not to damage the gutter or push the debris down into the downspouts.
- After clearing out the gutters, use a hose to flush water through them. Start from the end farthest from the downspout and work your way towards it. This will help dislodge any remaining dirt or small blockages.
- Check that the water flows freely through the downspouts and drains away from the foundation. If you notice any clogs or slow drainage, use a plumber’s snake or a pressure washer to clear the blockage.
- Once the gutters are clean and free of blockages, inspect them for any signs of damage or leaks. Look for loose or sagging sections, rust, or holes. Repair or replace any damaged areas to ensure proper functioning.
It’s recommended to inspect and clean your gutters at least twice a year, once in the fall and once in the spring. Regular maintenance will help prevent water damage, keep your gutters in good condition, and ensure they efficiently channel water away from your home.
By including gutter inspection and cleaning in your fall maintenance checklist, you’ll be taking an important step towards protecting your home against potential water damage and maintaining its structural integrity.
Check and repair roof
Your roof is your home’s first line of defense against the elements, so it’s crucial to ensure it’s in good condition before the winter arrives. By conducting a thorough roof inspection and addressing any issues, you can prevent leaks, water damage, and costly repairs down the line. Here’s how to check and repair your roof:
- Start by visually inspecting your roof from the ground. Look for any obvious signs of damage, such as missing, cracked, or curling shingles. Pay attention to areas where the shingles may be loose or out of place.
- If it’s safe to do so, use a ladder to access your roof for a closer inspection. Be cautious and use proper safety equipment, such as a safety harness and non-slip footwear.
- Inspect the shingles for signs of wear and tear, such as granule loss or thinning. These signs indicate that the shingles may be nearing the end of their lifespan and may need to be replaced.
- Check the flashing around chimneys, vents, skylights, and any other roof penetrations. Ensure that it is properly sealed and free from cracks or gaps that could allow water to penetrate.
- Look for any signs of water damage or staining on your ceilings and walls inside your home. These signs may indicate a roof leak that needs immediate attention.
- If you identify any damaged or missing shingles, it’s important to repair or replace them promptly. Secure loose shingles with roofing adhesive or replace them entirely to ensure a watertight seal.
- If you’re uncomfortable or inexperienced with roof repairs, it’s best to hire a professional roofing contractor. They have the expertise and tools to safely and effectively address any roof issues.
Regular roof inspections and timely repairs are essential for maintaining the integrity of your home and protecting it from water damage. It’s recommended to inspect your roof at least once a year, ideally before and after the winter season.
Remember, a well-maintained roof will not only protect your home but also increase its curb appeal and overall value. By including roof inspection and repair in your fall maintenance checklist, you can enjoy a worry-free winter season knowing that your roof is in top shape.
Seal any gaps or cracks in windows and doors
Sealing gaps and cracks in your windows and doors is an essential part of fall maintenance. Not only does it help improve energy efficiency and reduce drafts, but it also keeps your home comfortable and lowers your heating costs during the winter months. Here’s how to seal gaps and cracks effectively:
- Inspect all windows and doors for any visible gaps or cracks. Pay close attention to the areas where the window or door frame meets the wall.
- Use a caulk gun and high-quality weatherstripping or caulk to seal any gaps or cracks you find. Choose a caulk that is suitable for your specific window and door materials, such as silicone or latex-based caulk.
- Before applying caulk, ensure that the surfaces are clean and dry. Use a putty knife or scraper to remove any old caulk or debris.
- Apply a thin, consistent bead of caulk along the gap or crack. Smooth it out with your finger or a caulk smoothing tool to create a neat and even seal.
- For larger gaps, consider using weatherstripping. Cut the weatherstripping to the appropriate length and attach it to the frame or sash of the window or door, following the manufacturer’s instructions.
- After sealing the gaps and cracks, check that the windows and doors open and close smoothly. Make any necessary adjustments or repairs to ensure proper functionality.
- Don’t forget to seal any gaps or cracks in your window and door frames as well. Use expanding foam insulation or caulk to seal these areas, preventing drafts and heat loss.
Sealing gaps and cracks in windows and doors is a relatively simple and cost-effective way to improve the energy efficiency of your home and enhance overall comfort. It can also help prevent moisture from entering your home, reducing the risk of mold growth and damage to your walls.
By including this task in your fall maintenance checklist, you’ll create a tighter seal and reduce heat loss, keeping your home cozy and insulated during the winter season.
Clean and store outdoor furniture and equipment
As the colder weather approaches, it’s important to clean and store your outdoor furniture and equipment properly. By taking the time to prepare them for winter, you can prolong their lifespan and ensure they are ready to use again when spring arrives. Here’s how to clean and store your outdoor items:
- Start by thoroughly cleaning your outdoor furniture. Use a mild soap or a specialized cleaning solution appropriate for the material of your furniture, such as wood cleaner or plastic cleaner.
- If you have cushions or fabric covers, remove them and clean them according to the manufacturer’s instructions. Treat any stains or mildew spots before storing them.
- Rinse off the furniture with a hose or use a bucket of water to remove any soap residue. Allow the furniture to dry completely before storing it.
- Inspect your furniture for any signs of damage, such as cracks, loose screws, or peeling paint. Repair or replace any damaged parts to prevent further deterioration over the winter.
- For metal furniture, apply a protective layer of wax or rust-resistant coating. This will help prevent rust and corrosion during the winter months.
- When it comes to storing your furniture, choose a dry and sheltered location, such as a shed, garage, or basement. If you don’t have a suitable storage space, consider using weatherproof covers to protect your furniture from the elements.
- If you have any outdoor equipment, such as grills, lawnmowers, or gardening tools, clean and store them properly as well. Remove any excess dirt and debris, and ensure that they are dry to prevent rust or damage.
- Before storing your equipment, perform any necessary maintenance, such as sharpening lawnmower blades or oiling hinges and moving parts.
- Store your equipment in a clean and dry location. If possible, secure them to prevent them from shifting or falling during the winter months.
Properly cleaning and storing your outdoor furniture and equipment will protect them from harsh winter conditions, extending their lifespan and ensuring they’re in good shape when spring arrives. It’s best to complete this task before the winter weather sets in to avoid any potential damage caused by freezing temperatures or moisture.
By including this step in your fall maintenance checklist, you’ll be taking proactive measures to preserve the longevity and appearance of your outdoor items, making for an effortless transition into the next outdoor season.
Drain and turn off outdoor faucets
One crucial task to include in your fall maintenance checklist is draining and turning off outdoor faucets. By properly winterizing your outdoor water sources, you can prevent frozen pipes, leaks, and costly repairs. Here’s how to do it:
- Locate all outdoor faucets around your property. This includes faucets attached to the house, as well as those in the garden or yard.
- Start by shutting off the water supply to the outdoor faucets. This can usually be done by closing the shut-off valve located inside your home, near the corresponding faucet.
- Once the water supply is shut off, open the outdoor faucets fully to relieve any pressure and drain any remaining water. Leave the faucets open throughout the winter season.
- Next, disconnect any hoses or attachments from the outdoor faucets. Drain the hoses thoroughly and store them in a dry location for the winter.
- If you have a separate shut-off valve for your irrigation system, turn it off and drain any remaining water from the system as well. This will prevent freezing and potential damage to the pipes.
- After draining the outdoor faucets, consider installing insulated faucet covers. These covers are designed to provide an additional layer of protection against freezing temperatures.
- Inspect the outdoor faucets for any signs of damage, such as leaks or cracks. If you notice any issues, repair or replace the faucets before the winter sets in.
- Throughout the winter season, periodically check the outdoor faucets for any signs of leakage or freezing. If you notice any problems, contact a professional plumber to address the issue promptly.
Properly draining and turning off outdoor faucets is essential for preventing frozen pipes, which can lead to water damage and costly repairs. Taking the time to winterize these water sources will give you peace of mind knowing that your plumbing system is protected during the colder months.
By including this task in your fall maintenance checklist, you can ensure that your outdoor faucets are ready for winter and avoid any unwanted surprises when the weather starts to thaw in the spring.
Trim trees and bushes away from the house
As part of your fall maintenance routine, it’s important to trim trees and bushes that are in close proximity to your house. Overgrown branches and foliage near your home can pose risks during the winter months, such as damage from falling limbs or increased chances of pests entering your home. Here’s how to trim trees and bushes effectively:
- Start by identifying any trees or bushes that are located close to your house. Focus on those that have branches overhanging or touching the roof, windows, or other structures.
- Inspect the trees and bushes for any dead, damaged, or diseased branches. These should be pruned and removed to prevent them from falling onto your house or causing further harm.
- Trim any branches that are within a safe distance of your home. Use appropriate tools such as hand pruners or a saw, depending on the size of the branches.
- When trimming branches, it’s important to follow the proper technique. Make clean cuts at the branch collar without leaving stubs or damaging the trunk or remaining branches.
- Consider hiring a professional tree trimming service or arborist if the trees are large or the branches are located high off the ground. They have the expertise and equipment to safely and efficiently trim the trees.
- Trim bushes and shrubs away from the house, ensuring that there is enough space between them and the walls. This will help improve ventilation, prevent moisture buildup, and reduce the risk of pests finding their way into your home.
- After trimming, clean up any fallen branches or debris around your property. Dispose of the trimmed branches properly, either by using them as compost or arranging for green waste removal.
- Regularly inspect the trees and bushes throughout the winter season for any signs of damage or potential hazards. Address any issues promptly to prevent further risks.
Trimming trees and bushes away from your house not only enhances the aesthetic appeal of your property but also helps protect your home from potential damage. By maintaining a safe distance between the foliage and your house, you can reduce the risk of falling branches during storms and minimize the chances of pests finding shelter near your home.
By including tree and bush trimming in your fall maintenance checklist, you can ensure a safer and more visually appealing environment around your house, creating a sense of tranquility and protection throughout the winter season.
Interior Maintenance
While it’s important to focus on the exterior of your home during fall maintenance, don’t forget about the interior. Taking care of the interior systems and components will help ensure a comfortable and efficient living space throughout the colder months. Here are some key tasks to include in your interior maintenance checklist:
- Inspect and clean the furnace or heating system: Before the winter arrives, have your furnace or heating system inspected by a professional. They can clean and tune it up for optimal performance and energy efficiency. Remember to replace the air filters regularly to maintain good air quality.
- Test and replace smoke and carbon monoxide detectors’ batteries: Test your smoke and carbon monoxide detectors to ensure they are in proper working condition. Replace the batteries if needed, and consider installing extras for added safety.
- Check insulation in attics and crawl spaces: Insulation plays a vital role in keeping your home warm during the winter. Check the insulation in attics, crawl spaces, and walls for any gaps or damage. Add more insulation if necessary to improve energy efficiency and prevent heat loss.
- Seal drafty areas around doors and windows: Drafty areas can lead to heat loss and chilly drafts. Use weatherstripping or caulking to seal any gaps or cracks around doors and windows. This will help maintain a comfortable indoor temperature and reduce energy costs.
- Clean and inspect chimney and fireplace: If you have a chimney and fireplace, have them professionally cleaned and inspected before using them in the winter. This will remove any creosote buildup and ensure safe and efficient operation.
- Inspect and clean dryer vents: Lint buildup in dryer vents can pose a fire hazard. Remove any lint from the dryer vents and exhaust ducts to improve dryer efficiency and reduce the risk of a fire.
- Test and maintain sump pump (if applicable): If you have a sump pump in your basement or crawl space, test it to ensure it’s working properly. Clean out any debris or sediment and consider installing a backup battery system for added protection during power outages.
- Prepare emergency kits and supplies: As part of your interior maintenance, gather essential emergency supplies such as flashlights, batteries, nonperishable food, water, and a first aid kit. Ensure these supplies are readily accessible in case of a power outage or emergency situation.
By addressing these interior maintenance tasks, you can create a safe, comfortable, and energy-efficient living environment throughout the winter season. Regular maintenance and preparation will help keep your home running smoothly and protect it from potential hazards.
Now that we’ve covered the essential interior maintenance tasks, you can move forward with confidence, knowing that your home is ready to weather the winter months.
Check your home’s insulation and weather stripping to ensure that cold air stays out and warm air stays in during the winter months.
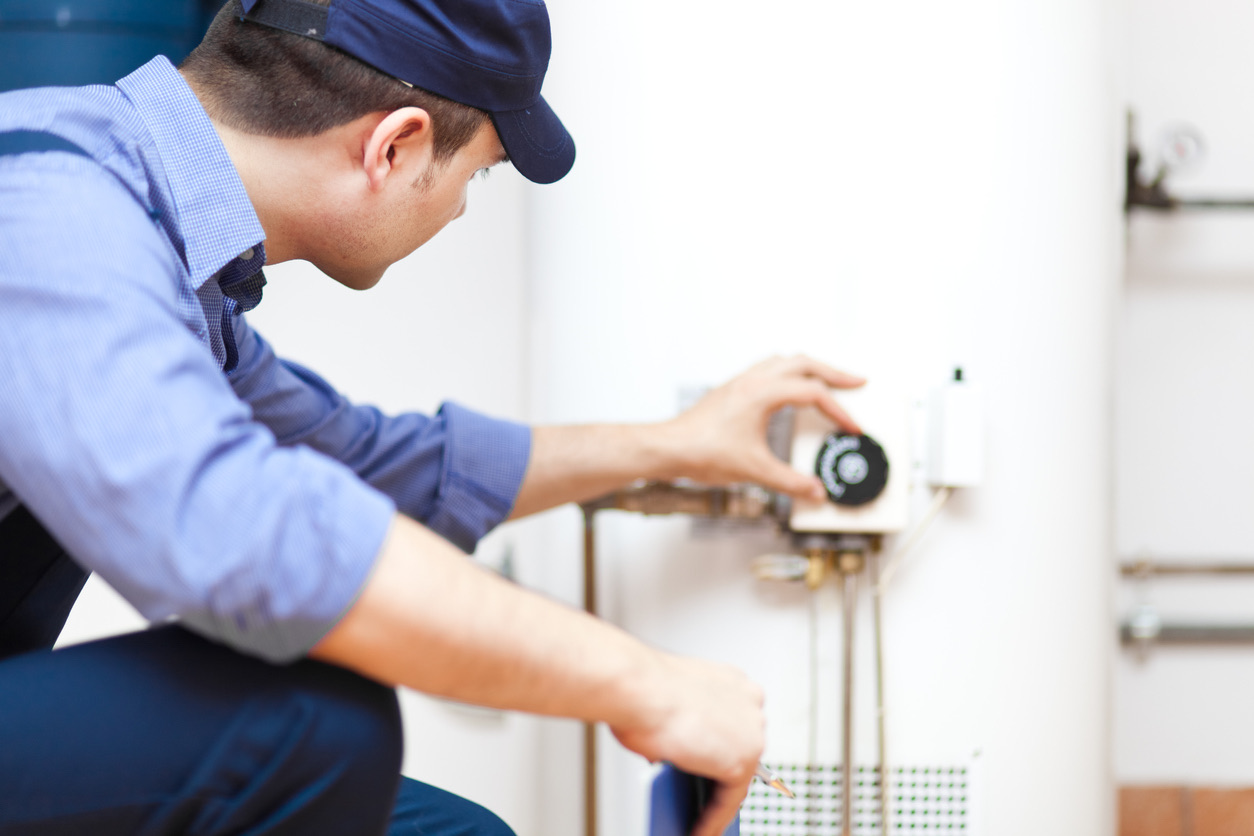
Inspect and clean the furnace or heating system
With the colder months approaching, it’s crucial to ensure that your furnace or heating system is in optimal condition. Regular maintenance and cleaning can improve efficiency, extend the lifespan of your system, and provide a comfortable indoor environment. Follow these steps to inspect and clean your furnace or heating system:
- Start by turning off the power to the heating system or furnace. The power switch is usually located near the unit or in the main electrical panel of your home.
- Remove any dust or debris from the exterior of the furnace. Use a vacuum cleaner with a soft brush attachment or a damp cloth to clean the surface.
- Next, carefully remove the furnace filter. If it’s disposable, replace it with a new one. If it’s reusable, clean it according to the manufacturer’s instructions. A clogged or dirty filter reduces airflow and puts strain on the system.
- Inspect the blower motor and fan blades for any dust or dirt buildup. Gently clean them using a soft brush or a cloth. Be careful not to damage any components.
- Check the fan belt for any signs of wear or damage. Replace it if necessary. A loose or worn-out belt can cause decreased airflow and affect the performance of the system.
- Inspect the furnace’s combustion chamber for any signs of corrosion or damage. If you notice any issues, it’s best to contact a professional HVAC technician for further inspection and repair.
- While cleaning the furnace, take the time to check the ductwork for any leaks or gaps. Seal any visible gaps or joints using HVAC foil tape or mastic sealant. This will help improve the efficiency of the system and prevent heat loss.
- After cleaning and inspection, restore power to the furnace or heating system. Test the system by setting the thermostat to a higher temperature to see if it starts up and heats the air properly.
- Schedule an annual maintenance visit by a professional HVAC technician. They can perform a more thorough inspection, clean the system’s internal components, and address any necessary repairs or adjustments.
Regular inspection and cleaning of your furnace or heating system are essential for its proper functioning and efficiency. By following these steps and scheduling professional maintenance, you can ensure that your system is ready to provide reliable and comfortable heating throughout the winter season.
Remember, a well-maintained heating system not only promotes a warm and cozy home but also helps reduce energy consumption and lower heating costs. Make it a priority to include the inspection and cleaning of your furnace or heating system in your fall maintenance checklist.
Test and replace smoke and carbon monoxide detector batteries
Smoke detectors and carbon monoxide detectors play a crucial role in keeping your home safe. Regular testing and battery replacement are essential to ensure these devices are functioning properly and providing optimal protection for you and your family. Follow these steps to test and replace the batteries in your smoke and carbon monoxide detectors:
- Start by gathering fresh batteries suitable for your detectors. It’s recommended to use long-lasting lithium batteries for reliable performance.
- Choose a convenient time when everyone in the household is awake and alert. Avoid testing or replacing batteries late at night or when there may be a risk of sleep interruption.
- Locate each smoke detector and carbon monoxide detector in your home. They are typically installed in bedrooms, hallways, and common areas.
- Test each detector by pressing the test button. You should hear a loud, distinctive sound to indicate that the detector is working properly. If you don’t hear a proper sound, replace the batteries immediately.
- Remove the old batteries from each detector, being careful to follow the correct battery replacement procedure outlined by the manufacturer.
- Insert the fresh batteries into each detector, ensuring they are properly aligned with the positive and negative terminals. Follow the manufacturer’s instructions for battery installation.
- Press the test button again to verify that the new batteries are providing power to the detector. Listen for the sound to confirm proper functionality.
- After replacing the batteries, dust off the detectors using a soft, dry cloth to remove any accumulated dirt or debris.
- Consider writing down the replacement date on a calendar or setting a reminder on your phone to ensure that you check and replace the batteries at least once a year or as recommended by the manufacturer.
- In addition to battery replacement, it’s important to replace smoke detectors and carbon monoxide detectors according to the manufacturer’s recommended lifespan. Typically, detectors should be replaced every 10 years.
Regular testing and battery replacement of your smoke and carbon monoxide detectors are essential for maintaining a safe living environment. By following these steps, you can ensure that these devices are in good working order and providing effective protection against potential hazards.
Remember, smoke and carbon monoxide detectors are your first line of defense in the event of a fire or carbon monoxide leak. Make it a priority to include the testing and replacement of batteries in your fall maintenance checklist to keep your home and loved ones safe.
Check insulation in attics and crawl spaces
Proper insulation in your home is crucial for maintaining comfortable indoor temperatures and reducing energy consumption. Checking the insulation in your attics and crawl spaces during your fall maintenance routine can help identify any gaps or damage that may compromise the efficiency of your insulation. Here’s how to check the insulation in these areas:
- Start by preparing yourself with protective gear, such as gloves, goggles, and a dust mask, as you may encounter loose or fiberglass insulation.
- Access the attics and crawl spaces and carefully inspect the existing insulation. Look for any signs of damage, such as wet spots, mold growth, or sagging, which may indicate a problem.
- Check for gaps or areas where the insulation may be thin or missing. These gaps can occur around pipes, vents, electrical wiring, or any other penetrations in the insulation.
- If you find any damaged or missing insulation, start by wearing protective gloves and removing any damaged insulation material. Dispose of it properly.
- Add new insulation to the areas where it is missing or thin. Use the appropriate type of insulation based on your region and the recommendations for thermal resistance, or R-value, for your area.
- Ensure that the insulation is properly installed, covering all necessary areas and filling any gaps or voids. Use insulation supports or wire to keep the insulation in place if needed.
- Pay attention to the recommended thickness of insulation for your region. Adding insulation to achieve the recommended R-value can greatly improve energy efficiency and indoor comfort.
- Consider hiring a professional insulation contractor if the scope of the project is extensive or if you are unsure about the insulation requirements. They can evaluate your home’s insulation needs and provide expert advice and installation services.
- Regularly check your insulation in the attics and crawl spaces for any future signs of damage or deterioration. Address any issues promptly to maintain its effectiveness.
Proper insulation in attics and crawl spaces helps prevent heat loss, reduces energy consumption, and provides a more comfortable living environment. By checking and addressing any insulation gaps or damage during your fall maintenance routine, you can ensure that your home is properly insulated for the colder months.
Remember, proper insulation not only improves energy efficiency but also contributes to savings on heating costs. Include checking the insulation in your attics and crawl spaces in your fall maintenance checklist to ensure year-round comfort in your home.
Seal drafty areas around doors and windows
Drafts around doors and windows can make your home feel colder and less comfortable during the winter months. Properly sealing these drafty areas is an important step in improving energy efficiency and maintaining a cozy living space. Here’s how you can seal drafty areas around doors and windows:
- Start by inspecting the areas around doors and windows for any drafts. You can do this by running your hand along the edges and feeling for any cold air coming in.
- Apply weatherstripping to seal the gaps between the door or window and its frame. Measure the length needed, and cut the weatherstripping accordingly. Adhesive-backed weatherstripping is easy to install and provides an effective seal.
- Apply the weatherstripping to the appropriate areas. For doors, place the weatherstripping along the top and sides, ensuring a tight seal when the door is closed. For windows, apply the weatherstripping along the bottom and sides of the window frame.
- For gaps around windows and doors that are larger or irregular in shape, use caulking to seal them. Silicone or latex-based caulk works well for sealing gaps. Apply a bead of caulk along the gap, and use a caulk smoothing tool or your finger to smooth it out for a neat finish.
- Check for any gaps between the window or door frame and the wall. These can be sealed using expanding foam insulation. Fill the gaps carefully, as the foam expands. Trim off any excess foam once it is dry.
- For windows, consider using window film insulation. This transparent film can be applied to the inside of the window, creating an additional barrier against drafts. Use a hairdryer to shrink the film and achieve a tight, secure fit.
- Test the effectiveness of your seals by running your hand along the edges of doors and windows again. Feel for any drafts, and make any necessary adjustments or additions to the weatherstripping or caulking.
- Repeat this sealing process for any other doors and windows in your home that may have drafts. Pay special attention to older windows and doors, as they are more likely to have gaps and drafts.
- Regularly check the condition of weatherstripping and caulking. Over time, they may wear out or become damaged. Replace or repair them as needed to maintain an effective seal against drafts.
Sealing drafty areas around doors and windows is a simple and cost-effective way to improve energy efficiency and create a more comfortable living environment. By including this task in your fall maintenance checklist, you can reduce heat loss and save on heating costs throughout the winter season.
Remember, a well-sealed home not only helps keep you warm but also prevents cold drafts and moisture from entering, contributing to a healthier and more comfortable living space. Take the time to seal drafty areas around doors and windows to ensure a cozy and energy-efficient home.
Clean and inspect chimney and fireplace
As the temperatures drop, many homeowners look forward to cozy nights by the fireplace. However, before you start using your chimney and fireplace, it’s important to clean and inspect them to ensure proper functioning and reduce the risk of fire hazards. Here’s how to clean and inspect your chimney and fireplace:
- Start by removing any debris from the fireplace, including ashes, soot, and leftover logs. Place them in a metal container and dispose of them properly.
- Inspect the fireplace flue or damper for any signs of blockages or damage. Open and close the damper several times to ensure it operates smoothly. If you notice any issues or if the damper is difficult to open or close, contact a professional chimney sweep for further inspection.
- Using a small brush or vacuum cleaner, clean the fireplace walls and floor. Make sure to remove any buildup of creosote, a flammable byproduct of burning wood that can pose a fire hazard if not cleaned regularly.
- Inspect the chimney and fireplace for any cracks, loose bricks, or signs of deterioration. If you notice any damage, consult a professional chimney sweep or qualified contractor to address the problem promptly.
- Schedule a professional chimney cleaning at least once a year. A certified chimney sweep will have the proper tools and knowledge to thoroughly clean the chimney, removing creosote and other debris that can accumulate and cause chimney fires.
- If you have a gas fireplace, schedule an annual inspection by a qualified technician. They will check the gas lines, ignition system, and ensure the proper ventilation and functioning of the fireplace.
- Consider installing a chimney cap if you don’t have one. A chimney cap prevents rain, debris, and animals from entering the chimney, reducing the risk of chimney blockages and damage.
- Regularly check the chimney cap and flue for any nests or blockages by birds or small animals. If you find any, wait until the nests are empty and remove them carefully. Install a mesh screen or bird guard to prevent future nesting.
- Keep flammable materials, such as furniture, drapes, and rugs, at a safe distance from the fireplace to prevent accidents and ensure fire safety.
- Remember to also test the smoke and carbon monoxide detectors located near the fireplace, ensuring they are in proper working order by pressing the test button.
Regular cleaning and inspection of your chimney and fireplace are crucial for both safety and efficiency. By following these steps and investing in professional maintenance, you can enjoy cozy fireside evenings while minimizing the risk of fire hazards and ensuring optimal performance of your chimney and fireplace.
Remember, a clean and well-maintained chimney and fireplace not only provide warmth and comfort but also offer peace of mind knowing that you’ve taken necessary precautions to protect your home and loved ones.
Inspect and clean dryer vents
Inspecting and cleaning your dryer vents is an important step in maintaining the safety and efficiency of your clothes dryer. Over time, lint can accumulate in the vents, increasing the risk of fires and reducing the dryer’s effectiveness. Follow these steps to inspect and clean your dryer vents:
- Start by disconnecting the dryer from the power source. This ensures your safety during the inspection and cleaning process.
- Locate the dryer vent on the back of the dryer. It is typically a flexible or rigid metal tube that connects to the wall or the floor.
- Disconnect the dryer vent from the dryer by loosening the clamp or releasing the attachment mechanism. Carefully remove the vent, taking note of its length and any bends or twists.
- Inspect the vent for any signs of damage, such as holes, cracks, or excessive lint buildup. Replace any damaged sections of the vent as necessary.
- Using a vent cleaning brush or a vacuum cleaner with a crevice attachment, remove any lint or debris from both ends of the vent. Pay extra attention to the vent opening on the back of the dryer and the vent outlet on the exterior of your home.
- For long or particularly stubborn blockages, you may need to use a specialized dryer vent cleaning kit. These kits include flexible rods and brush attachments that allow you to reach deeper into the vent for a more thorough cleaning.
- While cleaning, be mindful of any sharp edges or screws within the vent that could potentially damage the brush or vacuum attachment.
- Once the vent is free of lint and debris, reattach it to the dryer using the appropriate clamps or attachment mechanisms. Ensure a secure connection to prevent future leaks or blockages.
- Finally, plug the dryer back into the power source and run a test cycle to ensure proper airflow and functioning.
- Regularly clean your dryer’s lint trap after each use. This helps prevent lint buildup and reduces the risk of fire.
- Consider scheduling a professional dryer vent cleaning every 1-2 years, especially if you notice persistent issues with drying times or if your dryer is not operating efficiently.
Regularly inspecting and cleaning your dryer vents is essential for maintaining the safety and efficiency of your clothes dryer. By following these steps and staying vigilant about lint buildup, you can reduce the risk of fires, improve drying performance, and extend the lifespan of your dryer.
Remember, a clean and properly maintained dryer not only saves energy but also ensures the safety of your home and family. Make it a priority to include the inspection and cleaning of dryer vents in your fall maintenance checklist.
Test and maintain sump pump (if applicable)
If your home has a sump pump, it plays a crucial role in preventing basement flooding by removing excess water from the sump pit. To ensure that your sump pump is functioning correctly when you need it most, it’s important to test and maintain it regularly. Here’s how to test and maintain your sump pump:
- Locate the sump pump in your basement or crawl space. It should be installed in a pit or basin where water collects.
- Ensure that the sump pump is plugged into a working electrical outlet. If there is a power outage, consider installing a backup battery or a generator to keep the sump pump running.
- Slowly pour water into the sump pit to raise the water level. Observe the sump pump as it should activate automatically and start pumping the water out of the pit.
- Monitor the operation of the sump pump. Ensure that it is effectively removing the water from the pit and that the water is being discharged away from the foundation of your home.
- If the sump pump does not turn on or is not pumping the water properly, you may need to check for any mechanical issues, inspect the float switch, or consult a professional for further assistance.
- Regularly clean the sump pit and remove any debris or sediment that may hinder the sump pump’s performance.
- Inspect the discharge pipe and ensure it is securely fastened and directed away from your home’s foundation. Consider adding an extension to ensure the water is being properly discharged away from the property.
- Check the sump pump’s power cord for any signs of damage, such as fraying or exposed wires. Replace the cord if necessary to maintain safe operation.
- If your sump pump has a backup battery, test the battery’s condition and replace it if it’s no longer holding a charge. Backup batteries are crucial in case of power outages during heavy rainstorms.
- Consider having a professional sump pump inspection every 1-2 years. They can perform a more thorough evaluation, including testing the pump’s flow rate and checking the overall condition of the sump pump system.
Regular testing and maintenance of your sump pump are essential for ensuring its reliability and protecting your home from potential water damage. By following these steps and staying proactive, you can have peace of mind knowing that your sump pump is ready to handle any excess water during heavy rain or snowmelt.
Remember, a well-maintained sump pump is your first line of defense against basement flooding. Make it a priority to include the testing and maintenance of your sump pump in your fall maintenance checklist to safeguard your home and belongings.
Prepare emergency kits and supplies
Preparing emergency kits and supplies is an essential part of fall maintenance. It’s important to be well-prepared for unexpected situations such as power outages, severe weather events, or other emergencies. By having the necessary items readily available, you can ensure the safety and well-being of your household. Here’s how to prepare emergency kits and supplies:
- Create a comprehensive list of essential items to include in your emergency kit. This may consist of:
- Non-perishable food items, such as canned goods, granola bars, and dehydrated meals.
- Bottled water or a water filtration system to ensure a safe drinking water supply.
- A first aid kit with bandages, antiseptic solution, medications, and other necessary medical supplies.
- Flashlights, extra batteries, and a battery-powered or hand-cranked radio.
- Blankets, warm clothing, and emergency sleeping bags.
- An emergency whistle, signaling mirror, and a multi-purpose tool.
- Important documents, including identification papers, insurance policies, and emergency contact information.
- Personal hygiene items, such as toilet paper, wet wipes, and hand sanitizer.
- Cash, in case of power outages or disruptions to electronic payment systems.
- Gather all necessary items by purchasing them from a store or assembling them from existing supplies in your home.
- Store the emergency kits and supplies in a designated location that is easily accessible to all household members. Consider having multiple kits, including a smaller one for quick grab-and-go situations, such as a car emergency kit.
- Regularly check the expiration dates of food, batteries, and medications in your emergency kits. Replace items as needed to ensure their effectiveness when emergencies arise.
- Create an emergency communication plan with your household members. Establish a meeting point, designate an out-of-town contact, and determine how to communicate in case of an emergency when cell phone networks may be overloaded.
- Stay informed about potential emergencies or severe weather events by signing up for alerts from local authorities or utilizing weather alert apps.
- Periodically review and update your emergency kits and supplies, especially before the start of each season. Ensure that everything is in proper working condition and replace any items that have been used or expired.
- Inform all household members about the location of the emergency kits and educate them on how to use the items effectively in case of an emergency.
Preparing emergency kits and supplies is a proactive step to ensure the safety and well-being of your household during unexpected situations. By following these steps and regularly updating your emergency provisions, you’ll be better prepared to handle emergencies and effectively respond to any challenges that may arise.
Remember, being prepared is key when it comes to emergencies. By including the preparation of emergency kits and supplies in your fall maintenance checklist, you can have peace of mind knowing that you’re ready to face any unexpected situation that may come your way.
Conclusion
As the winter season approaches, taking the time to prioritize fall maintenance is crucial to ensure the continued safety, comfort, and efficiency of your home. By following a comprehensive checklist, you can tackle essential tasks both inside and outside of your home to prepare it for the colder months ahead.
From inspecting and cleaning gutters to sealing drafty areas around doors and windows, each maintenance task serves a unique purpose in safeguarding your home and improving its overall functionality. Regularly maintaining and addressing these areas can help prevent costly repairs, enhance energy efficiency, and create a more comfortable living environment.
Remember to pay attention to the interior of your home as well. Inspecting and servicing your heating system, testing and replacing batteries in smoke and carbon monoxide detectors, checking insulation, and cleaning dryer vents are critical steps to ensure a safe and efficient living space.
Additionally, it’s important to be well-prepared for emergencies. Creating and maintaining emergency kits and supplies will provide peace of mind and ensure that you have the necessary items to handle unexpected situations.
By incorporating these fall maintenance tasks into your routine, you can take proactive measures to protect your home and loved ones. Regular maintenance not only improves the longevity and functionality of your property but also enhances your overall safety and well-being.
As you embark on your fall maintenance journey, remember to stay organized, prioritize safety, and seek professional help when needed. By investing time and effort in fall maintenance, you’ll set the stage for a smooth transition into the winter season, allowing you to enjoy a comfortable and worry-free home throughout the colder months.
Frequently Asked Questions about Prep Your Home For Winter With Our Fall Maintenance Checklist
Was this page helpful?
At Storables.com, we guarantee accurate and reliable information. Our content, validated by Expert Board Contributors, is crafted following stringent Editorial Policies. We're committed to providing you with well-researched, expert-backed insights for all your informational needs.


0 thoughts on “Prep Your Home For Winter With Our Fall Maintenance Checklist”