Home>Kitchen & Cooking>Kitchen Gadgets & Utensils>How To Fix Kettle Switch
Kitchen Gadgets & Utensils
How To Fix Kettle Switch
Modified: August 17, 2024
Learn how to fix a kettle switch with our easy step-by-step guide. Keep your kitchen gadgets and utensils in top condition with our expert tips.
(Many of the links in this article redirect to a specific reviewed product. Your purchase of these products through affiliate links helps to generate commission for Storables.com, at no extra cost. Learn more)
Introduction
A faulty switch in your kettle can be a frustrating inconvenience, disrupting your daily routine and potentially leaving you without your much-needed cup of tea or coffee. However, fear not, as fixing a kettle switch is a manageable task that can save you the cost of a replacement appliance. With some basic tools, a bit of patience, and the right guidance, you can easily troubleshoot and resolve this issue.
In this guide, we will walk you through the step-by-step process of fixing a kettle switch. Whether you are a seasoned DIY enthusiast or a novice in the realm of home appliance repair, this comprehensive tutorial will equip you with the knowledge and confidence to tackle this common household problem. By following these instructions, you can revive your kettle and restore the convenience of having a reliable hot water source for your favorite beverages.
So, roll up your sleeves, gather your tools, and let's dive into the process of diagnosing and repairing a malfunctioning kettle switch. With a can-do attitude and a willingness to learn, you'll soon be enjoying a freshly brewed cuppa from your rejuvenated kettle.
Key Takeaways:
- Fixing a kettle switch is a manageable DIY task that saves money and extends appliance lifespan. Follow safety precautions, inspect, replace, and test the switch for a fully operational kettle.
- By embracing a proactive and resourceful mindset, you can gain valuable DIY skills and confidently troubleshoot and repair household appliances like a savvy homeowner.
Read more: How To Fix An Electric Kettle
Tools and Materials Needed
Before embarking on the task of fixing your kettle switch, it’s essential to gather the necessary tools and materials. Here’s what you’ll need:
- Screwdriver Set: A set of screwdrivers, including both flathead and Phillips head varieties, will be essential for disassembling the kettle.
- Replacement Switch: Depending on the specific issue with your kettle switch, you may need to purchase a replacement switch. Ensure that the new switch is compatible with your kettle model.
- Multimeter: This tool is useful for testing the continuity and functionality of electrical components, including the kettle switch.
- Wire Strippers: If the replacement switch requires rewiring, a pair of wire strippers will be necessary to prepare the wires for connection.
- Soldering Iron and Solder: In some cases, soldering may be required to secure the connections when replacing the switch. If this is the case, a soldering iron and solder will be indispensable.
- Cotton Swabs and Isopropyl Alcohol: These items are useful for cleaning electrical contacts and components, ensuring a reliable connection.
- Cloth or Towel: Having a clean cloth or towel on hand will help protect your work surface and keep components free of debris during the repair process.
- Safety Gloves and Goggles: When working with electrical components, it’s important to prioritize safety. Wearing gloves and goggles can help protect you from potential hazards.
By ensuring that you have these tools and materials ready, you’ll be well-prepared to tackle the task of fixing your kettle switch. With everything at your disposal, you can proceed with confidence, knowing that you’re equipped to handle the repair process efficiently and safely.
Safety Precautions
Prior to delving into the repair process, it’s crucial to prioritize safety. Working with electrical appliances and components requires a cautious approach to minimize the risk of accidents or injuries. Here are some essential safety precautions to observe when fixing a kettle switch:
- Unplug the Kettle: Before beginning any repair work, ensure that the kettle is unplugged from the power source. This will prevent the risk of electric shock during the disassembly and repair process.
- Work in a Well-Lit Area: Adequate lighting is essential for precision and safety when handling small components and electrical connections. Choose a well-lit workspace to carry out the repair.
- Use Insulated Tools: When working with electrical components, use tools with insulated handles to prevent electrical conductivity and reduce the risk of shock.
- Handle Soldering Equipment with Care: If soldering is required, exercise caution when using the soldering iron. Always place the soldering iron on its stand when not in use, and be mindful of the hot tip to avoid burns or accidental contact with flammable materials.
- Protective Gear: Wear safety gloves and goggles to shield your hands and eyes from potential hazards. This is especially important when handling wires, solder, and electrical connections.
- Keep Children and Pets Away: To prevent accidents, ensure that children and pets are kept away from your workspace during the repair process. This will minimize the risk of unintended contact with tools or components.
- Test the Kettle After Repair: Once the repair is complete, perform a thorough test of the kettle to ensure that it functions safely and efficiently. Check for any signs of overheating, unusual smells, or erratic behavior before returning the kettle to regular use.
By adhering to these safety precautions, you can mitigate potential risks and approach the repair process with confidence and peace of mind. Remember, safety should always be a top priority when working with electrical appliances, and taking the necessary precautions will contribute to a successful and secure repair experience.
Step 1: Disassembling the Kettle
Before you can access the kettle switch for inspection and potential replacement, you’ll need to disassemble the kettle. This process will vary depending on the specific design of your kettle, but the following general steps can guide you through the disassembly process:
- Unplug the Kettle: Ensure that the kettle is unplugged from the power source before proceeding with disassembly. This is a critical safety measure to prevent the risk of electric shock.
- Allow the Kettle to Cool: If the kettle has been recently used, allow it to cool down before beginning the disassembly process. This will prevent accidental burns from hot components.
- Remove the Base Plate: In many kettle designs, the base plate is secured with screws. Using the appropriate screwdriver, carefully remove the screws to detach the base plate from the kettle.
- Separate the Housing: Once the base plate is removed, you may need to detach the housing or outer casing of the kettle to access the internal components. This step may involve releasing clips or additional screws, so proceed with caution and refer to any available product documentation for guidance.
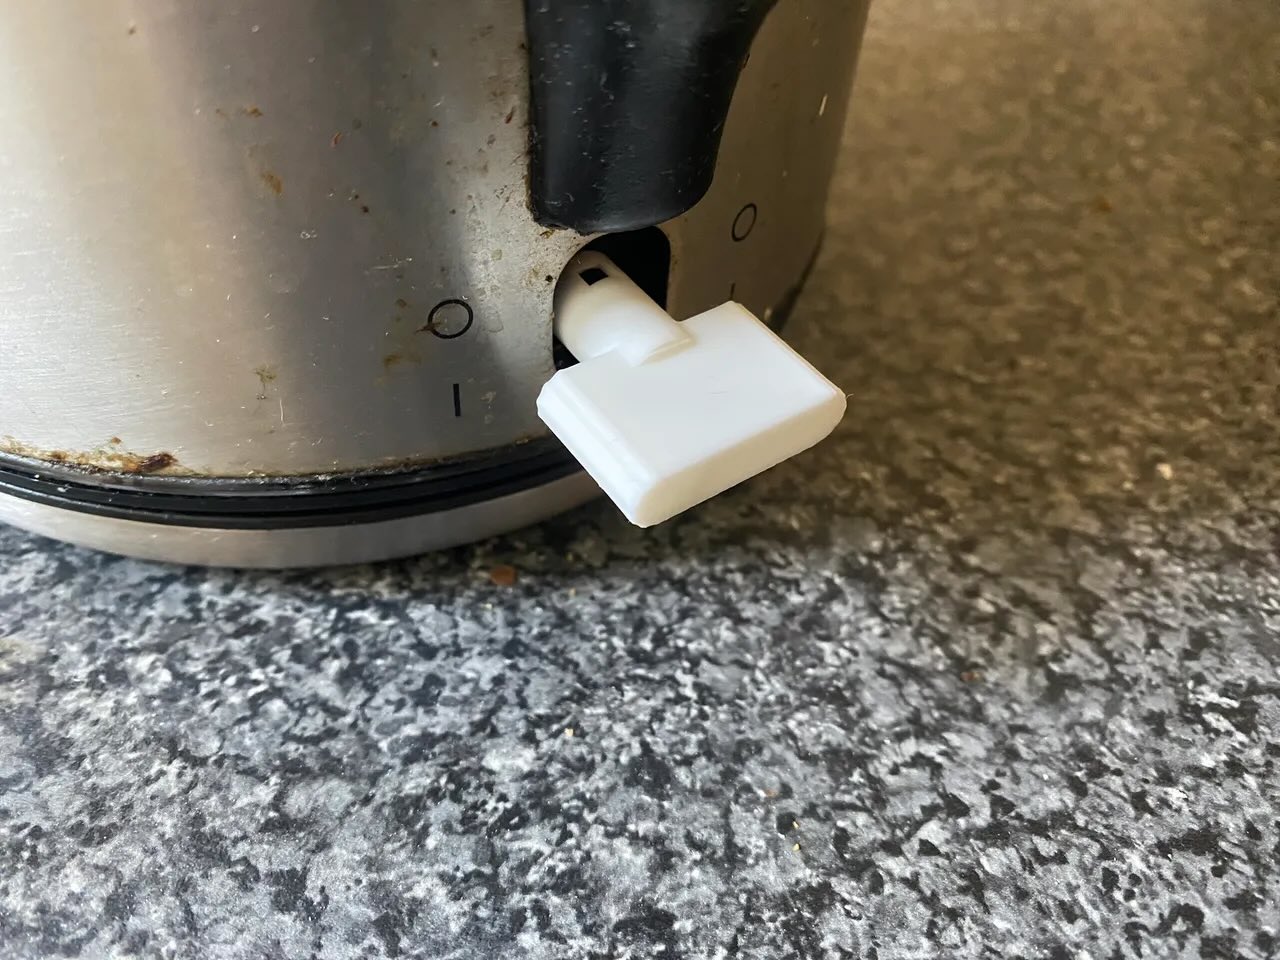
- Identify the Switch Location: As you disassemble the kettle, take note of the switch’s position and its wiring connections. This will be crucial for the subsequent inspection and potential replacement of the switch.
- Organize and Secure Components: As you remove screws, panels, or other components, keep them organized and secure to prevent misplacement or damage. Consider using a small container or labeled bags to store the disassembled parts.
By carefully following these steps, you can safely disassemble your kettle and gain access to the internal components, including the switch. Remember to work methodically and take note of the arrangement of components for the reassembly process. With the kettle disassembled, you’ll be ready to proceed to the next step of inspecting the switch and identifying any issues that may be affecting its functionality.
Step 2: Inspecting the Switch
With the kettle disassembled and the internal components exposed, it’s time to focus on inspecting the switch. This step involves a thorough assessment of the switch’s condition, wiring connections, and overall functionality. Here’s how you can approach the inspection process:
- Visual Examination: Carefully examine the switch for any visible signs of damage, such as burnt or melted components, loose connections, or corrosion. Pay close attention to the terminals and wiring associated with the switch.
- Test for Continuity: Using a multimeter set to the continuity or resistance setting, test the switch to determine if it is effectively completing the electrical circuit when activated. This will help identify whether the switch is functioning as intended or if it is experiencing a fault.
- Check Wiring Connections: Inspect the wiring connections to the switch, ensuring that they are securely attached and free from damage. Loose or frayed wires can lead to electrical issues and may necessitate rewiring or replacement.
- Clean the Switch and Contacts: If the switch and its contacts appear dirty or corroded, carefully clean them using cotton swabs and isopropyl alcohol. This can help restore proper electrical conductivity and improve the switch’s performance.
- Refer to Product Documentation: If available, consult the kettle’s product documentation or schematic diagrams to gain insight into the switch’s design, wiring configuration, and standard functionality. This information can be valuable for troubleshooting any observed issues.
By conducting a meticulous inspection of the switch and its associated components, you can gain a clearer understanding of any underlying issues affecting its performance. Identifying the specific nature of the problem will guide your next steps, whether it involves repairing the existing switch or proceeding with a replacement. With the inspection complete, you’re prepared to take action to address the switch-related issues and restore your kettle to optimal working condition.
Before attempting to fix a kettle switch, always unplug the kettle to avoid electric shock. Check for loose connections or damaged wires, and replace the switch if necessary. If unsure, seek professional help.
Read more: How To Fix A Dimmer Switch
Step 3: Replacing the Faulty Switch
If the inspection reveals that the kettle switch is indeed faulty and in need of replacement, you can proceed with the process of replacing the switch. This task involves careful removal of the existing switch and the installation of a new, functional replacement. Here’s a systematic approach to replacing the faulty switch in your kettle:
- Acquire the Correct Replacement: Ensure that you have obtained the appropriate replacement switch that is compatible with your kettle model. Refer to the product documentation or seek assistance from the manufacturer or a reputable supplier to obtain the correct part.
- Disconnect Power Source: Prior to commencing the replacement, confirm that the kettle is unplugged from the power source to eliminate the risk of electric shock during the procedure.
- Remove the Faulty Switch: Carefully detach the wiring connections from the faulty switch, taking note of their positions for the installation of the new switch. Unscrew or release any fasteners securing the switch in place, ensuring that you maintain a clear record of the switch’s orientation and positioning.
- Install the New Switch: Position the new switch in alignment with the original orientation, and secure it in place using the appropriate fasteners. Reconnect the wiring to the corresponding terminals on the new switch, ensuring a secure and accurate connection.
- Test the New Switch: Before reassembling the kettle, perform a preliminary test of the new switch to verify its functionality. Use a multimeter to check for continuity and ensure that the switch operates as expected when activated.
- Reassemble the Kettle: With the new switch successfully installed and tested, proceed to reassemble the kettle by reversing the disassembly steps. Carefully reattach the housing, base plate, and any other removed components, ensuring that all fasteners are securely tightened.
By following these steps, you can effectively replace the faulty switch in your kettle, setting the stage for the restoration of its operational functionality. With the new switch in place, you’re one step closer to enjoying the convenience of a fully operational kettle for your daily hot beverage needs.
Step 4: Reassembling the Kettle
After successfully replacing the faulty switch, the next crucial step is to reassemble the kettle. This process involves carefully restoring the internal components and housing to their original configuration, ensuring that the kettle is fully functional and safe for use. Here’s a detailed guide to reassembling your kettle:
- Refer to Disassembly Notes: If you took notes or photographs during the disassembly process, utilize them as a reference to guide the reassembly. This will help ensure that components are correctly positioned and secured.
- Secure Internal Components: Begin by securing any internal components, such as the heating element, thermostat, or other elements that were accessed during the repair. Ensure that they are properly positioned and fastened according to the manufacturer’s specifications.
- Reattach the Housing: Carefully position the housing or outer casing over the internal components, aligning any clips or fastening points. Secure the housing in place, ensuring a snug fit that prevents any movement or instability.
- Reinstall the Base Plate: If the base plate was removed during disassembly, reattach it to the kettle using the original screws or fasteners. Ensure that the base plate is securely affixed to maintain the structural integrity of the kettle.
- Check for Loose Components: Before proceeding, perform a visual inspection to confirm that all components are properly secured and that no loose screws, wires, or other parts are left within the kettle.
- Clean the Exterior: Take a moment to wipe down the exterior of the kettle with a damp cloth to remove any dust or debris that may have accumulated during the repair process. This will restore the kettle’s appearance and ensure cleanliness.
By methodically reassembling the kettle and ensuring that all components are securely positioned, you can finalize the repair process and prepare the appliance for testing. With the kettle reassembled, you’re ready to move on to the critical stage of testing its functionality to confirm that the repair has been successful.
Testing the Kettle
With the repair and reassembly complete, it’s time to conduct a thorough test of the kettle to ensure that the switch replacement has resolved the previous issues and that the appliance is operating safely and efficiently. Here’s a comprehensive guide to testing your kettle following the repair:
- Plug In and Power On: Carefully plug the kettle into a power source and switch it on. Observe the initial power-up sequence, ensuring that the kettle’s indicator lights, if applicable, illuminate as expected.
- Monitor Heating Element: As the kettle powers up, pay close attention to the heating element. Listen for the sound of the heating element activating, and visually confirm that it begins to generate heat within a reasonable timeframe.
- Observe Switch Functionality: Test the new switch by engaging it to start the heating process. Verify that the switch operates smoothly and that it effectively activates and deactivates the kettle’s heating element as intended.
- Boiling Test: Fill the kettle with an appropriate amount of water and initiate a boiling cycle. Monitor the kettle as it heats the water, ensuring that it reaches a rolling boil within a reasonable timeframe and that the heating process proceeds without interruptions.
- Check for Leaks or Abnormal Noises: Throughout the testing phase, inspect the kettle for any signs of water leaks, unusual sounds, or erratic behavior. A properly functioning kettle should heat water efficiently without exhibiting leaks or abnormal operational characteristics.
- Perform Multiple Test Cycles: To thoroughly assess the kettle’s performance, consider conducting multiple boiling cycles to confirm consistent and reliable operation. This will provide a comprehensive evaluation of the kettle’s functionality following the repair.
By diligently testing the kettle and closely monitoring its performance, you can ascertain whether the switch replacement has effectively resolved the previous issues and restored the appliance to optimal working condition. A successful testing phase will provide the confidence to reintegrate the kettle into your daily routine, knowing that it is once again a dependable and safe appliance for your hot beverage needs.
Conclusion
Repairing a faulty kettle switch is a rewarding endeavor that allows you to revive a vital appliance and extend its lifespan. By following the step-by-step process outlined in this guide, you’ve gained the knowledge and confidence to diagnose, replace, and test the switch, ultimately restoring your kettle to reliable working condition. Throughout this repair journey, you’ve demonstrated a proactive and resourceful approach to addressing a common household issue, saving both time and money by avoiding the need for a new kettle.
As you navigated the disassembly, inspection, replacement, and reassembly of the kettle components, you honed your DIY skills and deepened your understanding of electrical appliance repair. This hands-on experience not only resolved the specific issue with your kettle but also empowered you with valuable knowledge that can be applied to future repair projects.
Furthermore, by adhering to safety precautions and methodically following each step of the repair process, you prioritized your well-being and approached the task with a meticulous and responsible mindset. This commitment to safety and thoroughness is commendable and underscores the importance of conscientious repair practices.
Ultimately, as you tested the kettle and confirmed its restored functionality, you celebrated the successful outcome of your efforts. With a fully operational kettle at your disposal, you can once again savor the convenience of effortlessly preparing hot beverages, whether it’s a comforting cup of tea, a revitalizing coffee, or an indulgent hot chocolate.
Remember, the skills and confidence you’ve gained through this repair experience can be applied to various other home appliances and DIY projects, enriching your ability to maintain and troubleshoot everyday items. By embracing a proactive and resourceful mindset, you’ve not only fixed a kettle switch but also cultivated a valuable skill set that enhances your capabilities as a savvy and capable homeowner.
As you reflect on this repair journey, take pride in your accomplishment and the knowledge you’ve acquired. Whether it’s tackling future repair tasks or sharing your expertise with others, your journey to fix a kettle switch has left a lasting impact, empowering you with the skills to conquer new challenges and maintain a well-functioning home environment.
Frequently Asked Questions about How To Fix Kettle Switch
Was this page helpful?
At Storables.com, we guarantee accurate and reliable information. Our content, validated by Expert Board Contributors, is crafted following stringent Editorial Policies. We're committed to providing you with well-researched, expert-backed insights for all your informational needs.


0 thoughts on “How To Fix Kettle Switch”