Home>Kitchen & Cooking>Kitchen Gadgets & Utensils>How To Grease A Kitchenaid Stand Mixer

Kitchen Gadgets & Utensils
How To Grease A Kitchenaid Stand Mixer
Modified: August 28, 2024
Learn how to properly grease your KitchenAid stand mixer to keep it running smoothly and efficiently. Find out the essential steps and tools needed for maintenance. Discover more kitchen gadgets and utensils tips.
(Many of the links in this article redirect to a specific reviewed product. Your purchase of these products through affiliate links helps to generate commission for Storables.com, at no extra cost. Learn more)
Introduction
Welcome to the world of culinary craftsmanship, where the clinking of utensils and the aroma of delectable creations fill the air. If you're the proud owner of a KitchenAid stand mixer, you understand the unparalleled convenience and versatility it brings to your kitchen. However, to ensure that this indispensable tool continues to function at its best, proper maintenance is key. One essential aspect of maintaining your KitchenAid stand mixer is ensuring that it is adequately greased.
In this comprehensive guide, we will delve into the importance of greasing your KitchenAid stand mixer, the tools and materials you'll need, the step-by-step process of greasing the mixer, and valuable tips for its upkeep. Whether you're a seasoned culinary enthusiast or a novice cook, this guide will equip you with the knowledge and skills to keep your KitchenAid stand mixer in prime condition, ensuring that it remains a reliable partner in your culinary adventures.
So, let's embark on this journey to discover the art of greasing and maintaining your KitchenAid stand mixer, ensuring that it continues to be a steadfast companion in your culinary escapades for years to come.
Key Takeaways:
- Properly greasing your KitchenAid stand mixer reduces friction, minimizes noise, prevents wear, and enhances overall performance, ensuring it remains a reliable culinary companion.
- Regular maintenance, including greasing, cleaning, and proper storage, will uphold the functionality and condition of your KitchenAid stand mixer, guaranteeing its reliability and longevity.
Why Greasing Your KitchenAid Stand Mixer Is Important
Just like any well-crafted machine, your KitchenAid stand mixer requires regular maintenance to uphold its optimal performance. One of the most crucial aspects of this maintenance is ensuring that the internal components are adequately lubricated. Here are several reasons why greasing your KitchenAid stand mixer is of utmost importance:
- Friction Reduction: The moving parts within your KitchenAid stand mixer, such as the gears and bearings, require proper lubrication to minimize friction. Over time, friction can lead to wear and tear, potentially compromising the efficiency and longevity of the machine. By greasing the internal components, you reduce friction, thereby promoting smoother operation and extending the lifespan of your stand mixer.
- Noise Reduction: Adequate lubrication not only reduces friction but also diminishes the operating noise of the stand mixer. This is particularly beneficial if you enjoy a quiet kitchen environment while preparing your culinary creations.
- Prevention of Wear: Without proper lubrication, the metal components within the stand mixer can experience accelerated wear, potentially leading to damage and diminished performance. By regularly greasing your KitchenAid stand mixer, you safeguard its internal mechanisms, ensuring that it continues to function optimally.
- Enhanced Performance: A well-maintained stand mixer operates at its best, delivering consistent and reliable performance. Proper greasing contributes to the overall efficiency and effectiveness of the machine, allowing you to effortlessly tackle a wide array of culinary tasks.
By understanding the significance of greasing your KitchenAid stand mixer, you recognize the pivotal role that maintenance plays in preserving its functionality and longevity. Now, let’s explore the tools and materials you’ll need to embark on the greasing process.
Tools and Materials Needed
Before delving into the process of greasing your KitchenAid stand mixer, it’s essential to gather the necessary tools and materials. Ensuring that you have the following items at your disposal will streamline the greasing process and facilitate a thorough maintenance procedure:
- Food-Safe Grease: Selecting a high-quality, food-safe grease is paramount for maintaining the integrity of your stand mixer. Look for a grease specifically formulated for kitchen appliances, ensuring that it is safe for contact with food and complies with industry standards.
- Flathead Screwdriver: A flathead screwdriver will be indispensable for accessing and removing certain components of the stand mixer during the greasing process.
- Needle-Nose Pliers: These pliers will aid in removing retaining rings and accessing hard-to-reach areas within the stand mixer.
- Clean Cloth or Paper Towels: Having a clean cloth or paper towels on hand will allow you to wipe away any old grease and debris, ensuring a clean surface for the application of new grease.
- Cotton Swabs or Small Brush: These tools are useful for reaching intricate areas and ensuring thorough coverage when applying the new grease.
- Replacement Gasket (Optional): If the gasket in your stand mixer shows signs of wear or damage, having a replacement gasket on hand will enable you to address any issues during the maintenance process.
By assembling these tools and materials, you’ll be well-equipped to embark on the greasing process, ensuring that your KitchenAid stand mixer receives the care and maintenance it deserves. Now, let’s proceed to the step-by-step guide for greasing your stand mixer.
Before greasing your Kitchenaid stand mixer, make sure to unplug it and remove any attachments. Use food-grade grease to lubricate the gears and avoid over-greasing. Wipe off any excess grease and reassemble the mixer.
Steps to Grease Your KitchenAid Stand Mixer
Now that you’ve gathered the necessary tools and materials, it’s time to embark on the process of greasing your KitchenAid stand mixer. Following these step-by-step instructions will ensure that you effectively lubricate the internal components, promoting smooth operation and prolonged durability of your stand mixer:
- Prepare Your Work Area: Begin by creating a clean and well-lit workspace for the maintenance procedure. Ensure that you have ample space to maneuver and access the various components of the stand mixer.
- Unplug the Stand Mixer: Prior to any maintenance work, it’s crucial to disconnect the stand mixer from the power source to prevent accidental activation during the greasing process.
- Remove the Housing Cover: Using a flathead screwdriver, carefully remove the screws securing the housing cover of the stand mixer. Set the screws aside in a secure location to prevent misplacement.
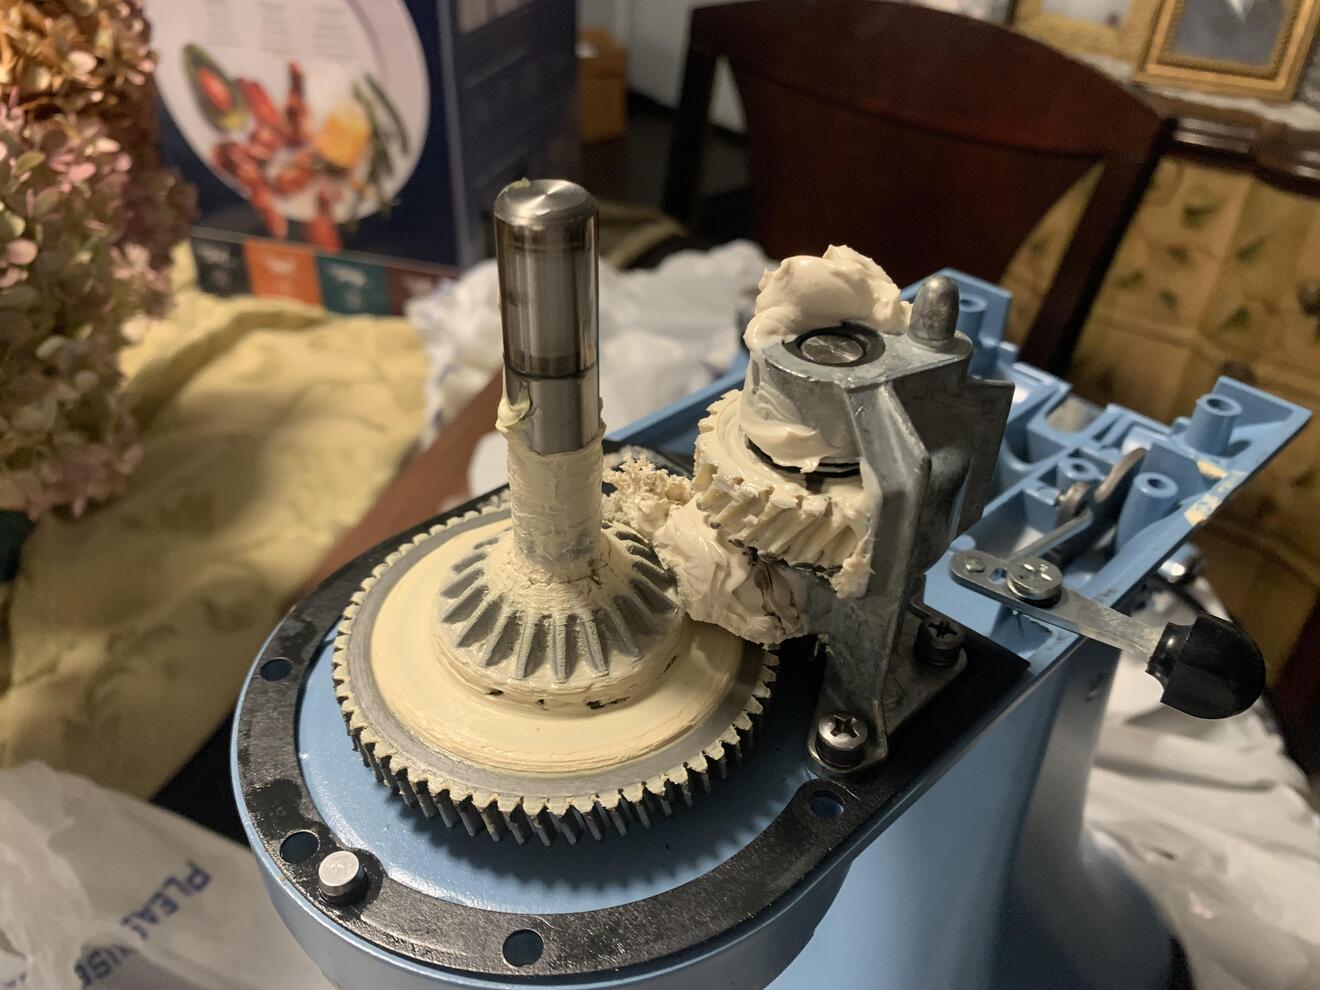
- Access the Gears and Bearings: Once the housing cover is removed, you’ll gain access to the gears and bearings within the stand mixer. Inspect these components for any signs of old or degraded grease, as well as any accumulated debris.
- Clean and Degrease: Utilizing a clean cloth or paper towels, thoroughly wipe away any residual grease and debris from the gears and bearings. This step is essential to ensure that the new grease adheres effectively and that the internal components are free from contaminants.
- Apply the New Grease: Using a food-safe grease and a small brush or cotton swabs, meticulously apply the new grease to the gears and bearings. Ensure that the components are evenly coated with the grease, promoting optimal lubrication.
- Reassemble the Stand Mixer: Once the greasing process is complete, carefully reassemble the stand mixer by securing the housing cover with the previously removed screws. Ensure that all components are properly aligned and fastened.
- Test the Stand Mixer: After reassembly, plug in the stand mixer and conduct a brief test run to ensure that the greasing process has resulted in smoother and quieter operation. This allows you to confirm the effectiveness of the maintenance procedure.
By meticulously following these steps, you’ll effectively grease your KitchenAid stand mixer, preserving its functionality and ensuring that it continues to be a reliable asset in your culinary pursuits. Now, let’s explore valuable tips for maintaining your stand mixer beyond the greasing process.
Tips for Maintaining Your KitchenAid Stand Mixer
While greasing your KitchenAid stand mixer is a crucial aspect of its maintenance, implementing additional practices will further enhance its longevity and performance. Consider the following tips to ensure that your stand mixer remains in optimal condition:
- Regular Inspection: Periodically inspect the exterior and internal components of your stand mixer for any signs of wear, damage, or accumulation of debris. Promptly addressing any issues that arise will prevent potential complications and preserve the machine’s functionality.
- Cleaning and Sanitizing: After each use, thoroughly clean the exterior of the stand mixer with a damp cloth and mild detergent. Additionally, ensure that the attachments and accessories are sanitized to maintain a hygienic kitchen environment.
- Proper Storage: When not in use, store your KitchenAid stand mixer in a dry and dust-free environment. Covering the machine with a designated appliance cover will safeguard it from dust and maintain its pristine condition.
- Attachment Compatibility: Ensure that the attachments and accessories used with your stand mixer are compatible with its model. Using incompatible attachments may strain the machine and compromise its performance.
- Professional Servicing: If you encounter any persistent issues or unusual noises during the operation of your stand mixer, consider seeking professional servicing to address any underlying mechanical concerns.
- Usage Guidelines: Adhere to the recommended usage guidelines provided by KitchenAid to prevent overloading the machine or subjecting it to tasks beyond its designated capacity.
- Invest in Quality Attachments: When expanding your culinary repertoire with various attachments, prioritize quality and compatibility to ensure seamless integration with your KitchenAid stand mixer.
By incorporating these maintenance tips into your routine, you’ll uphold the functionality and condition of your KitchenAid stand mixer, guaranteeing its reliability and longevity. Now, armed with a comprehensive understanding of greasing and maintaining your stand mixer, you’re well-equipped to preserve this indispensable culinary tool for years to come.
Read also: 11 Amazing Kitchenaid Mixer Grease for 2025
Conclusion
Congratulations on mastering the art of greasing and maintaining your KitchenAid stand mixer! By delving into the intricacies of this essential maintenance procedure, you’ve empowered yourself to preserve the functionality, performance, and longevity of this indispensable culinary companion.
Understanding the importance of greasing your stand mixer, you’ve learned how proper lubrication reduces friction, minimizes noise, prevents wear, and enhances overall performance. Armed with this knowledge, you’ve embarked on the greasing process equipped with the necessary tools and materials, ensuring a thorough and effective maintenance procedure.
Furthermore, by embracing valuable tips for maintaining your stand mixer beyond the greasing process, you’ve solidified your commitment to upholding its pristine condition. Regular inspection, proper cleaning, storage, attachment compatibility, and adherence to usage guidelines will collectively contribute to the enduring reliability of your KitchenAid stand mixer.
As you continue to embark on culinary adventures and create delectable masterpieces, your well-maintained stand mixer will stand as a steadfast ally, effortlessly blending, kneading, and mixing with precision and reliability.
So, whether you’re whipping up a batch of fluffy meringue, kneading dough for artisanal bread, or experimenting with innovative recipes, your KitchenAid stand mixer will remain a cornerstone of your culinary endeavors, faithfully serving as a testament to your dedication to the art of cooking.
With your newfound expertise in greasing and maintaining your KitchenAid stand mixer, you’re poised to embark on a journey of culinary creativity and gastronomic delight, confident in the reliability and longevity of this cherished kitchen appliance.
Frequently Asked Questions about How To Grease A Kitchenaid Stand Mixer
Was this page helpful?
At Storables.com, we guarantee accurate and reliable information. Our content, validated by Expert Board Contributors, is crafted following stringent Editorial Policies. We're committed to providing you with well-researched, expert-backed insights for all your informational needs.








0 thoughts on “How To Grease A Kitchenaid Stand Mixer”