Home>Storage Ideas>Kitchen Storage>How To Clean A Coffee Maker For A Better Tasting Cup Of Joe
Kitchen Storage
How To Clean A Coffee Maker For A Better Tasting Cup Of Joe
Modified: August 16, 2024
Learn the best kitchen storage ideas to keep your coffee maker clean and maintain the ultimate flavor in your favorite cup of Joe.
(Many of the links in this article redirect to a specific reviewed product. Your purchase of these products through affiliate links helps to generate commission for Storables.com, at no extra cost. Learn more)
Introduction
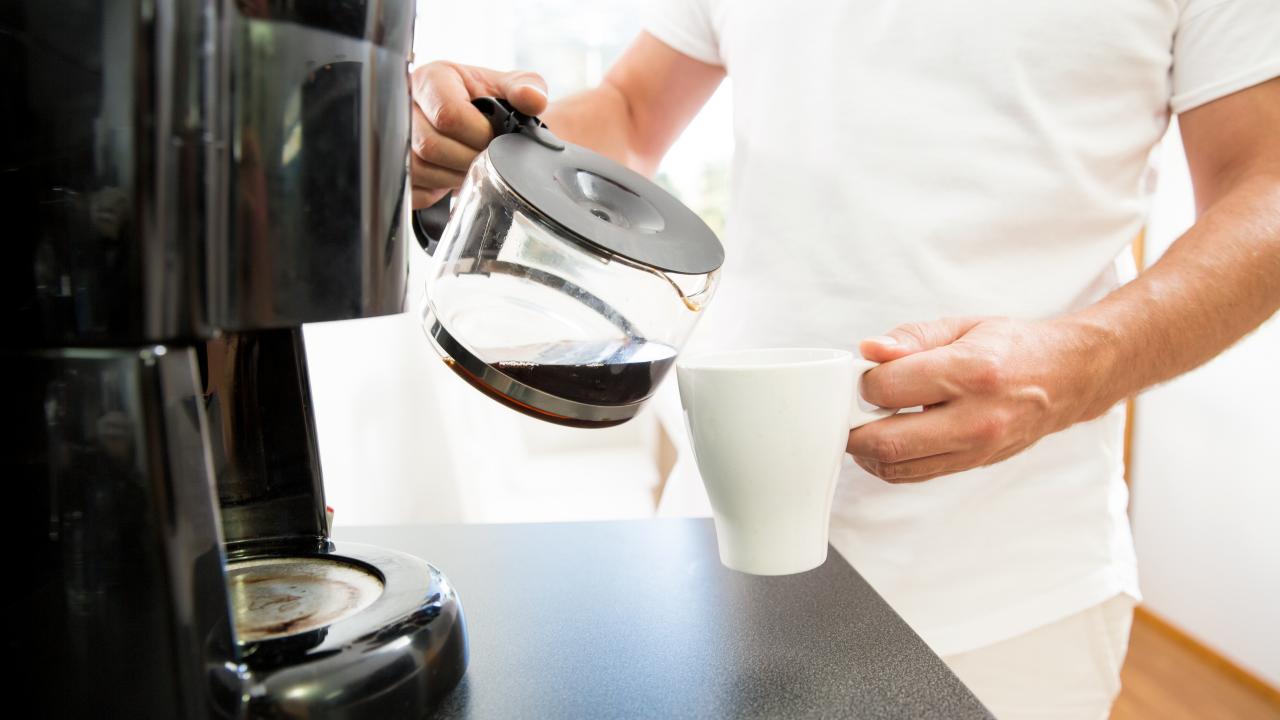
Welcome to our comprehensive guide on how to clean a coffee maker! Whether you’re an avid coffee lover or someone who relies on a cup of Joe to jumpstart their day, taking the time to clean your coffee maker is essential for ensuring a better tasting brew.
Over time, your coffee maker can accumulate mineral deposits, coffee residue, and even mold, which can not only affect the flavor of your coffee but also pose health risks. Cleaning your coffee maker regularly will help remove these impurities, improve the lifespan of your machine, and ensure that every cup you brew is as delicious as possible.
In this article, we will provide you with step-by-step instructions on how to clean your coffee maker effectively. We’ll cover everything from cleaning the carafe and filter basket to descaling the machine and maintaining its pristine condition. So, let’s get started and discover the secrets to achieving a better-tasting cup of coffee!
Key Takeaways:
- Say goodbye to stale coffee! Regularly cleaning your coffee maker removes mineral deposits, bacteria, and mold, ensuring a fresh and delicious brew every time.
- Keep your coffee maker in top shape! Follow a regular cleaning schedule, use filtered water, and descale when needed to maintain optimal performance and extend its lifespan.
Read more: Why Does Beer Taste Better In A Glass
Why Cleaning Your Coffee Maker is Important
Regularly cleaning your coffee maker is crucial for several reasons. Let’s dive into why it’s so important:
- Improved Taste: Over time, mineral deposits from water and coffee residue can accumulate in your coffee maker, affecting the taste of your brew. Cleaning ensures that your coffee maker produces a clean and flavorful cup of coffee every time.
- Removal of Bacteria and Mold: Coffee makers provide a warm and moist environment, making them susceptible to the growth of bacteria, mold, and yeast. These microorganisms can contaminate your coffee and, if ingested, may lead to health issues. Regular cleaning helps eliminate these harmful particles.
- Optimal Performance: A clean coffee maker functions more efficiently. When mineral deposits build up in the internal components, such as the heating element and water lines, they can impede the machine’s performance. Cleaning prevents clogs, ensures proper water flow, and helps maintain the optimal brewing temperature.
- Extended Lifespan: Your coffee maker is an investment, and regular cleaning can help prolong its lifespan. By preventing mineral buildup and clogs, you reduce the risk of damage to the machine, ensuring it continues to brew delicious coffee for years to come.
Now that you understand the importance of cleaning your coffee maker, let’s gather the necessary tools and materials to get started!
Tools and Materials Needed
Before you begin cleaning your coffee maker, it’s essential to gather the necessary tools and materials. Here’s what you’ll need:
- Vinegar: White vinegar is the star ingredient for descaling your coffee maker. It helps remove mineral deposits and buildup that can affect the taste of your coffee.
- Water: You’ll need water for various steps of the cleaning process, such as rinsing and brewing a cycle of plain water to remove any lingering vinegar taste.
- Mild Dish Soap: Use a gentle dish soap to clean the exterior of your coffee maker.
- Clean Sponge or Cloth: A soft sponge or cloth will come in handy to clean the exterior surfaces of your coffee maker.
- Brush or Toothbrush: A small brush or toothbrush can be useful for scrubbing hard-to-reach areas, such as the nooks and crannies around the filter basket.
- Coffee Filter: You’ll need a coffee filter to trap any loose debris during the cleaning process.
- Warm, Soapy Water: Prepare a bowl or sink with warm, soapy water to clean the carafe, filter basket, and other removable parts.
With these tools and materials at your disposal, you’re ready to embark on the journey of cleaning your coffee maker. In the next section, we’ll start with the first step: cleaning the carafe!
Step 1: Cleaning the Carafe
The first step in cleaning your coffee maker is to tackle the carafe, where you pour and serve your coffee. Follow these simple steps to ensure your carafe is sparkling clean:
- Empty the Carafe: Start by emptying any leftover coffee from the carafe. Dispose of the coffee grounds appropriately.
- Hand Wash with Warm, Soapy Water: Fill your sink or a bowl with warm water and a few drops of mild dish soap. Submerge the carafe and use a sponge or cloth to scrub away any stains or residue. Pay special attention to the spout and handle, as these areas can accumulate coffee oils and stickiness.
- Rinse Thoroughly: After scrubbing, rinse the carafe with clean water to remove any soap residue. Ensure there are no soapy flavors left behind that could affect the taste of your coffee.
- Dry Completely: Once rinsed, towel dry the carafe thoroughly. Be sure it is completely dry before using it again to prevent any moisture from being trapped, which can lead to mold or bacteria growth.
By regularly cleaning your carafe, you’ll keep it free from stains, odors, and residue, ensuring a fresh and delicious cup of coffee each time. Now, let’s move on to step two: cleaning the filter basket.
Step 2: Cleaning the Filter Basket
The filter basket is where you place the coffee grounds before brewing. It’s important to keep this component clean to prevent clogs and ensure a smooth brewing process. Follow these steps to clean the filter basket:
- Remove the Filter Basket: Depending on your coffee maker, the filter basket may be detachable or built-in. If it’s removable, carefully remove it from the coffee maker.
- Empty the Used Coffee Grounds: Discard any used coffee grounds from the filter basket. If there’s a paper filter, remove and dispose of it as well.
- Tap out Loose Debris: Tap the filter basket gently on the edge of the sink to remove any loose coffee grounds or residue.
- Wash with Warm, Soapy Water: Fill your sink or a bowl with warm water and a few drops of mild dish soap. Submerge the filter basket and use a brush or toothbrush to scrub away any stubborn stains or residue. Pay attention to the mesh or filter, ensuring it’s free from clogs.
- Rinse Thoroughly: After scrubbing, rinse the filter basket with clean water, ensuring all soap residue is removed.
- Dry Completely: Once rinsed, towel dry the filter basket or let it air dry completely before placing it back into the coffee maker.
By keeping your filter basket clean, you ensure optimal water flow, prevent clogs, and maintain the integrity of flavor in your brewed coffee. Now, let’s move on to the next step of descaling the coffee maker.
To clean your coffee maker, mix equal parts water and vinegar and run a brewing cycle. Then run two cycles with just water to rinse. Clean the carafe and filter basket with warm, soapy water.
Read more: How To Store Coffee Cups
Step 3: Descaling the Coffee Maker
Over time, mineral deposits from water, known as scale, can build up in your coffee maker. Descaling is a crucial step to remove these deposits, which can affect the taste of your coffee and the performance of your machine. Here’s how to descale your coffee maker:
- Prepare the Descaling Solution: Mix equal parts of white vinegar and water to create a descaling solution. The amount you’ll need depends on the size of your coffee maker. For smaller machines, 4-6 cups of the solution should suffice.
- Run the Descaling Solution: Pour the descaling solution into the water reservoir of your coffee maker. Place an empty carafe or cup under the brew basket to catch the liquid.
- Start the Brewing Cycle: Begin the brewing cycle and allow the descaling solution to run through the coffee maker. The acidic properties of the vinegar will break down the mineral deposits as it passes through the internal components.
- Pause the Brewing Cycle: Once half of the descaling solution has passed through the coffee maker, pause the brewing cycle and let the solution sit in the machine for about 20 minutes. This allows the vinegar to penetrate and dissolve stubborn scale.
- Resume and Complete the Brewing Cycle: After the 20-minute interval, resume the brewing cycle and let the rest of the descaling solution run through the machine.
- Rinse with Fresh Water: Once the brewing cycle is complete, empty the carafe or cup and thoroughly rinse the water reservoir. Run a cycle of fresh water through the coffee maker to rinse away any vinegar residue.
- Repeat if Necessary: If there are still visible mineral deposits or a vinegar smell, you may need to repeat the descaling process.
- Wipe Clean and Reassemble: Once the coffee maker has been thoroughly rinsed, use a clean cloth or sponge to wipe down the exterior of the machine. Reassemble any removable parts, such as the filter basket and carafe.
Descaling your coffee maker regularly will keep it functioning optimally and ensure a clean, delicious brew. Let’s move on to the next step: cleaning the exterior of the machine.
Step 4: Cleaning the Exterior
While it’s essential to clean the internal components of your coffee maker, don’t forget about the exterior! Here’s how to clean the exterior of your machine:
- Unplug the Coffee Maker: Before cleaning, make sure your coffee maker is completely unplugged to ensure safety.
- Mix Warm, Soapy Water: Fill a bowl or sink with warm water and a few drops of mild dish soap.
- Dampen a Cloth or Sponge: Dip a cloth or sponge into the soapy water and wring out any excess moisture.
- Wipe Down the Exterior Surfaces: Gently wipe down the exterior of the coffee maker, including the control panel, buttons, and any other accessible surfaces. Take care not to let excessive moisture seep into any electrical components.
- Scrub Stubborn Stains: For any stubborn stains or dried-on residue, use a soft brush or toothbrush dipped in the soapy water to scrub the affected areas.
- Rinse with Clean Water: Once you’ve cleaned all the exterior surfaces, rinse the cloth or sponge with clean water and wipe away any soap residue.
- Dry Thoroughly: Finally, use a dry cloth to wipe down the coffee maker, ensuring it is completely dry before plugging it back in and using it again.
Cleaning the exterior of your coffee maker not only keeps it looking pristine but also eliminates any potential dirt or grime that could transfer to your hands or the brewing process. Now, let’s move on to the final step: giving your coffee maker a final rinse and reassembling it.
Step 5: Final Rinse and Reassembly
Congratulations! You’re almost done with the cleaning process. Now, let’s complete the final steps to ensure your coffee maker is ready for brewing:
- Rinse the Coffee Maker: Fill the water reservoir with clean water and run a cycle without any coffee grounds or cleaning solution. This final rinse will help remove any remaining vinegar or soapy residue.
- Empty and Rinse the Carafe: While the coffee maker is rinsing, empty and rinse the carafe with clean water to remove any lingering vinegar or soap.
- Allow Parts to Dry: Once the brewing cycle is complete, remove any removable parts, such as the filter basket and carafe, and allow them to air dry completely.
- Reassemble the Coffee Maker: Once everything is dry, reassemble the coffee maker by placing the filter basket back in its position, followed by the carafe.
- Plug in and Brew: Finally, plug in your coffee maker, add fresh coffee grounds to the filter basket, fill the water reservoir with clean water, and brew a fresh pot of coffee. Enjoy the aroma and the taste of a clean and delicious cup!
By giving your coffee maker a final rinse and reassembling it properly, you ensure that it’s ready to consistently deliver great-tasting coffee. Remember, it’s important to repeat this cleaning process regularly to maintain the cleanliness and performance of your coffee maker.
Now that you’ve completed all the necessary steps to clean your coffee maker, let’s explore some tips to help you maintain a clean machine for the long run.
Tips for Maintaining a Clean Coffee Maker
Keeping your coffee maker clean doesn’t stop at a deep cleaning session. Here are some tips to help you maintain a clean and well-functioning machine:
- Regular Cleaning Schedule: Set a reminder to clean your coffee maker at least once a month. This routine will prevent mineral buildup and keep your coffee tasting fresh.
- Empty and Rinse the Carafe: After each use, empty the carafe and rinse it with warm water. This simple step prevents coffee residue from accumulating and becoming stubborn to remove.
- Use Filtered Water: If your tap water has a high mineral content, consider using filtered or bottled water to reduce scale accumulation in your coffee maker.
- Regularly Replace the Filter: If your coffee maker has a built-in water filter, follow the manufacturer’s instructions for replacing it. A clean filter ensures better-tasting coffee and prevents clogs.
- Clean the Brew Basket: In addition to regular cleaning, give the brew basket an occasional scrub to remove any trapped coffee oils and residue.
- Descale When Needed: Pay attention to signs of scale buildup, such as slower brew times or a noticeable change in taste. If needed, repeat the descaling process to keep your coffee maker running smoothly.
- Store the Coffee Maker Properly: When not in use, store your coffee maker in a clean and dry area. Avoid leaving water in the reservoir, as it can lead to mold growth.
- Read the Manufacturer’s Instructions: Every coffee maker is unique, so be sure to read the manufacturer’s instructions for specific cleaning and maintenance recommendations.
By following these tips, you’ll not only maintain a clean coffee maker but also prolong its lifespan and ensure a consistently delicious cup of coffee every time you brew.
As a coffee lover, you understand the importance of a clean coffee maker. By taking the time to clean and maintain your machine, you’ll be rewarded with a better-tasting and more enjoyable coffee experience. Cheers to a clean and flavorful cup of Joe!
Please note that the specific cleaning instructions may vary depending on the make and model of your coffee maker. Always refer to the manufacturer’s guidelines for the best cleaning practices.
Read more: Why Does My Ice Maker Ice Taste Funny
Conclusion
Cleaning your coffee maker is a vital step in ensuring a better tasting cup of Joe and maintaining the longevity of your machine. By following the step-by-step guide and incorporating regular cleaning into your routine, you can enjoy a clean and delicious brew every time.
Throughout this article, we’ve discussed the importance of cleaning your coffee maker to improve taste, remove bacteria and mold, optimize performance, and extend its lifespan. We’ve also provided detailed instructions on cleaning the carafe, filter basket, descaling the coffee maker, and cleaning the exterior.
Additionally, we’ve shared valuable tips for maintaining a clean coffee maker, such as adhering to a regular cleaning schedule, using filtered water, replacing filters, and storing the machine properly. By incorporating these tips into your coffee routine, you can keep your machine in excellent condition and enjoy the freshest coffee flavors.
Remember, a clean coffee maker not only brews better coffee but also contributes to your overall coffee-drinking experience. So, don’t neglect this essential aspect of coffee preparation.
Now that you have the knowledge and tools to clean your coffee maker effectively, it’s time to put it into practice. Take the necessary steps to remove mineral deposits, coffee residue, and potential contaminants, ensuring that each cup of coffee is brewed to perfection.
So, roll up your sleeves, gather your cleaning supplies, and give your coffee maker the tender loving care it deserves. Your taste buds will thank you for the cleaner and more flavorful coffee that awaits!
Frequently Asked Questions about How To Clean A Coffee Maker For A Better Tasting Cup Of Joe
Was this page helpful?
At Storables.com, we guarantee accurate and reliable information. Our content, validated by Expert Board Contributors, is crafted following stringent Editorial Policies. We're committed to providing you with well-researched, expert-backed insights for all your informational needs.

0 thoughts on “How To Clean A Coffee Maker For A Better Tasting Cup Of Joe”