Home>Technology>Smart Home Devices>How To Remove A Printer Driver From Windows 10
Smart Home Devices
How To Remove A Printer Driver From Windows 10
Modified: March 26, 2024
Learn how to easily remove a printer driver from Windows 10 and optimize your smart home devices for peak performance. Simplify your tech setup today!
(Many of the links in this article redirect to a specific reviewed product. Your purchase of these products through affiliate links helps to generate commission for Storables.com, at no extra cost. Learn more)
Introduction
Removing a printer driver from Windows 10 can be a necessary step when troubleshooting printing issues or when upgrading to a new printer model. Over time, outdated or corrupt printer drivers can lead to various problems, such as print job errors, slow printing, or even system crashes. Fortunately, Windows 10 offers multiple methods for removing printer drivers, allowing users to efficiently manage their printing devices and maintain optimal performance.
In this guide, we will explore three effective methods for removing printer drivers from Windows 10. Whether you prefer using the Control Panel, Print Management tool, or Command Prompt, each approach provides a straightforward way to uninstall printer drivers and ensure a smooth printing experience. By following these methods, you can effectively declutter your system from unnecessary printer drivers and resolve any printing issues that may arise.
Key Takeaways:
- Say goodbye to printing problems by removing outdated printer drivers from Windows 10 using the Control Panel, Print Management, or Command Prompt. Keep your printing experience smooth and error-free!
- Whether you’re a fan of user-friendly interfaces, advanced tools, or command-line precision, Windows 10 offers versatile methods to declutter your system from unnecessary printer drivers. Choose your preferred method and enjoy hassle-free printing!
Method 1: Uninstalling Printer Driver from Control Panel
One of the most common and straightforward ways to remove a printer driver from Windows 10 is through the Control Panel. This method is suitable for users who prefer a user-friendly interface and a step-by-step approach to managing their system’s devices.
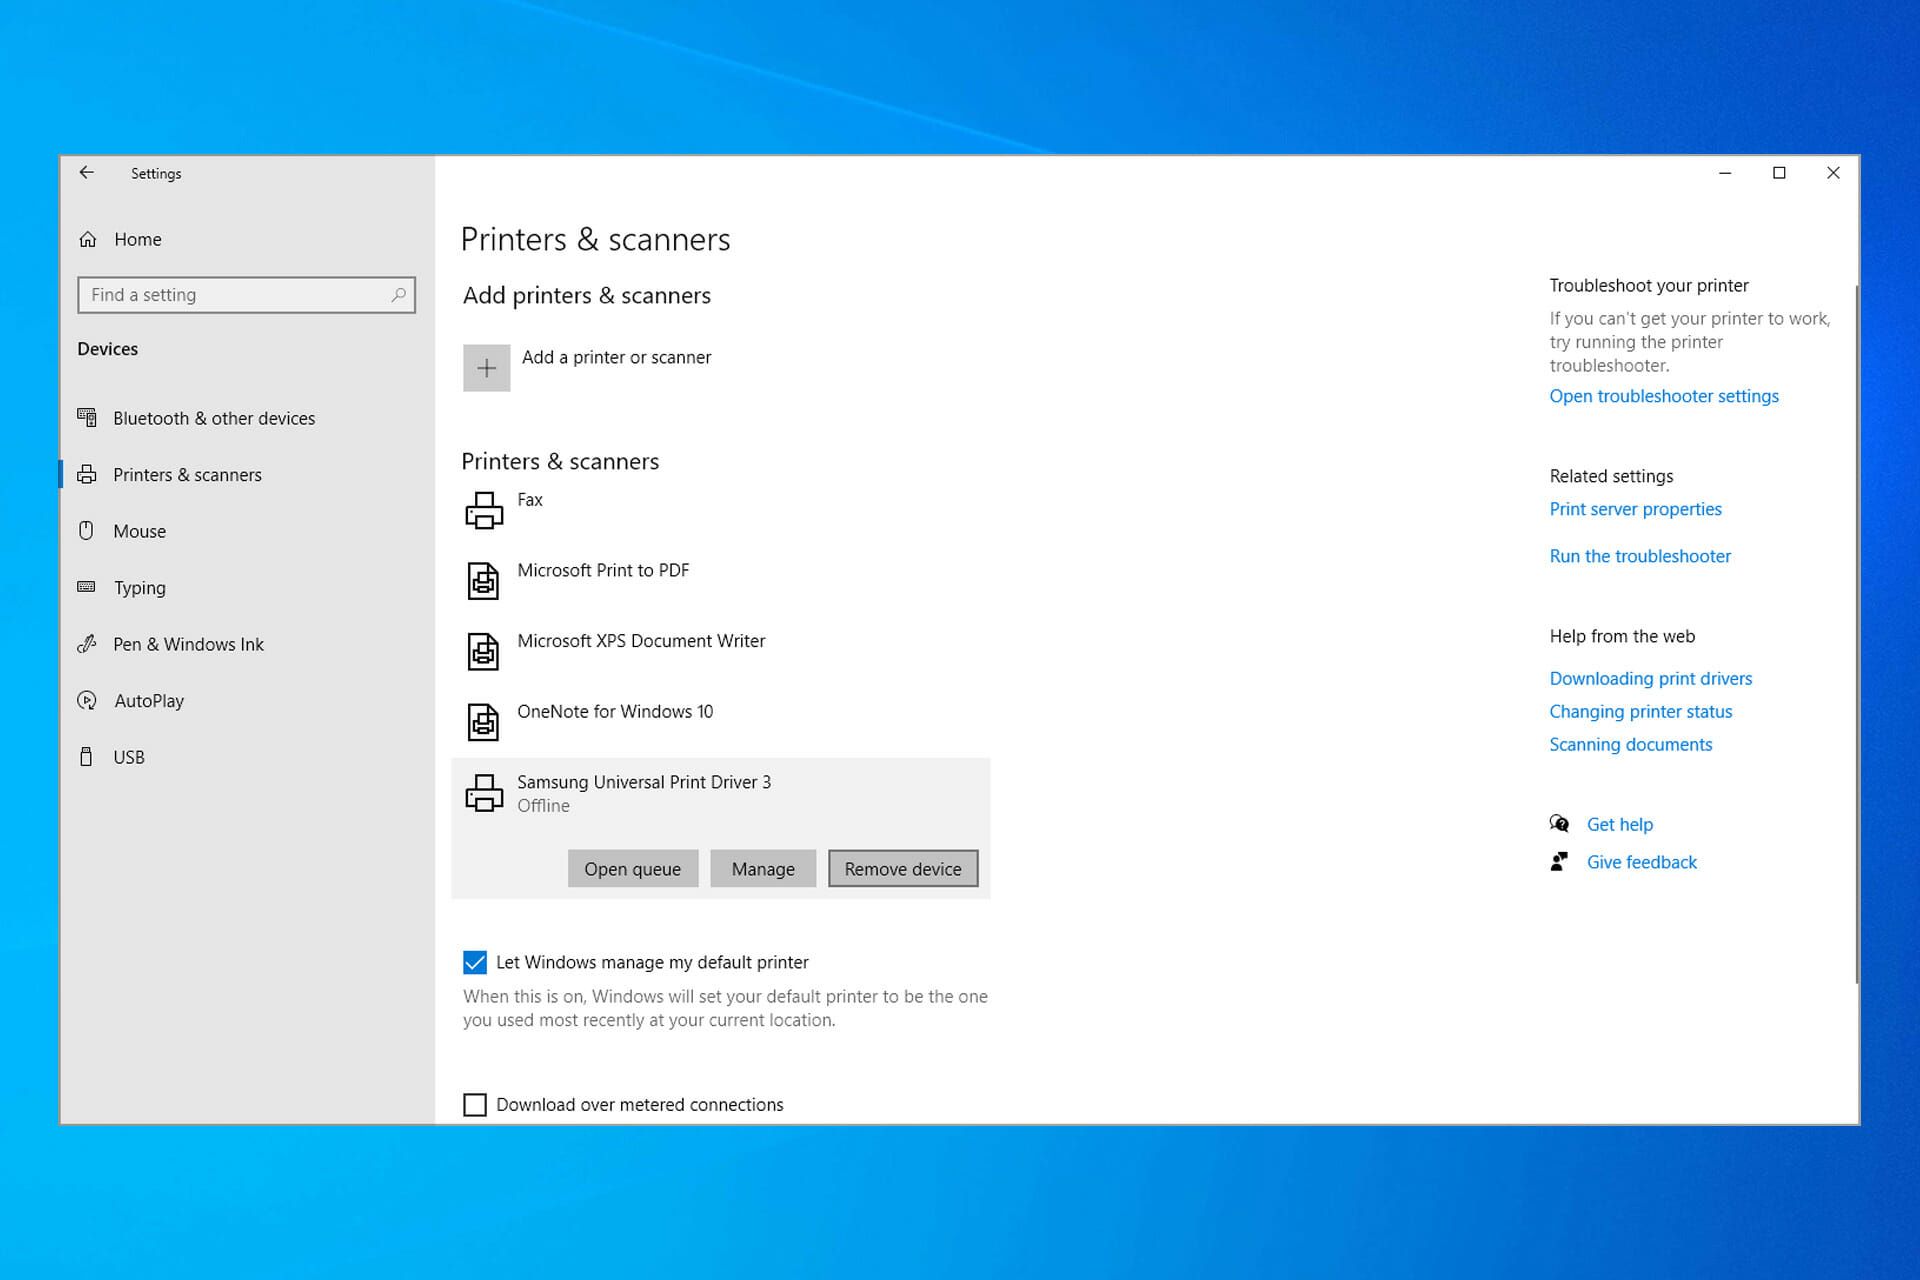
To begin, access the Control Panel by typing “Control Panel” in the Windows search bar and selecting it from the results. Within the Control Panel, navigate to the “Hardware and Sound” section and click on “Devices and Printers.” Here, you will find a list of installed printers and devices connected to your computer.
Locate the printer whose driver you wish to uninstall, right-click on it, and select “Remove device” from the context menu. Confirm the action when prompted, and the printer and its associated driver will be uninstalled from your system. It’s important to note that some printer drivers may require administrative privileges to uninstall, so ensure that you have the necessary permissions before proceeding.
After removing the printer driver, it’s recommended to restart your computer to complete the uninstallation process and allow the system to refresh its device configurations. Once the computer restarts, the printer driver will be fully removed, and you can proceed with installing a new printer or updating existing drivers as needed.
Using the Control Panel to uninstall printer drivers offers a simple and intuitive approach for managing printing devices on Windows 10. This method is ideal for users who prefer a graphical interface and a guided process for removing printer drivers from their system.
Method 2: Using Print Management
For users who require more advanced tools and granular control over printer management, Windows 10 provides the Print Management console, which offers a comprehensive set of features for managing printers, drivers, and print queues.
To access Print Management, type “print management” in the Windows search bar and select the corresponding result. Once the Print Management console opens, navigate to the “All Drivers” section in the left-hand pane. Here, you will find a list of installed printer drivers on your system.
Locate the specific printer driver you want to remove, right-click on it, and select “Remove Driver Package” from the context menu. You may encounter a prompt asking for confirmation to remove the driver package. Confirm the action, and the selected printer driver will be uninstalled from your system.
Using Print Management provides a centralized and organized approach to managing printer drivers, especially in environments with multiple printers and print servers. Additionally, the console offers detailed information about each printer driver, allowing users to make informed decisions when removing specific drivers from their system.
After removing the printer driver using Print Management, it’s advisable to restart your computer to ensure that the changes take effect. Once the system restarts, the printer driver will be successfully uninstalled, and you can proceed with any additional printer management tasks as needed.
Utilizing the Print Management console offers a powerful and efficient method for removing printer drivers from Windows 10, making it an ideal choice for users who require advanced print management capabilities and detailed insights into their system’s printing infrastructure.
To remove a printer driver from Windows 10, go to “Settings” > “Devices” > “Printers & scanners”, select the printer, and click “Remove device”. Then, go to “Control Panel” > “Devices and Printers”, right-click on the printer, and select “Remove device”.
Method 3: Using Command Prompt
Removing printer drivers from Windows 10 via the Command Prompt provides a command-line approach for users who prefer a more direct and scriptable method of managing their system’s printer drivers.
To begin, open Command Prompt with administrative privileges by searching for “Command Prompt” in the Windows search bar, right-clicking on it, and selecting “Run as administrator.” Once the Command Prompt window opens, you can proceed with the driver removal process.
First, you will need to identify the name of the printer driver you intend to remove. To do this, type the following command and press Enter:
pnputil /e
This command will display a list of installed driver packages on your system, including printer drivers. Locate the specific printer driver package in the list, and note its published name and original filename for reference.
Next, to remove the printer driver package, use the following command, replacing “DriverPackageName” with the actual published name of the driver package you identified earlier:
pnputil /d DriverPackageName
After executing the command, the selected printer driver package will be uninstalled from your system. It’s important to exercise caution when using the Command Prompt, as the commands directly impact system configurations and device drivers.
Upon successful removal of the printer driver package, it’s recommended to restart your computer to ensure that the changes take effect. Once the system restarts, the printer driver will be completely removed, allowing you to proceed with any necessary printer management tasks.
Using the Command Prompt to remove printer drivers offers a command-line driven approach, providing users with precise control over the driver removal process. This method is suitable for users who are comfortable with command-line interfaces and prefer a more direct method of managing their system’s printer drivers.
Conclusion
Removing printer drivers from Windows 10 is an essential task for maintaining an efficient and trouble-free printing environment. Whether you opt for the user-friendly interface of the Control Panel, the advanced capabilities of Print Management, or the direct command-line approach of the Command Prompt, Windows 10 offers versatile methods to uninstall printer drivers and streamline your printing infrastructure.
By following the methods outlined in this guide, users can effectively remove outdated, corrupt, or unnecessary printer drivers, thereby reducing the risk of printing errors, improving system performance, and facilitating the installation of new printers or updated drivers.
It’s important to exercise caution and ensure administrative privileges when uninstalling printer drivers, especially when using advanced tools such as Print Management and Command Prompt. Additionally, restarting the computer after removing a printer driver allows the system to finalize the driver removal process and update its configuration accordingly.
Whether you prefer the graphical interface of the Control Panel, the comprehensive features of Print Management, or the command-line precision of the Command Prompt, Windows 10 accommodates diverse user preferences and provides efficient solutions for managing printer drivers.
By leveraging these methods, users can maintain a well-organized and optimized printing environment, ensuring seamless printing operations and minimizing potential issues related to outdated or problematic printer drivers.
With the knowledge and tools at your disposal, you can confidently navigate the process of removing printer drivers from Windows 10, empowering you to effectively manage your printing devices and maintain a reliable and efficient printing infrastructure.
Frequently Asked Questions about How To Remove A Printer Driver From Windows 10
Was this page helpful?
At Storables.com, we guarantee accurate and reliable information. Our content, validated by Expert Board Contributors, is crafted following stringent Editorial Policies. We're committed to providing you with well-researched, expert-backed insights for all your informational needs.


0 thoughts on “How To Remove A Printer Driver From Windows 10”