Articles
How To Begin Intarsia Woodworking
Modified: May 6, 2024
Discover the art of intarsia woodworking with our informative articles. Learn the techniques and tips to create stunning woodwork masterpieces.
(Many of the links in this article redirect to a specific reviewed product. Your purchase of these products through affiliate links helps to generate commission for Storables.com, at no extra cost. Learn more)
Introduction
Welcome to the world of intarsia woodworking! If you have a love for both woodworking and art, then this creative and intricate craft is the perfect combination for you. Intarsia woodworking is a technique that allows you to create beautiful images by fitting together different pieces of wood, each with its own unique color and grain.
In this article, we will explore the art of intarsia woodworking, from understanding the tools and materials you need to mastering the techniques and creating stunning pieces. Whether you are a beginner looking to learn the basics or an experienced woodworker seeking new challenges, this guide will provide you with the knowledge and inspiration you need to delve into the world of intarsia woodworking.
Throughout the article, we will cover various topics such as choosing the right wood for your project, creating patterns, cutting and shaping the wood pieces, fitting them together seamlessly, and adding finishing touches that bring your artwork to life. Additionally, we will address common challenges that you may encounter along the way and provide troubleshooting tips to help you overcome them.
As we progress, we will also delve into advanced techniques and design ideas that will elevate your intarsia woodworking skills to the next level. These advanced techniques will enable you to create intricate details, add depth and dimension to your pieces, and explore new creative possibilities.
Whether you aspire to create stunning wall hangings, decorative boxes, or intricate wildlife sculptures, this guide will provide you with the foundation and inspiration to bring your intarsia woodworking projects to fruition. So, let’s dive in and discover the artistry and craftsmanship of intarsia woodworking!
Key Takeaways:
- Intarsia woodworking is a meticulous craft that combines woodworking skills with artistic sensibility, allowing for the creation of visually captivating and three-dimensional artwork using different wood species and advanced techniques.
- Mastering intarsia woodworking requires attention to detail, patience, and a passion for both woodworking and art. Embracing challenges as learning opportunities and experimenting with advanced techniques can lead to the creation of unique and stunning intarsia pieces.
Read more: How To Begin Indoor Gardening
What is Intarsia Woodworking?
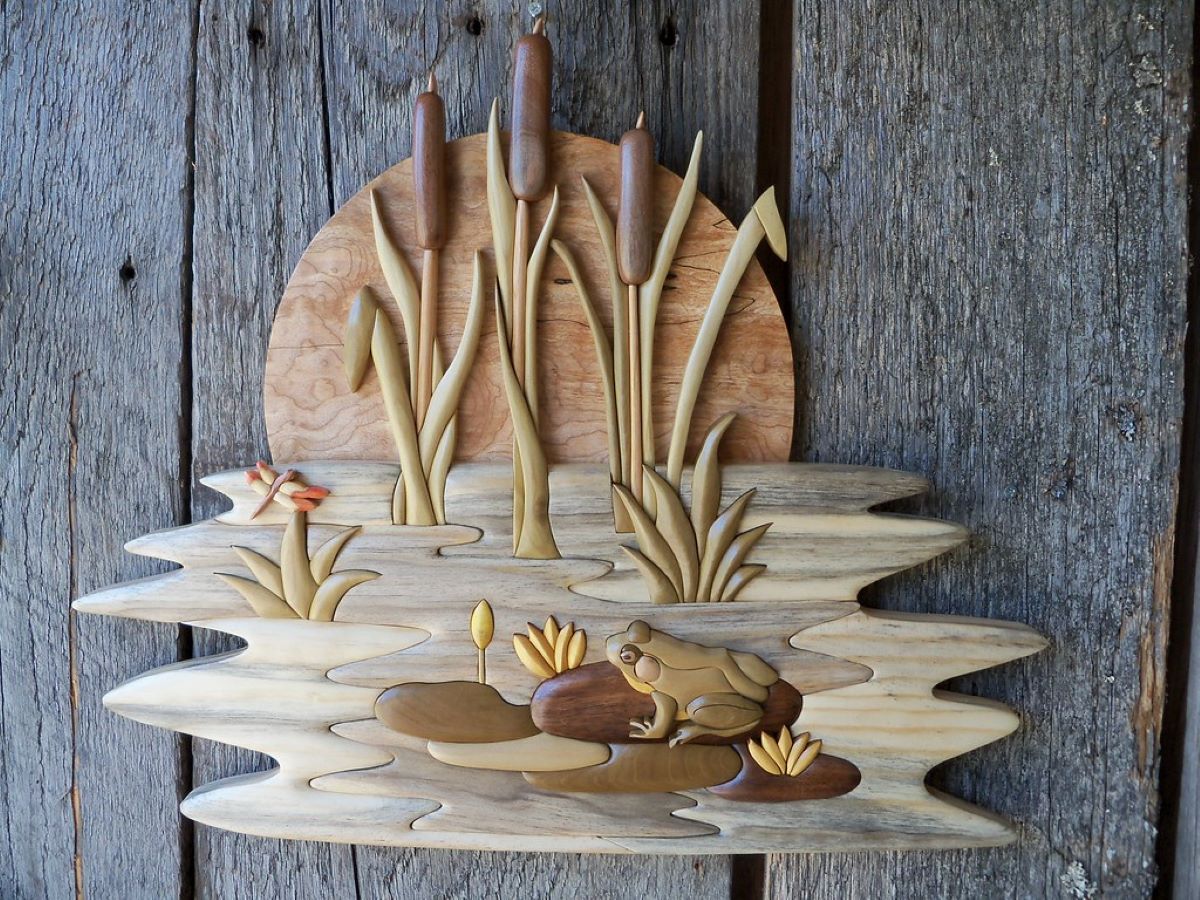
Intarsia woodworking is a woodworking technique that involves the assembly of different pieces of wood to create intricate, mosaic-like images or patterns. It is an art form that dates back hundreds of years and can be traced back to ancient Egypt and the Byzantine Empire.
The word “intarsia” comes from the Italian word “intarsiare,” which means “to inlay.” In intarsia woodworking, instead of using inlays to add decorative elements to the surface of a piece of furniture or other wooden object, the wood pieces themselves are the decorative elements. Each piece of wood used in intarsia has its own unique color, grain pattern, and texture, which adds to the overall beauty and visual impact of the finished artwork.
Unlike marquetry, which involves using veneer to create decorative designs, intarsia woodworking uses solid pieces of wood, often of different species, to achieve the desired effect. This allows for greater creativity and flexibility in design, as the wood pieces can be shaped, carved, and sanded to create depth and texture.
One of the key aspects of intarsia woodworking is the ability to create the illusion of depth and three-dimensionality in the flat surface of the artwork. By carefully selecting and positioning the wood pieces, the artist can create shading, highlights, and perspective that make the image come to life.
Intarsia woodworking requires a combination of woodworking skills, including the ability to precisely cut and shape the wood, as well as artistic sensibility to create visually appealing designs. It is a meticulous and time-consuming process that requires patience, attention to detail, and a passion for both woodworking and art.
Intarsia woodworking has a wide range of applications, from creating wall hangings and decorative panels to designing intricate jewelry boxes and furniture accents. It allows for endless creativity and the opportunity to showcase the natural beauty of wood in a unique and visually captivating way.
In the next section, we will explore the tools and materials needed to embark on your intarsia woodworking journey. So, let’s gather our tools and get ready to create stunning works of art!
Tools and Materials Needed
Before you begin your intarsia woodworking project, it is essential to have the right tools and materials to ensure successful and efficient completion. Here are some of the key tools and materials you will need:
Tools:
- A Scroll Saw: This is the most crucial tool for intarsia woodworking. A scroll saw allows you to make intricate, precise cuts in the wood, allowing for the creation of detailed designs.
- Clamps: Clamps are essential for holding the wood pieces securely in place during the cutting and assembly process. They ensure that the pieces fit together seamlessly and accurately.
- Chisels and Gouges: These tools are used for shaping and carving the wood pieces, adding depth and texture to the artwork.
- Sanding Tools: Sandpaper, sanding blocks, and a rotary tool with sanding attachments are necessary for smoothing and refining the surfaces of the wood pieces, creating a polished and professional look.
- Drill: A drill with various drill bits will be useful for creating holes, countersinking screws, and adding details to your intarsia woodworking project.
- Pliers: Pliers are handy for gripping and manipulating small pieces of wood, especially when fitting them together.
Materials:
- Different Species of Wood: Intarsia woodworking allows you to showcase the natural colors and grains of different wood species. It is essential to choose a variety of woods with contrasting colors and textures to create visually appealing designs.
- Wood Glue: High-quality wood glue is necessary for securely attaching the wood pieces together. It is recommended to use a clear-drying glue that will not affect the appearance of the finished piece.
- Finishing Products: Depending on the desired finish, you will need sanding sealer, stains, varnishes, or lacquers to protect and enhance the appearance of your intarsia artwork.
- Safety Gear: Intarsia woodworking involves using sharp tools and working with wood dust. It is important to wear safety goggles, a dust mask, and hearing protection to protect yourself during the process.
Having the right tools and materials is crucial for achieving the desired results in intarsia woodworking. Investing in high-quality tools and selecting the appropriate wood species will ensure that your finished artwork is of the highest quality and visually stunning.
Now that we’ve covered the tools and materials needed let’s move on to the next step: choosing wood for intarsia.
Choosing Wood for Intarsia
Choosing the right wood is a crucial step in intarsia woodworking, as it not only affects the visual appeal of your artwork but also the ease of working with the material. Here are some important factors to consider when selecting wood for your intarsia project:
Color and Grain:
The color and grain pattern of the wood play a significant role in the overall aesthetics of your intarsia artwork. Consider using woods with contrasting colors to create visually striking designs. Woods like walnut, cherry, and padauk are popular choices for their rich hues. Additionally, pay attention to the grain pattern as it can add depth and texture to your piece.
Hardness and Density:
Different wood species have varying levels of hardness and density. Softer woods, like pine or cedar, are easier to cut and shape but may not hold intricate details as well. Harder woods, such as oak or mahogany, are more durable but may be more challenging to work with. It is important to strike a balance between the complexity of your design and the wood’s workability.
Availability and Cost:
Consider the availability and cost of the wood species you choose. Some exotic or rare woods may be more challenging to find and may come with a higher price tag. It’s important to factor in your budget and the availability of the wood when making your selection.
Size and Thickness:
Consider the size and thickness of the wood pieces needed for your design. Choose wood that is thick enough to allow for shaping and carving without the risk of breaking or splintering. It’s also important to ensure that the wood pieces are large enough to showcase the intricate details of your design.
Combining Different Woods:
Intarsia woodworking offers the opportunity to combine different wood species to create visual interest and dimension in your artwork. Experiment with different combinations to achieve the desired effect and to bring your designs to life.
Before making your final wood selection, it’s a good idea to create a small test piece using the desired species. This will allow you to evaluate how the wood cuts, shapes, and fits together, giving you a better idea of what to expect for your larger project.
Remember, choosing the right wood is an essential part of the intarsia woodworking process. The wood you select will greatly impact the final result of your artwork, so take your time and carefully consider the factors mentioned above. Now that you have chosen your wood, let’s move on to the next step: getting started with the basic techniques of intarsia woodworking.
Getting Started: Basic Techniques
Now that you have selected your wood and gathered your tools and materials, it’s time to familiarize yourself with the basic techniques of intarsia woodworking. These techniques will serve as the foundation for creating stunning and intricate intarsia pieces. Here are the fundamental steps to get you started:
1. Creating a Pattern:
Begin by creating a pattern or design for your intarsia project. You can either draw it freehand or use design software to develop a precise pattern. Ensure that the pattern is appropriately scaled to fit the dimensions of your wood pieces.
2. Cutting and Shaping the Wood Pieces:
Using your scroll saw, carefully cut out the individual wood pieces according to the pattern. Take your time and make precise cuts to ensure a snug fit when assembling the pieces. Use chisels and gouges to shape the wood pieces if necessary, adding depth and detail to the design.
3. Fitting the Pieces Together:
Assemble the cut and shaped wood pieces according to the pattern. Pay attention to how the pieces fit together, ensuring that they align correctly to create a seamless image. Use clamps to hold the pieces in place while you work on the assembly.
4. Sanding and Finishing:
After the wood pieces are fitted together, it’s time to sand the surface to achieve a smooth and polished finish. Start with lower grit sandpaper and gradually work your way up to higher grits to remove any rough edges or imperfections. Apply a sanding sealer to enhance the natural color and grain of the wood. Finally, apply your chosen finish, such as varnish or lacquer, to protect the wood and give it a professional appearance.
5. Adding Depth and Dimension:
To bring your intarsia piece to life, consider adding depth and dimension. You can achieve this by carving and shaping the wood pieces, creating contours and shadows. Use your gouges and chisels to carefully remove wood, adding texture and depth to specific areas of your design.
Read more: How To Learn Woodworking
6. Common Challenges and Troubleshooting:
Intarsia woodworking comes with its share of challenges. Common issues include gaps between wood pieces and uneven surfaces. To fix gaps, you can use wood filler or adjust the fit of the pieces. For uneven surfaces, continue sanding until the surface is level. Don’t be discouraged by these challenges; they provide valuable learning opportunities for improvement.
Practice these basic techniques, refining your skills and gaining confidence as you progress. As you become more comfortable with the process, you can explore advanced techniques and create more intricate designs. In the next section, we will discuss how to create a pattern for your intarsia woodworking project. So, sharpen your tools and let your creativity take shape!
Creating a Pattern
Creating a pattern is a crucial step in intarsia woodworking as it serves as a roadmap for your project. A well-designed pattern ensures accurate cutting and assembly of the wood pieces, resulting in a beautiful and cohesive final piece. Here are the steps to help you create a pattern for your intarsia woodworking project:
1. Choose or Design Your Image:
Start by selecting an image that you would like to recreate in wood. It can be a photograph, a drawing, or any other visual reference that inspires you. If you prefer, you can also create your own design from scratch. Keep in mind that complex images may require more intricate cutting and shaping, so consider your skill level and the level of difficulty you are willing to take on.
2. Scale the Design:
Once you have chosen your image, determine the size at which you want to create your intarsia piece. Measure the dimensions of the wood pieces you will be using and scale the design accordingly. This step is crucial to ensure that the pieces fit together seamlessly and accurately.
Read more: When Did Monsanto Begin To Market GMO Seeds
3. Break the Design into Components:
Break down the image into distinct components or areas that can be cut and assembled separately. Identify the different wood species and colors that will be used for each section of the design. This step will help you plan your wood selection and make the cutting process more manageable.
4. Sketch the Pattern:
Using a pencil and graph paper, sketch the outline of each wood piece for each component of your design. Be as precise as possible, making sure the dimensions and proportions are accurate. This will serve as a guide for cutting the wood pieces and fitting them together later on.
5. Mark Wood Grain:
Take note of the direction and pattern of the wood grain in your design. Mark arrows or lines on your pattern indicating the grain direction for each wood piece. This step is important to ensure a cohesive and visually appealing final piece, as it will help you align the grains and create a seamless transition between different sections of your design.
6. Label and Organize:
Label each wood piece on your pattern to keep track of the different sections and species of wood you will be using. This will make the cutting and assembly process much more efficient. Additionally, consider creating a color-coded key or legend to indicate the specific wood species and colors to be used in each section.
Remember, creating a well-designed pattern is essential for the success of your intarsia woodworking project. Take your time with this step, ensuring accuracy and attention to detail. Your pattern will serve as a guide throughout the entire process and will be the foundation of your intarsia masterpiece.
Now that you have created a pattern, it’s time to move on to the next step: cutting and shaping the wood pieces for your intarsia project. Grab your scroll saw and let your creativity come to life!
Cutting and Shaping the Wood Pieces
Now that you have your pattern ready, it’s time to bring it to life by cutting and shaping the wood pieces. This step requires precision and attention to detail to ensure that the pieces fit together seamlessly. Here are the steps to guide you through the process:
1. Prepare the Wood:
Start by preparing the wood pieces according to the dimensions specified in your pattern. Use a pencil or a marking tool to transfer the outline of each piece onto the wood. This will serve as a guide for cutting.
2. Choose the Right Blade:
When using a scroll saw, it’s important to choose the right blade for the job. Select a blade with a fine tooth count to achieve a smooth and precise cut. The size and thickness of the wood pieces will also influence your choice of blade.
3. Make the Cuts:
Follow the lines on your wood pieces and carefully cut along the outline using your scroll saw. Take your time and maintain a steady pace to ensure accuracy. Make any necessary adjustments or re-cuts as needed to achieve the desired shape.
Read more: How To Start A Woodworking Business
4. Shaping the Wood:
After cutting the wood pieces, you may need to shape and refine them to add depth and detail to your intarsia design. Use chisels, gouges, or sandpaper to shape the edges and create contours according to your pattern. This step allows you to give your intarsia piece a three-dimensional effect.
5. Test Fit the Pieces:
As you progress, frequently test fit the wood pieces together to ensure they align correctly and create a seamless image. This will help you identify any areas that require further shaping or adjustment before proceeding to the final assembly.
6. Finishing Touches:
Once you are satisfied with the shape and fit of the wood pieces, it’s time to add any final touches. Use sandpaper or filing tools to smooth any rough edges or imperfections. This will ensure a polished and professional appearance for your intarsia woodworking project.
Remember to work carefully and attentively during the cutting and shaping process. Take breaks as needed to maintain focus and reduce the risk of errors or accidents. As you gain more experience with intarsia woodworking, you will become more proficient in cutting and shaping the wood pieces, allowing you to create intricate and stunning designs.
Now that the wood pieces are cut and shaped, it’s time to fit them together and bring your intarsia artwork to life. In the next section, we will explore the process of fitting the pieces together for a seamless and visually captivating finished piece.
Fitting the Pieces Together
Now that you’ve cut and shaped the wood pieces for your intarsia project, it’s time to fit them together like puzzle pieces. This step requires patience and precision to ensure a seamless and visually captivating finished piece. Here are the steps to guide you through the process of fitting the pieces together:
Read more: How To Inlay Wood With Hand Tools
1. Organize and Arrange:
Start by organizing the wood pieces according to your pattern and design. Lay them out in the order they will be assembled to get a visual understanding of how they fit together. This will help you make any necessary adjustments before attaching them permanently.
2. Dry Fit the Pieces:
Before applying any adhesive, dry fit the pieces together to ensure they align properly and create a cohesive image. This step allows you to make any necessary adjustments or refinements to the shape or fit of the pieces.
3. Glue Application:
Once you’re satisfied with the dry fit, it’s time to apply wood glue to the contact surfaces of the wood pieces. Select a high-quality wood glue that dries clear and is suitable for your chosen wood species. Use a small brush or toothpick to apply the glue evenly and avoid excessive amounts that could cause unwanted drips or oozing.
4. Press and Clamp:
After applying the glue, carefully press the wood pieces together, ensuring a tight and secure fit. Use clamps to hold the pieces in place during the drying process. Place a protective layer such as wax paper between the clamps and the wood to prevent them from leaving marks or indentations.
Read more: How To Join Wood Planks With Hand Tools
5. Remove Excess Glue:
While the glue is still wet, use a damp cloth or sponge to remove any excess glue that may have seeped out during the clamping process. It’s important to remove the excess glue now to prevent it from drying and causing an unsightly finish on your intarsia artwork.
6. Allow Drying Time:
Leave the clamped pieces to dry according to the glue manufacturer’s instructions. Avoid handling or moving the pieces until the glue has completely cured. This may take several hours or overnight, depending on the type of glue used.
By carefully fitting the wood pieces together, you create a seamless and harmonious image in your intarsia artwork. The adhesive bonds the pieces together, ensuring the longevity and stability of your finished piece. It’s important to double-check the alignment and fit of the pieces before the glue dries to avoid any misalignments or gaps.
Now that the pieces are securely fitted together, it’s time to move on to the next step: sanding and finishing the surface for a polished and professional appearance. Let’s bring out the beauty of your intarsia masterpiece!
Sanding and Finishing
After fitting the wood pieces together in your intarsia project, it’s time to sand and finish the surface to create a polished and professional appearance. This step enhances the beauty of the wood and gives your artwork a refined and smooth finish. Here are the steps to guide you through the process of sanding and finishing:
1. Sanding Process:
Start by sanding the surface of your intarsia piece to achieve a smooth and even finish. Begin with a coarse-grit sandpaper and gradually work your way up to finer grits. This progression helps to remove any rough areas, imperfections, or excess glue while gradually smoothing the surface.
Read more: How To Make A Cutting Board Using Hand Tools
2. Sanding Techniques:
Use a sanding block or sandpaper wrapped around a flat object to maintain even pressure and avoid uneven sanding. Sand in the direction of the wood grain to prevent scratching or damaging the surface. Take your time and sand each wood piece thoroughly, ensuring the edges are smooth and refined.
3. Contour Sanding:
For areas that require more shaping, use sanding drums or files to contour the wood pieces. This technique helps to create rounded or curved edges, adding depth and dimension to your intarsia artwork.
4. Finish Application:
Once the sanding process is complete, it’s time to apply a finish to protect and enhance the appearance of your intarsia piece. Consider using a clear varnish, lacquer, or oil-based finish. Apply the finish using a brush, following the manufacturer’s instructions, and ensure even coverage across the entire surface.
5. Multiple Coats:
Depending on your desired finish, you may need to apply multiple coats of the chosen finish. Allow each coat to dry completely before applying the next one. This helps to build up a durable and protective layer and enhances the natural beauty of the wood.
6. Finishing Touches:
After applying the final coat of finish, inspect your intarsia piece for any remaining imperfections or rough edges. Use fine-grit sandpaper or sanding pads to gently sand any areas that need further refinement. Wipe away any dust or debris and ensure the surface is smooth and ready for display or further embellishment.
By sanding and finishing your intarsia artwork, you create a professional and polished look that highlights the natural beauty of the wood. The finish not only enhances the appearance but also helps to protect the wood from stains, moisture, and UV damage, ensuring the longevity of your work.
Now that your intarsia piece is sanded and finished, it’s time to add depth and dimension to your artwork. In the next section, we will explore techniques for adding depth and bringing your intarsia woodworking projects to life. Let’s dive into the creative possibilities!
Adding Depth and Dimension
Adding depth and dimension is an important step in the intarsia woodworking process as it brings your artwork to life and creates a sense of realism. By carefully shaping and carving the wood pieces, you can create contours, shadows, and visual interest in your intarsia piece. Here are some techniques to help you add depth and dimension:
1. Shaping the Wood:
Use chisels, gouges, and other carving tools to shape the wood pieces and create depth. Carve away small sections of the wood to add contours and create the illusion of three-dimensionality. Pay attention to the shape and form of the subject in your intarsia design and carve accordingly.
2. Layering Technique:
Consider layering wood pieces to add depth and dimension. By overlapping pieces and raising them slightly, you create a sense of depth in your intarsia artwork. This technique works particularly well for creating a sense of perspective in landscapes or adding depth to objects in your design.
Read more: How To Make A Chess Board With Hand Tools
3. Texturing the Surfaces:
Using carving tools, you can add texture to the surfaces of the wood pieces. Create lines, texture, or patterns to mimic the natural texture found in the subject of your intarsia piece. This technique enhances the visual interest and realism of your artwork.
4. Burnishing Technique:
Burnishing is a technique where you use a rounded tool, like a bone folder or rounded end of a spoon, to rub the surface of the wood. This smooths and compresses the wood fibers, creating a polished and tactile effect. Burnishing can be used to add highlights or emphasize certain areas of your design.
5. Wood Staining:
You can also add depth and dimension by selectively staining certain areas of your intarsia piece. Darkening certain sections and leaving others lighter can create shadows and highlights, enhancing the three-dimensional effect of your artwork.
6. Finishing with Oil or Wax:
After adding depth and dimension to your intarsia piece, finish it with oil or wax to create a soft sheen and enhance the natural beauty of the wood. This final step adds richness and depth to the colors and textures in your artwork.
By incorporating these techniques, you can make your intarsia artwork pop and create a sense of realism. Experiment with different methods and find the ones that work best for your design and style. As you gain experience, you will become more adept at adding depth and dimension to your intarsia woodworking projects.
Now that you’ve mastered the techniques for adding depth and dimension, it’s important to be aware of common challenges and how to troubleshoot them. In the next section, we will address common challenges in intarsia woodworking and provide tips for overcoming them. Let’s tackle those challenges head-on!
Read more: How To Draw Plans For Woodworking
Common Challenges and Troubleshooting
Intarsia woodworking, like any craft, comes with its own set of challenges. Knowing how to troubleshoot and overcome these challenges will help you achieve the best results in your projects. Here are some common challenges you may encounter in intarsia woodworking and tips for troubleshooting them:
1. Uneven Fit:
If you find that the wood pieces don’t fit together seamlessly, the problem may be uneven cutting or shaping. Double-check your pattern and measurements to ensure accuracy. Use sandpaper or a file to carefully shape the pieces for a better fit. Take your time and make small adjustments until the pieces align properly.
2. Gaps Between Pieces:
Gaps between wood pieces can detract from the overall appearance of your intarsia piece. If you notice gaps, it could be due to imprecise cutting or not sanding the edges properly. Carefully sand the edges of the pieces to create a tight fit. You can also use wood filler to fill in small gaps, then sand the filled areas until smooth.
3. Splintering or Tear-out:
Splintering or tear-out can occur while cutting or shaping the wood pieces. Choose a finer-toothed blade for your scroll saw to minimize tear-out. Ensure that the wood is securely clamped and supported to prevent excessive vibration. If tear-out does occur, you can try using sandpaper or a sharp chisel to smooth the affected area and remove any splinters.
Read more: How To Cut Hardwood With Hand Tools
4. Wood Movement:
Wood is a natural material that can expand or contract due to changes in humidity and temperature. This movement can cause gaps or warping in your intarsia piece over time. To mitigate this, ensure that the wood is properly acclimated before starting your project. Use a stable wood species or consider incorporating expansion joints to allow for natural movement.
5. Finishing Issues:
Finishing your intarsia piece can sometimes present challenges, such as uneven application or a blotchy appearance. To overcome this, thoroughly sand the surface before applying the finish to ensure a smooth and even base. Test the finish on a scrap piece of the same wood to check compatibility and achieve the desired appearance. Apply multiple thin coats, allowing each coat to dry completely before applying the next, to avoid a blotchy finish.
6. Design Corrections:
If you realize a mistake in your design or pattern after cutting the wood pieces, don’t panic. Depending on the extent of the mistake, you can either make adjustments to the affected pieces or create new ones to replace them. Take it as an opportunity to learn and improve your skills. Mistakes can sometimes lead to innovative and unique designs.
Remember, challenges are a natural part of the creative process. Don’t get discouraged. Take your time, be patient, and embrace the learning experience associated with overcoming these challenges. Each project will bring new lessons and help you refine your intarsia woodworking skills.
Now that you are equipped with troubleshooting strategies, let’s explore advanced techniques and design ideas to expand your intarsia woodworking repertoire in the next section. Let your creativity soar!
Advanced Techniques and Design Ideas
Once you have mastered the basic techniques of intarsia woodworking, you can further develop your skills by exploring advanced techniques and experimenting with innovative design ideas. These techniques and ideas will allow you to push the boundaries of your creativity and create even more stunning and intricate intarsia pieces. Here are some advanced techniques and design ideas to consider:
Read more: How To Make A Perfect Box With Hand Tools
1. Introducing Inlay:
Combine intarsia with inlay techniques to add extra detail and complexity to your designs. Incorporate small pieces of contrasting wood, metal accents, or even stones into your intarsia pieces. Inlay can be used to highlight specific features or add intricate patterns within the larger design.
2. Creating Curved Intarsia:
Experiment with curved or shaped designs to add a unique twist to your intarsia pieces. This technique involves bending or shaping the wood pieces to create three-dimensional curves or contours. The use of layered and shaped pieces can add depth and movement to your artwork.
3. Incorporating Mixed Media:
Expand your intarsia work by incorporating other materials such as glass, metal, or even fabric. Combining different textures and materials can create striking contrasts and add complexity to your designs. Explore the synergy between wood and other mediums to create truly one-of-a-kind pieces.
4. Intarsia Portraits:
Challenge yourself by creating intarsia portraits. This advanced technique involves capturing the likeness and details of a person or animal through the thoughtful arrangement of wood pieces. Pay careful attention to shading, blending colors, and capturing the unique features of the subject to bring the portrait to life.
Read more: How To Make A Perfect Box With Hand Tools
5. Multi-layered Intarsia:
Take your intarsia to the next level by incorporating multiple layers of wood pieces. This technique allows you to create more intricate designs with a sense of depth and dimension. By carefully planning and fitting the multiple layers together, you can achieve stunning, three-dimensional effects in your artwork.
6. Abstract Intarsia:
Explore the world of abstract art with intarsia. Break away from representational designs and let your imagination run wild. Experiment with unconventional shapes, colors, and textures to create visually captivating and thought-provoking abstract intarsia pieces.
As you delve into these advanced techniques and design ideas, keep in mind that practice and experimentation are key. Embrace your own unique style and let your creativity guide you. Allow your imagination to lead you to new and extraordinary intarsia creations.
Now that you have learned advanced techniques and explored design ideas, it’s time to wrap up your intarsia woodworking journey. Reflect on your progress, share your creations with others, and continue to challenge yourself with new projects and ideas. Enjoy the beauty and satisfaction that come from the artistry of intarsia woodworking. Happy crafting!
Conclusion
Congratulations on embarking on your intarsia woodworking journey! Throughout this guide, you have learned the ins and outs of this beautiful and intricate art form. From understanding the tools and materials needed to mastering the techniques and exploring advanced design ideas, you have gained the knowledge and skills necessary to create stunning intarsia pieces.
Intarsia woodworking offers a unique combination of woodworking craftsmanship and artistic expression. It allows you to showcase the natural beauty of wood while creating visually captivating and three-dimensional artwork. With patience, practice, and a touch of creativity, you can transform simple pieces of wood into masterpieces.
Remember, the key to success in intarsia woodworking lies in attention to detail, precision, and a love for the craft. Take the time to choose the right wood, carefully cut and shape the pieces, and fit them together seamlessly. Embrace challenges as learning opportunities and never be afraid to experiment and try new techniques.
Whether you choose to create intricate wildlife scenes, decorative wall hangings, or abstract artwork, let your imagination guide you and infuse your unique style into each piece. Share your creations with others, inspire fellow woodworkers, and continue to hone your skills.
Intarsia woodworking is not only a rewarding hobby but also a form of self-expression. Enjoy the meditative process of working with wood, the satisfaction of bringing a pattern to life, and the joy of witnessing the final result.
Now that you have all the knowledge and tools you need, it’s time to turn your vision into reality. So, pick up your tools, select your wood, and let your artistic spirit guide you in creating exquisite intarsia masterpieces. Happy woodworking!
Eager to expand your woodworking skills beyond intarsia? Dive into our guide on the most prominent woodworking trends set to dominate 2024. Whether you're a seasoned woodworker or just starting, this article offers fresh ideas and insights to refine your craft. Likewise, if you're into more varied crafting, our piece on the benefits of DIY projects will surely pique your interest. From home decor to practical solutions, DIY projects allow for personal expression and can be incredibly rewarding.
Frequently Asked Questions about How To Begin Intarsia Woodworking
Was this page helpful?
At Storables.com, we guarantee accurate and reliable information. Our content, validated by Expert Board Contributors, is crafted following stringent Editorial Policies. We're committed to providing you with well-researched, expert-backed insights for all your informational needs.
0 thoughts on “How To Begin Intarsia Woodworking”