Articles
How To Cap Ice Maker Water Line
Modified: September 2, 2024
Learn how to cap an ice maker water line with our informative articles. Find step-by-step guides and expert tips on safely disconnecting and sealing the water supply.
(Many of the links in this article redirect to a specific reviewed product. Your purchase of these products through affiliate links helps to generate commission for Storables.com, at no extra cost. Learn more)
How To Cap Ice Maker Water Line
Having an ice maker in your refrigerator can be a convenient feature, but there may be times when you need to temporarily or permanently cap the water line supplying the ice maker. Whether you’re moving the refrigerator, performing maintenance, or simply don’t want to use the ice maker anymore, capping the water line is a simple process that you can do yourself. In this article, we will guide you through the steps to cap an ice maker water line.
Read more: How To Unclog Water Line To Ice Maker
Step 1: Gather the necessary tools and materials
Before you begin, make sure you have the following tools and materials:
- Pliers
- Adjustable wrench
- Teflon tape
- Cap or plug
Step 2: Locate the water supply valve
The first step is to locate the water supply valve that controls the flow of water to the ice maker. This valve is usually located behind the refrigerator or under the sink. If you’re having trouble finding it, consult the refrigerator or plumbing manual.
Step 3: Turn off the water supply
Once you’ve located the water supply valve, turn it clockwise to shut off the water flow. This will prevent any water from leaking out when you disconnect the water line.
Step 4: Drain the water line
Next, you’ll need to drain any remaining water from the water line. To do this, place a bucket or towel under the water line connection to catch any water that may drip out. Then, open the ice maker dispenser to allow the water to flow out until the line is empty.
Read more: How To Replace Ice Maker Water Line
Step 5: Remove the water line connection
Using pliers or an adjustable wrench, loosen the connection between the water line and the ice maker. Carefully disconnect the water line, taking care not to damage the line or fittings.
Step 6: Apply Teflon tape
Before capping the water line, wrap Teflon tape around the threaded end of the ice maker water line. This will create a watertight seal when the cap or plug is installed.
Step 7: Cap the water line
Place a cap or plug onto the threaded end of the water line and tighten it securely. Make sure the cap or plug is compatible with the size and type of the water line.
Step 8: Test for leaks
Once the water line is capped, turn on the water supply valve again and check for any leaks. If you notice any dripping or water seeping out, tighten the cap or plug further. Ensure that the cap is properly sealed to prevent any water leakage.
By following these steps, you can successfully cap the ice maker water line. Remember to consult your refrigerator’s manual or seek professional help if you encounter any difficulties or have specific instructions for your particular model. Capping the water line will allow you to use your refrigerator without the ice maker or perform any necessary repairs or maintenance without worrying about water leakage.
Disclaimer: It’s important to note that the process of capping the ice maker water line may vary depending on the brand, model, and configuration of your refrigerator. Always refer to your refrigerator’s manual or consult a professional if you have any doubts or concerns.
How To Cap Ice Maker Water Line
Having an ice maker in your refrigerator can be a convenient feature, providing you with a steady supply of ice cubes whenever you need them. However, there may be situations where you need to temporarily or permanently cap the ice maker water line. Perhaps you’re moving your refrigerator to a new location, performing maintenance on the ice maker, or simply no longer have a need for it. Whatever the reason may be, capping the ice maker water line is a fairly straightforward process that you can do yourself.
In this article, we will guide you through the steps to cap an ice maker water line, ensuring that you safely and effectively secure the water line to prevent any leaks or water damage.
Before we dive into the steps, it’s important to note that the process of capping the ice maker water line can vary depending on the brand, model, and configuration of your refrigerator. Always refer to your refrigerator’s manual or consult a professional if you have any doubts or concerns. Additionally, it’s important to shut off the water supply and disconnect the power to the refrigerator before working on the ice maker water line to ensure your safety.
Now, let’s get started with the step-by-step guide to capping an ice maker water line:
Read more: How To Unclog Water Line To Ice Maker
Step 1: Gather the necessary tools and materials
To effectively cap an ice maker water line, you’ll need to gather the following tools and materials:
- Pliers: These will come in handy for disconnecting the water line from the ice maker and tightening the cap or plug.
- Adjustable wrench: An adjustable wrench will help you loosen and tighten any fittings or connections in the water line.
- Teflon tape: Also known as plumber’s tape, Teflon tape is used to create a watertight seal when connecting the cap or plug to the water line.
- Cap or plug: Depending on the configuration of your ice maker water line, you’ll need either a cap or a plug to seal off the line. Make sure to choose a cap or plug that is compatible with the size and type of your water line.
Once you have gathered these tools and materials, you’ll be ready to move on to the next step of the process.
Step 2: Locate the water supply valve
Before you can cap the ice maker water line, you’ll need to locate the water supply valve that controls the flow of water to the ice maker. This valve is usually located behind the refrigerator or under the sink, but its exact location may vary depending on the model and configuration of your refrigerator.
To find the shut-off valve, start by checking the back of the refrigerator. Look for a small, metal or plastic valve connected to a water supply line. If you can’t find it there, try looking under the sink if your refrigerator is located nearby.
If you’re having trouble locating the water supply valve, consult your refrigerator’s manual or reach out to the manufacturer for assistance. They will be able to provide you with specific instructions for your particular model.
Once you have located the shut-off valve, you’ll be ready to move on to the next step of shutting off the water supply.
How To Cap Ice Maker Water Line
Having an ice maker in your refrigerator can be a convenient feature, providing you with a steady supply of ice cubes whenever you need them. However, there may be situations where you need to temporarily or permanently cap the ice maker water line. Perhaps you’re moving your refrigerator to a new location, performing maintenance on the ice maker, or simply no longer have a need for it. Whatever the reason may be, capping the ice maker water line is a fairly straightforward process that you can do yourself.
In this article, we will guide you through the steps to cap an ice maker water line, ensuring that you safely and effectively secure the water line to prevent any leaks or water damage.
Before we dive into the steps, it’s important to note that the process of capping the ice maker water line can vary depending on the brand, model, and configuration of your refrigerator. Always refer to your refrigerator’s manual or consult a professional if you have any doubts or concerns. Additionally, it’s important to shut off the water supply and disconnect the power to the refrigerator before working on the ice maker water line to ensure your safety.
Now, let’s get started with the step-by-step guide to capping an ice maker water line:
Read more: How To Unclog Water Line To Ice Maker
Step 1: Gather the necessary tools and materials
To effectively cap an ice maker water line, you’ll need to gather the following tools and materials:
- Pliers: These will come in handy for disconnecting the water line from the ice maker and tightening the cap or plug.
- Adjustable wrench: An adjustable wrench will help you loosen and tighten any fittings or connections in the water line.
- Teflon tape: Also known as plumber’s tape, Teflon tape is used to create a watertight seal when connecting the cap or plug to the water line.
- Cap or plug: Depending on the configuration of your ice maker water line, you’ll need either a cap or a plug to seal off the line. Make sure to choose a cap or plug that is compatible with the size and type of your water line.
Once you have gathered these tools and materials, you’ll be ready to move on to the next step of the process.
Step 2: Locate the water supply valve
Before you can cap the ice maker water line, you’ll need to locate the water supply valve that controls the flow of water to the ice maker. This valve is usually located behind the refrigerator or under the sink, but its exact location may vary depending on the model and configuration of your refrigerator.
To find the shut-off valve, start by checking the back of the refrigerator. Look for a small, metal or plastic valve connected to a water supply line. If you can’t find it there, try looking under the sink if your refrigerator is located nearby.
If you’re having trouble locating the water supply valve, consult your refrigerator’s manual or reach out to the manufacturer for assistance. They will be able to provide you with specific instructions for your particular model.
Step 3: Turn off the water supply
Now that you have located the water supply valve, it’s time to shut off the water flow. This is an important step to prevent any water leakage when you disconnect the water line.
To turn off the water supply, simply turn the shut-off valve clockwise until it is fully closed. This will stop the flow of water to the ice maker and allow you to safely proceed with capping the water line.
Once the water supply is turned off, it’s a good idea to check if the shut-off valve is properly closed by attempting to dispense ice from the ice maker. If no water comes out, then you can be sure that the water supply is effectively shut off.
With the water supply turned off, you’re now ready to move on to the next step of draining the water line.
How To Cap Ice Maker Water Line
Having an ice maker in your refrigerator can be a convenient feature, providing you with a steady supply of ice cubes whenever you need them. However, there may be situations where you need to temporarily or permanently cap the ice maker water line. Perhaps you’re moving your refrigerator to a new location, performing maintenance on the ice maker, or simply no longer have a need for it. Whatever the reason may be, capping the ice maker water line is a fairly straightforward process that you can do yourself.
In this article, we will guide you through the steps to cap an ice maker water line, ensuring that you safely and effectively secure the water line to prevent any leaks or water damage.
Before we dive into the steps, it’s important to note that the process of capping the ice maker water line can vary depending on the brand, model, and configuration of your refrigerator. Always refer to your refrigerator’s manual or consult a professional if you have any doubts or concerns. Additionally, it’s important to shut off the water supply and disconnect the power to the refrigerator before working on the ice maker water line to ensure your safety.
Now, let’s get started with the step-by-step guide to capping an ice maker water line:
Read more: How To Unclog Water Line To Ice Maker
Step 1: Gather the necessary tools and materials
To effectively cap an ice maker water line, you’ll need to gather the following tools and materials:
- Pliers: These will come in handy for disconnecting the water line from the ice maker and tightening the cap or plug.
- Adjustable wrench: An adjustable wrench will help you loosen and tighten any fittings or connections in the water line.
- Teflon tape: Also known as plumber’s tape, Teflon tape is used to create a watertight seal when connecting the cap or plug to the water line.
- Cap or plug: Depending on the configuration of your ice maker water line, you’ll need either a cap or a plug to seal off the line. Make sure to choose a cap or plug that is compatible with the size and type of your water line.
Once you have gathered these tools and materials, you’ll be ready to move on to the next step of the process.
Step 2: Locate the water supply valve
Before you can cap the ice maker water line, you’ll need to locate the water supply valve that controls the flow of water to the ice maker. This valve is usually located behind the refrigerator or under the sink, but its exact location may vary depending on the model and configuration of your refrigerator.
To find the shut-off valve, start by checking the back of the refrigerator. Look for a small, metal or plastic valve connected to a water supply line. If you can’t find it there, try looking under the sink if your refrigerator is located nearby.
If you’re having trouble locating the water supply valve, consult your refrigerator’s manual or reach out to the manufacturer for assistance. They will be able to provide you with specific instructions for your particular model.
Step 3: Turn off the water supply
Now that you have located the water supply valve, it’s time to shut off the water flow. This is an important step to prevent any water leakage when you disconnect the water line.
To turn off the water supply, simply turn the shut-off valve clockwise until it is fully closed. This will stop the flow of water to the ice maker and allow you to safely proceed with capping the water line.
Once the water supply is turned off, it’s a good idea to check if the shut-off valve is properly closed by attempting to dispense ice from the ice maker. If no water comes out, then you can be sure that the water supply is effectively shut off.
Step 4: Drain the water line
Before you can cap the water line, it’s important to drain any remaining water from the line. This will prevent any water from leaking out when you disconnect the water line.
To drain the water line, place a bucket or a towel under the water line connection to catch any water that may drip out. Then, open the ice maker dispenser or press the dispense button to allow the water to flow out. You may need to hold the button down for a few seconds to fully empty the line.
Continue draining the water line until no more water comes out. This will ensure that the line is completely empty and ready for the next step.
Once the water line is drained, you’re now ready to move on to the next step of removing the water line connection.
How To Cap Ice Maker Water Line
Having an ice maker in your refrigerator can be a convenient feature, providing you with a steady supply of ice cubes whenever you need them. However, there may be situations where you need to temporarily or permanently cap the ice maker water line. Perhaps you’re moving your refrigerator to a new location, performing maintenance on the ice maker, or simply no longer have a need for it. Whatever the reason may be, capping the ice maker water line is a fairly straightforward process that you can do yourself.
In this article, we will guide you through the steps to cap an ice maker water line, ensuring that you safely and effectively secure the water line to prevent any leaks or water damage.
Before we dive into the steps, it’s important to note that the process of capping the ice maker water line can vary depending on the brand, model, and configuration of your refrigerator. Always refer to your refrigerator’s manual or consult a professional if you have any doubts or concerns. Additionally, it’s important to shut off the water supply and disconnect the power to the refrigerator before working on the ice maker water line to ensure your safety.
Now, let’s get started with the step-by-step guide to capping an ice maker water line:
Read more: How To Unclog Water Line To Ice Maker
Step 1: Gather the necessary tools and materials
To effectively cap an ice maker water line, you’ll need to gather the following tools and materials:
- Pliers: These will come in handy for disconnecting the water line from the ice maker and tightening the cap or plug.
- Adjustable wrench: An adjustable wrench will help you loosen and tighten any fittings or connections in the water line.
- Teflon tape: Also known as plumber’s tape, Teflon tape is used to create a watertight seal when connecting the cap or plug to the water line.
- Cap or plug: Depending on the configuration of your ice maker water line, you’ll need either a cap or a plug to seal off the line. Make sure to choose a cap or plug that is compatible with the size and type of your water line.
Once you have gathered these tools and materials, you’ll be ready to move on to the next step of the process.
Step 2: Locate the water supply valve
Before you can cap the ice maker water line, you’ll need to locate the water supply valve that controls the flow of water to the ice maker. This valve is usually located behind the refrigerator or under the sink, but its exact location may vary depending on the model and configuration of your refrigerator.
To find the shut-off valve, start by checking the back of the refrigerator. Look for a small, metal or plastic valve connected to a water supply line. If you can’t find it there, try looking under the sink if your refrigerator is located nearby.
If you’re having trouble locating the water supply valve, consult your refrigerator’s manual or reach out to the manufacturer for assistance. They will be able to provide you with specific instructions for your particular model.
Step 3: Turn off the water supply
Now that you have located the water supply valve, it’s time to shut off the water flow. This is an important step to prevent any water leakage when you disconnect the water line.
To turn off the water supply, simply turn the shut-off valve clockwise until it is fully closed. This will stop the flow of water to the ice maker and allow you to safely proceed with capping the water line.
Once the water supply is turned off, it’s a good idea to check if the shut-off valve is properly closed by attempting to dispense ice from the ice maker. If no water comes out, then you can be sure that the water supply is effectively shut off.
Step 4: Drain the water line
Before you can cap the water line, it’s important to drain any remaining water from the line. This will prevent any water from leaking out when you disconnect the water line.
To drain the water line, place a bucket or a towel under the water line connection to catch any water that may drip out. Then, open the ice maker dispenser or press the dispense button to allow the water to flow out. You may need to hold the button down for a few seconds to fully empty the line.
Continue draining the water line until no more water comes out. This will ensure that the line is completely empty and ready for the next step.
Read more: How To Replace Ice Maker Water Line
Step 5: Remove the water line connection
Using pliers or an adjustable wrench, carefully loosen the connection between the water line and the ice maker. Be gentle to avoid damaging the line or any fittings.
Once the connection is loose, you should be able to easily disconnect the water line from the ice maker. Hold onto the water line near the connection to keep it steady while you disconnect it.
Set aside the disconnected water line and prepare it for later use or disposal, depending on your needs.
With the water line connection removed, you’re now ready to move on to the next step of applying Teflon tape.
How To Cap Ice Maker Water Line
Having an ice maker in your refrigerator can be a convenient feature, providing you with a steady supply of ice cubes whenever you need them. However, there may be situations where you need to temporarily or permanently cap the ice maker water line. Perhaps you’re moving your refrigerator to a new location, performing maintenance on the ice maker, or simply no longer have a need for it. Whatever the reason may be, capping the ice maker water line is a fairly straightforward process that you can do yourself.
In this article, we will guide you through the steps to cap an ice maker water line, ensuring that you safely and effectively secure the water line to prevent any leaks or water damage.
Before we dive into the steps, it’s important to note that the process of capping the ice maker water line can vary depending on the brand, model, and configuration of your refrigerator. Always refer to your refrigerator’s manual or consult a professional if you have any doubts or concerns. Additionally, it’s important to shut off the water supply and disconnect the power to the refrigerator before working on the ice maker water line to ensure your safety.
Now, let’s get started with the step-by-step guide to capping an ice maker water line:
Read more: How To Unclog Water Line To Ice Maker
Step 1: Gather the necessary tools and materials
To effectively cap an ice maker water line, you’ll need to gather the following tools and materials:
- Pliers: These will come in handy for disconnecting the water line from the ice maker and tightening the cap or plug.
- Adjustable wrench: An adjustable wrench will help you loosen and tighten any fittings or connections in the water line.
- Teflon tape: Also known as plumber’s tape, Teflon tape is used to create a watertight seal when connecting the cap or plug to the water line.
- Cap or plug: Depending on the configuration of your ice maker water line, you’ll need either a cap or a plug to seal off the line. Make sure to choose a cap or plug that is compatible with the size and type of your water line.
Once you have gathered these tools and materials, you’ll be ready to move on to the next step of the process.
Step 2: Locate the water supply valve
Before you can cap the ice maker water line, you’ll need to locate the water supply valve that controls the flow of water to the ice maker. This valve is usually located behind the refrigerator or under the sink, but its exact location may vary depending on the model and configuration of your refrigerator.
To find the shut-off valve, start by checking the back of the refrigerator. Look for a small, metal or plastic valve connected to a water supply line. If you can’t find it there, try looking under the sink if your refrigerator is located nearby.
If you’re having trouble locating the water supply valve, consult your refrigerator’s manual or reach out to the manufacturer for assistance. They will be able to provide you with specific instructions for your particular model.
Step 3: Turn off the water supply
Now that you have located the water supply valve, it’s time to shut off the water flow. This is an important step to prevent any water leakage when you disconnect the water line.
To turn off the water supply, simply turn the shut-off valve clockwise until it is fully closed. This will stop the flow of water to the ice maker and allow you to safely proceed with capping the water line.
Once the water supply is turned off, it’s a good idea to check if the shut-off valve is properly closed by attempting to dispense ice from the ice maker. If no water comes out, then you can be sure that the water supply is effectively shut off.
Step 4: Drain the water line
Before you can cap the water line, it’s important to drain any remaining water from the line. This will prevent any water from leaking out when you disconnect the water line.
To drain the water line, place a bucket or a towel under the water line connection to catch any water that may drip out. Then, open the ice maker dispenser or press the dispense button to allow the water to flow out. You may need to hold the button down for a few seconds to fully empty the line.
Continue draining the water line until no more water comes out. This will ensure that the line is completely empty and ready for the next step.
Read more: How To Replace Ice Maker Water Line
Step 5: Remove the water line connection
Using pliers or an adjustable wrench, carefully loosen the connection between the water line and the ice maker. Be gentle to avoid damaging the line or any fittings.
Once the connection is loose, you should be able to easily disconnect the water line from the ice maker. Hold onto the water line near the connection to keep it steady while you disconnect it.
Set aside the disconnected water line and prepare it for later use or disposal, depending on your needs.
Step 6: Apply Teflon tape
Now that the water line is disconnected, it’s time to prepare the connection for capping. This is done by applying Teflon tape to the threaded end of the water line.
To apply Teflon tape, start by holding the end of the tape against the threads of the water line connection. Hold the tape with your thumb and wrap it around the threads in a clockwise direction. Make sure to wrap the tape snugly and evenly around the threads, covering them completely.
Repeat the process of wrapping the Teflon tape around the threaded end of the water line connection at least two or three times for a secure seal.
Applying Teflon tape helps to create a watertight seal when the cap or plug is installed, preventing any water leakage.
With the Teflon tape applied, you’re now ready to move on to the next step of capping the water line.
How To Cap Ice Maker Water Line
Having an ice maker in your refrigerator can be a convenient feature, providing you with a steady supply of ice cubes whenever you need them. However, there may be situations where you need to temporarily or permanently cap the ice maker water line. Perhaps you’re moving your refrigerator to a new location, performing maintenance on the ice maker, or simply no longer have a need for it. Whatever the reason may be, capping the ice maker water line is a fairly straightforward process that you can do yourself.
In this article, we will guide you through the steps to cap an ice maker water line, ensuring that you safely and effectively secure the water line to prevent any leaks or water damage.
Before we dive into the steps, it’s important to note that the process of capping the ice maker water line can vary depending on the brand, model, and configuration of your refrigerator. Always refer to your refrigerator’s manual or consult a professional if you have any doubts or concerns. Additionally, it’s important to shut off the water supply and disconnect the power to the refrigerator before working on the ice maker water line to ensure your safety.
Now, let’s get started with the step-by-step guide to capping an ice maker water line:
Read more: How To Unclog Water Line To Ice Maker
Step 1: Gather the necessary tools and materials
To effectively cap an ice maker water line, you’ll need to gather the following tools and materials:
- Pliers: These will come in handy for disconnecting the water line from the ice maker and tightening the cap or plug.
- Adjustable wrench: An adjustable wrench will help you loosen and tighten any fittings or connections in the water line.
- Teflon tape: Also known as plumber’s tape, Teflon tape is used to create a watertight seal when connecting the cap or plug to the water line.
- Cap or plug: Depending on the configuration of your ice maker water line, you’ll need either a cap or a plug to seal off the line. Make sure to choose a cap or plug that is compatible with the size and type of your water line.
Once you have gathered these tools and materials, you’ll be ready to move on to the next step of the process.
Step 2: Locate the water supply valve
Before you can cap the ice maker water line, you’ll need to locate the water supply valve that controls the flow of water to the ice maker. This valve is usually located behind the refrigerator or under the sink, but its exact location may vary depending on the model and configuration of your refrigerator.
To find the shut-off valve, start by checking the back of the refrigerator. Look for a small, metal or plastic valve connected to a water supply line. If you can’t find it there, try looking under the sink if your refrigerator is located nearby.
If you’re having trouble locating the water supply valve, consult your refrigerator’s manual or reach out to the manufacturer for assistance. They will be able to provide you with specific instructions for your particular model.
Step 3: Turn off the water supply
Now that you have located the water supply valve, it’s time to shut off the water flow. This is an important step to prevent any water leakage when you disconnect the water line.
To turn off the water supply, simply turn the shut-off valve clockwise until it is fully closed. This will stop the flow of water to the ice maker and allow you to safely proceed with capping the water line.
Once the water supply is turned off, it’s a good idea to check if the shut-off valve is properly closed by attempting to dispense ice from the ice maker. If no water comes out, then you can be sure that the water supply is effectively shut off.
Step 4: Drain the water line
Before you can cap the water line, it’s important to drain any remaining water from the line. This will prevent any water from leaking out when you disconnect the water line.
To drain the water line, place a bucket or a towel under the water line connection to catch any water that may drip out. Then, open the ice maker dispenser or press the dispense button to allow the water to flow out. You may need to hold the button down for a few seconds to fully empty the line.
Continue draining the water line until no more water comes out. This will ensure that the line is completely empty and ready for the next step.
Read more: How To Replace Ice Maker Water Line
Step 5: Remove the water line connection
Using pliers or an adjustable wrench, carefully loosen the connection between the water line and the ice maker. Be gentle to avoid damaging the line or any fittings.
Once the connection is loose, you should be able to easily disconnect the water line from the ice maker. Hold onto the water line near the connection to keep it steady while you disconnect it.
Set aside the disconnected water line and prepare it for later use or disposal, depending on your needs.
Step 6: Apply Teflon tape
Now that the water line is disconnected, it’s time to prepare the connection for capping. This is done by applying Teflon tape to the threaded end of the water line.
To apply Teflon tape, start by holding the end of the tape against the threads of the water line connection. Hold the tape with your thumb and wrap it around the threads in a clockwise direction. Make sure to wrap the tape snugly and evenly around the threads, covering them completely.
Repeat the process of wrapping the Teflon tape around the threaded end of the water line connection at least two or three times for a secure seal.
Applying Teflon tape helps to create a watertight seal when the cap or plug is installed, preventing any water leakage.
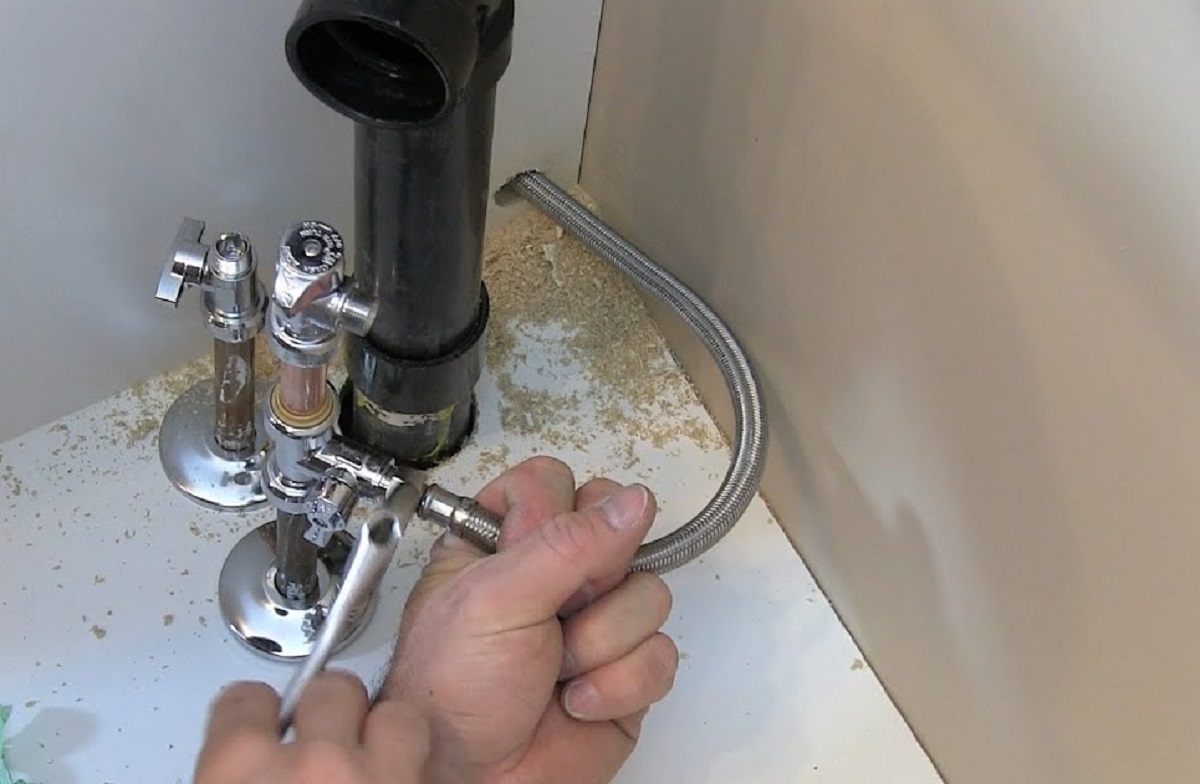
Step 7: Cap the water line
Now that the Teflon tape is applied, it’s time to install the cap or plug onto the threaded end of the water line. Select the appropriate cap or plug that matches the size and type of your water line.
Place the cap or plug onto the threaded end of the water line and begin turning it clockwise to tighten it. Use pliers or an adjustable wrench, if necessary, to ensure a tight and secure fit. Be careful not to over-tighten, as it may damage the threads or the cap itself.
Once the cap or plug is securely in place, give it a gentle tug to make sure it is properly sealed. There should be no movement or loosening.
With the water line capped, you have successfully sealed off the line and prevented any water flow.
Now you can proceed with reconnecting the power to the refrigerator and testing for any leaks. If no leaks are detected, you can safely use your refrigerator without the ice maker.
Remember, it’s always a good idea to consult your refrigerator’s manual or seek professional help if you have any specific instructions or concerns about capping the water line of your particular model.
How To Cap Ice Maker Water Line
Having an ice maker in your refrigerator can be a convenient feature, providing you with a steady supply of ice cubes whenever you need them. However, there may be situations where you need to temporarily or permanently cap the ice maker water line. Perhaps you’re moving your refrigerator to a new location, performing maintenance on the ice maker, or simply no longer have a need for it. Whatever the reason may be, capping the ice maker water line is a fairly straightforward process that you can do yourself.
In this article, we will guide you through the steps to cap an ice maker water line, ensuring that you safely and effectively secure the water line to prevent any leaks or water damage.
Before we dive into the steps, it’s important to note that the process of capping the ice maker water line can vary depending on the brand, model, and configuration of your refrigerator. Always refer to your refrigerator’s manual or consult a professional if you have any doubts or concerns. Additionally, it’s important to shut off the water supply and disconnect the power to the refrigerator before working on the ice maker water line to ensure your safety.
Now, let’s get started with the step-by-step guide to capping an ice maker water line:
Read more: How To Unclog Water Line To Ice Maker
Step 1: Gather the necessary tools and materials
To effectively cap an ice maker water line, you’ll need to gather the following tools and materials:
- Pliers: These will come in handy for disconnecting the water line from the ice maker and tightening the cap or plug.
- Adjustable wrench: An adjustable wrench will help you loosen and tighten any fittings or connections in the water line.
- Teflon tape: Also known as plumber’s tape, Teflon tape is used to create a watertight seal when connecting the cap or plug to the water line.
- Cap or plug: Depending on the configuration of your ice maker water line, you’ll need either a cap or a plug to seal off the line. Make sure to choose a cap or plug that is compatible with the size and type of your water line.
Once you have gathered these tools and materials, you’ll be ready to move on to the next step of the process.
Step 2: Locate the water supply valve
Before you can cap the ice maker water line, you’ll need to locate the water supply valve that controls the flow of water to the ice maker. This valve is usually located behind the refrigerator or under the sink, but its exact location may vary depending on the model and configuration of your refrigerator.
To find the shut-off valve, start by checking the back of the refrigerator. Look for a small, metal or plastic valve connected to a water supply line. If you can’t find it there, try looking under the sink if your refrigerator is located nearby.
If you’re having trouble locating the water supply valve, consult your refrigerator’s manual or reach out to the manufacturer for assistance. They will be able to provide you with specific instructions for your particular model.
Step 3: Turn off the water supply
Now that you have located the water supply valve, it’s time to shut off the water flow. This is an important step to prevent any water leakage when you disconnect the water line.
To turn off the water supply, simply turn the shut-off valve clockwise until it is fully closed. This will stop the flow of water to the ice maker and allow you to safely proceed with capping the water line.
Once the water supply is turned off, it’s a good idea to check if the shut-off valve is properly closed by attempting to dispense ice from the ice maker. If no water comes out, then you can be sure that the water supply is effectively shut off.
Step 4: Drain the water line
Before you can cap the water line, it’s important to drain any remaining water from the line. This will prevent any water from leaking out when you disconnect the water line.
To drain the water line, place a bucket or a towel under the water line connection to catch any water that may drip out. Then, open the ice maker dispenser or press the dispense button to allow the water to flow out. You may need to hold the button down for a few seconds to fully empty the line.
Continue draining the water line until no more water comes out. This will ensure that the line is completely empty and ready for the next step.
Read more: How To Replace Ice Maker Water Line
Step 5: Remove the water line connection
Using pliers or an adjustable wrench, carefully loosen the connection between the water line and the ice maker. Be gentle to avoid damaging the line or any fittings.
Once the connection is loose, you should be able to easily disconnect the water line from the ice maker. Hold onto the water line near the connection to keep it steady while you disconnect it.
Set aside the disconnected water line and prepare it for later use or disposal, depending on your needs.
Step 6: Apply Teflon tape
Now that the water line is disconnected, it’s time to prepare the connection for capping. This is done by applying Teflon tape to the threaded end of the water line.
To apply Teflon tape, start by holding the end of the tape against the threads of the water line connection. Hold the tape with your thumb and wrap it around the threads in a clockwise direction. Make sure to wrap the tape snugly and evenly around the threads, covering them completely.
Repeat the process of wrapping the Teflon tape around the threaded end of the water line connection at least two or three times for a secure seal.
Applying Teflon tape helps to create a watertight seal when the cap or plug is installed, preventing any water leakage.
Step 7: Cap the water line
Now that the Teflon tape is applied, it’s time to install the cap or plug onto the threaded end of the water line. Select the appropriate cap or plug that matches the size and type of your water line.
Place the cap or plug onto the threaded end of the water line and begin turning it clockwise to tighten it. Use pliers or an adjustable wrench, if necessary, to ensure a tight and secure fit. Be careful not to over-tighten, as it may damage the threads or the cap itself.
Once the cap or plug is securely in place, give it a gentle tug to make sure it is properly sealed. There should be no movement or loosening.
Step 8: Test for leaks
With the water line capped, it’s important to test for any potential leaks. Turn on the water supply and carefully inspect the area around the capped water line.
Look for any signs of water seepage, dripping, or moisture. Pay attention to the connection points and the cap or plug itself. If you notice any leaks, tighten the cap or plug further or consider using additional Teflon tape for better sealing.
Additionally, you can run water through the ice maker or dispense ice to check for any water leakage. Monitor the area closely as you do this test.
If there are no signs of leakage, congratulations! You have successfully capped the ice maker water line.
Remember, always refer to your refrigerator’s manual or consult a professional if you have any specific instructions or concerns about capping the water line of your particular model. By following these steps and ensuring a watertight seal, you can safely use your refrigerator without the ice maker while preventing any potential water damage.
Conclusion
Capping an ice maker water line can be a straightforward process that you can do yourself with the right tools and materials. Whether you’re moving your refrigerator, performing maintenance on the ice maker, or simply no longer need it, capping the water line is essential to prevent any leaks or water damage. By following the step-by-step guide outlined in this article, you can effectively seal the water line and ensure a watertight connection.
Throughout the process, it’s important to refer to your refrigerator’s manual or consult a professional if you have any specific instructions or concerns. Different models and configurations may have variations in the capping process, so it’s crucial to follow the guidelines provided by the manufacturer.
Make sure to gather all the necessary tools and materials before starting. Pliers, an adjustable wrench, Teflon tape, and the appropriate cap or plug are essential to complete the task. Always shut off the water supply and disconnect the power to the refrigerator for your safety.
The step-by-step guide includes locating the water supply valve, turning off the water supply, draining the water line, removing the water line connection, applying Teflon tape, capping the water line, and testing for leaks. Each step plays a crucial role in ensuring a successful and leak-free outcome.
Once you have completed the process and capped the water line, it’s important to do a thorough inspection for any signs of leakage. Monitor the connection points, the cap or plug, and run water through the ice maker to ensure there are no leaks or water seepage.
Remember, if you encounter any difficulties or have specific concerns about capping the water line, it’s always recommended to consult a professional or reach out to the manufacturer for guidance.
Capping the ice maker water line allows you to continue using your refrigerator without the need for the ice maker. It’s an essential step for preventing any potential water damage and maintaining the integrity of your appliance. By following the steps outlined in this guide, you can confidently cap the ice maker water line and ensure a secure and leak-free connection.
Now that you've mastered capping off that ice maker water line, why not dive deeper into related home improvement tasks? If upgrading your fridge setup sounds appealing, our detailed guide on selecting the best refrigerator water line for next year will surely intrigue you. Or, if expanding your DIY skills is on your agenda, consider our straightforward tutorial on ice maker installation. Both articles are packed with practical advice to ensure your appliances run smoothly without a hitch.
Frequently Asked Questions about How To Cap Ice Maker Water Line
Was this page helpful?
At Storables.com, we guarantee accurate and reliable information. Our content, validated by Expert Board Contributors, is crafted following stringent Editorial Policies. We're committed to providing you with well-researched, expert-backed insights for all your informational needs.
0 thoughts on “How To Cap Ice Maker Water Line”