Articles
Why Is My Ice Maker Not Getting Water
Modified: September 2, 2024
Read informative articles about why your ice maker is not getting water and learn how to troubleshoot and fix the issue for optimal performance.
(Many of the links in this article redirect to a specific reviewed product. Your purchase of these products through affiliate links helps to generate commission for Storables.com, at no extra cost. Learn more)
Introduction
Having an ice maker that is not getting water can be a frustrating issue to deal with. Whether you rely on ice for beverages or use it for cooling purposes, a malfunctioning ice maker can disrupt your daily routine. Fortunately, most cases of an ice maker not getting water are relatively easy to diagnose and fix. In this article, we will explore the common causes of this problem and provide troubleshooting steps to resolve the issue.
There can be several factors that lead to an ice maker not receiving water. It is essential to identify the underlying cause to determine the appropriate solution. Some of the most common causes include water supply issues, a clogged water filter, a faulty water inlet valve, or a malfunctioning ice maker assembly.
Water supply issues can be caused by a variety of factors. It is possible that the water supply line is kinked or curled, preventing water from reaching the ice maker. The water supply valve may also be turned off or not fully open. In some cases, the water pressure may be too low to adequately supply the ice maker with water.
A clogged water filter can restrict the flow of water to the ice maker. Over time, the filter can accumulate sediment and debris, reducing its effectiveness. This can result in inadequate water flow to the ice maker, leading to limited or no ice production.
The water inlet valve is responsible for allowing water to flow into the ice maker. If this valve becomes faulty or damaged, it may not open properly, preventing water from entering the ice maker’s reservoir. A malfunctioning water inlet valve can cause the ice maker to stop receiving water altogether.
The ice maker assembly, which includes components such as the motor, gears, and sensors, can also experience malfunctions. If any of these components fail, it can disrupt the ice-making process and prevent water from reaching the ice maker. In such cases, repairing or replacing the ice maker assembly may be necessary.
Now that we have outlined the common causes of an ice maker not getting water, let’s move on to the troubleshooting steps that can help resolve this issue. By following these steps, you can quickly identify and fix the problem, ensuring your ice maker is back up and running smoothly.
Key Takeaways:
- Don’t let a malfunctioning ice maker disrupt your routine. Troubleshoot common issues like water supply problems, clogged filters, faulty valves, and assembly malfunctions to keep the ice flowing.
- Regular maintenance and timely replacements of water filters can prevent clogs and ensure proper water flow to your ice maker, keeping it running smoothly.
Read more: Why Is My Ice Melting In My Ice Maker
Common Causes of Ice Maker Not Getting Water
When your ice maker isn’t getting water, there are a few common culprits that you should consider. Understanding these causes can help you diagnose the issue and implement the appropriate solution. Let’s take a closer look at the most frequent reasons why your ice maker may not be receiving water.
1. Water Supply Issues
One of the primary causes of an ice maker not getting water is a problem with the water supply. This can include issues such as a kinked or twisted water supply line, a closed or partially closed water supply valve, or low water pressure. It’s essential to ensure that the water supply line is properly connected and free from any obstructions. Additionally, verify that the water supply valve is completely open and allowing adequate water flow.
2. Clogged Water Filter
A clogged water filter is another common culprit for an ice maker not receiving water. Over time, the filter can accumulate sediment, debris, and mineral deposits, obstructing the water flow to the ice maker. This can result in reduced water pressure or even a complete blockage. Regularly replacing or cleaning the water filter can prevent clogs and ensure proper water flow to the ice maker.
3. Faulty Water Inlet Valve
The water inlet valve controls the flow of water into the ice maker. If this valve becomes defective or fails, it may not open properly, preventing water from reaching the ice maker. A malfunctioning water inlet valve can lead to a complete lack of water in the ice maker’s reservoir. Testing the water inlet valve for proper functionality is crucial in diagnosing this issue.
Read more: Why Is My Ice Maker Not Dropping Ice
4. Malfunctioning Ice Maker Assembly
The ice maker assembly consists of various components, including the motor, gears, and sensors, that work together to produce ice. If any of these components malfunction or fail, it can disrupt the ice-making process and prevent water from entering the ice maker. A faulty assembly can cause the ice maker to stop producing ice altogether or result in insufficient water supply.
Identifying these common causes can help you narrow down the issue and determine the best course of action. In the next section, we will explore troubleshooting steps that can help you resolve the problem and get your ice maker back to working order.
Water Supply Issues
When your ice maker is not getting water, one of the first areas to check is the water supply. There are several potential issues that can disrupt the water flow to your ice maker. Let’s explore these water supply issues in more detail:
Kinked or Twisted Water Supply Line
A common cause of inadequate water supply to the ice maker is a kinked or twisted water supply line. Over time, the water supply line may become tangled or bent, restricting the water flow. Inspect the water supply line behind the refrigerator to ensure it is not kinked or twisted. If you find any bends or twists, straighten the line to restore proper water flow.
Closed or Partially Closed Water Supply Valve
Another issue that can affect the water supply to the ice maker is a closed or partially closed water supply valve. The water supply valve is typically located behind the refrigerator or under the sink. Check to ensure that the valve is fully open and allowing water to flow freely. If the valve is partially closed, turn it counterclockwise to open it completely.
Low Water Pressure
In some cases, the water pressure in your home may be too low to adequately supply the ice maker with water. Low water pressure can result in a weak or slow water flow to the ice maker, affecting its performance. To check the water pressure, you can use a water pressure gauge or consult a plumber. If low water pressure is identified as the issue, consider installing a pressure regulator to boost the water flow to the ice maker.
By addressing these water supply issues, you can ensure a steady and consistent water supply to your ice maker. However, if the water supply appears to be functioning properly, it is essential to investigate other potential causes, such as a clogged water filter or a faulty water inlet valve. We will discuss these issues further in the following sections.
Clogged Water Filter
A clogged water filter is another common cause of an ice maker not getting water. Over time, the water filter can accumulate sediment, debris, and mineral deposits, obstructing the water flow to the ice maker. This can result in reduced water pressure or even a complete blockage. Here’s what you need to know about a clogged water filter:
Regular Replacement or Cleaning
Typically, water filters are designed to be replaced every six months or as recommended by the manufacturer. Regularly replacing the water filter ensures that it remains free from clogs and maintains optimal water flow to the ice maker. Refer to your refrigerator’s user manual or consult the manufacturer’s recommendations to determine the appropriate replacement schedule for the water filter.
Signs of a Clogged Water Filter
If you suspect that a clogged water filter is causing the issue, there are some signs to look out for. These signs include a decrease in ice production, low water flow from the dispenser, or a change in the taste and quality of the water. If you notice any of these symptoms, it is likely that the water filter needs to be replaced or cleaned.
Cleaning the Water Filter
In some cases, the water filter may not require a complete replacement and can be cleaned to restore its functionality. To clean the water filter, follow the instructions provided by the manufacturer. This may involve soaking the filter in warm water or a specialized filter cleaning solution. Once cleaned, reinstall the filter and test the ice maker to ensure that water flow is restored. However, keep in mind that not all filters can be cleaned, and replacement may be necessary.
Regular maintenance and timely replacement of the water filter can prevent clogs and ensure proper water flow to the ice maker. If addressing the clogged water filter doesn’t resolve the issue, it’s important to investigate other potential causes, such as a faulty water inlet valve or a malfunctioning ice maker assembly. We will explore these possible causes in the next sections.
Faulty Water Inlet Valve
A faulty water inlet valve is another common cause of an ice maker not receiving water. The water inlet valve is responsible for controlling the flow of water into the ice maker. When it becomes defective or fails, it can result in little to no water entering the ice maker’s reservoir. Here’s what you need to know about a faulty water inlet valve:
Symptoms of a Faulty Water Inlet Valve
There are a few signs that can indicate a faulty water inlet valve. These include a complete lack of water entering the ice maker, inadequate water flow, or water leaking from the valve itself. If you notice any of these symptoms, it is likely that the water inlet valve needs to be replaced.
Testing the Water Inlet Valve
To determine if the water inlet valve is the culprit, you can perform a simple test. Start by disconnecting the water supply line from the valve. Then, dispense water into a container or sink to check if there is an adequate water flow. If water flows freely, it indicates that the water inlet valve is faulty and needs to be replaced. However, if there is no water flow or a weak flow, the issue may lie elsewhere, such as a clogged water filter or low water pressure.
Read more: Why Is My Ice Maker Making Clumps Of Ice
Replacing the Water Inlet Valve
Replacing a faulty water inlet valve requires turning off the water supply and disconnecting the water supply line. Once safely disconnected, remove the old valve and install a new one by following the manufacturer’s instructions. Ensure that the new valve is properly connected and securely tightened. Finally, turn on the water supply and check if water flows into the ice maker correctly.
By addressing a faulty water inlet valve, you can restore the proper flow of water to your ice maker. However, if the issue persists, it’s important to explore other potential causes, such as a malfunctioning ice maker assembly. We will discuss this further in the next section.
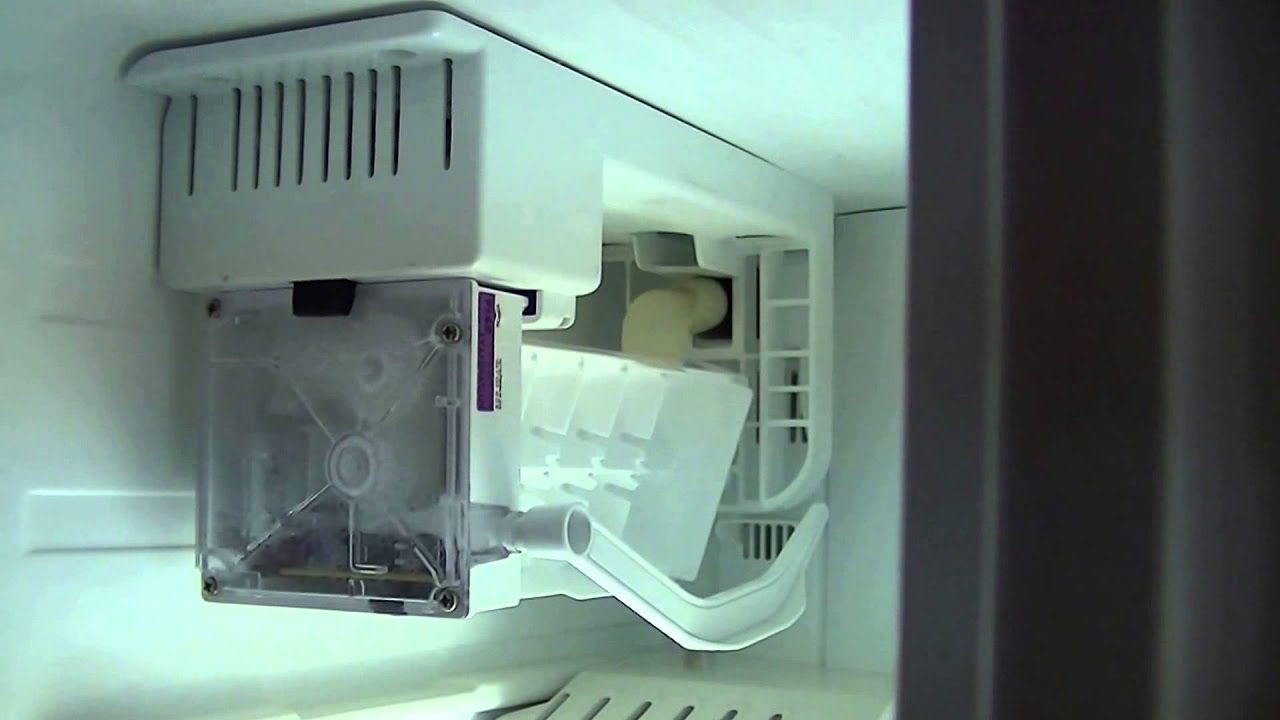
Malfunctioning Ice Maker Assembly
If your ice maker is still not receiving water, despite addressing water supply issues, a clogged water filter, or a faulty water inlet valve, the problem may lie within the ice maker assembly itself. The ice maker assembly consists of various components, including the motor, gears, and sensors, that work together to produce ice. Here’s what you need to know about a malfunctioning ice maker assembly:
Signs of a Malfunctioning Ice Maker Assembly
There are a few indicators that can suggest a malfunctioning ice maker assembly. These may include the ice maker not cycling or producing any ice, unusual noises coming from the ice maker, or the ice maker not receiving water despite adequate water flow to the unit.
Inspecting the Ice Maker Assembly
Before taking any further action, it’s crucial to thoroughly inspect the ice maker assembly. Look for any visible signs of damage, wear, or misalignment. Check the motor, gears, and sensors to ensure they are functioning correctly and are not obstructed by any debris or ice buildup.
Read more: Why Is My Ice Maker Knocking
Repairing or Replacing the Ice Maker Assembly
If you discover any issues during the inspection, you may need to repair or replace the malfunctioning components of the ice maker assembly. In some cases, a simple adjustment or cleaning may be sufficient to restore proper functionality. However, if major components are damaged or malfunctioning, you may need to consider replacing the entire ice maker assembly.
Professional Assistance for Ice Maker Assembly
If you are not experienced in appliance repairs or feel uncomfortable handling the ice maker assembly, it is advisable to seek the assistance of a qualified technician. They have the expertise to diagnose and resolve complex issues with the ice maker assembly, ensuring it works efficiently.
By addressing any potential problems with the ice maker assembly, you can restore the proper functioning of your ice maker and ensure it receives the necessary water to produce ice. If you have exhausted all troubleshooting steps and the ice maker is still not working, it may be time to consult a professional technician for further assistance.
Troubleshooting Steps for Ice Maker Not Getting Water
If your ice maker is not receiving water, it’s essential to follow a systematic approach to troubleshoot and resolve the issue. Here are some steps you can take to identify and fix the problem:
1. Check the Water Supply Line
Start by inspecting the water supply line that connects to the back of your refrigerator. Ensure that it is properly connected and not kinked or twisted. Straighten any bends or obstructions to allow for a smooth water flow. Also, check if the water supply valve is fully open and not partially closed, as this can restrict water flow to the ice maker.
Read more: Why Is My Ice Maker Not Making
2. Inspect and Replace the Water Filter
If your refrigerator has a water filter, check if it is due for replacement. A clogged water filter can hinder water flow to the ice maker. Follow the manufacturer’s guidelines for replacing the water filter. If the filter is reusable, clean it according to the instructions provided. Regularly replacing or cleaning the water filter can prevent clogs and ensure proper water flow.
3. Test the Water Inlet Valve
Use a multimeter to test the water inlet valve for continuity. This will help identify if the valve is functioning correctly. If the test reveals a lack of continuity, it indicates a faulty valve that needs to be replaced. Consult the appliance’s user manual or seek professional assistance for guidance on replacing the water inlet valve.
4. Examine and Repair the Ice Maker Assembly
Inspect the ice maker assembly for any visible signs of damage, misalignment, or blockages. Look for debris or ice buildup that may be hindering the proper functioning of the assembly. Clean the assembly and remove any obstructions that are preventing water flow. If you notice any damaged or malfunctioning components, consider repairing or replacing them to restore the ice maker’s functionality.
If the troubleshooting steps mentioned above do not resolve the issue, it might be time to consult a professional technician who specializes in appliance repairs. They have the expertise and tools necessary to diagnose and fix complex issues with the ice maker. Remember to always prioritize your safety and consult the manufacturer’s guidelines or seek professional assistance when dealing with electrical or mechanical components.
By following these troubleshooting steps, you can effectively identify and resolve the problem of your ice maker not receiving water. Restoring proper water flow will ensure the consistent production of ice and allow you to enjoy cold beverages without any interruptions.
Check the Water Supply Line
When your ice maker is not getting water, the first step in troubleshooting is to check the water supply line. The water supply line is responsible for carrying water to the ice maker, so any issues with the line can prevent water from reaching the appliance. Here’s how to check the water supply line:
Read more: Why Is My LG Ice Maker Not Dropping Ice
Inspect the Water Supply Line
Start by examining the water supply line that connects to the back of your refrigerator. Look for any visible signs of damage or leaks, such as cracks, kinks, or loose connections. If you notice any issues, you may need to replace or repair the water supply line.
Ensure Proper Connection
Verify that the water supply line is properly connected to both the refrigerator and the water source. Make sure the connections are secure and tightened to prevent any leaks or disruptions in water flow.
Check for Kinks or Twists
Inspect the water supply line for any kinks, twists, or bends. These can restrict or block the water flow to the ice maker. Straighten out any kinks or twists in the line to ensure a smooth and uninterrupted water supply.
Turn on the Water Supply Valve
Check if the water supply valve, which is usually located behind the refrigerator or under the sink, is fully open. Sometimes, the valve might be partially closed, limiting the water flow to the ice maker. Turn the valve counterclockwise to ensure it is fully open and allowing water to flow freely.
Read more: Why Is My Samsung Ice Maker Not Dropping Ice
Verify Water Pressure
Inadequate water pressure can also affect the ice maker’s ability to receive water. Check the water pressure in your home by using a water pressure gauge or consulting a professional plumber. If the water pressure is low, it can be due to issues with the main water supply or plumbing, which may require professional assistance to resolve.
By inspecting and ensuring the proper functioning of the water supply line, you can eliminate one possible cause of your ice maker not receiving water. If the issue persists, you can proceed to check other potential causes, such as the water filter, water inlet valve, or the ice maker assembly. Troubleshooting step by step will help you identify and resolve the problem effectively.
Inspect and Replace the Water Filter
When your ice maker is not getting water, a clogged water filter could be the culprit. The water filter is designed to remove impurities from the water before it reaches the ice maker. Over time, the filter can become clogged with sediment, debris, and mineral deposits, hindering the water flow. Here’s how to inspect and replace the water filter:
Locate the Water Filter
Find the location of the water filter in your refrigerator. This can typically be found either inside the refrigerator compartment or at the back of the appliance. Consult your refrigerator’s user manual if you’re unsure about the filter’s location.
Inspect the Water Filter
Remove the water filter from its housing and inspect it. Look for any signs of clogging, such as discoloration or visible debris trapped in the filter. A clogged water filter can reduce water flow, leading to the ice maker not receiving enough water to produce ice.
Read more: Why Does My Ice Maker Ice Taste Funny
Replace the Water Filter
If you notice any signs of clogging or if it has been more than six months since the last replacement, it’s time to replace the water filter. Follow the manufacturer’s instructions for your specific refrigerator model to ensure proper replacement. Insert the new filter into the housing and secure it tightly.
Flush the New Water Filter
After installing the new water filter, it’s important to flush it to remove any air or loose particles. Follow the manufacturer’s instructions to flush the filter properly. It typically involves running a few gallons of water through the dispenser to ensure clean and clear water supply to the ice maker.
Regular Maintenance
To prevent future water filter issues, make a note of when it was last replaced and set a reminder to replace it according to the manufacturer’s recommendations. Regularly replacing the water filter at the recommended interval will help maintain an uninterrupted flow of water to the ice maker.
By inspecting and replacing the water filter as needed, you can ensure that sediment, debris, and mineral deposits do not clog the filter and impede water flow to the ice maker. If replacing the water filter does not resolve the issue, further troubleshooting steps are required, such as checking the water inlet valve or examining the ice maker assembly.
Test the Water Inlet Valve
When your ice maker is not getting water, a faulty water inlet valve could be to blame. The water inlet valve controls the flow of water into the ice maker, so any issues with this valve can disrupt the water supply. Here’s how to test the water inlet valve:
Read more: Why Is My Ice Maker Only Making Crushed Ice
Locate the Water Inlet Valve
The water inlet valve is usually located at the back of the refrigerator, near the bottom. It is connected to the water supply line. Refer to your refrigerator’s user manual or diagram to locate the water inlet valve.
Disconnect the Water Supply Line
Before testing the water inlet valve, ensure that the refrigerator is unplugged or the power is turned off. Then, disconnect the water supply line from the inlet valve. Place a towel or container underneath to catch any water that may come out.
Use a Multimeter
Set your multimeter to the continuity setting. Connect the multimeter probes to the electrical terminals on the water inlet valve that the water supply line was connected to. If the multimeter shows a reading of continuity, it means the valve is working properly. However, if there is no continuity, it indicates a faulty water inlet valve that needs to be replaced.
Replace the Water Inlet Valve
If the water inlet valve fails the continuity test, you will need to replace it. Consult the manufacturer’s instructions or seek professional assistance to ensure proper installation. Disconnect the existing water inlet valve and connect the new one, ensuring secure and tight connections.
Read more: Why Is My Ice Maker Making Ice So Slow
Reconnect the Water Supply Line
Once the new water inlet valve is installed, reconnect the water supply line. Double-check that the connections are secure, and ensure there are no leaks. Turn on the water supply and check if water flows into the ice maker correctly.
Testing the water inlet valve is a crucial step in troubleshooting an ice maker not receiving water. If the valve is faulty, replacing it will restore the proper flow of water to the ice maker. If the issue persists, further examination of the ice maker assembly or seeking professional assistance may be necessary.
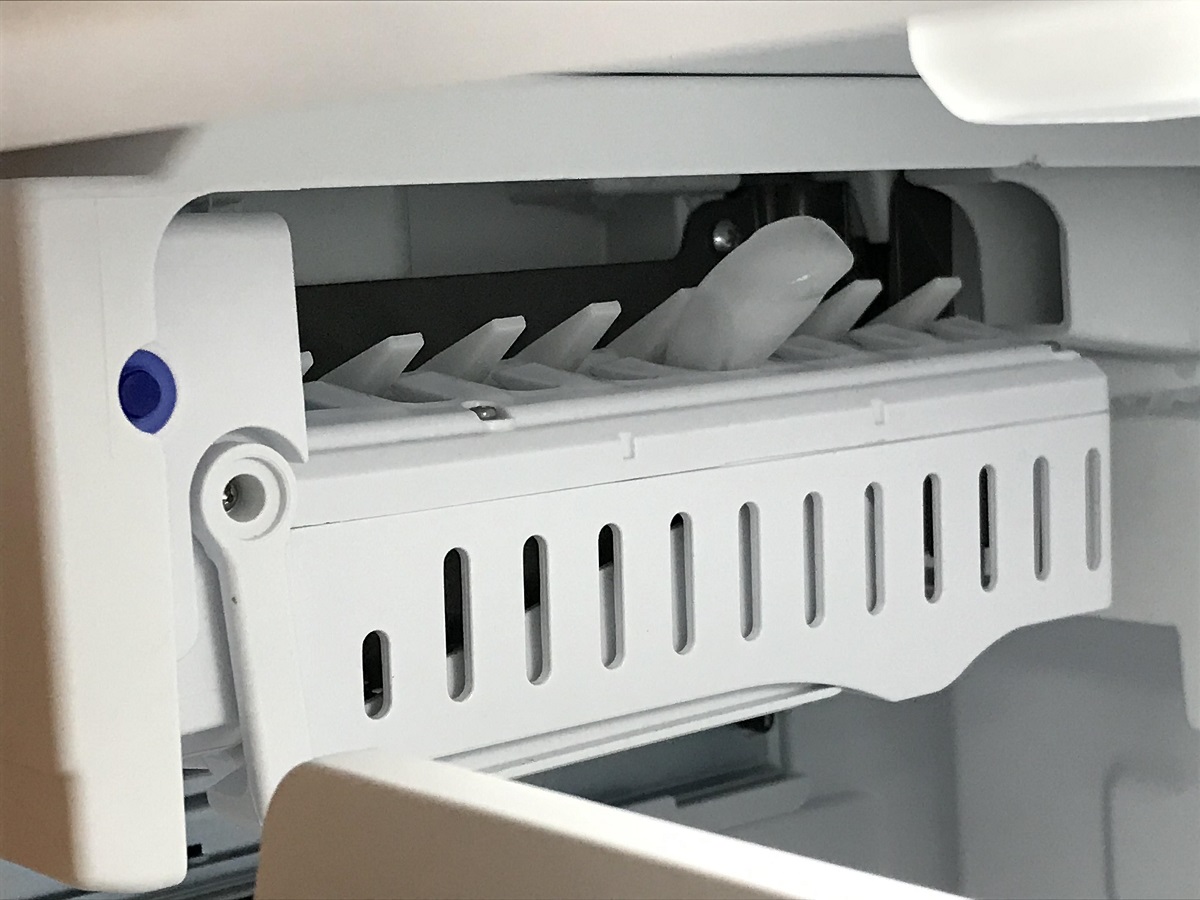
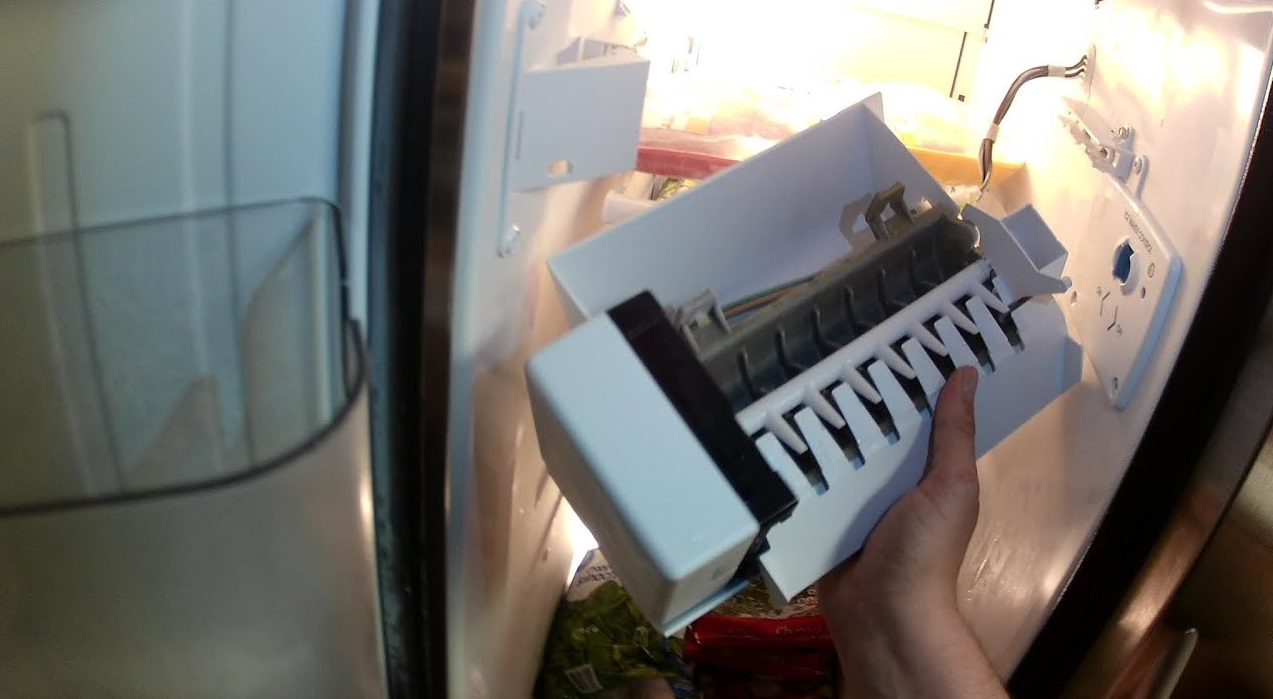
Examine and Repair the Ice Maker Assembly
If your ice maker is still not receiving water after checking the water supply line, replacing the water filter, and testing the water inlet valve, it’s time to examine and potentially repair the ice maker assembly. The ice maker assembly consists of various components that work together to produce ice. Here’s how to examine and repair the ice maker assembly:
Inspect for Visible Damage or Blockages
Start by visually inspecting the ice maker assembly for any visible signs of damage or blockages. Look for broken or misaligned components, such as the motor, gears, or sensors. Check for any obstructions, such as ice buildup or debris, that could be hindering the proper functioning of the assembly.
Clean the Ice Maker Assembly
If you notice any debris or ice buildup, clean the ice maker assembly to remove any obstructions. Use a soft cloth or brush to gently clean the components. Be careful not to apply excessive force or damage any delicate parts of the assembly. Cleaning the assembly can often resolve minor issues and restore the proper flow of water.
Read more: Why Is My Ice Maker Frozen Up
Repair or Replace Faulty Components
If you identify any damaged or malfunctioning components, you may need to repair or replace them. Check the motor, gears, and sensors for any signs of wear or failure. If a component is broken or not functioning correctly, consult the manufacturer’s instructions or seek professional assistance to determine the best course of action. In some cases, replacing the faulty components may be necessary to restore the ice maker’s functionality.
Follow Manufacturer’s Guidelines
When making repairs or replacements, it’s important to follow the manufacturer’s guidelines to ensure proper installation and avoid causing further damage. Use appropriate tools and techniques as instructed. If you’re unsure about performing the repairs yourself, it’s best to consult a professional technician who has experience with ice maker repairs.
Regular Maintenance and Care
To prevent future issues with the ice maker assembly, it’s important to perform regular maintenance and care. Keep the ice maker clean and free from debris, and follow any recommended maintenance procedures outlined in the manufacturer’s instructions. Regular maintenance can help extend the lifespan of the assembly and prevent future problems.
By examining and repairing the ice maker assembly as needed, you can troubleshoot and potentially resolve issues that are causing the ice maker not to receive water. However, if the problem persists, it’s recommended to seek professional assistance, as complex issues may require specialized knowledge and tools to fix.
Conclusion
Having an ice maker that is not getting water can be frustrating, but with the right troubleshooting steps, you can identify and resolve the issue. Throughout this article, we have discussed the common causes of an ice maker not receiving water and provided solutions for each cause:
1. Water supply issues: Check the water supply line for any kinks or twists, ensure the water supply valve is fully open, and verify the water pressure in your home.
2. Clogged water filter: Inspect and replace the water filter regularly to prevent clogs and maintain proper water flow to the ice maker.
3. Faulty water inlet valve: Test the water inlet valve for continuity and replace it if necessary to ensure proper water flow to the ice maker.
4. Malfunctioning ice maker assembly: Inspect and clean the ice maker assembly, and repair or replace any damaged or faulty components if needed.
By following these troubleshooting steps, you can restore the water flow to your ice maker and ensure a steady supply of ice for your needs. However, it is important to note that if the problem persists or if you are unsure about performing the repairs yourself, it is recommended to seek professional assistance.
Remember to regularly maintain your ice maker by cleaning it and following the manufacturer’s guidelines. This will help prevent future issues and prolong the lifespan of your ice maker.
We hope that this article has provided you with valuable insights and guidance on resolving the problem of an ice maker not receiving water. Enjoy the convenience of a fully functional ice maker, and cheers to refreshing drinks and cool beverages all year round!
Frequently Asked Questions about Why Is My Ice Maker Not Getting Water
Was this page helpful?
At Storables.com, we guarantee accurate and reliable information. Our content, validated by Expert Board Contributors, is crafted following stringent Editorial Policies. We're committed to providing you with well-researched, expert-backed insights for all your informational needs.
0 thoughts on “Why Is My Ice Maker Not Getting Water”