
Articles
How To Change Ceiling Fan Direction
Modified: March 19, 2024
Learn how to change the direction of your ceiling fan with these helpful articles. Follow our step-by-step guide for a comfortable and efficient cooling or heating experience.
(Many of the links in this article redirect to a specific reviewed product. Your purchase of these products through affiliate links helps to generate commission for Storables.com, at no extra cost. Learn more)
Introduction
Ceiling fans are a common fixture in many households, providing much-needed comfort during hot summer days and even aiding in circulation during colder months. One important aspect of maximizing the effectiveness of a ceiling fan is understanding and changing its direction. In this article, we will dive into the importance of ceiling fan direction and guide you through the steps to change it.
When it comes to ceiling fan direction, there are typically two settings: clockwise and counterclockwise. The direction of the blades determines the way air is circulated in the room. In the summer, you would want the fan to rotate counterclockwise, creating a cooling breeze. In the winter, you would want the fan to rotate clockwise, helping distribute warm air throughout the room.
Understanding and making the necessary adjustments to the ceiling fan direction can significantly impact the comfort level in your home, as well as potentially save you money on energy bills. By utilizing the correct direction, you can make the most of your ceiling fan’s cooling or heating capabilities, depending on the season.
In the following sections, we will discuss the benefits of changing ceiling fan direction, the step-by-step process to make the adjustment, and other tips to optimize its performance. Whether you are a seasoned homeowner or a first-time ceiling fan user, this article will provide you with all the information you need to effectively change the direction of your ceiling fan. So, let’s dive in and explore the world of ceiling fan direction!
Key Takeaways:
- Optimizing your ceiling fan’s direction can enhance comfort and save energy. In summer, set it to rotate counterclockwise for a cooling breeze, and in winter, switch to clockwise for better warmth distribution.
- Changing your ceiling fan’s direction is a simple process with significant benefits. Enjoy improved air circulation, energy efficiency, and seasonal comfort by following the easy step-by-step guide.
Understanding Ceiling Fan Direction
Before we delve into the process of changing the direction of a ceiling fan, let’s first understand why it matters. The direction of the fan blades plays a crucial role in determining the airflow in the room, which can greatly impact the comfort level and energy efficiency of your home.
In the summer months, you will want your ceiling fan to rotate in a counterclockwise direction. This creates a cool breeze that can make you feel up to 8 degrees Fahrenheit cooler, allowing you to rely less on your air conditioning unit and potentially save on energy costs. The counterclockwise rotation creates a downdraft, which circulates cool air from the ceiling to the floor. This cooling effect can make a significant difference, especially in rooms with high ceilings or limited airflow.
On the other hand, during the winter season, you’ll want to switch the direction of your ceiling fan to clockwise. This might seem counterintuitive at first, as we associate ceiling fans with cooling, but it can actually help distribute warm air throughout the room. When the fan rotates in a clockwise direction, it creates an updraft, pushing warm air that naturally rises back down along the walls and into the living space. This can help alleviate cold spots, improve the overall temperature distribution, and reduce the workload on your heating system.
Understanding and utilizing the correct ceiling fan direction based on the season can greatly enhance the effectiveness of your fan and improve indoor comfort. It’s important to note that not all ceiling fans have a direction switch which allows for reverse rotation. If your ceiling fan lacks this feature, it may not be suitable for use during the winter season as it won’t be able to effectively distribute warm air.
Now that we have a clear understanding of why ceiling fan direction matters, let’s move on to exploring the benefits of changing fan direction and how to do it correctly.
Benefits of Changing Ceiling Fan Direction
Changing the direction of your ceiling fan can provide numerous benefits, both in terms of comfort and energy efficiency. Let’s explore some of the key advantages:
1. Enhanced Cooling: During the hot summer months, setting your ceiling fan to rotate counterclockwise creates a cooling breeze in the room. This airflow can help lower the perceived temperature by evaporating moisture from your skin. By relying on your ceiling fan to provide a cooling effect, you can reduce the need for air conditioning and save on energy costs.
2. Improved Air Circulation: In addition to cooling, ceiling fans also help improve air circulation in a room. The counterclockwise rotation creates a downward airflow that helps move stagnant air and keep the room well-ventilated. This is especially beneficial in rooms with poor air circulation or high humidity levels.
3. Energy Efficiency: By utilizing your ceiling fan instead of relying solely on air conditioning or heating, you can significantly reduce your energy consumption. Ceiling fans use considerably less energy than HVAC systems, making them a cost-effective and eco-friendly option for maintaining comfortable temperatures in your home.
4. Winter Comfort: Changing the direction of your ceiling fan to clockwise during winter can also provide benefits. The updraft created by the clockwise rotation helps push warm air down to the floor, preventing it from accumulating near the ceiling. This even distribution of warm air can help eliminate cold spots, making your living space more comfortable without having to rely solely on heating systems.
5. Cost Savings: By using ceiling fans effectively and adjusting their direction based on the season, you can save on energy costs. By reducing the usage of air conditioning or heating systems, you can lower your monthly energy bills and contribute to a greener environment.
6. Longevity of HVAC Systems: Utilizing ceiling fans can also help prolong the lifespan of your air conditioning and heating units. By reducing the workload on these systems, they won’t have to run as frequently or work as hard, resulting in less wear and tear and potentially reducing the need for costly repairs or replacements.
In summary, changing the direction of your ceiling fan can provide you with enhanced cooling, improved air circulation, energy savings, and increased comfort during both the summer and winter seasons. Now let’s move on to learning how to change the direction of your ceiling fan correctly.
How to Change Ceiling Fan Direction
Changing the direction of a ceiling fan is a simple process that can be done in just a few steps. Here’s a guide to help you make the adjustment correctly:
Step 1: Turn off the Ceiling Fan
Before attempting to change the fan direction, make sure the fan is turned off and the blades have come to a complete stop. This is crucial for your safety during the process.
Step 2: Locate the Fan Direction Switch
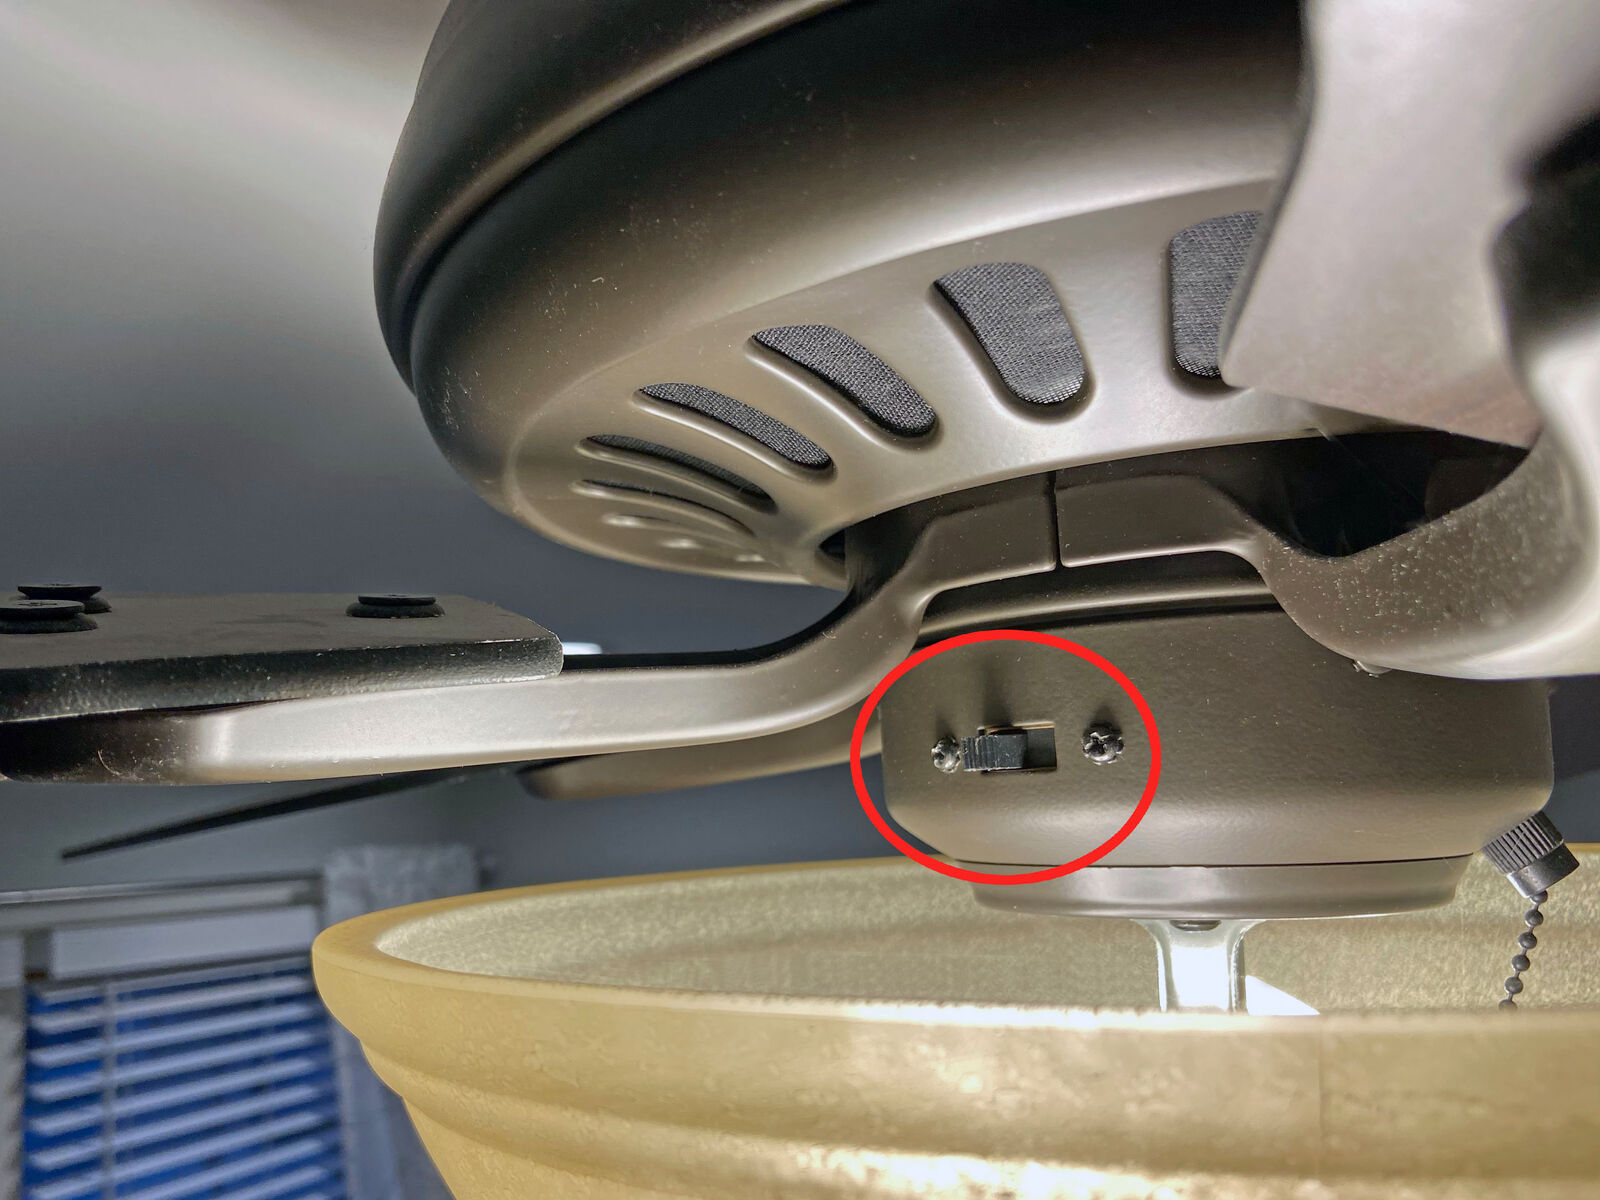
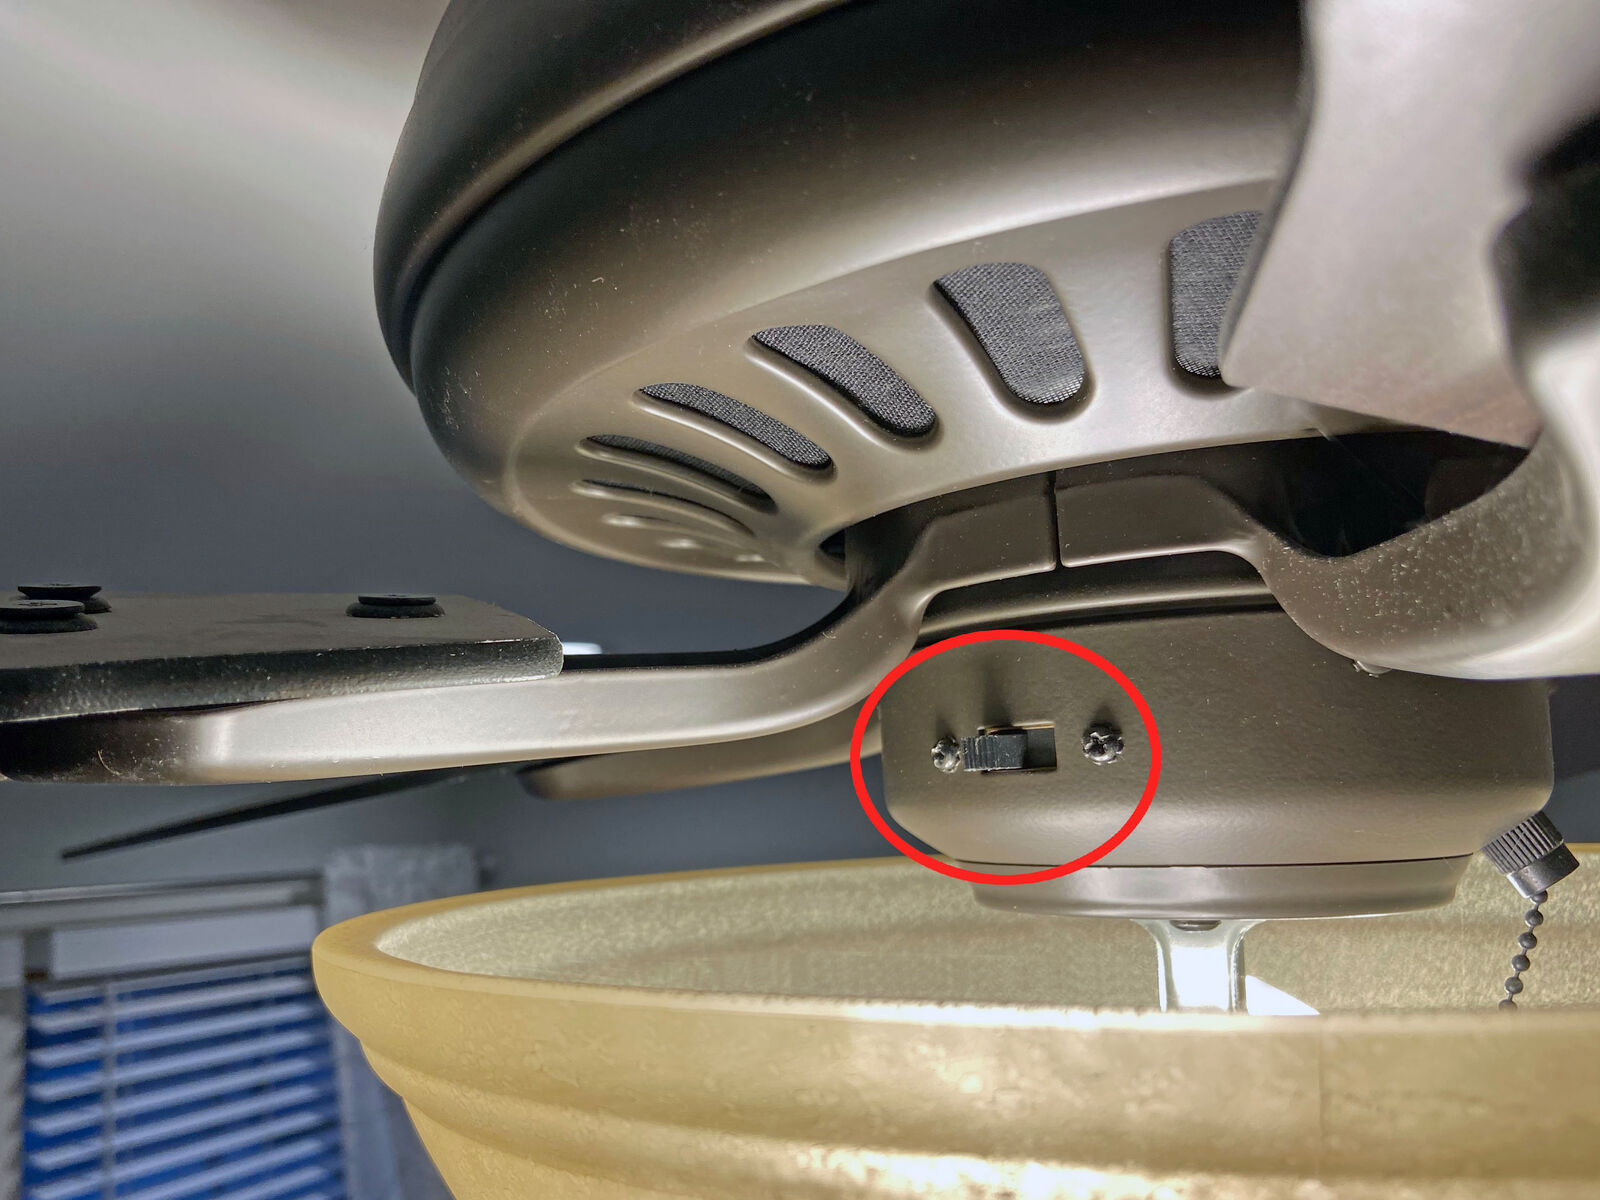
Most ceiling fans have a switch located on the housing of the fan motor that controls the direction. The switch can usually be found near the fan’s light fixture or above the blades. Look for a small toggle or slide switch labeled “Forward/Reverse” or “Summer/Winter.”
Step 3: Adjust the Fan Direction Switch
Using a step ladder if necessary, reach up and locate the fan direction switch. Depending on the model of your ceiling fan, you may need to toggle the switch or slide it to the desired direction. For counterclockwise rotation (summer setting), move the switch to the “Forward” or “Summer” position. For clockwise rotation (winter setting), move the switch to the “Reverse” or “Winter” position.
Step 4: Turn on the Ceiling Fan
Once you have adjusted the fan direction switch, you can now turn the ceiling fan back on. Allow the fan to run for a few moments to verify that it is rotating in the desired direction. Stand underneath the fan and feel the airflow to ensure that it is moving in the expected manner.
That’s it! You have successfully changed the direction of your ceiling fan. Remember to adjust the direction again as the seasons change to optimize the fan’s performance.
Here are a few additional tips to keep in mind:
– If you’re unsure about the specific location or operation of the fan direction switch, refer to the instruction manual that came with your ceiling fan. It will provide detailed information on where to find the switch and how to adjust it.
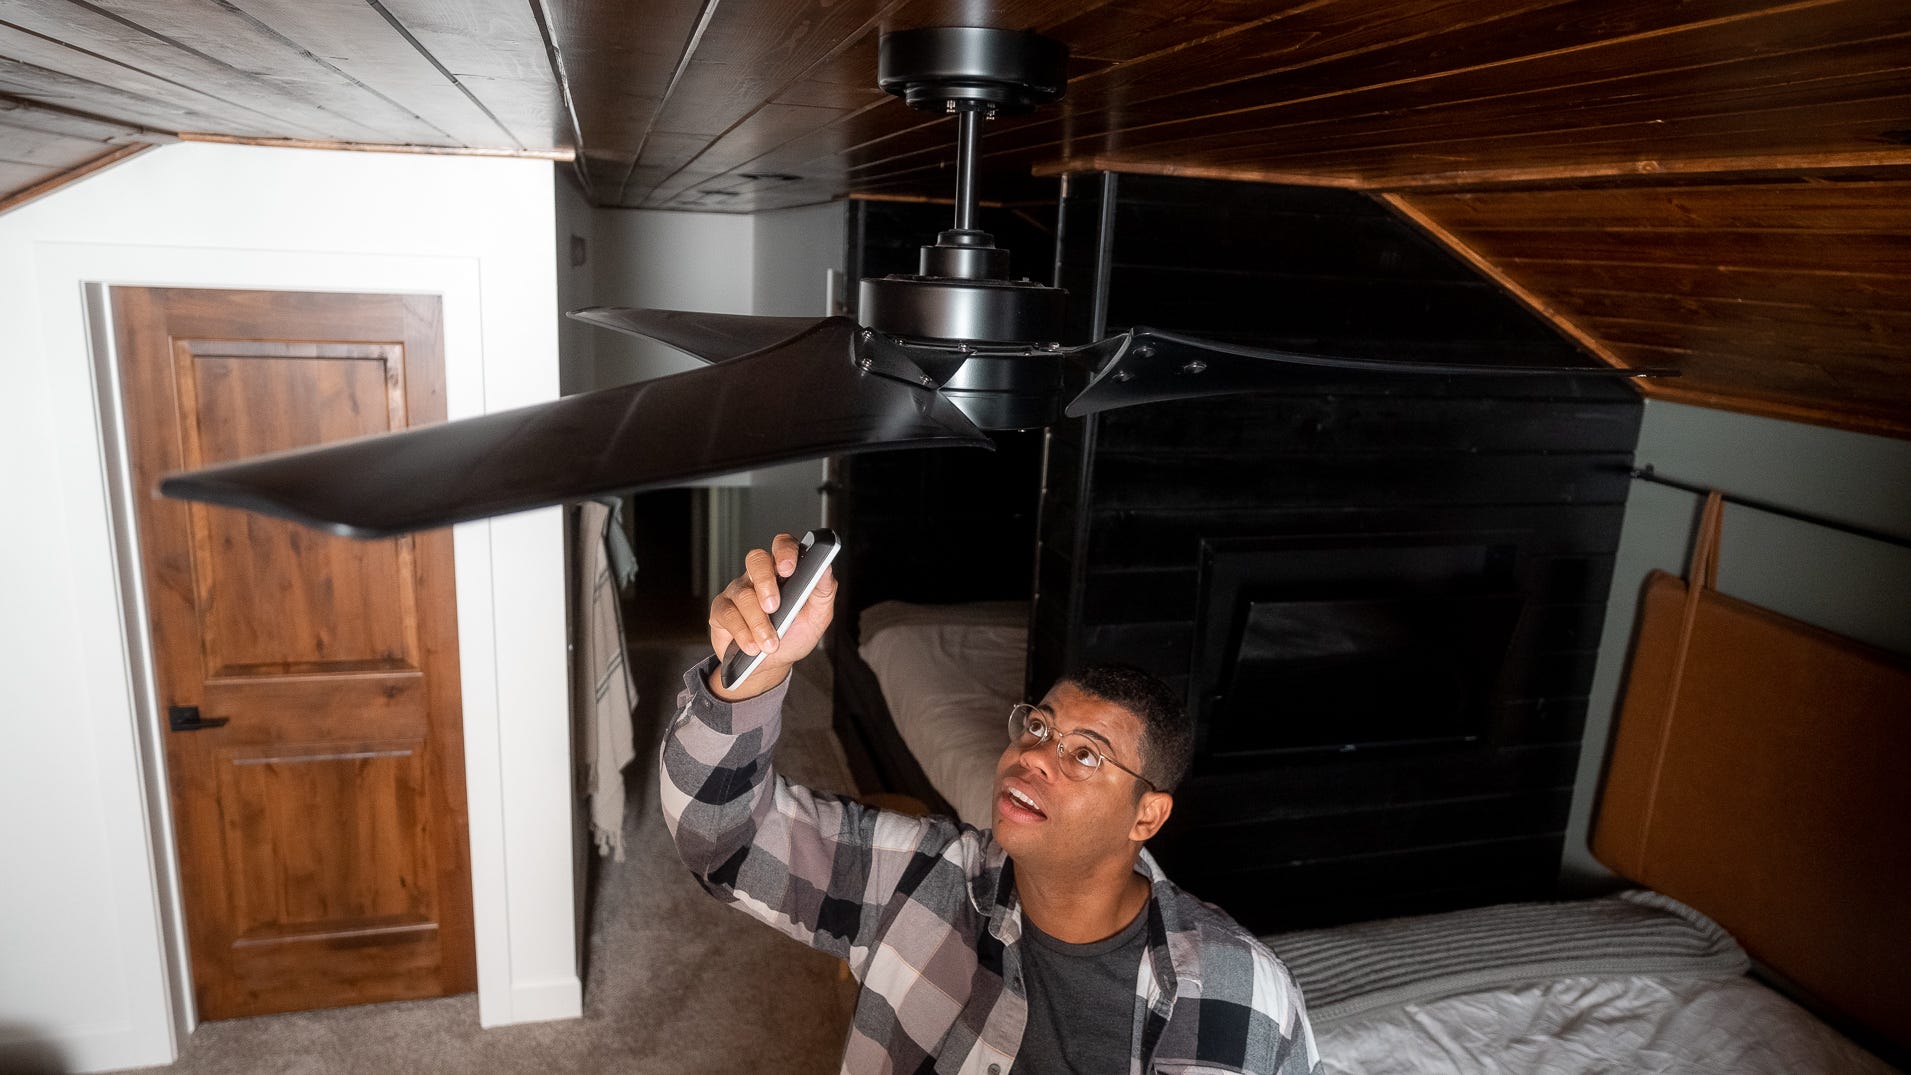
– Some ceiling fans may have a remote control that includes a direction button. If your fan has a remote, consult the remote control manual for instructions on changing the fan direction.
– If you experience any difficulties or the fan does not change direction as expected, consult a professional electrician or contact the fan manufacturer for assistance.
By following these simple steps, you can easily change the direction of your ceiling fan and enjoy its benefits throughout the year.
Step 1: Turn off the Ceiling Fan
To start the process of changing the direction of your ceiling fan, the first and most important step is to ensure that the fan is turned off. This is crucial for your safety during the process. Here’s a detailed guide on how to properly turn off the ceiling fan:
1. Locate the Fan’s Power Source: Before attempting to turn off the ceiling fan, you need to locate the power source. In most cases, this will be a wall switch or a pull chain. If your fan is controlled by a wall switch, locate the switch on the wall and turn it off. If your fan has a pull chain, reach up and give the chain a gentle tug to switch off the fan.
2. Confirm the Fan has Stopped Completely: After turning off the power source, it’s important to ensure that the fan has come to a complete stop before proceeding. Stand underneath the fan and wait for the blades to stop spinning. You can also use a ladder or step stool to get a closer look and verify that the fan is no longer in motion.
3. Double-Check the Fan’s Speed Setting: Some ceiling fans have multiple speed settings, which allow you to control the fan’s rotation speed. Before moving on to the next step, take a moment to ensure that the fan is set to its lowest speed setting. This will minimize any potential movement caused by air currents or residual momentum.
By turning off the ceiling fan and ensuring that it has come to a complete stop, you eliminate the risk of any accidental contact with moving blades or other fan components. This step is crucial to ensure your safety and should never be skipped or rushed.
Note: If you have a ceiling fan that is controlled by a remote, make sure to turn off the fan using the remote control before proceeding with the next steps. Additionally, if you’re uncertain about how to turn off your specific ceiling fan model, refer to the manufacturer’s instructions or consult a professional electrician for guidance.
Now that you have successfully turned off the ceiling fan, you are ready to move on to the next step in changing its direction.
Most ceiling fans have a switch on the motor housing that allows you to change the direction of the fan blades. In the summer, set the fan to rotate counterclockwise to create a cooling breeze, and in the winter, set it to rotate clockwise to circulate warm air.
Step 2: Locate the Fan Direction Switch
After turning off the ceiling fan, the next step in changing its direction is to locate the fan direction switch. This switch is usually located on the housing of the fan motor and controls the rotation direction of the fan blades.
Here’s a detailed guide on how to find the fan direction switch:
1. Examine the Fan Motor Housing: Take a close look at the motor housing of your ceiling fan. This is the part of the fan that the blades are attached to. Look for any visible switches or buttons on the housing.
2. Check Near the Light Fixture: Some ceiling fans have the fan direction switch located near the light fixture. The switch may be a toggle switch, a slide switch, or a button. Look for any labeled markings or indicators that signify the direction switch.
3. Inspect Above the Blades: In certain models, the direction switch can be found above the blades, often around the center of the fan. It may be concealed behind a small cover or panel. Carefully look for any access points or removable parts that could reveal the switch.
4. Refer to the Instruction Manual: If you’re having trouble locating the fan direction switch, refer to the instruction manual that came with your ceiling fan. The manual may have specific instructions, diagrams, or illustrations indicating the location of the switch.
Remember, the placement of the fan direction switch can vary depending on the make and model of your ceiling fan. It’s essential to look for specific markings or labels on the fan housing to help identify the switch. If you have difficulty locating the switch or cannot find any clear markings, consulting the manufacturer’s instructions or contacting customer support may provide additional guidance.
During this step, make sure to handle the fan with care to avoid any accidental damage or injury. Avoid touching any electrical components and always exercise caution when working with the fan.
Once you have located the fan direction switch, you are ready to move on to the next step – adjusting the direction to suit your needs.
Step 3: Adjust the Fan Direction Switch
After locating the fan direction switch on your ceiling fan, it’s time to adjust it to change the rotation direction of the fan blades. The switch is designed to allow you to toggle between different settings, typically labeled “Forward/Reverse” or “Summer/Winter.” Here’s a detailed guide on how to adjust the fan direction switch:
1. Toggle or Slide the Switch: Depending on the design of your ceiling fan, you may need to either toggle a switch or slide it to adjust the fan direction. Refer to the markings or labels on the switch to determine which position corresponds to the desired rotation direction.
2. Setting for Summer (Counterclockwise): For the summer season, you will want your ceiling fan to rotate in a counterclockwise direction. This creates a cooling breeze in the room. Move the fan direction switch to the “Forward” or “Summer” position to set the fan blades to rotate counterclockwise.
3. Setting for Winter (Clockwise):
In colder months, you will want your ceiling fan to rotate in a clockwise direction. This helps redistribute warm air that tends to rise and get trapped near the ceiling. Slide or toggle the fan direction switch to the “Reverse” or “Winter” position to set the fan blades to rotate clockwise.
4. Confirm the Adjustment: After adjusting the fan direction switch, visually inspect the fan blades to ensure they have changed their rotation direction. Take a moment to double-check the switch position and make any necessary adjustments if it doesn’t align with the desired direction.
Remember, the exact mechanism and operation of the fan direction switch may vary depending on the specific model of your ceiling fan. It’s essential to consult the manufacturer’s instructions or refer to the product manual if you encounter any difficulties or have questions about the switch’s operation.
Once you have adjusted the fan direction switch, you are ready to proceed to the next step – turning the ceiling fan back on and confirming the new rotation direction.
Step 4: Turn on the Ceiling Fan
Now that you have adjusted the fan direction switch on your ceiling fan, it’s time to turn the fan back on and ensure that it is rotating in the desired direction. Here’s a detailed guide on how to properly turn on the ceiling fan:
1. Double-Check the Switch Position: Before turning on the fan, take a quick look at the fan direction switch to confirm the setting. Make sure the switch is in the appropriate position for the desired direction (counterclockwise for summer or clockwise for winter).
2. Switch on the Power Source: If you turned off the ceiling fan using a wall switch or pull chain, switch it back on to restore power to the fan. If your ceiling fan is controlled by a remote, use the remote control to turn on the fan. Alternatively, refer to the specific instructions for your fan model.
3. Observe the Rotation: Once the fan is turned on, step away and observe the rotation of the fan blades. Stand underneath the fan or use a ladder to get a closer look. Check the direction of airflow and feel the breeze to ensure that it aligns with the desired direction.
4. Verify Comfort and Airflow: Stand in different areas of the room and gauge the comfort and airflow provided by the fan. Pay attention to any areas where there may have been previously stagnant or cool air. Confirm that the new rotation direction is effectively distributing air throughout the room.
5. Make Adjustments if Needed: If you find that the fan is not rotating in the desired direction or if you are not experiencing the anticipated airflow, double-check the fan direction switch position. If necessary, turn off the fan and make any adjustments needed to align the switch with the appropriate direction.
By following these steps, you can ensure that your ceiling fan is functioning correctly and providing the desired airflow based on the season. If you have any concerns or difficulties during this step, consult the fan’s instruction manual or contact the manufacturer for further assistance.
Remember to exercise caution when turning on the fan and be mindful of any potential hazards such as loose items or hanging objects that may be affected by the fan’s rotation.
Now that you have successfully turned on the ceiling fan and verified the new rotation direction, you can enjoy the benefits of a properly adjusted fan throughout the seasons.
Conclusion
Changing the direction of your ceiling fan is a simple yet impactful way to optimize its performance throughout the year. By understanding the importance of ceiling fan direction and following the step-by-step guide, you can benefit from increased comfort, enhanced airflow, and potential energy savings.
In the summer, setting your ceiling fan to rotate counterclockwise creates a cooling breeze that can help lower the perceived temperature in the room. This allows you to rely less on air conditioning, saving energy and reducing your utility bills. During the winter, changing the direction to clockwise helps distribute warm air more effectively, improving overall temperature distribution and reducing the workload on your heating system.
In addition to the seasonal benefits, changing the ceiling fan direction can also enhance air circulation, improve ventilation, and prolong the lifespan of your HVAC systems. By optimizing your fan’s performance, you contribute to a more comfortable and energy-efficient living space.
Remember to follow the proper safety precautions when changing the direction of your ceiling fan, such as turning off the fan and ensuring it has come to a complete stop before making any adjustments. Take the time to locate the fan direction switch, adjust it accordingly, and confirm the new rotation direction before turning the fan back on.
If you encounter any difficulties or have questions about your specific ceiling fan model, don’t hesitate to consult the manufacturer’s instructions or seek help from a professional electrician.
By taking a few simple steps to change and optimize the direction of your ceiling fan, you can enjoy a more comfortable and energy-efficient home environment. So, don’t hesitate to make the necessary adjustments and reap the benefits that a properly configured ceiling fan can provide.
Stay cool in the summer, stay warm in the winter, and make the most of your ceiling fan all year round!
Frequently Asked Questions about How To Change Ceiling Fan Direction
Was this page helpful?
At Storables.com, we guarantee accurate and reliable information. Our content, validated by Expert Board Contributors, is crafted following stringent Editorial Policies. We're committed to providing you with well-researched, expert-backed insights for all your informational needs.





0 thoughts on “How To Change Ceiling Fan Direction”