
Articles
How To Change A Ceiling Fan
Modified: November 2, 2024
Learn how to change a ceiling fan with step-by-step articles and expert tips. Enhance the cooling and aesthetic of your space efficiently.
(Many of the links in this article redirect to a specific reviewed product. Your purchase of these products through affiliate links helps to generate commission for Storables.com, at no extra cost. Learn more)
Introduction
Changing a ceiling fan can be a relatively straightforward DIY project that can bring a refreshing breeze to any room in your home. Whether you’re looking to upgrade an outdated fan or replace a malfunctioning one, this article will guide you through the steps to successfully change a ceiling fan.
A ceiling fan not only provides relief from hot summer days but also helps to circulate the air in all seasons, creating a comfortable living environment. Installing a new ceiling fan can also add a stylish touch to your home decor, enhancing the overall aesthetic appeal of the space. With the right tools, materials, and instructions, you can easily tackle this project and enjoy the benefits of a new ceiling fan in no time.
In this article, we will outline a step-by-step guide on how to change a ceiling fan, from gathering the necessary tools and materials to testing the new fan. By following these instructions, you’ll be able to confidently replace your old ceiling fan and enjoy improved air circulation and energy-efficiency in your home.
Before we dive into the specifics, it’s important to note that working with electricity can be dangerous if proper precautions are not taken. Therefore, it’s crucial to ensure your safety by turning off the power supply to the area where you’ll be working. If you’re not comfortable working with electrical components, it’s always best to hire a licensed electrician to handle the installation for you.
Now that we’ve covered the essential safety reminder, let’s move on to the first step: gathering the necessary tools and materials.
Key Takeaways:
- DIY enthusiasts can easily upgrade their home by changing a ceiling fan, enhancing comfort and aesthetics. Prioritize safety, gather tools, and follow step-by-step instructions for a successful installation.
- Testing the new ceiling fan is crucial for ensuring proper functionality and addressing any issues. Enjoy the cool breeze and improved aesthetics of the newly installed fan, adding value to your home.
Step 1: Gather the necessary tools and materials
Before you begin the process of changing your ceiling fan, it’s important to gather all the necessary tools and materials. By having everything you need at hand, you can ensure a smooth and efficient installation process.
Here’s a list of the tools and materials you will need:
- Ceiling fan
- Ladder or step stool
- Screwdriver (flathead and Phillips head)
- Wire cutters
- Wire stripper
- Electrical tape
- Voltage tester
- Wire connectors
- Mounting bracket
- Ceiling fan blades
- Canopy
- Hardware (screws, nuts, and bolts)
Make sure to double-check that you have all these items before you begin. It can save you time and frustration down the line.
Once you have gathered all the necessary tools and materials, it’s a good idea to read through the instruction manual that comes with your new ceiling fan. This will familiarize you with the specific steps and requirements for your particular model. Each ceiling fan may have slight variations in the installation process, so it’s essential to follow the manufacturer’s instructions.
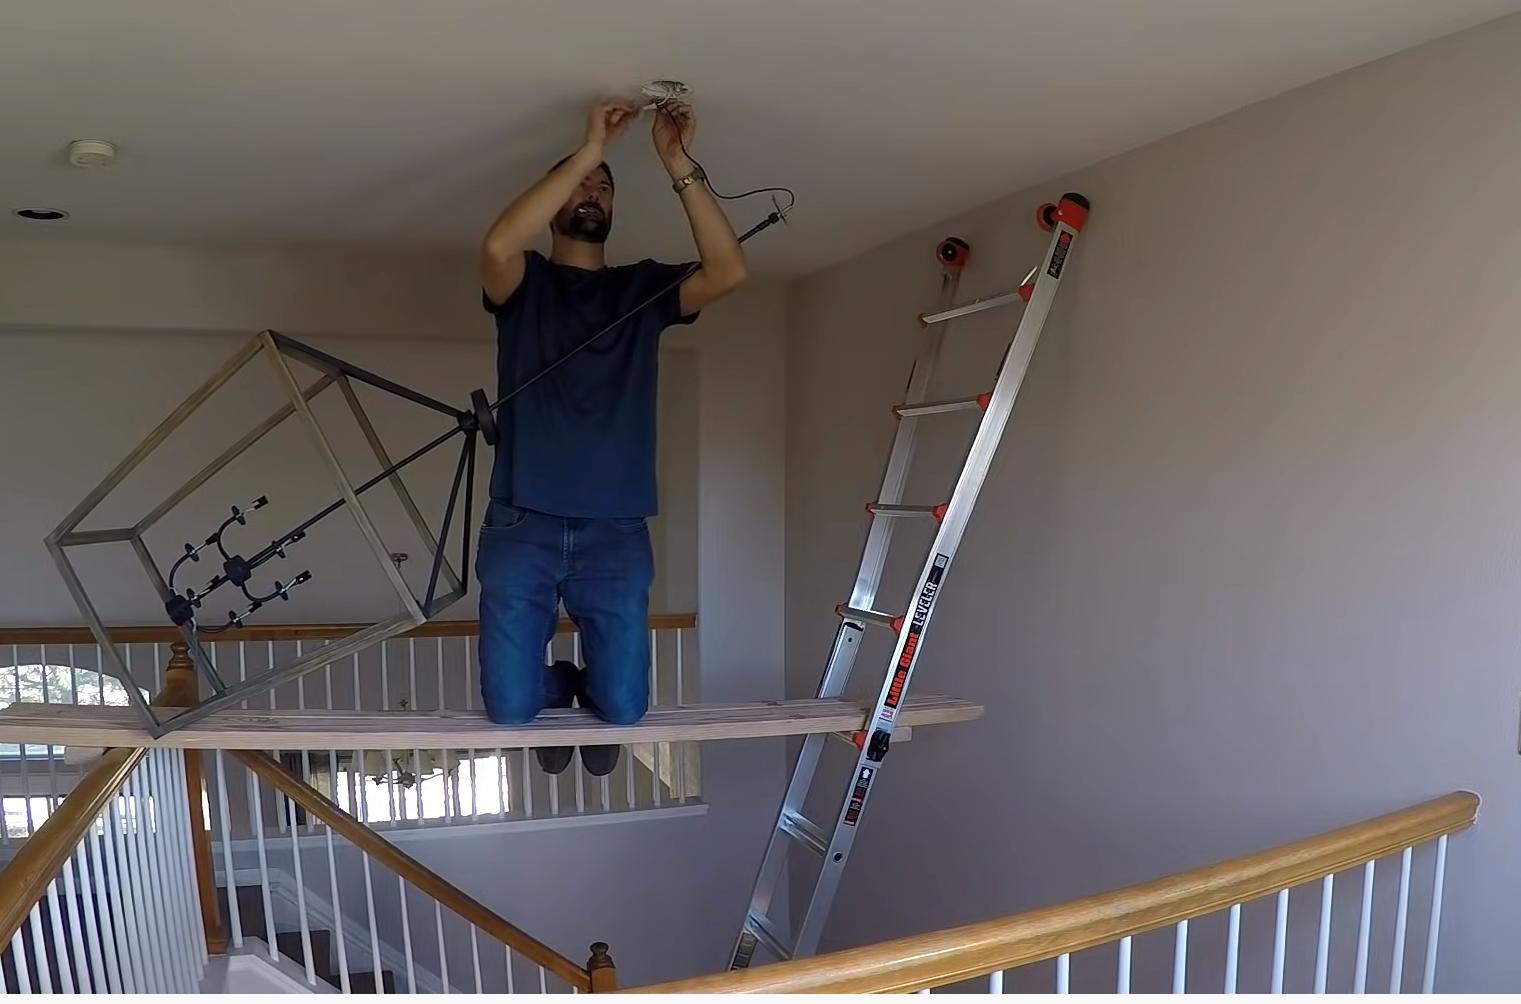
Additionally, it’s crucial to keep safety in mind throughout the installation process. Ensure that you have adequate lighting in the room and a stable ladder or step stool to reach the ceiling. Always work on a stable surface and take precautions to prevent any accidents or injuries. If you’re unsure about your ability to safely complete the installation, consider seeking assistance from a professional electrician.
Now that you have all the necessary tools and materials and are familiar with the basic safety precautions, you’re ready to move on to the next step: turning off the power supply.
Step 2: Turn off the power supply
Before starting any electrical work, it’s crucial to ensure your safety by turning off the power supply to the area where you’ll be working. This step is essential to prevent any potential electrical accidents or injuries.
To turn off the power supply, follow these steps:
- Locate the circuit breaker panel in your home. It is usually located in a utility room, garage, or basement.
- Open the panel door to reveal the circuit breakers.
- Look for the breaker labeled “ceiling fan” or “fan.” If you’re unsure which breaker controls the fan, you can turn off the main breaker to cut power to the entire house for added safety. However, keep in mind that doing so will also disrupt power to other appliances and lights.
- Flip the identified breaker switch to the “off” position.
After switching off the breaker, it’s a good practice to double-check that the power is indeed off before you proceed. You can do this by using a voltage tester. Simply follow the instructions provided with the voltage tester to determine if there is any electrical current present. If the tester indicates no voltage, you can confidently continue with the installation process.
Remember, never assume that the power is off without using a reliable voltage tester. It’s always better to be safe than sorry when working with electrical components.
Once you have confirmed that the power supply is turned off, you can proceed to the next step: removing the old ceiling fan.
Step 3: Remove the old ceiling fan
With the power supply safely turned off, it’s time to remove the old ceiling fan. This step will require some disassembly and careful handling of the various components.
Follow these steps to remove the old ceiling fan:
- Locate the screws or bolts that connect the fan blades to the motor housing. Use a screwdriver or wrench to loosen and remove them.
- Carefully disconnect the wires connecting the fan motor to the electrical box in the ceiling. Depending on the wiring setup, there may be wire connectors securing the connections. Loosen the wire connectors and separate the wires.
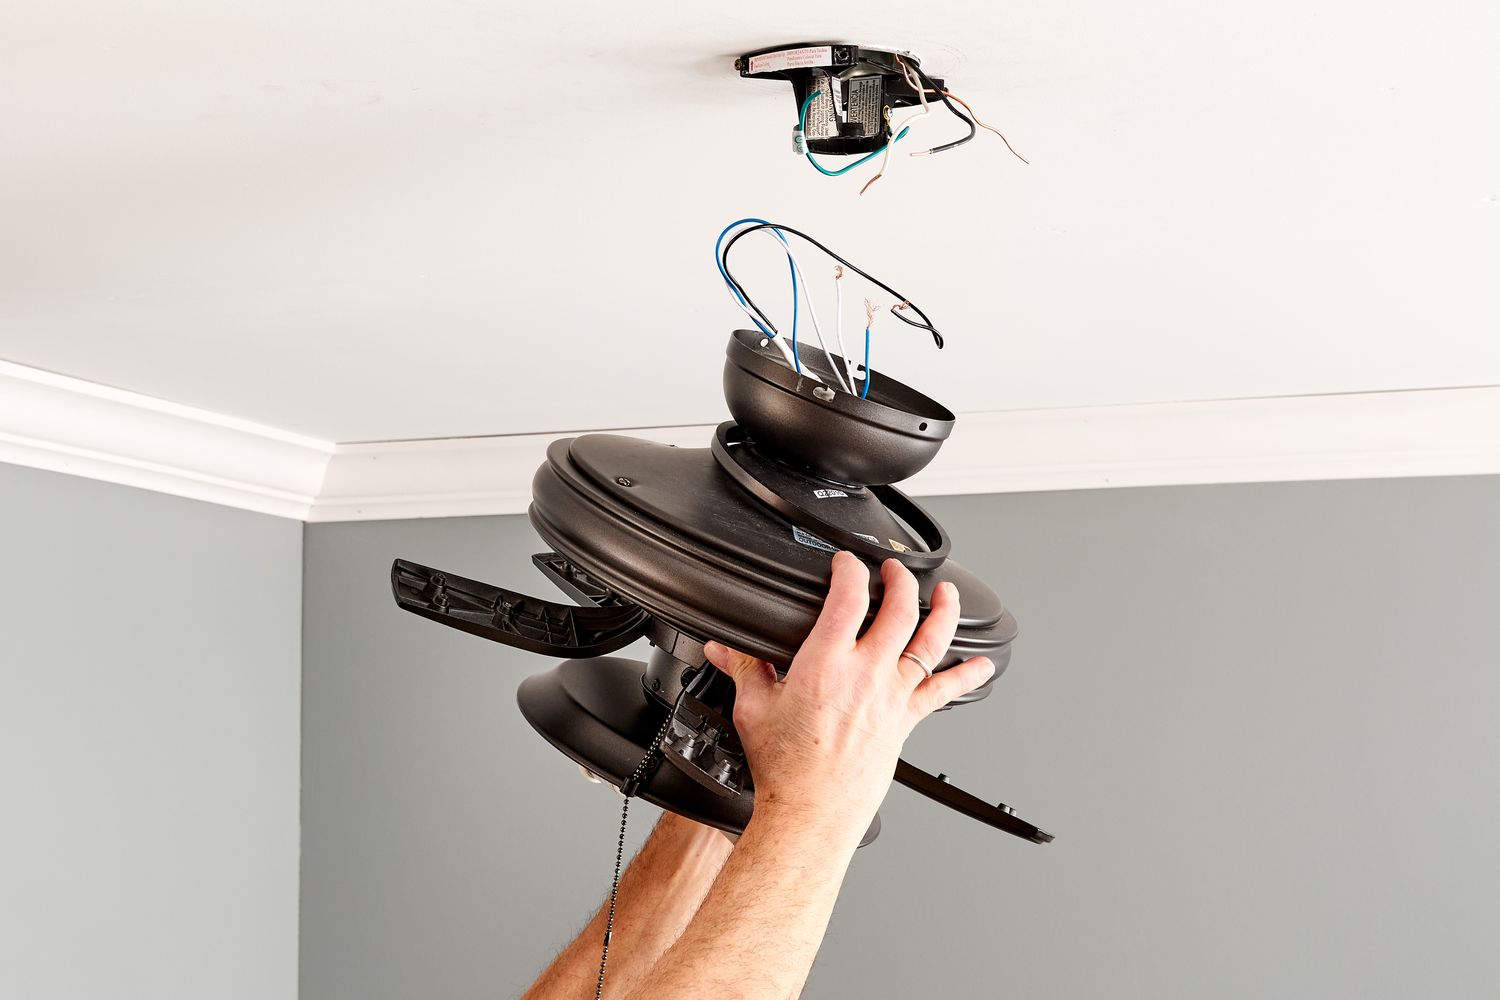
- Once the blades and wires are disconnected, locate the screws or bolts that secure the fan motor housing to the mounting bracket attached to the ceiling. Unscrew these fasteners and gently lower the motor housing. If necessary, have someone assist you in holding the motor housing to prevent it from falling.
- With the motor housing removed, examine the mounting bracket attached to the ceiling. There typically are screws or bolts that secure the bracket to the electrical box. Unscrew these fasteners and carefully remove the mounting bracket.
- Inspect the electrical box in the ceiling to ensure it is secure and in good condition. Replace or repair the electrical box if needed before installing the new bracket.
Once you have successfully removed the old ceiling fan and inspected the electrical box, you are ready to move on to the next step: installing the new mounting bracket.
Remember to handle all the parts with care and avoid forcing or damaging any components during the removal process. By taking your time and following the steps diligently, you can ensure a smooth transition to the installation of your new ceiling fan.
Step 4: Install the new mounting bracket
Now that you have removed the old ceiling fan, it’s time to install the new mounting bracket. The mounting bracket provides stability and support for the new fan, ensuring it is securely attached to the ceiling.
Follow these steps to install the new mounting bracket:
- Take the new mounting bracket and hold it against the electrical box in the ceiling. Align the screw holes in the bracket with the holes in the electrical box.
- Using a screwdriver or drill, insert the provided screws or bolts into the holes and tighten them securely. Ensure the mounting bracket is firmly attached to the electrical box.
- Check that the mounting bracket is level. Use a level tool to confirm that it is straight and adjust as necessary.
- Verify that the wires are easily accessible through the opening in the center of the mounting bracket. If needed, adjust the position of the bracket to ensure proper wire clearance.
- Once the mounting bracket is securely installed and leveled, you are ready to proceed to the next step: connecting the new ceiling fan.
It’s important to note that the specific instructions for installing the mounting bracket may vary depending on the manufacturer and model of your new ceiling fan. Always refer to the instruction manual provided with your fan for detailed guidance.
By carefully following these steps, you can successfully install the new mounting bracket, setting a solid foundation for the forthcoming installation of your new ceiling fan.
When changing a ceiling fan, always turn off the power at the circuit breaker before starting any work. This will ensure your safety while working with electrical components.
Step 5: Connect the new ceiling fan
With the mounting bracket securely installed, it’s time to connect the new ceiling fan. This step involves wiring the fan motor to the electrical system in your home and ensuring all connections are properly made.
Follow these steps to connect the new ceiling fan:
- Take the fan motor and carefully lift it towards the mounting bracket. Align the holes in the fan motor with the corresponding holes in the mounting bracket.
- Gently pass the wires from the fan motor through the center opening of the mounting bracket. Make sure to leave enough slack to work comfortably with the wires.
- Refer to the manufacturer’s instructions or the wiring diagram provided with your new ceiling fan to identify the specific wire connections. Typically, there will be color-coded wires that need to be matched and connected.
- Strip the insulation off the ends of the wires, if necessary, using a wire stripper. Twist together the corresponding wires to join them. For example, connect the black wire from the fan motor to the black wire from the electrical box.
- Secure the wire connection by twisting on a wire connector and then covering it with electrical tape for added protection.
- Repeat this process for each wire connection, following the wiring diagram provided. Typically, you’ll connect the black wires, white wires, and green or copper ground wires.
Once all the wire connections are made and properly secured, gently push the excess wiring into the electrical box. Be careful not to pinch or damage any wires during this step.
Before proceeding to the next step, double-check all the wire connections to ensure they are tight and secure. This will help prevent any electrical issues or malfunctions once the fan is in operation.
Now that the new ceiling fan is connected, you are ready to move on to the next step: securing the fan blades.
Remember to consult the manufacturer’s instructions or wiring diagram for your specific model to verify the correct wire connections. Taking caution and ensuring proper wiring will ensure a safe and functional ceiling fan installation.
Step 6: Secure the fan blades
With the new ceiling fan connected to the electrical system, the next step is to secure the fan blades. This step is crucial to ensure the blades are firmly attached and balanced for optimal performance.
Follow these steps to secure the fan blades:
- Take each fan blade and align it with the pre-drilled holes on the fan motor. Ensure that the blade is straight and properly positioned.
- Using the provided screws or bolts, insert them through the holes in the blades and tighten them securely to the fan motor.
- Continue this process for each fan blade, making sure they are evenly spaced and tight. Check that all blades are aligned properly and free from any obstructions.
- After securing all the fan blades, give each blade a gentle tug to ensure it is securely attached to the motor.
- Once all the blades are securely fastened, visually inspect them to ensure they are symmetrically positioned and balanced.
- If necessary, use a blade balancing kit to correct any imbalances. These kits typically include adhesive weights that can be placed on the blades to achieve proper balance.
Ensuring the fan blades are securely attached and balanced is important for both the performance and longevity of the ceiling fan. Balanced blades help reduce vibrations, noise, and unnecessary strain on the motor.
Once you have verified that all the fan blades are properly secured and in balance, you’re ready to proceed to the next step: attaching the fan’s canopy.
Keep in mind that the specific instructions for securing the fan blades may vary depending on the make and model of your ceiling fan. Always refer to the manufacturer’s instructions for the most accurate and detailed guidance.
By following these steps, you’ll have a properly mounted ceiling fan with securely attached and balanced blades, ensuring optimal performance and functionality.
Step 7: Attach the fan’s canopy
After securing the fan blades, the next step in installing your new ceiling fan is attaching the fan’s canopy. The canopy is the decorative cover that hides the electrical wires and connections, giving your ceiling fan a clean and finished look.
Follow these steps to attach the fan’s canopy:
- Take the canopy and gently lift it towards the fan motor. Align the holes on the canopy with the corresponding holes on the motor.
- Using the provided screws or bolts, insert them through the holes in the canopy and into the motor housing. Make sure the screws are tightened securely but be careful not to over-tighten and damage the canopy or motor housing.
- Once all the screws are in place, give the canopy a gentle tug to ensure it is securely attached to the fan motor.
- Step back and visually inspect the canopy to ensure it is level and properly aligned with the ceiling.
Some ceiling fans may have additional steps or requirements for attaching the canopy, such as inserting screws or clips. Always refer to the manufacturer’s instructions specific to your fan model for the most accurate installation guidance.
Attaching the fan’s canopy not only completes the overall appearance of your ceiling fan but also conceals the wiring connections for a neat and professional look. It’s important to ensure the canopy is securely attached to prevent any potential hazards or instability.
With the fan’s canopy properly attached, you’re now ready to move on to the final step: testing the new ceiling fan.
Remember to follow the manufacturer’s instructions carefully to ensure proper installation of the canopy and to avoid any damage to the fan or its components.
Step 8: Test the new ceiling fan
Congratulations! You’re in the final step of installing your new ceiling fan. It’s time to test your work and ensure that the fan is functioning properly before enjoying its cool breeze.
Follow these steps to test your new ceiling fan:
- Turn on the power supply to the area where the fan is installed. Use the circuit breaker panel to switch on the power or turn on the main breaker if you previously switched it off.
- Locate the fan’s control switch or remote control and set it to the desired speed. Start with the lowest speed setting and gradually increase it to higher speeds.
- Observe the fan blades as they rotate and ensure they are moving smoothly without any wobbling or hitting any obstructions.
- Listen for any unusual noise or vibrations coming from the fan motor. A quiet and smooth operation is ideal.
- Check that the fan’s lights, if included, are functioning properly. Turn them on and off to ensure they are responsive and provide adequate illumination.
If you encounter any issues during the testing phase, it’s essential to troubleshoot the problem before continuous operation. Common issues might include loose connections, imbalanced blades, or defective components. Refer to the manufacturer’s instructions or seek professional assistance if needed.
Remember to exercise caution while operating the fan and avoid placing any objects near the blades that could be thrown off or damaged by the rotating fan.
By testing your new ceiling fan, you can ensure its proper functionality and address any issues before they become more significant problems. Once you’re satisfied with the performance and operation of the fan, you can confidently enjoy the comfort and air circulation it provides.
Congratulations on successfully installing your new ceiling fan! Now sit back, relax, and delight in the cool breeze and improved aesthetics of your newly installed ceiling fan.
Conclusion
Changing a ceiling fan can be a rewarding and relatively simple DIY project that can enhance the comfort and style of your home. By following the step-by-step guide outlined in this article, you can successfully replace an old ceiling fan with a new one, bringing a refreshing breeze and updated look to any room.
Throughout the installation process, it’s important to prioritize safety. Always turn off the power supply before starting any electrical work and take necessary precautions to avoid accidents or injuries. If you’re not confident in your abilities or unfamiliar with electrical work, it’s advisable to hire a licensed electrician to handle the installation for you.
Gathering the necessary tools and materials, turning off the power supply, removing the old fan, installing the new mounting bracket, connecting the fan’s wiring, securing the fan blades, attaching the canopy, and testing the fan’s functionality are key steps to successfully changing a ceiling fan.
Ensure you carefully read and follow the instructions provided by the manufacturer for your specific ceiling fan model. Each fan may have slight variations in the installation process, so it’s important to stay informed and knowledgeable about the particular requirements of your fan.
By taking your time, following the instructions diligently, and paying attention to detail, you can install a new ceiling fan that will cool and circulate the air in your home efficiently. Don’t forget to test the fan thoroughly before regular use to ensure proper functionality.
With your new ceiling fan installed, sit back, relax, and enjoy the improved comfort and aesthetic appeal it brings to your living space. Whether it’s cooling you down during the hot summer months or circulating warm air during the colder seasons, a ceiling fan is a valuable addition to any home.
Remember, if you encounter any difficulties or concerns during the installation process, it’s always wise to seek professional assistance. A licensed electrician or knowledgeable handyman can ensure that the installation is done safely and correctly.
Now, armed with the knowledge and guidance provided in this article, you’re ready to embark on your ceiling fan installation journey. Enjoy the process and the comfort your new ceiling fan will bring to your home for years to come!
Frequently Asked Questions about How To Change A Ceiling Fan
Was this page helpful?
At Storables.com, we guarantee accurate and reliable information. Our content, validated by Expert Board Contributors, is crafted following stringent Editorial Policies. We're committed to providing you with well-researched, expert-backed insights for all your informational needs.


0 thoughts on “How To Change A Ceiling Fan”