Articles
How To Connect Homelink To Garage Door
Modified: October 28, 2024
Learn how to connect Homelink to your garage door with these informative articles. Unlock the convenience of automated garage access today!
(Many of the links in this article redirect to a specific reviewed product. Your purchase of these products through affiliate links helps to generate commission for Storables.com, at no extra cost. Learn more)
Introduction
Connecting your Homelink to your garage door opener can provide convenience and ease of use, allowing you to effortlessly open and close your garage door with just a push of a button. Homelink is a wireless control system that is integrated into many vehicles, providing a seamless way to operate your garage door opener without the need for a separate remote control.
In this article, we will guide you through the steps to connect Homelink to your garage door opener. We will provide you with detailed instructions and troubleshooting tips to ensure a smooth and successful setup process.
Please note that the compatibility of Homelink with your garage door opener depends on the make, model, and year of your vehicle as well as the type of garage door opener you have. It’s always a good idea to check your vehicle’s manual or consult the manufacturer’s website for specific compatibility information.
Now, let’s get started with the first step: checking for compatible vehicles.
Key Takeaways:
- Ensure compatibility by checking your vehicle’s manual or manufacturer’s website before attempting to connect Homelink to your garage door opener. Aftermarket solutions are available for non-compatible vehicles, adding convenience to your daily routine.
- Clear the Homelink memory and carefully follow the programming steps to successfully connect Homelink to your garage door opener. Test the connection and use troubleshooting tips if needed for a seamless and efficient setup process.
Read more: How To Connect Garage Door Opener Liftmaster
Step 1: Check Compatible Vehicles
Before attempting to connect Homelink to your garage door opener, it’s important to verify if your vehicle is compatible with the Homelink system. While many modern vehicles come equipped with Homelink, not all makes and models have this feature.
To check if your vehicle is compatible, you can refer to your vehicle’s user manual or visit the manufacturer’s website. Look for information on the specifications and features of your vehicle, specifically regarding Homelink integration.
If your vehicle is not compatible with Homelink, there are aftermarket solutions available that can add Homelink functionality to your car. These solutions typically involve installing a separate Homelink module that integrates with your vehicle’s existing controls.
Once you have confirmed that your vehicle is Homelink-compatible or have installed an aftermarket Homelink module, you can proceed to the next step: determining Homelink compatibility with your specific garage door opener.
Step 2: Determine Homelink Compatibility
After confirming that your vehicle is compatible with Homelink, you need to determine if your specific garage door opener is compatible as well. Homelink uses different technology and frequencies to communicate with different types of garage door openers, so it’s important to ensure compatibility for a successful connection.
First, check your garage door opener’s user manual or its manufacturer’s website for information on Homelink compatibility. Look for details such as the required frequency or type of technology (e.g., rolling code or dip switch) that your garage door opener supports.
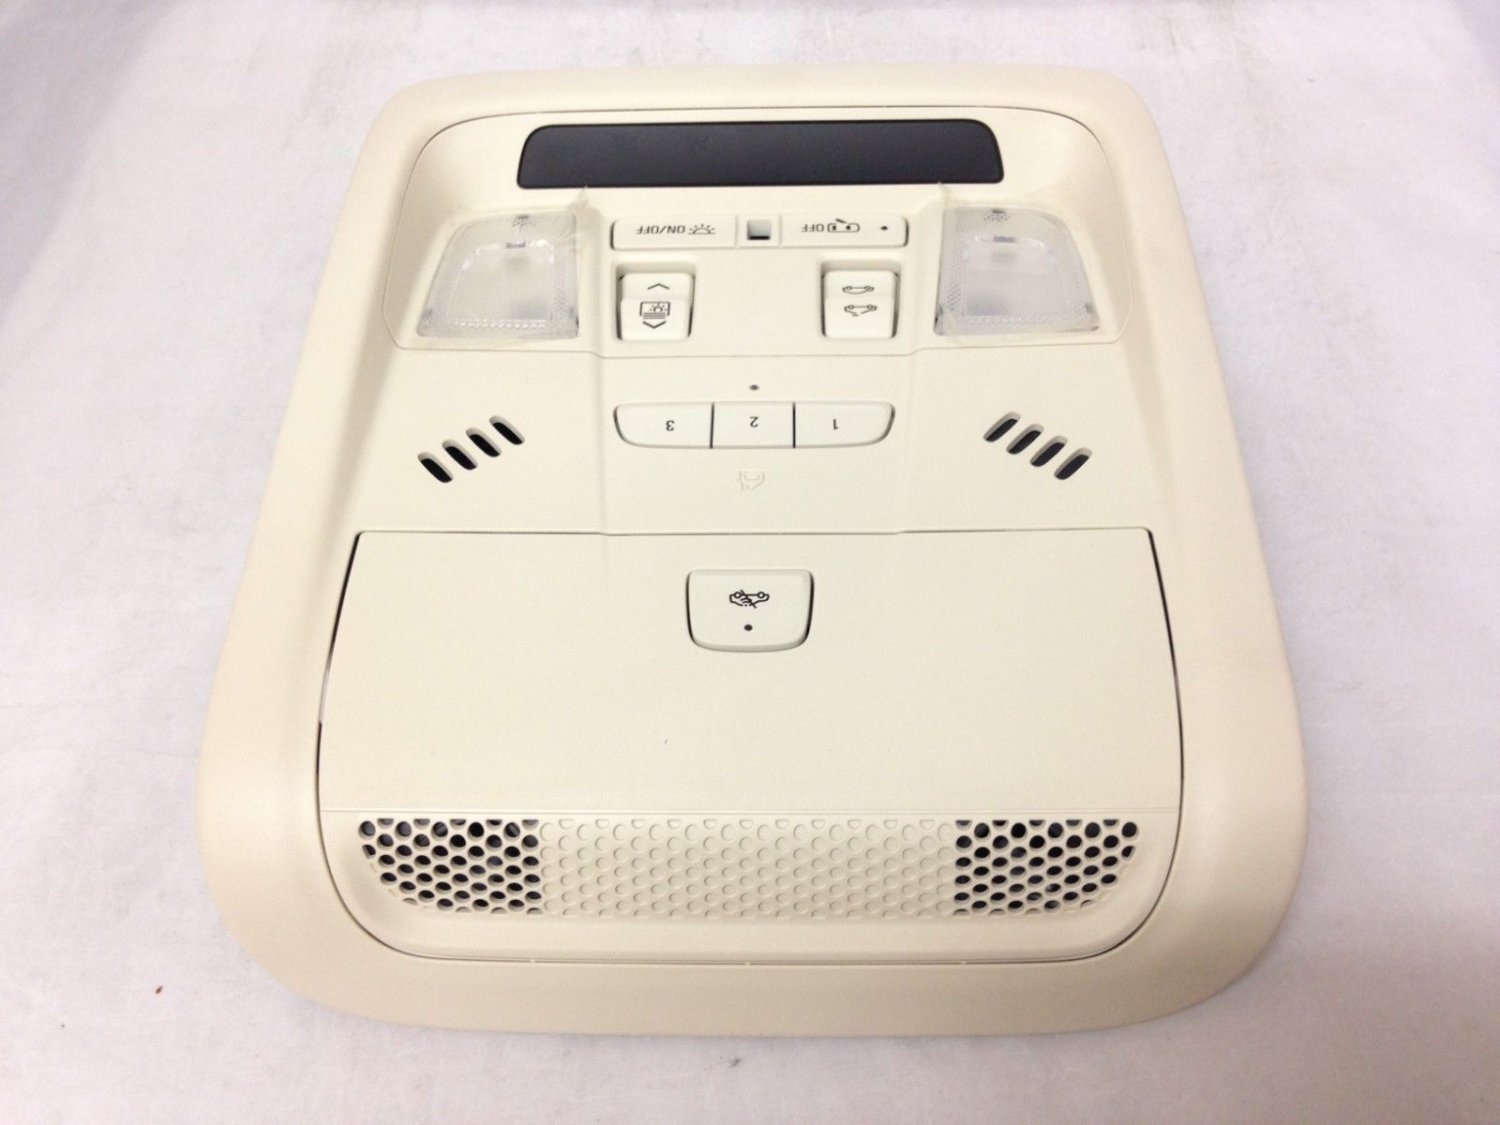
If you cannot find the information in the manual or online, you can try a simple compatibility test. Start by locating the small Homelink buttons on your vehicle’s overhead console or on the rearview mirror. Press and hold one of the Homelink buttons while standing directly in front of your garage door opener.
If the garage door opener activates and the door starts moving, it indicates that your vehicle’s Homelink is compatible with your garage door opener. However, if nothing happens or the door only partially responds, it may indicate incompatibility. In such cases, you might need to explore alternative solutions, such as using a universal garage door opener that can work with Homelink.
If your garage door opener is compatible with Homelink, you can proceed to the next step: clearing the Homelink memory.
Step 3: Clear Homelink Memory
Before programming your Homelink to connect with your garage door opener, it’s crucial to clear the Homelink memory to ensure a fresh start. Clearing the memory will remove any previously programmed codes or signals that may interfere with the new connection process.
To clear the Homelink memory, follow these steps:
- Locate the Homelink buttons in your vehicle. They are usually located on the interior roof console or on the rearview mirror.
- Press and hold the first and third buttons simultaneously until the Homelink indicator light starts flashing rapidly. This may take around 20-30 seconds.
- Release the buttons. This will clear the Homelink memory.
Once you have cleared the Homelink memory, you are ready to put your garage door opener into programming mode. This will allow Homelink to learn and store the necessary codes for operating your specific garage door opener.
In the next step, we will guide you through the process of putting your garage door opener into programming mode. Ensure that you are near the garage door opener and have all required tools and access passwords or PINs ready.
Step 4: Put the Garage Door Opener Into Programming Mode
In order to program your Homelink with your garage door opener, you need to put the garage door opener into programming mode. This mode allows the garage door opener to receive and learn the signals sent by Homelink.
The process of putting the garage door opener into programming mode may vary depending on the make and model of your opener. Therefore, it’s important to refer to your specific garage door opener’s user manual for detailed instructions. However, here is a general guide:
- Locate the “Learn” or “Programming” button on the garage door opener. It is usually found on the back or side of the opener, near the motor unit.
- Press and release the “Learn” or “Programming” button. The indicator light on the garage door opener should start flashing, indicating it is in programming mode.
- You will typically have 30 seconds to proceed with the programming process before the garage door opener exits programming mode.
Keep in mind that some garage door openers require additional steps or may have different procedures for different models. Make sure to carefully follow the instructions provided by the manufacturer to ensure successful programming.
Once your garage door opener is in programming mode, you can move on to the next step, which is programming Homelink to connect with the opener. We will guide you through the programming process in the next step.
Make sure your garage door opener is compatible with Homelink. Follow the specific programming instructions for your vehicle and garage door opener. Keep the Homelink button pressed until the garage door responds.
Step 5: Program Homelink
Now that your garage door opener is in programming mode, it’s time to program your Homelink system to connect with the opener. The programming process may vary slightly depending on your vehicle’s make and model, but the general steps are as follows:
- Get into your vehicle and turn the ignition to the “On” position. Note that some vehicles may require the engine to be running during the programming process.
- Locate the Homelink buttons in your vehicle. These buttons are typically found on the overhead console or on the rearview mirror.
- Press and hold the desired Homelink button that you want to program for the garage door opener. At the same time, press and hold the open/close button on your existing garage door opener remote control.
- Continue holding both buttons until the Homelink indicator light flashes slowly, then rapidly. This may take up to 30 seconds.
- Release both buttons once the Homelink light starts flashing rapidly.
- Go to your garage door opener motor unit and press the “Learn” or “Programming” button within 30 seconds of releasing the buttons on your vehicle’s Homelink system. The indicator light on the garage door opener should flash to indicate that it has received the signal.
- Return to your vehicle and press the Homelink button you just programmed a few times, holding it down for a few seconds each time. This will test the connection between Homelink and the garage door opener.
Please note that the programming steps may differ for different vehicles and garage door opener models. Always consult your vehicle’s manual and the garage door opener’s instructions for specific details.
Once you have successfully programmed Homelink, you can move on to the next step: testing the Homelink connection.
Step 6: Test Homelink Connection
After programming Homelink to connect with your garage door opener, it’s important to test the connection to ensure everything is working properly. Testing the connection will give you peace of mind and allow you to make any necessary adjustments if the connection is not functioning correctly.
To test the Homelink connection, follow these steps:
- Ensure that your vehicle is parked within range of the garage door opener, typically within a few feet.
- Press the Homelink button that you programmed for the garage door opener and hold it down.
- Observe the garage door’s response. It should start moving, either opening or closing, depending on its current position.
- If the garage door activates as expected, release the Homelink button and wait for the door to complete its operation. This indicates that the Homelink connection is successful.
- If the garage door does not respond or only partially responds, there may be an issue with the programming. Repeat the programming steps and ensure that you are following the instructions correctly.
- If you encounter any difficulties or the connection is not functioning properly, consult the troubleshooting tips in the next step.
Remember to test the connection multiple times from different distances and angles to ensure consistent performance. Once you have confirmed that the Homelink connection is working fine, you can proceed to the final step: troubleshooting any issues that may arise during the setup process.
Step 7: Troubleshooting Tips
During the process of connecting Homelink to your garage door opener, you may encounter some challenges or issues. Here are some troubleshooting tips to help you address common problems:
- Weak Signal: If the Homelink connection is weak or inconsistent, try holding the Homelink button down for a longer duration when programming or operating the garage door. This can enhance the signal strength and improve the connection.
- Interference: Sometimes, other devices or signals in the area can interfere with the Homelink connection. Make sure there are no other electronic devices nearby that might be causing interference. Additionally, ensure that the antenna on your garage door opener is properly extended to optimize signal reception.
- Distance: If you are testing the Homelink connection from too far away, the signal may not reach the garage door opener. Move closer to the garage door and test the connection again.
- Garage Door Opener Compatibility: If your garage door opener is an older model or uses unique technology, it may not be fully compatible with the Homelink system. In such cases, contact the manufacturer or consult a professional to explore alternative solutions.
- Reprogramming: If the Homelink connection is not working as expected, try reprogramming the Homelink button by performing the programming steps again. Ensure that you follow each step carefully and accurately.
- Battery Replacement: If your garage door opener remote control uses batteries, check and replace them if necessary. Weak batteries can hinder the performance of the Homelink connection.
- Consult Manufacturer: If you have tried all troubleshooting steps and are still experiencing issues, reach out to the manufacturer of your vehicle or the garage door opener for further assistance. They may be able to provide additional guidance or offer specialized support.
By following these troubleshooting tips, you should be able to overcome common hurdles and ensure a successful connection between Homelink and your garage door opener.
With the troubleshooting steps complete, you have now completed the process of connecting Homelink to your garage door opener! Enjoy the convenience and ease of operating your garage door with just the push of a button from the comfort of your vehicle.
Conclusion
Connecting your Homelink to your garage door opener can greatly enhance the convenience and efficiency of operating your garage door. With just a few simple steps, you can enjoy the ease of opening and closing your garage door from the comfort of your vehicle.
In this article, we covered the step-by-step process of connecting Homelink to your garage door opener. We began by checking for compatible vehicles and determining Homelink compatibility with your specific garage door opener. We then cleared the Homelink memory and put the garage door opener into programming mode. We programmed Homelink and tested the connection to ensure everything was working properly. Lastly, we provided troubleshooting tips to address any potential challenges you may encounter.
Remember to consult your vehicle’s manual and the garage door opener’s instructions for any specific guidance related to your make and model. It’s important to follow the instructions accurately and carefully to ensure a successful connection.
By connecting Homelink to your garage door opener, you can enjoy the convenience of easily opening and closing your garage door, eliminating the need for a separate remote control or manually operating the door. This not only adds efficiency to your daily routine but also provides an added layer of security and convenience.
If you encounter any difficulties during the setup process or have further questions, do not hesitate to reach out to the manufacturer of your vehicle or the garage door opener for assistance. They are equipped to provide the necessary support to help you successfully connect your Homelink system.
Now that you have completed the process of connecting Homelink to your garage door opener, you’re ready to enjoy the convenience and ease of use it offers. Sit back, relax, and effortlessly operate your garage door with just a push of a button!
Frequently Asked Questions about How To Connect Homelink To Garage Door
Was this page helpful?
At Storables.com, we guarantee accurate and reliable information. Our content, validated by Expert Board Contributors, is crafted following stringent Editorial Policies. We're committed to providing you with well-researched, expert-backed insights for all your informational needs.


0 thoughts on “How To Connect Homelink To Garage Door”