Articles
How To Fix Wobble Wheel On Tool Chest
Modified: February 22, 2024
Learn how to fix a wobble wheel on your tool chest with these helpful articles. Ensure smooth and stable movement for your tools.
(Many of the links in this article redirect to a specific reviewed product. Your purchase of these products through affiliate links helps to generate commission for Storables.com, at no extra cost. Learn more)
Introduction
Having a tool chest is a great way to keep your tools organized and easily accessible. However, over time, you may notice that one of the wheels on your tool chest has developed a wobble, making it difficult to move the chest around smoothly. This wobble can be not only irritating but also a potential safety hazard, as it can cause the tool chest to tip over or become unstable.
Fortunately, fixing a wobble wheel on a tool chest is a relatively straightforward process that you can tackle yourself, without needing to hire a professional. This article will guide you through the steps to fix the wobble wheel and restore the stability and functionality of your tool chest.
To effectively address the wobble wheel issue, it is essential to first understand the root cause of the problem. In most cases, a wobble wheel is caused by loose or worn-out mounting hardware. Over time, the nuts, bolts, or screws that secure the wheel to the chest may become loose, leading to the wobbling motion.
Before diving into the repair process, you’ll need a few tools and materials. These include a wrench or socket set, pliers, lubricating oil, a rag or towel, and replacement wheel hardware if necessary. Gathering these items upfront will ensure a smooth repair process without interruptions.
Now that you have a basic understanding of the issue and have assembled the necessary tools let’s start fixing that wobble wheel on your tool chest. Follow the step-by-step instructions provided in this article, and soon you’ll be back to smoothly rolling your chest around your workspace.
Key Takeaways:
- Regular maintenance and understanding the root causes of wobble wheels can help DIY enthusiasts easily fix the issue, ensuring a stable and safe tool chest for efficient project work.
- By following the step-by-step repair process, DIYers can confidently address wobble wheel problems, reassemble their tool chest, and enjoy a smoothly rolling and stable storage solution for their tools.
Read more: How To Put Wheels On A Craftsman Tool Chest
Understanding the Wobble Wheel Issue
Before diving into the repair process, it’s important to have a clear understanding of why the wobble wheel issue occurs. A wobble wheel is typically caused by loose or worn-out mounting hardware. Over time, the nuts, bolts, or screws that secure the wheel to the tool chest may become loose due to regular use or vibrations. As a result, the wheel loses its stability, causing it to wobble.
There are a few factors that can contribute to the wobble wheel problem. Firstly, inadequate tightening of the mounting hardware during the assembly process can lead to loose connections. If the fasteners were not tightened securely from the beginning, they may gradually loosen over time, causing the wheel to wobble.
Secondly, heavy usage of the tool chest can also contribute to the wobble wheel issue. If the tool chest is frequently moved around or carries heavy tools, the constant strain on the wheel can loosen the mounting hardware. This is particularly common in environments where the tool chest is subject to rough handling or uneven surfaces.
Additionally, environmental factors such as temperature changes and humidity levels can affect the stability of the mounting hardware. Over time, these fluctuations can cause the nuts, bolts, or screws to become loose, leading to the wobble wheel problem.
It’s worth noting that the issue of wobble wheels is not limited to tool chests alone. Similar problems can occur with other wheeled furniture or equipment, including chairs, carts, or even bicycles. The underlying cause usually remains the same – loose or worn-out mounting hardware.
Now that you have a clearer understanding of why the wobble wheel issue occurs, it’s time to gather the necessary tools and materials and move on to the repair process. By following the step-by-step instructions in the upcoming sections, you’ll be able to fix the wobble wheel on your tool chest and restore its stability and functionality.
Tools and Materials Needed
Before you begin repairing the wobble wheel on your tool chest, it’s important to gather the necessary tools and materials. Having everything at hand will ensure a smooth and efficient repair process. Here are the tools and materials you’ll need:
- Wrench or socket set: You’ll need a suitable wrench or socket set to tighten or loosen the mounting hardware. The size may vary depending on the specific type of fasteners used on your tool chest.
- Pliers: Pliers will come in handy if any nuts or bolts are difficult to manipulate by hand. They will provide a better grip and allow you to tighten or loosen fasteners more effectively.
- Lubricating oil: If the wheel and the mounting hardware show signs of rust or are difficult to rotate, applying lubricating oil can help loosen them up and improve their functionality.
- Rag or towel: It’s always a good idea to have a rag or towel on hand to wipe away any dirt, grease, or excess lubricating oil during the repair process. Keeping the area clean will make it easier to work and ensure a proper connection.
- Replacement wheel hardware (if necessary): If you inspect the mounting hardware and find that it is worn-out or damaged beyond repair, having replacement wheel hardware on hand will enable you to replace the old hardware and restore stability to the wobble wheel.
With these tools and materials gathered, you’ll be well-equipped to tackle the repair process. Ensure that you have a clean and well-lit workspace, as this will make the repair process more efficient and help prevent any accidental damage.
Now that you’re prepared with the necessary tools and materials, let’s move on to the step-by-step process of fixing your wobble wheel and restoring stability to your tool chest.
Step 1: Emptying the Tool Chest
Before you begin fixing the wobble wheel on your tool chest, it’s crucial to empty the contents of the chest. This will not only make the repair process easier but also prevent any damage to your tools or equipment during the repair.
Start by removing all the tools, accessories, and items stored in the tool chest. Carefully place them in a safe and organized manner, ensuring that they are easily accessible when you’re ready to reassemble the tool chest.
This step is particularly important if you have heavy or sharp tools in your chest. By removing them, you’ll reduce the weight and the risk of injury during the repair process.
Once the chest is empty, take the time to clean both the inside and outside of the tool chest. Use a soft cloth or a mild cleaning solution to remove any dirt, dust, or debris that may have accumulated over time.
Inspect the interior of the tool chest for any loose screws, nuts, or bolts that may have come loose due to the wobble wheel issue. Keep these components aside for later inspection and potential replacement if necessary.
Emptying the tool chest provides a clear workspace for the repair process and ensures that your tools and equipment are protected during the repair. Plus, you’ll have the opportunity to give your tool chest a good cleaning, contributing to its overall maintenance and longevity.
With the tool chest emptied and cleaned, you’re now ready to move on to the next step: locating the wobble wheel on your tool chest. Stay tuned!
Step 2: Locating the Wobble Wheel
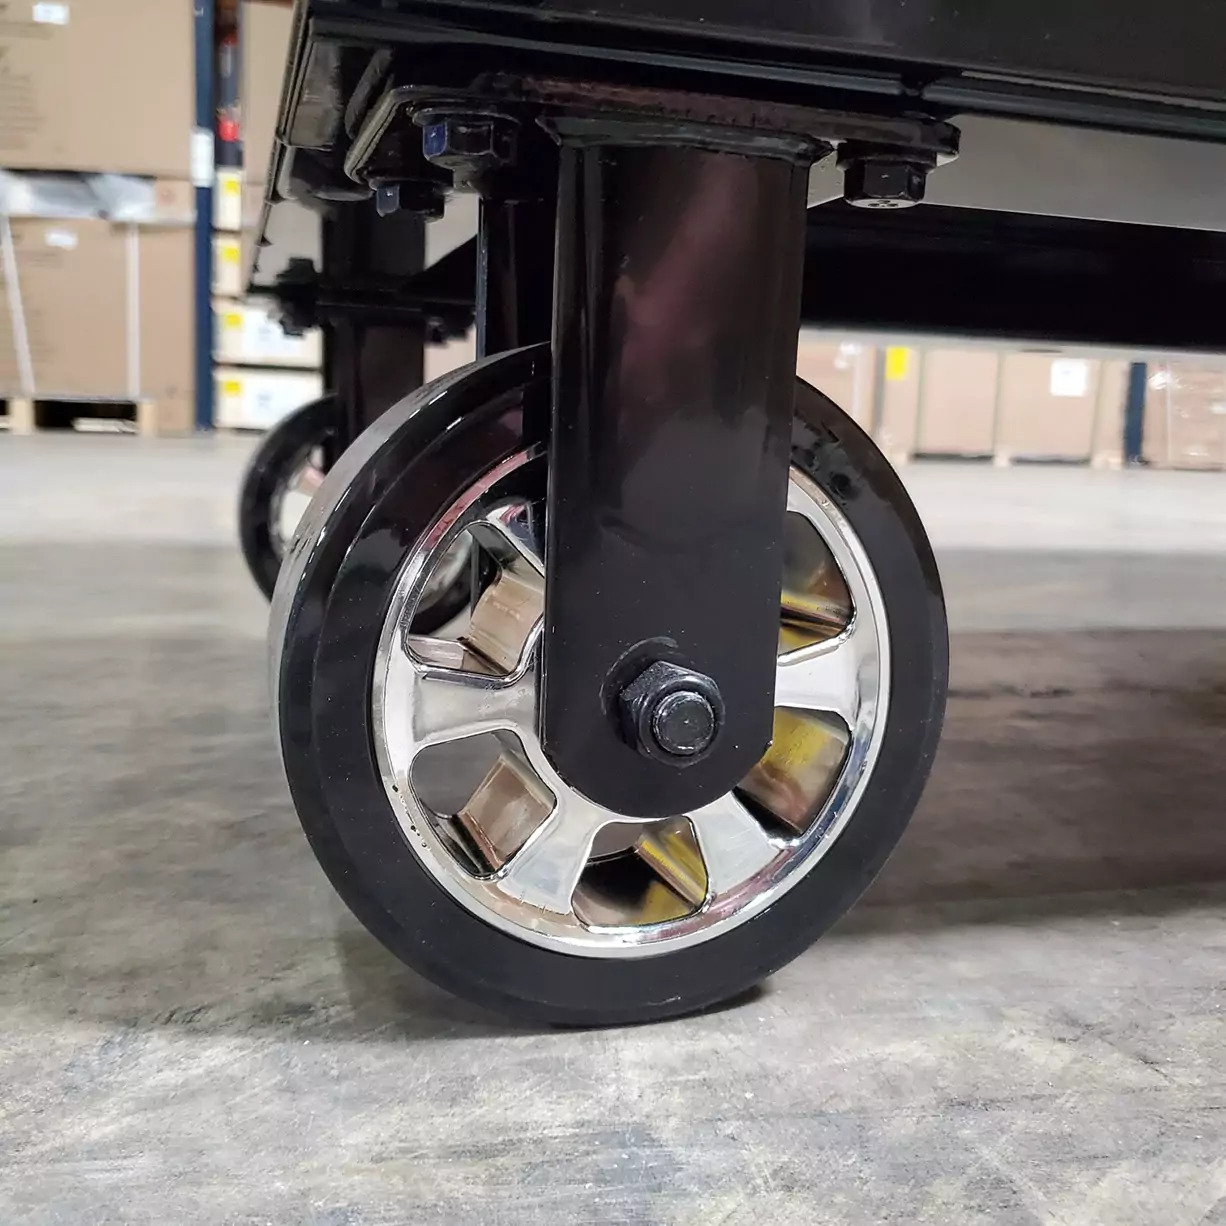
Now that you have emptied and cleaned your tool chest, it’s time to locate the wobble wheel. Identifying the exact wheel that is causing the issue will allow you to focus your repair efforts efficiently.
Start by closely inspecting each wheel on the tool chest. Look for any visible signs of wobbling or instability. Rotate each wheel gently to determine which one is causing the wobble. You may notice uneven movement or hear a rattling sound when rotating the problematic wheel.
Once you have identified the wobble wheel, it’s a good idea to mark it somehow to ensure you don’t lose track during the repair process. You can place a piece of tape or simply make a mental note of which wheel it is.
While examining the wobble wheel, also check the condition of the mounting hardware. Look for any loose nuts, bolts, or screws that may be contributing to the problem. Pay attention to any signs of wear or damage that might require replacement hardware.
It’s worth noting that some tool chests have swivel casters, which allow for both rolling and turning. In such cases, the wobble may not be limited to just one wheel. Take the time to inspect all the wheels and note any signs of wobbling or loose hardware.
By accurately identifying the wobble wheel and assessing its condition, you’ll be better equipped to address the specific issues causing the wobble. This will help you proceed with the repair process more effectively while avoiding unnecessary repairs to other wheels that may not be causing the problem.
With the wobble wheel located and any additional issues noted, you’re now ready to move on to the next step: inspecting the wheel mounting. Stay tuned!
Check the wheel bolts and make sure they are tightened securely. If the wobbling persists, inspect the wheel for any damage or wear and replace if necessary.
Read also: 9 Amazing Tool Box With Wheels for 2025
Step 3: Inspecting the Wheel Mounting
Now that you have identified the wobble wheel on your tool chest, it’s time to inspect the wheel mounting to determine the root cause of the wobbling issue. The mounting hardware is crucial for maintaining stability and preventing the wheel from moving excessively.
Start by examining the area where the wheel is attached to the tool chest. Look for any signs of loose nuts, bolts, or screws. Use a wrench, socket set, or pliers if necessary to tighten the mounting hardware.
Inspect the condition of the mounting hardware as well. If you notice any rust, corrosion, or damage, it may be necessary to replace the hardware to ensure a secure connection. Refer to the instructions provided with your tool chest or consult the manufacturer’s website for guidance on obtaining suitable replacement hardware.
While inspecting the wheel mounting, also check for any excessive play or movement. Gently wiggle the wheel back and forth and observe if there is any noticeable looseness. This could indicate worn-out or damaged components that need to be addressed.
In some cases, the wheel itself may be worn out or damaged, contributing to the wobble. Take a close look at the wheel and assess its condition. If it shows signs of significant wear or if the tread is uneven, it may be necessary to replace the wheel entirely.
During the inspection, don’t forget to refer to any documentation or instructions provided with your tool chest. The manufacturer may have specific recommendations for tightening the mounting hardware or replacing components.
By thoroughly inspecting the wheel mounting, you’ll be able to identify any loose or damaged hardware, addressing the root cause of the wobble. In the next step, we’ll cover the process of tightening the mounting hardware to restore stability to the wobble wheel. Stay tuned!
Step 4: Tightening the Mounting Hardware
Now that you have inspected the wheel mounting and identified any loose or damaged hardware, it’s time to tighten the mounting hardware to restore stability to the wobble wheel. The key to fixing the wobble is ensuring that the wheel is securely attached to the tool chest.
Start by using a wrench, socket set, or pliers to tighten the nuts, bolts, or screws that secure the wheel to the tool chest. Work methodically, starting with the loosest fasteners first. Turn them clockwise to tighten them until they are snug but not overly tight.
As you tighten each fastener, check for any noticeable improvement in the stability of the wheel. Remember to refer to any documentation or instructions provided with your tool chest for specific recommendations on tightening torque or procedures.
If you encounter damaged or worn hardware during the tightening process, it may be necessary to replace the affected components. Remove the old hardware carefully, ensuring that you have the correct replacements on hand. Install the new hardware according to the manufacturer’s instructions.
While tightening the mounting hardware, be cautious not to overtighten, as this can cause the fasteners to strip or break. Use caution and feel for resistance to determine when the fasteners are tightened sufficiently.
After tightening all the fasteners, give the wheel a gentle shake or spin to confirm that it is securely attached and does not exhibit any wobbling or excessive movement. If the wobble persists, double-check the tightness of the mounting hardware and consider replacing any damaged wheel components.
By focusing on the tightening process, you will restore stability to the wobble wheel on your tool chest, making it safe and functional once again. In the next step, we’ll move on to testing the wheel to ensure that it is fully repaired. Stay tuned!
Step 5: Testing the Wheel
After tightening the mounting hardware, it’s important to test the wobble wheel to ensure that it has been properly repaired and is functioning as expected. Testing the wheel will allow you to confirm that the wobbling issue has been resolved and that the wheel moves smoothly and securely.
To test the wheel, gently push or roll the tool chest around your workspace. Pay close attention to the wheel that was previously wobbling, observing its movement and stability. Note any signs of wobbling, uneven rolling, or unusual noise during the test.
If the wobbling issue persists or if you notice any other problems, it may be necessary to revisit the previous steps and reinspect the wheel mounting and hardware. Double-check that the fasteners are securely tightened and that there are no damaged or worn components.
During the wheel test, consider trying different terrains or surfaces to ensure that the wheel performs consistently. Move the tool chest over both smooth and rough surfaces, making turns and navigating obstacles if applicable. This will provide a comprehensive assessment of the wheel’s functionality.
If the wheel continues to exhibit wobbling or instability, it may be necessary to seek professional assistance or contact the manufacturer for further guidance. They can provide specialized knowledge and solutions to address more complex issues that are beyond the scope of this DIY repair.
However, if the wheel performs well during the test and no signs of wobbling or instability are observed, you can proceed to the final step: reassembling the tool chest.
Remember, testing the wheel is crucial to ensure that the repair has been successful and that you can confidently use your tool chest without any safety concerns. In the next step, we’ll cover the process of reassembling the tool chest. Stay tuned!
Step 6: Reassembling the Tool Chest
Now that you have successfully repaired the wobble wheel on your tool chest, it’s time to reassemble the chest and restore it to its functional state. Reassembling the tool chest involves putting the tools, accessories, and items back into their designated places and ensuring that everything is organized and secure.
Start by gathering all the tools and equipment that were previously removed from the chest. Clean them if necessary and inspect them for any damage or wear. Replace any damaged tools or equipment so that your tool chest is fully stocked and ready for use.
Place each tool and item back into its respective compartment or drawer in the tool chest. Take care to organize them in a way that is efficient and convenient for your specific needs. Consider using dividers or labels to further categorize and organize your tools.
As you reassemble the tool chest, pay attention to the weight distribution to ensure that it is balanced. Avoid placing too many heavy items on one side, as this can affect the stability and maneuverability of the chest.
Once everything is back in its place, close and secure the drawers or compartments. Check that they are properly latched and that nothing is at risk of falling out or shifting during movement.
Give the wobble wheel another test by gently pushing or rolling the tool chest around your workspace. Confirm that the wheel remains stable and secure, without any signs of wobbling or instability.
Finally, take a moment to admire your repaired tool chest. You’ve successfully fixed the wobble wheel and restored the functionality of the chest. Now you can enjoy the convenience of a smooth-rolling and stable tool chest for all your projects.
Remember to regularly inspect the mounting hardware and wheels of your tool chest and address any issues promptly. By maintaining the proper care and attention, you can extend the lifespan of your tool chest and ensure its continued functionality.
Congratulations on successfully repairing your wobble wheel and reassembling your tool chest! You can now confidently use your tools and move the chest around without any concerns. Happy DIY-ing!
Conclusion
Fixing a wobble wheel on a tool chest may initially seem like a daunting task, but with the right knowledge and tools, it can be easily accomplished. By following the steps outlined in this article, you’ve successfully addressed the wobble wheel issue and restored stability to your tool chest.
Throughout the repair process, you’ve gained an understanding of the common causes of wobble wheels, identified the specific wheel causing the issue, inspected and tightened the mounting hardware, tested the wheel for stability, and finally reassembled your tool chest with confidence.
Remember, regular maintenance is essential to keep your tool chest in optimal condition. Periodically inspect the mounting hardware and wheels to catch any loosening or wear early on. Addressing these issues promptly will prevent them from escalating into more significant problems in the future.
By addressing the wobble wheel issue and maintaining your tool chest, you can ensure that your tools are easily accessible and safely stored. This will enhance your productivity and workflow, allowing you to focus on your projects without distractions or safety concerns.
We hope this guide has been helpful in resolving your wobble wheel issue. If you have any further questions or if other issues arise, don’t hesitate to reach out to a professional or the manufacturer for assistance.
Thank you for taking the time to read this article and for caring for your tool chest. We wish you many successful projects and a smoothly rolling tool chest!
Frequently Asked Questions about How To Fix Wobble Wheel On Tool Chest
Was this page helpful?
At Storables.com, we guarantee accurate and reliable information. Our content, validated by Expert Board Contributors, is crafted following stringent Editorial Policies. We're committed to providing you with well-researched, expert-backed insights for all your informational needs.


0 thoughts on “How To Fix Wobble Wheel On Tool Chest”