Articles
How To German Schmear Fireplace
Modified: December 7, 2023
Learn how to German schmear your fireplace with our informative articles. Discover step-by-step instructions and get expert tips for a stunning transformation.
(Many of the links in this article redirect to a specific reviewed product. Your purchase of these products through affiliate links helps to generate commission for Storables.com, at no extra cost. Learn more)
Introduction
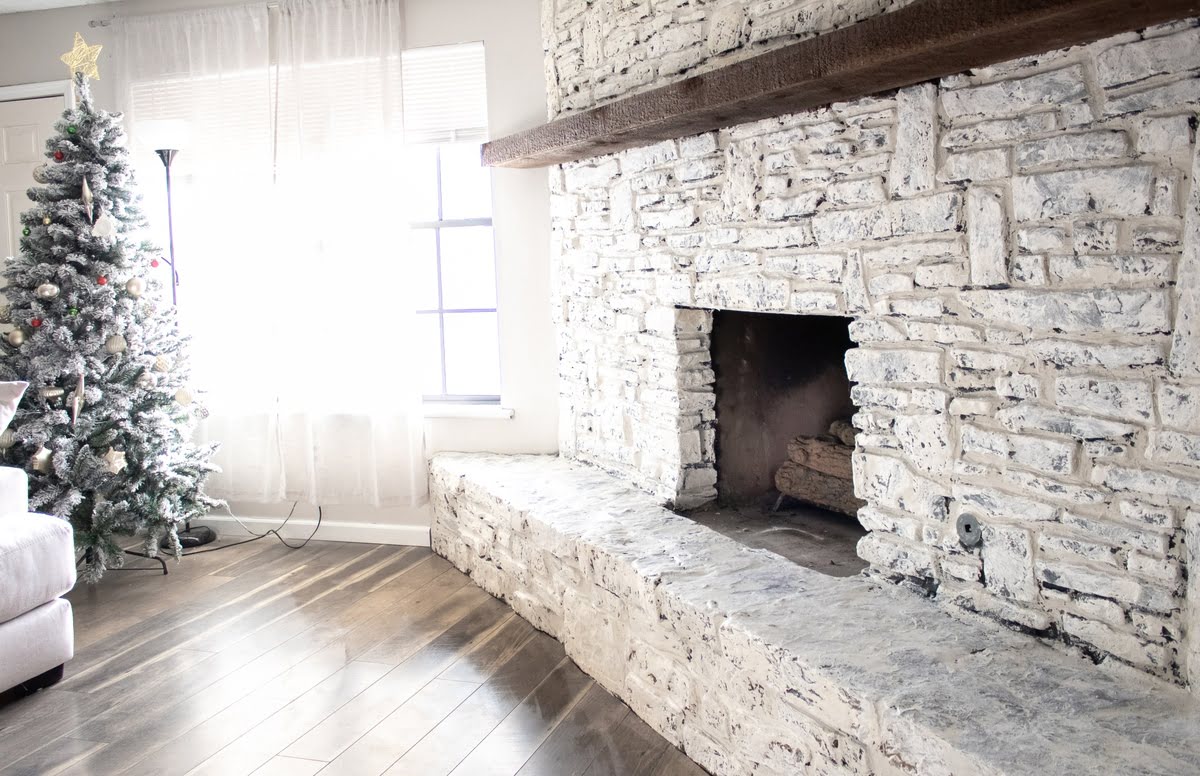
Welcome to our guide on how to German schmear your fireplace! German schmearing, also known as German smear or mortar wash, is a popular technique used to give brick or stone surfaces a unique and rustic appearance. This technique involves applying a thin layer of mortar onto the surface and then partially wiping it off to create a textured and aged effect.
German schmearing is a great way to transform the look of your fireplace and add a touch of character to your space. Whether you prefer a traditional or modern style, this technique can be adapted to suit your personal taste and décor.
In this article, we will walk you through the step-by-step process of German schmearing your fireplace. We will cover the materials you will need, as well as the necessary preparation and application techniques. So, let’s dive in and learn how to create a stunning German schmear finish for your fireplace.
Key Takeaways:
- Transform your fireplace with a rustic German schmear finish, adding character and charm to your space. Embrace imperfections for a unique and natural look that enhances the ambiance of your home.
- Achieve a stunning German schmear effect by carefully selecting mortar mix, preparing the surface, and adding depth and texture. Enjoy the cozy and inviting atmosphere of your DIY masterpiece.
Read more: How To German Smear On Brick
Materials Needed
Before you begin the German schmear process, it’s important to gather all the necessary materials. Here’s a list of what you’ll need:
- Drop cloths or plastic sheets to protect surrounding areas
- Tape or painter’s tape
- Brush or broom for cleaning the surface
- Mild detergent and water for surface cleaning
- Mortar mix in your preferred color
- Water for mixing the mortar
- Mixing container and trowel for mortar preparation
- Gloves and safety goggles
- Sponge or damp cloth for wiping off excess mortar
- Lint-free cloth for cleaning up
It’s important to choose a mortar mix that is suitable for your specific project. Different mortar mixes are available in a range of colors and textures, so be sure to select one that complements the overall aesthetic you’re aiming for.
Once you have assembled all the necessary materials, you’ll be ready to move on to the next step: preparing your fireplace for the German schmear application.
Step 1: Preparing the Fireplace
Before you can start applying the German schmear, it’s important to prepare the surface of your fireplace. Follow these steps to ensure a clean and smooth base for the mortar:
- Start by protecting the surrounding area with drop cloths or plastic sheets. This will prevent any accidental spills or messes from damaging your floor or furniture.
- Use tape or painter’s tape to cover any areas that you don’t want the mortar to touch, such as the edges of the fireplace or adjacent walls.
- Remove any loose dirt or debris from the surface of the fireplace. Use a brush or broom to sweep away any dust or cobwebs. This will help the mortar adhere better to the brick or stone.
- For a thorough cleaning, mix a mild detergent with water and scrub the surface of the fireplace. Rinse with clean water and allow it to dry completely before proceeding.
By taking the time to properly clean and prepare your fireplace, you’ll ensure that the mortar will bond effectively and provide the desired result.
Once you’ve finished these preparation steps, you can move on to the next step: mixing your mortar.
Step 2: Mixing the Mortar
Once your fireplace is properly prepared, it’s time to mix the mortar. Follow these steps to achieve the right consistency:
- Start by wearing gloves and safety goggles to protect yourself from any potential hazards.
- Read the instructions on the packaging of your mortar mix to determine the ratio of water to mortar. Follow these guidelines to ensure proper mixing.
- Pour the mortar mix into a mixing container, such as a bucket or wheelbarrow.
- Add water to the mix gradually, stirring it with a trowel. Aim for a consistency that is similar to peanut butter – not too runny or too thick. It should be easy to spread but not slide off the surface.
- Continue mixing until the mortar is well-blended and lump-free. If necessary, add more water or mortar mix to achieve the desired consistency.
- Allow the mortar mix to sit for a few minutes to activate the bonding agents.
Remember, it’s important to follow the instructions provided with your specific mortar mix, as different products may have slightly different mixing ratios or instructions.
Once your mortar is mixed to the proper consistency, you’re ready to move on to the next step: applying the mortar onto the fireplace.
Before starting the German schmear process on your fireplace, make sure to thoroughly clean the surface and remove any loose debris or soot. This will ensure a smooth and even application of the mortar mixture.
Step 3: Applying the Mortar
Now comes the exciting step of applying the mortar to your fireplace. Follow these steps to achieve the desired German schmear effect:
- Using a trowel, take a small amount of mixed mortar and apply it to the surface of the fireplace. Start at the bottom and work your way up.
- Spread the mortar onto the brick or stone using the flat side of the trowel. Make sure to cover the surface evenly, leaving no gaps or exposed areas.
- Once you’ve applied a thin layer of mortar, use the trowel’s edge or a flat edge scraper to create texture. Drag it across the mortar in a random pattern to achieve a rustic and aged look.
- Continue applying and texturing the mortar in small sections, working your way up the fireplace. It’s important to work quickly to prevent the mortar from drying before you can achieve the desired effect.
- If you prefer a more textured appearance, you can create additional depth by dabbing the mortar with a sponge or damp cloth. This will add dimension to the finish.
- Step back and inspect your work regularly to ensure that the mortar is applied evenly and meets your desired aesthetic.
Remember, the beauty of German schmearing lies in its imperfections and variations, so don’t worry about making it too perfect. Embrace the organic and natural look that mortar provides.
Once you’ve applied the mortar to the entire fireplace, you can move on to the next step: adding depth and texture to enhance the overall look.
Read more: What Is German Thyme
Step 4: Adding Depth and Texture
Now that you’ve applied the mortar to the surface of your fireplace, it’s time to enhance the depth and texture to create a stunning German schmear effect. Follow these steps:
- Using a damp sponge or cloth, lightly dab the surface of the mortar to create a textured appearance. This will help to blend the mortar and create a more natural and aged look.
- Work in small sections, applying gentle pressure and moving the sponge or cloth in circular motions.
- If you prefer a more pronounced texture, you can use a brush to create grooves or lines in the mortar. This will add further dimension and visual interest to your fireplace.
- As you work, periodically step back and assess the overall effect. Adjust the texture as needed to achieve a balanced and visually pleasing result.
- Remember to maintain consistency throughout the fireplace, ensuring that the depth and texture are even across the entire surface.
By adding depth and texture, you can create a unique and visually captivating German schmear finish on your fireplace. The variations and imperfections in the mortar will contribute to the charm and character of the final result.
Once you are satisfied with the depth and texture, you’re ready to move on to the final step: cleaning up and completing the German schmear process.
Step 5: Cleaning Up
After you have achieved the desired German schmear effect on your fireplace, it’s time to clean up and put the finishing touches. Follow these steps for a clean and polished final result:
- Use a damp cloth or sponge to gently wipe off any excess mortar from the surface. Be careful not to disturb the texture or depth you have created.
- Pay special attention to corners, edges, and grout lines where excess mortar may have accumulated. Use a damp cloth or small brush to clean these areas thoroughly.
- If you find any spots or areas where the mortar has dried unevenly or has a buildup, you can lightly sand it with fine-grit sandpaper to smooth out the surface. Take care not to over-sand and remove too much of the mortar.
- Once you have removed all excess mortar and cleaned the surface, allow it to dry completely.
- After the mortar is dry, use a lint-free cloth to gently buff the surface and remove any remaining dust or residue.
By taking the time to clean up properly, you’ll ensure that your German schmear fireplace looks polished and professional.
Congratulations! You have successfully completed the German schmear process and transformed your fireplace into a stunning focal point. Sit back, relax, and enjoy the warmth and ambiance it brings to your space.
Remember, German schmearing can be applied to other surfaces as well, such as walls or columns, so feel free to explore and experiment with this technique in other areas of your home.
Thank you for following this guide. We hope you found it helpful and inspiring. Happy schmearing!
Conclusion
German schmearing your fireplace is a rewarding DIY project that can transform the look and feel of your space. By following the step-by-step process outlined in this guide, you can achieve a beautiful and rustic German schmear finish that adds character and charm to your fireplace.
Throughout the process, it’s important to take your time, pay attention to detail, and let your creativity shine. The imperfections and variations in the mortar will contribute to the unique and natural appearance of the final result.
Remember, selecting the right mortar mix, properly preparing the surface of your fireplace, and applying the mortar with care are key factors in achieving the desired German schmear effect. Additionally, enhancing depth and texture and thoroughly cleaning up will ensure a polished and professional finish.
Once your German schmear fireplace is complete, take the time to sit back, relax, and enjoy the cozy and inviting ambiance it creates in your home. Show off your newfound DIY skills and be proud of the unique and personalized look you have achieved.
Don’t be afraid to experiment with German schmearing on other surfaces as well, such as walls or columns. With some practice and creativity, you can bring the rustic charm of German schmear to various areas of your living space.
We hope you found this guide informative and helpful as you embark on your German schmear fireplace project. Best of luck, and may your fireplace become the heart of your home!
Frequently Asked Questions about How To German Schmear Fireplace
Was this page helpful?
At Storables.com, we guarantee accurate and reliable information. Our content, validated by Expert Board Contributors, is crafted following stringent Editorial Policies. We're committed to providing you with well-researched, expert-backed insights for all your informational needs.


0 thoughts on “How To German Schmear Fireplace”