
Articles
How To Hang A Barn Quilt
Modified: February 24, 2024
Learn how to hang a beautiful barn quilt with our informative articles. Find step-by-step instructions and tips for displaying this unique art form.
(Many of the links in this article redirect to a specific reviewed product. Your purchase of these products through affiliate links helps to generate commission for Storables.com, at no extra cost. Learn more)
Introduction
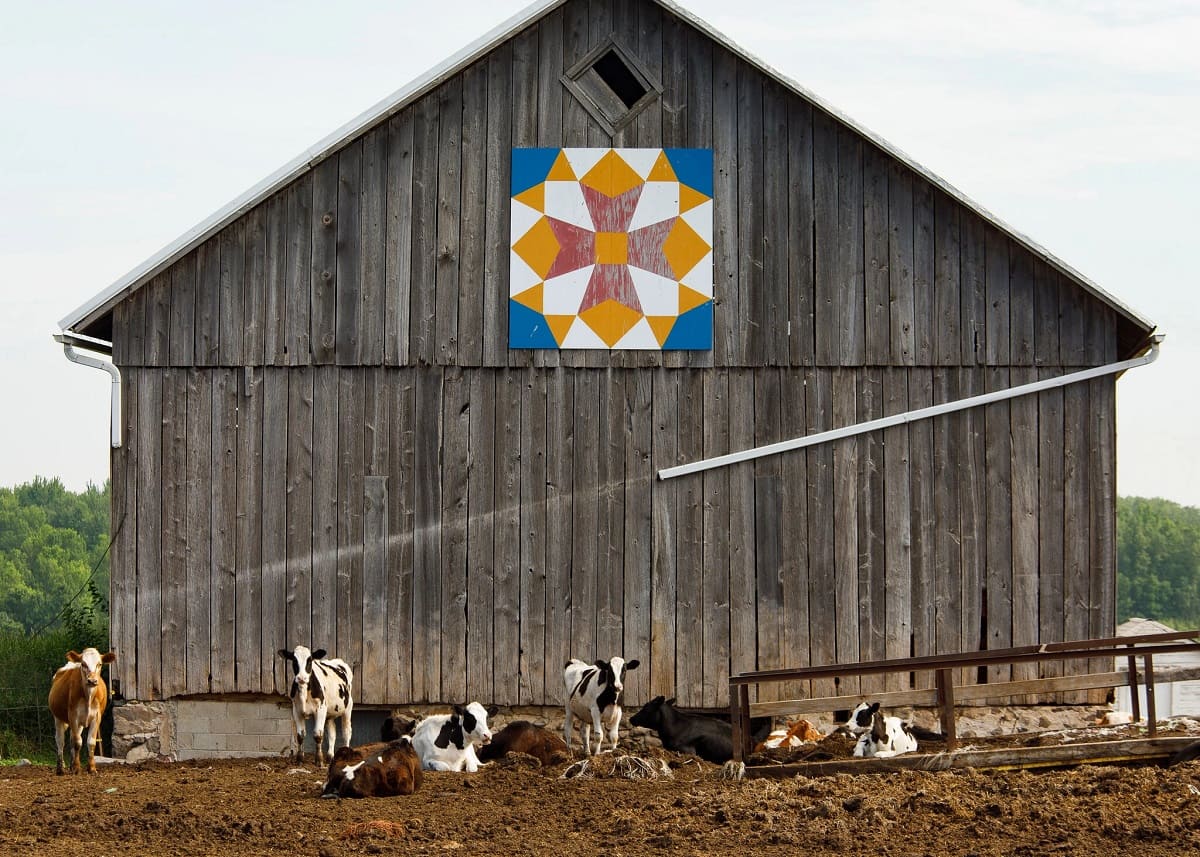
Have you ever driven through the countryside and admired those beautifully decorated barns with colorful geometric patterns? Those eye-catching designs are called barn quilts. Barn quilts have become a popular way to add a touch of creativity and charm to rural landscapes. Hanging a barn quilt is not only a wonderful way to enhance the visual appeal of your property but also a great way to showcase your artistic side.
In this article, we will guide you through the process of hanging a barn quilt. We will cover everything from selecting the perfect location to maintaining the quilt’s vibrant appearance. So, let’s dive in and learn how to hang a barn quilt.
Key Takeaways:
- Add a Touch of Creativity to Your Property
Hanging a barn quilt is a fun and rewarding way to showcase your artistic side and enhance the visual appeal of your property. From choosing the perfect location to securing and maintaining the quilt, each step adds a unique touch of creativity to your surroundings. - Preserve the Beauty for Years to Come
By properly preparing, securing, and maintaining your barn quilt, you can ensure its longevity and vibrant appearance. Take the time to care for your quilt, and you’ll enjoy its beauty for years to come, adding a timeless charm to your property.
Read more: How To Hang Pottery Barn Curtains
Materials Needed
Before you begin hanging your barn quilt, it’s essential to gather all the necessary materials. Here’s a list of items you’ll need:
- Wooden barn quilt panel
- Exterior paint or weather-resistant sealant
- Paintbrushes
- Drill
- Measuring tape
- Pencil or marker
- Level
- Screws or nails
- Stud finder (optional)
- Ladder or scaffolding
- Protective gloves and goggles
It’s important to choose a high-quality wooden panel that can withstand outdoor conditions. You can purchase pre-made barn quilt panels or create your own using plywood or MDO (Medium-Density Overlay) board.
When it comes to paint or sealant, make sure to select a weather-resistant option that will prevent your barn quilt from fading or deteriorating over time. Acrylic or latex exterior paint is a popular choice, as it offers durability and vibrant colors.
Additionally, wearing protective gloves and goggles is crucial to keep yourself safe while handling tools and chemicals.
Once you have all the necessary materials, you’re ready to choose the best location for your barn quilt.
Choosing a Location
Choosing the right location for your barn quilt is essential to ensure its visibility and impact. Here are a few factors to consider when selecting a spot for your barn quilt:
Visibility:
Find a location on your property that is easily visible from the road or other vantage points. This will allow others to enjoy the beauty of your barn quilt, and it can also serve as a point of interest for passersby.
Size and Scale:
Consider the size and scale of your barn quilt in relation to the surrounding area. A larger barn quilt might be more suitable for a wide-open space, while a smaller one might work well on a smaller building or in a more confined area.
Read more: How Do You Make A Barn Quilt
Background:
Take into account the background against which your barn quilt will be displayed. Choose a location where the colors and design of the quilt will contrast nicely with the surrounding environment. This will allow the barn quilt to stand out and create a visually striking display.
Structure:
Ensure that the structure you intend to hang the barn quilt on is sturdy and in good condition. It should be able to support the weight of the quilt and withstand the elements. A barn, garage, or shed with a smooth, flat surface is typically the best option.
Personal Preference:
Ultimately, choose a location that resonates with your personal taste and style. Your barn quilt should reflect your personality and add a touch of uniqueness to your property.
Once you have selected the perfect location, it’s time to prepare the barn quilt for hanging.
Preparing the Barn Quilt
Before you hang your barn quilt, it’s important to properly prepare it to ensure its longevity and durability. Here are the steps to prepare your barn quilt:
Read more: What Do Quilt Patterns On Barns Mean
Clean the Surface:
Start by cleaning the surface of the barn quilt panel. Use a soft brush or cloth to remove any dirt, dust, or debris. This will help the paint or sealant adhere better to the surface.
Prime the Wood:
If you’re using unfinished wood or plywood for your barn quilt, it’s a good idea to prime the wood before painting. Applying a coat of primer helps to seal the wood, improve paint adherence, and protect it against moisture and weathering.
Choose the Paint or Sealant:
Select a weather-resistant paint or sealant that is suitable for exterior use. Acrylic or latex paint is a common choice as it offers both durability and a wide range of vibrant colors. If you prefer a more rustic look, you can use a stain or varnish instead of paint.
Apply Multiple Coats:
Apply multiple coats of paint or sealant to achieve a vibrant and long-lasting finish. Allow each coat to dry fully before applying the next one. Follow the manufacturer’s instructions regarding the drying time between coats.
Read more: How To Make A Wall Hanging Quilt
Consider a Design Template:
If you’re not confident in your freehand painting skills, you can create or purchase a design template. This will help you achieve a crisp and accurate design for your barn quilt. Simply trace the design onto the panel before painting.
Protect with a Topcoat:
To protect your barn quilt from UV rays and other weather elements, apply a clear topcoat. This will help preserve the colors and increase the longevity of your barn quilt. Choose a varnish or sealant specifically designed for outdoor use.
By properly preparing your barn quilt, you’ll ensure that it can withstand the elements and maintain its vibrant appearance over time. Once your barn quilt is ready, it’s time to measure and mark the hanging location.
Measuring and Marking
Measuring and marking the hanging location for your barn quilt is a crucial step to ensure proper alignment and placement. Follow these steps to accurately measure and mark the position:
Measure the Barn Quilt:
Measure the dimensions of your barn quilt panel using a measuring tape. Take note of the height and width of the panel.
Read more: Barn Doors With Style
Find the Center Point:
Divide the width and height of the panel in half to find the center point. Mark this point with a pencil or marker on both the top and bottom edges of the panel.
Measure the Hanging Location:
Choose the height at which you want to hang your barn quilt. Measure this distance from the ground or desired reference point on the structure where you will be hanging the quilt. Mark this measurement on the structure using a measuring tape and a level to ensure accuracy.
Align the Center Points:
Position the panel against the structure, aligning the center points marked on the panel with the corresponding center mark on the structure. Ensure that the panel is level using a spirit level horizontally and vertically.
Mark the Screw or Nail Locations:
Once the panel is properly aligned, use a pencil or marker to mark the screw or nail locations on the structure. These marks should align with the corners or edges of the panel. Make sure to account for any hanging hardware that will be used.
Double-Check Alignment:
Before moving on to the next step, thoroughly double-check the alignment of the marks and the levelness of the panel. This will ensure that your barn quilt is hung straight and level.
Now that you have measured and marked the hanging location, it’s time to move on to the actual process of hanging the barn quilt.
Hanging the Barn Quilt
Now that you have measured and marked the hanging location, it’s time to hang your barn quilt. Follow these steps to ensure a secure and visually appealing installation:
Prepare the Hanging Hardware:
If your barn quilt panel doesn’t already have hanging hardware attached, now is the time to do so. Depending on the weight and size of your panel, you can use screws, nails, or picture hanging brackets. Make sure the hardware is secure and properly aligned with the marked locations.
Position the Barn Quilt:
Hold the barn quilt panel against the structure, aligning the hanging hardware with the marked locations on the structure. Ensure that the panel is level and properly centered. Ask for assistance if needed, as larger panels can be heavy and challenging to handle on your own.
Read more: How To Childproof Barn Doors
Attach the Barn Quilt:
Using a drill or hammer, attach the panel to the structure by inserting screws or nails into the pre-marked locations. Ensure that the fasteners are driven straight and secure the panel firmly. Be cautious not to overtighten and damage the panel.
Check for Stability:
Gently wiggle the barn quilt panel to check for stability. It should be securely affixed to the structure and not wobble or shift excessively. If needed, adjust the screws or nails to ensure a snug fit.
Step Back and Evaluate:
Step back and take a moment to assess the hanging barn quilt. Ensure that it is visually appealing and properly aligned with the structure. Make any necessary adjustments or fine-tuning to achieve the desired look.
With your barn quilt securely hung, the next step is to ensure its long-term maintenance and care.
Securing the Barn Quilt
Now that your barn quilt is hanging beautifully, it’s important to take steps to ensure it remains secure and protected. Here are some tips for securing your barn quilt:
Read more: How To Build A Barn-Style Shed
Tighten Fasteners:
Periodically check the screws or nails that hold the barn quilt in place to make sure they remain secure. Over time, these fasteners may loosen due to weather conditions or vibrations. Use a screwdriver or hammer to tighten them if necessary, being careful not to damage the panel.
Consider Reinforcements:
If your barn quilt is particularly large or heavy, you may want to consider using additional reinforcements. This can include using additional screws or nails, or even installing brackets or anchors to provide additional support and stability.
Protect Against Weather:
To protect your barn quilt from the elements, consider applying a clear weather-resistant sealant or topcoat. This will provide an extra layer of protection against moisture, UV rays, and other environmental factors that can cause damage or fading over time.
Inspect Regularly:
Regularly inspect your barn quilt for any signs of damage or wear. Look for cracks, peeling paint, or any other issues that could compromise its integrity. Address any repairs or touch-ups promptly to keep your barn quilt in top shape.
Read more: How To Build A Barn Door For A Shed
Secure Against Theft:
If you live in an area where theft or vandalism is a concern, take precautions to secure your barn quilt. Consider installing security cameras, motion-activated lights, or even a protective barrier around the structure to deter potential theft or damage.
By taking measures to secure your barn quilt, you can ensure its longevity and enjoy its beauty for years to come. However, it’s essential to also maintain and care for your barn quilt properly.
Maintenance and Care
Maintaining and caring for your barn quilt is vital to preserve its beauty and extend its lifespan. Follow these maintenance tips to ensure your barn quilt stays in excellent condition:
Clean Regularly:
Regularly clean your barn quilt to remove dirt, dust, and pollutants that can accumulate on the surface. Use a soft brush or cloth and mild soap combined with water to gently clean the panel. Avoid using harsh chemicals or abrasive materials that can damage the paint or sealant.
Inspect for Damage:
Periodically inspect your barn quilt for any signs of damage, such as cracks, chips, or peeling paint. Address any issues promptly by repairing or repainting the affected areas. This will prevent further deterioration and help maintain the overall appearance of the quilt.
Read more: How To Insulate A Pole Barn Ceiling
Touch Up as Needed:
If you notice any areas where the paint has faded or become worn, touch them up with the appropriate paint or sealant. Match the color and finish as closely as possible to maintain a cohesive look across the entire barn quilt panel.
Protect from Harsh Weather:
In extreme weather conditions, such as heavy rain, strong winds, or intense sunlight, consider taking additional measures to protect your barn quilt. This can include using a cover or tarp during harsh weather, or applying an extra layer of sealant for added protection.
Seasonal Inspections:
Perform seasonal inspections of your barn quilt to monitor its condition and detect any early signs of damage or wear. This is especially important after winter when the quilt may have been subjected to freezing temperatures or heavy snowfall.
Document and Preserve:
If you live in an area prone to severe weather events, such as hurricanes or tornadoes, consider documenting your barn quilt through photographs or detailed descriptions. This will allow you to recreate the design in the event of significant damage or loss.
By following these maintenance and care guidelines, you can ensure that your barn quilt remains vibrant and visually stunning for years to come. Whether you’ve created a quilt with a traditional pattern or your original design, preserving its beauty is key.
Read more: How To Plan For Pole Barn Construction
Conclusion
Hanging a barn quilt is an exciting and rewarding project that can add a touch of beauty and creativity to your property. By following the steps outlined in this article, you can successfully hang a barn quilt and create a visually striking focal point.
From choosing the perfect location to properly preparing and securing the barn quilt, each step is essential to ensure a successful installation. Consider the visibility, size, background, and personal preference when selecting the location. Prepare the barn quilt by cleaning the surface, applying multiple coats of paint or sealant, and protecting it with a topcoat. Measure and mark the hanging location accurately to achieve proper alignment and placement.
Once you’ve hung the barn quilt, remember to secure it by tightening the fasteners and considering reinforcements if necessary. Protect your quilt against weather elements by applying a weather-resistant sealant and regularly inspecting it for any damage. Clean it regularly using gentle methods to maintain its appearance, and touch up any fading or worn areas as needed.
Maintaining and caring for your barn quilt will ensure its longevity and preserve its vibrant colors. By investing time and effort into its maintenance, you can enjoy the beauty of your barn quilt for years to come.
So go ahead and get creative with your barn quilt project. Let your imagination soar, and let your unique design brighten up your property and neighboring landscapes. Happy hanging!
Frequently Asked Questions about How To Hang A Barn Quilt
Was this page helpful?
At Storables.com, we guarantee accurate and reliable information. Our content, validated by Expert Board Contributors, is crafted following stringent Editorial Policies. We're committed to providing you with well-researched, expert-backed insights for all your informational needs.


0 thoughts on “How To Hang A Barn Quilt”