Articles
How To Make A Quilt Design Board
Modified: August 28, 2024
Learn how to make a quilt design board with helpful articles and step-by-step instructions. Create a space to plan and organize your quilting projects efficiently.
(Many of the links in this article redirect to a specific reviewed product. Your purchase of these products through affiliate links helps to generate commission for Storables.com, at no extra cost. Learn more)
Introduction
Quilting is a beloved craft that allows individuals to express their creativity and create beautiful works of art. Whether you’re a seasoned quilter or just starting out, having a quilt design board is an essential tool to help you plan and design your quilts. A design board serves as a visual aid that allows you to arrange and rearrange quilt blocks, fabric swatches, and other elements to create the perfect composition. It not only helps you visualize your design before sewing but also keeps your pieces organized during the quilting process.
In this article, we will guide you through the process of making a quilt design board from scratch. We’ll go step by step, outlining the supplies needed and providing detailed instructions to ensure your design board turns out functional and aesthetically pleasing. So let’s get started on creating your own quilt design board!
Key Takeaways:
- Create a quilt design board to visualize, plan, and organize quilt pieces before sewing. Use it as a creative space to experiment with layouts, color combinations, and make informed design decisions.
- Assemble a quilt design board with essential supplies and meticulous preparation. Utilize the board as a visual aid to maintain design integrity, unleash creativity, and bring quilting ideas to life.
Read more: How To Make An Ironing Board For Quilting
Supplies Needed
Before embarking on your quilt design board project, it’s important to gather all the necessary supplies. Here’s a list of items you’ll need to create your own design board:
- Corkboard or foam board: This will serve as the base of your design board. Choose a size that suits your needs and the space you have available.
- Fabric: You’ll need enough fabric to cover the corkboard or foam board. Choose a fabric that complements your personal style or matches your quilting space.
- Batting or foam: This will provide extra cushioning and support to the design board. You can use quilt batting or foam padding, depending on your preference.
- Double-sided adhesive tape or fabric glue: This will be used to secure the fabric to the corkboard or foam board.
- Scissors: You’ll need scissors to cut the fabric and batting to the appropriate size.
- Measuring tape or ruler: This will help you ensure accurate measurements when cutting the fabric.
- Iron and ironing board: You’ll need these to press the fabric before covering the design board.
- Staple gun or adhesive spray: These are optional but can be used to secure the batting to the corkboard or foam board.
- Tacks or pins: These will be used to secure your quilt pieces and fabric swatches to the design board.
Make sure to gather all these supplies before you begin the project. Having everything on hand will save you time and ensure a smooth process as you create your quilt design board.
Step 1: Preparing the Materials
Before you can start assembling your quilt design board, you need to prepare the materials. Here are the steps to follow:
- Measure your corkboard or foam board: Use a measuring tape or ruler to determine the dimensions of your corkboard or foam board. Make a note of the measurements, as you will need them when cutting the fabric and batting.
- Iron the fabric: Lay out your chosen fabric on an ironing board and iron out any wrinkles. This step is important to ensure a smooth and professional finish when covering the design board.
- Cut the fabric: Using the measurements of your corkboard or foam board, cut the fabric accordingly. Leave a few inches of excess fabric on all sides to allow for wrapping and securing it to the board.
- Cut the batting or foam: If you are using batting or foam for extra cushioning, cut it to the same dimensions as the fabric. Ensure that it fits well within the borders of the corkboard or foam board.
By preparing the materials ahead of time, you will have everything ready for the next steps in creating your quilt design board. Take your time during this stage to ensure accurate measurements and clean cuts.
Step 2: Cutting and Measuring
Once you have prepared the basic materials for your quilt design board, it’s time to move on to the cutting and measuring stage. This step ensures that your design board is the perfect size and fits your quilting needs. Follow these steps:
- Place the fabric on a flat surface: Lay the fabric flat on a clean and smooth surface, such as a table or the floor. Ensure that there are no wrinkles or creases that may affect the accuracy of your measurements.
- Position the corkboard or foam board: Place the corkboard or foam board on top of the fabric, aligning the edges. Make sure the fabric has enough excess on all sides to be wrapped around the board.
- Measure and mark the fabric: Use a measuring tape or ruler to measure and mark the fabric along the edges of the board. This will guide you when cutting the fabric to the correct size.
- Cut the fabric: Using a pair of sharp scissors, carefully cut along the marked lines to create a fabric piece that matches the size of the board. Take your time to ensure clean and straight edges.
- Measure and cut the batting or foam: If you are using batting or foam, repeat the previous steps to measure and cut it to the same size as the fabric. The batting or foam should fit snugly inside the fabric borders.
Proper cutting and measuring ensure a neat and professional finish for your quilt design board. Take your time during this step to ensure accuracy, as it will affect the overall appearance and functionality of the board.
Step 3: Assembling the Design Board
Now that you have your fabric and batting prepared, it’s time to assemble your quilt design board. Follow these steps to complete this stage:
- Place the fabric on a flat surface: Lay the fabric on a clean and smooth surface, with the wrong side facing up.
- Position the batting or foam: If you are using batting or foam for extra cushioning, place it on top of the fabric. Make sure it is centered and aligned with the fabric edges.
- Place the corkboard or foam board: Carefully place the corkboard or foam board on top of the batting or foam. Make sure it is centered and aligns with the fabric and batting edges.
- Secure the layers: Starting from one side, use double-sided adhesive tape or fabric glue to secure the fabric to the back of the corkboard or foam board. Pull the fabric taut and continue securing it along all four sides, making small adjustments as needed.
- Smooth out any wrinkles: As you secure the fabric, smooth out any wrinkles or creases that may have formed. This will give your design board a clean and professional look.
By following these steps, you will assemble the layers of your quilt design board, making sure that everything is securely in place. Take your time during this step to ensure a smooth and neat finish.
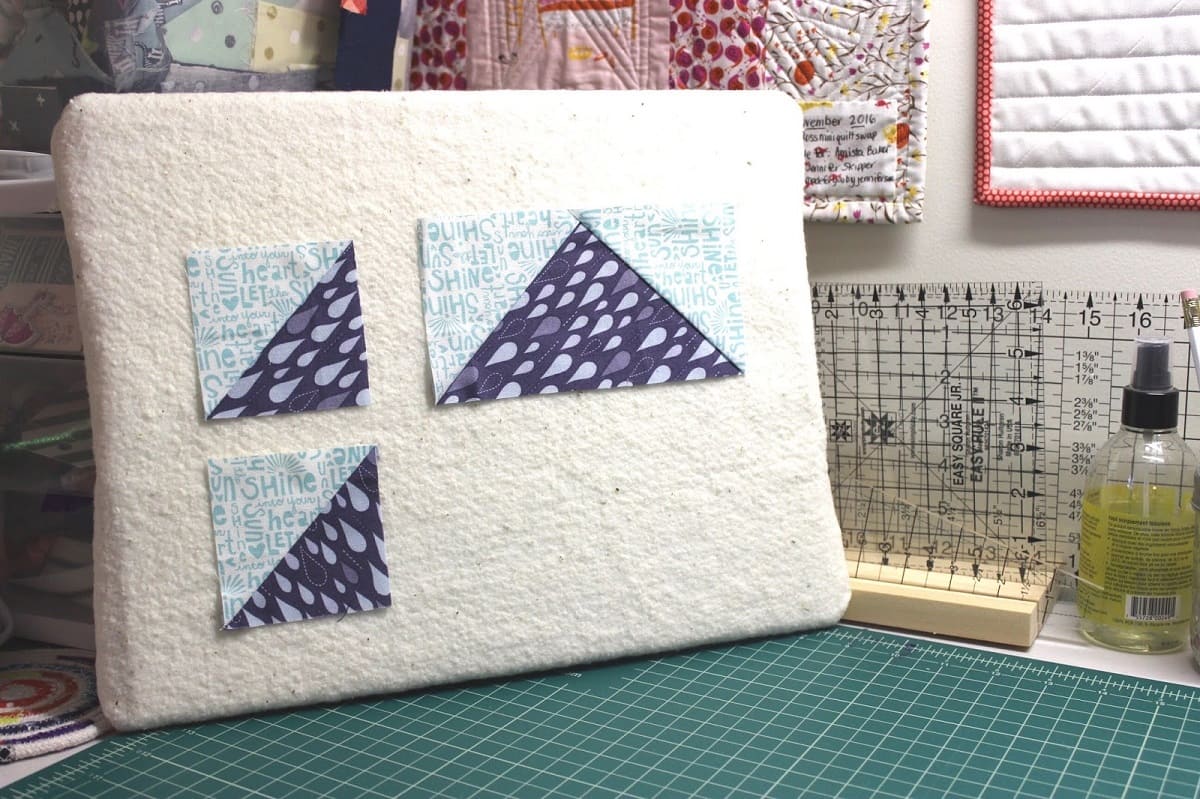
When making a quilt design board, use a foam core board or a large piece of cardboard covered with batting to create a soft surface for arranging and pinning fabric pieces. This will help you visualize and plan your quilt design before sewing.
Read more: How To Make A Quilt
Step 4: Covering the Design Board
Once the layers of your quilt design board are securely assembled, it’s time to cover the board with the fabric for a polished and finished look. Follow these steps to cover the design board:
- Flip the design board over: Carefully flip the design board over so that the fabric-covered side is facing down.
- Fold and staple the fabric: Fold the excess fabric on one side of the board towards the center, making sure it is taut and smooth. Use a staple gun to secure the fabric in place, placing staples at regular intervals along the edge. Repeat this process for the remaining sides, pulling the fabric tightly and stapling it down.
- Trim excess fabric: Use scissors to trim any excess fabric that extends beyond the stapled edges. Be careful not to cut too close to the staples, as this may loosen them.
- Check for wrinkles or unevenness: Once the fabric is stapled and trimmed, inspect the design board for any wrinkles or unevenness. Smooth out any imperfections by gently pulling the fabric and readjusting it as needed.
By following these steps, you will cover your design board with fabric, ensuring a clean and professional finish. Take your time during this step to ensure that the fabric is taut and smooth, creating a visually appealing surface.
Step 5: Organizing your Quilt Pieces
Once you have your quilt design board covered and ready, it’s time to start organizing your quilt pieces. This step is crucial for visualizing and planning your quilt design. Here’s how you can organize your quilt pieces effectively:
- Gather your quilt blocks and fabric swatches: Collect all the quilt blocks, fabric swatches, and other elements you plan to use in your quilt. Arrange them in a designated area near your design board for easy access.
- Use pins or tacks to secure the pieces: Take a quilt block or fabric swatch and position it on the design board. Use pins or tacks to secure it in place. Repeat this process for each piece, arranging them in the desired layout.
- Step back and evaluate: Once you have arranged your quilt pieces, take a step back and evaluate the overall composition. Pay attention to color and pattern placement, making sure they harmonize well. Rearrange pieces as necessary to achieve the desired design.
- Experiment with different arrangements: Feel free to experiment with different layouts and arrangements. The design board allows you to easily move and reposition quilt blocks and fabric swatches without committing to a final design. Take your time to explore various possibilities before finalizing your quilt layout.
- Use the design board as a reference: As you work on your quilt, use the design board as a visual reference. It will help you keep track of the layout and ensure that you sew the pieces together accurately.
Organizing your quilt pieces on the design board allows you to see how they fit together and make any necessary adjustments before sewing. Take advantage of this step to unleash your creativity and create a stunning quilt design.
Step 6: Using the Design Board for Designing Quilts
Now that you have your quilt design board set up and your quilt pieces organized, it’s time to utilize the board for designing your quilts. Here’s how you can make the most of your design board:
- Experiment with different layouts: Move the quilt pieces around on the design board to explore different layout options. Rearrange them until you find a composition that you love. The design board allows you to visualize how the quilt will look before sewing.
- Play with color and pattern combinations: Use the design board to experiment with different color and pattern combinations. Try placing different fabrics next to each other to see how they work together. This will help you achieve a cohesive and visually appealing design.
- Take photos for reference: Once you have finalized a layout that you’re happy with, take photos of the design board from different angles. These photos can serve as a reference when you start sewing the quilt pieces together.
- Make notes and adjustments: As you work with the design board, make notes about any adjustments or changes you want to make. This can include swapping out fabrics, rearranging blocks, or making alterations to the design. These notes will guide you during the sewing process.
- Keep the design board within reach: Throughout the quilting process, keep the design board within reach. As you sew the quilt pieces, refer to the board to ensure accuracy in alignment and placement. This will help you maintain the design integrity throughout the project.
The design board is a valuable tool for trying out different design ideas and making decisions before committing to sewing. Use it as a creative space to explore different possibilities and bring your quilting vision to life.
Conclusion
Creating a quilt design board is a practical and essential step in the quilting process. It allows you to visualize, plan, and organize your quilt pieces before sewing, saving you time and ensuring a beautifully designed quilt. By following the steps outlined in this article, you can create your own quilt design board with ease.
Remember to gather all the necessary supplies, including a corkboard or foam board, fabric, batting or foam, and tools like scissors and measuring tape. Preparing the materials accurately and assembling them carefully sets the foundation for a well-constructed design board.
Once your design board is set up, use it as a creative space to organize your quilt pieces, experiment with layouts and color combinations, and make design decisions. The design board serves as a visual aid, allowing you to step back and evaluate your design before committing to sewing.
Throughout the quilting process, refer to the design board as a reference and make any necessary adjustments or notes. It will help you maintain the integrity of your design and ensure that your quilt turns out just as you envisioned.
Having a quilt design board not only enhances your quilting experience but also adds a level of professionalism to your quilting projects. It allows you to unleash your creativity and make informed design choices while keeping your quilt pieces organized and easily accessible.
So, go ahead and create your own quilt design board. Use it as a tool to bring your quilting ideas to life and enjoy the process of designing and sewing beautiful quilts.
Frequently Asked Questions about How To Make A Quilt Design Board
Was this page helpful?
At Storables.com, we guarantee accurate and reliable information. Our content, validated by Expert Board Contributors, is crafted following stringent Editorial Policies. We're committed to providing you with well-researched, expert-backed insights for all your informational needs.


0 thoughts on “How To Make A Quilt Design Board”