Home>Articles>How To Hang A Chandelier From A 20-Foot Ceiling

Articles
How To Hang A Chandelier From A 20-Foot Ceiling
Modified: January 3, 2024
Looking for articles on how to hang a chandelier from a 20-foot ceiling? Get step-by-step instructions and expert tips in this comprehensive guide.
(Many of the links in this article redirect to a specific reviewed product. Your purchase of these products through affiliate links helps to generate commission for Storables.com, at no extra cost. Learn more)
Introduction
Decorating your home with a beautiful chandelier can add a touch of elegance and sophistication to any space. However, when it comes to hanging a chandelier from a 20-foot ceiling, there are certain considerations and steps that need to be taken to ensure a safe and successful installation.
In this guide, we will walk you through the process of hanging a chandelier from a 20-foot ceiling. From gathering the necessary tools and materials to assembling and attaching the chandelier, we will cover each step in detail, providing you with the knowledge and confidence needed to complete this project.
Before we begin, it is important to note that working with electricity can be dangerous. If you do not have experience with electrical work or are unsure about any part of the installation process, it is highly recommended to consult a professional electrician.
Now, let’s get started on transforming your high-ceilinged space into a stunning showcase with a carefully hung chandelier!
Key Takeaways:
- Hanging a chandelier from a 20-foot ceiling requires careful planning, precise measurements, and attention to safety. From gathering tools to testing the installation, each step is crucial for a successful and stunning result.
- Prioritize safety and consult a professional if unsure about any aspect of the installation. With the right tools and steps, you can transform your high-ceilinged space into a captivating showcase with a beautifully hung chandelier.
Read more: How To Hang A Chandelier From The Ceiling
Step 1: Gather the necessary tools and materials
Before you begin hanging a chandelier from a 20-foot ceiling, it is crucial to gather all the necessary tools and materials. Having everything at hand will help streamline the installation process and ensure that you have everything you need.
Here’s a list of tools and materials you will need:
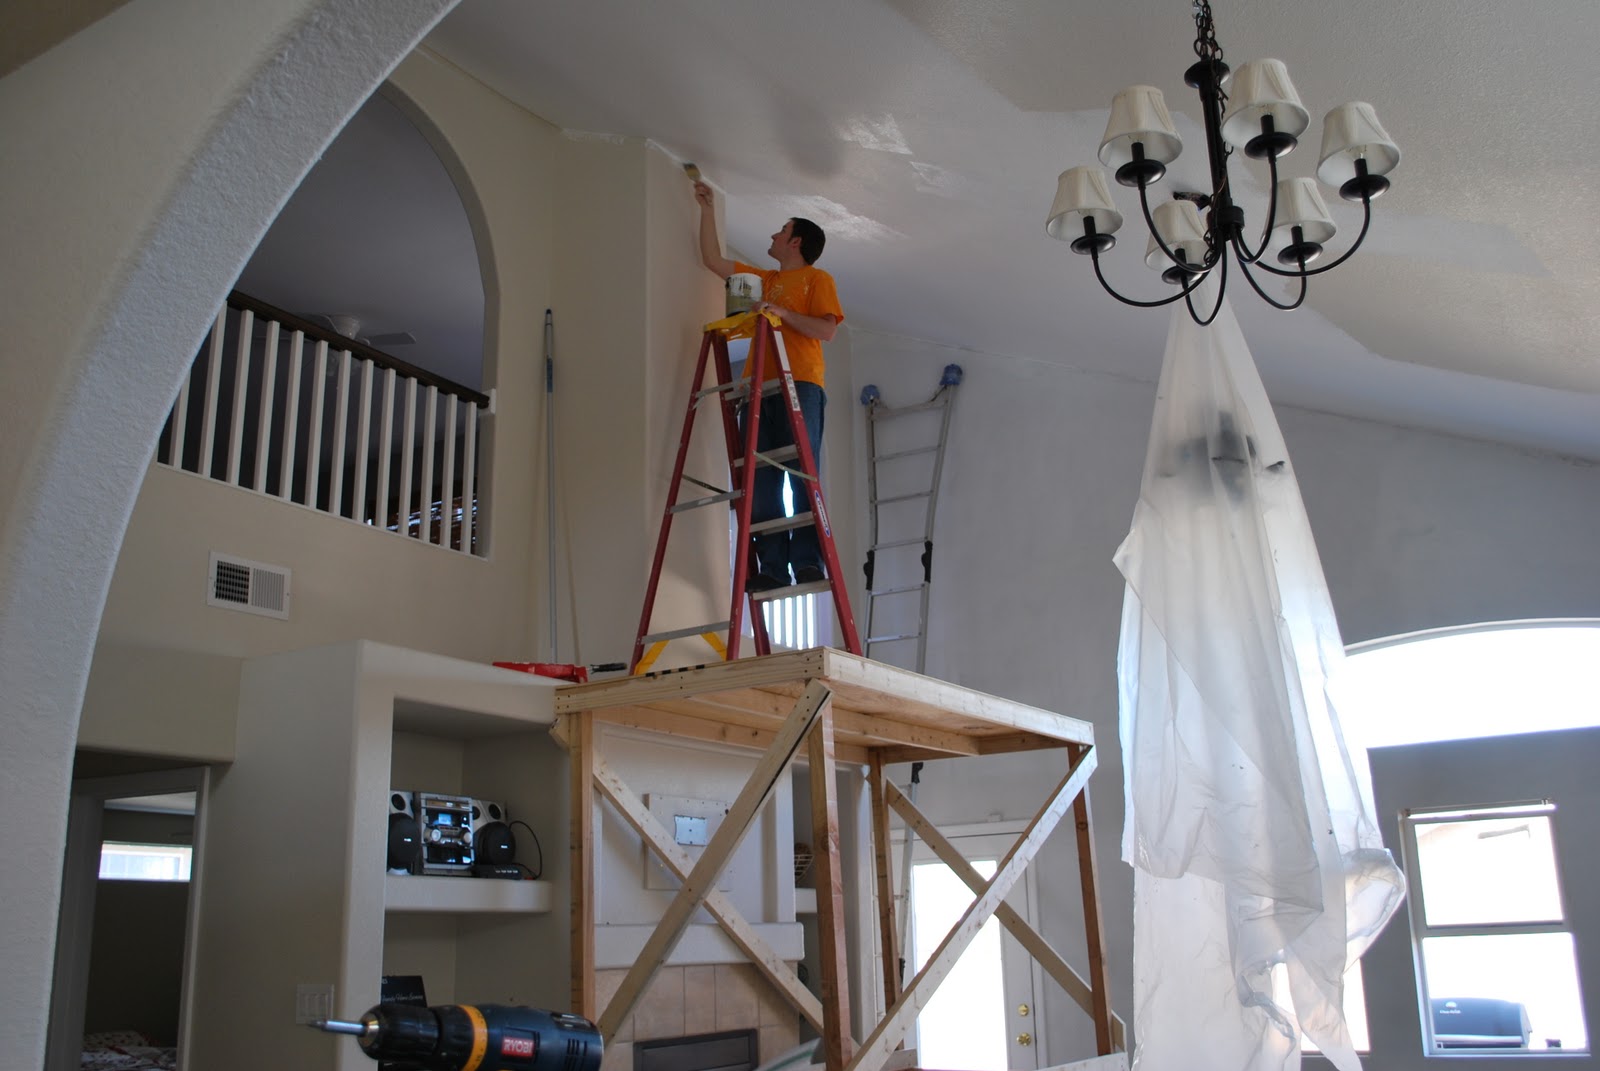
- Ladder or scaffolding: Since you’ll be working with a high ceiling, you’ll need a sturdy ladder or scaffolding to reach the installation area safely. Make sure the ladder is tall enough to reach the ceiling comfortably.
- Chandelier: Choose a chandelier that suits the style and specifications of your space. Consider the size, weight, and design of the chandelier to ensure it is suitable for a 20-foot ceiling.
- Chandelier installation kit: Most chandeliers come with an installation kit that includes necessary hardware such as hooks, screws, and wire connectors. Check that your chandelier package includes these items.
- Electrical tester: A voltage tester will help you ensure that the electricity is turned off before you start working on the installation.
- Wire cutters/strippers: You’ll need wire cutters or strippers to cut and strip the electrical wires as needed during the installation process.
- Junction box/ceiling brace: If your chandelier is heavy, it is essential to have a junction box or ceiling brace installed to provide additional support. Consult an electrician if you are unsure about how to install a junction box or brace.
- A helper: Given the height involved, having an extra pair of hands can be extremely helpful. Enlist a friend or family member to assist you with the installation process.
Once you have gathered all the necessary tools and materials, you will be ready to move on to the next step: measuring and marking the desired hanging location.
Step 2: Measure and mark the desired hanging location
Now that you have all the necessary tools and materials, it’s time to measure and mark the desired hanging location for your chandelier on the 20-foot ceiling. An accurate placement is essential to ensure that the chandelier is centered and properly positioned in the room.
Follow these steps to measure and mark the hanging location:
- Choose the position: Determine the ideal placement of the chandelier in the room. Consider factors such as the room’s layout, existing furniture, and lighting requirements.
- Measure the ceiling height: Use a measuring tape or a laser level to measure the distance from the floor to the desired hanging location on the ceiling. Confirm that it is indeed 20 feet high.
- Find the center point: Mark the center point of your room’s ceiling using a pencil or a removable marking tool. This will serve as the reference point for hanging the chandelier.
- Measure the chandelier: Measure the dimensions of your chandelier, including its width and height. Divide the width in half to determine the central point of the chandelier.
- Mark the hanging location: From the center point on the ceiling, use the chandelier’s central point measurement to mark the hanging location. This will ensure that the chandelier is centered and properly positioned.
- Double-check the alignment: Step back and visually assess the marked hanging location to ensure it aligns with the room’s dimensions, architectural features, and furniture placement.
By taking accurate measurements and marking the hanging location, you will be able to proceed with confidence to the next step: installing a support brace if necessary.
Step 3: Install a support brace for heavy chandeliers
If you have chosen a heavy chandelier for your 20-foot ceiling, it is crucial to install a support brace to ensure its stability and prevent any accidents. A support brace provides additional reinforcement and helps distribute the weight of the chandelier across the ceiling joists.
Follow these steps to install a support brace:
- Select a suitable support brace: Choose a support brace that can withstand the weight of your chandelier. Look for a brace that is specifically designed for heavy fixtures and meets safety standards.
- Locate the ceiling joists: Use a stud finder or a tapping method to locate the ceiling joists above the intended hanging location. Ceiling joists provide the necessary structural support for the chandelier.
- Mark the joist positions: Once you have located the ceiling joists, use a pencil or a removable marker to mark their positions on the ceiling. This will guide you during the installation process.
- Install the support brace: Position the support brace over the marked joist positions and adjust its length to fit securely between them. Follow the manufacturer’s instructions to secure the brace to the joists using screws or bolts.
- Test the support brace: Give the support brace a gentle tug to ensure it is firmly attached to the ceiling joists and can support the weight of the chandelier. Make any necessary adjustments or reinforcements if needed.
Remember, if you are unsure about installing a support brace for your chandelier, it is recommended to consult a professional electrician for assistance. Your safety and the stability of the chandelier are of utmost importance!
Once the support brace is securely installed, you are ready to move on to the next step: assembling the chandelier according to the manufacturer’s instructions.
Consider using a chandelier lift system for easy installation and maintenance of a chandelier on a 20-foot ceiling. This will allow you to lower the chandelier for cleaning and bulb replacement without needing a tall ladder.
Step 4: Assemble the chandelier according to the manufacturer’s instructions
Now that you have installed the support brace, it’s time to assemble the chandelier according to the manufacturer’s instructions. The assembly process may vary depending on the specific design and components of your chandelier, so it’s important to carefully read and follow the instructions provided.
Here are the general steps for assembling a chandelier:
- Unpack the chandelier: Carefully unpack all the components of your chandelier and lay them out in an organized manner. Take care to avoid damaging any delicate parts during this process.
- Identify the components: Familiarize yourself with the different components of the chandelier, including the body, arms, bulbs, crystals, and any additional decorative elements.
- Attach the arms: Follow the instructions to attach the arms of the chandelier to the central body. Ensure that they are securely connected, using any provided screws or connectors.
- Install the bulbs: Insert the required bulbs into their designated sockets. Be cautious not to overtighten or force them into place, as this may cause damage.
- Attach the crystals: If your chandelier includes crystals or other decorative elements, carefully attach them following the manufacturer’s instructions. Take your time to ensure that they are evenly distributed and properly secured.
- Check for balance: Gently shake the chandelier to check if it is well-balanced. If it swings or tilts excessively, make any necessary adjustments to ensure proper alignment and stability.
It’s important to note that some chandeliers may require additional steps or have specific instructions based on their design. Always refer to the manufacturer’s instructions for any unique assembly requirements specific to your chandelier.
Once you have successfully assembled the chandelier, you are ready to move on to the next step: attaching the chandelier to the support brace or ceiling.
Step 5: Attach the chandelier to the support brace or ceiling
With the chandelier fully assembled, it’s time to attach it to the support brace or the ceiling. The method of attachment will depend on the type of support system you have in place.
Follow these steps to attach the chandelier:
- Turn off the power: Before working on the electrical connections, turn off the power supply to the area where you will be installing the chandelier. This can be done by flipping the circuit breaker or removing the fuse.
- Connect the wiring: If your chandelier comes with pre-wired cords or chain links, carefully feed them through the canopy or mounting plate. Connect the chandelier wiring to the electrical wiring in the ceiling using wire connectors, following the manufacturer’s instructions. Make sure to match the appropriate color-coded wires.
- Secure the canopy or mounting plate: Once the wiring is properly connected, secure the canopy or mounting plate to the support brace or ceiling using the provided screws or bolts. Ensure that it is firmly in place.
- Hang the chandelier: With the canopy or mounting plate secured, carefully hang the chandelier by aligning the hooks or loops on the chandelier body with the corresponding slots or connectors on the canopy or mounting plate. Gently push the chandelier upward until it is snugly in place.
- Double-check the stability: Give the chandelier a gentle tug to ensure it is securely attached to the support brace or ceiling. If it feels loose or unstable, double-check the installation or consider consulting a professional electrician.
Remember to always follow the manufacturer’s instructions for attaching the chandelier to ensure a safe and secure installation.
Once the chandelier is properly attached, you are almost done! The final step is to test the chandelier to ensure it is securely hung and functioning correctly.
Step 6: Test the chandelier to ensure it is securely hung
After hanging the chandelier, it is crucial to test it to ensure it is securely hung and functioning properly. This step will help you identify any issues or adjustments that may need to be made before fully enjoying the beauty and illumination of your chandelier.
Follow these steps to test the chandelier:
- Turn on the power: Restore power to the area by flipping the circuit breaker or putting the fuse back in place. Ensure that the chandelier’s electrical supply is turned on.
- Check for any loose connections: Inspect the chandelier and its connections to ensure that all screws, bolts, and wire connections are tight and secure. If you notice any loose parts, carefully tighten them to ensure stability.
- Switch on the chandelier: Turn on the chandelier using the designated switch or control. Monitor its operation to ensure that all bulbs are lit and that the light is evenly distributed throughout the room.
- Observe for any issues: Watch for any flickering lights, buzzing sounds, or unusual behavior from the chandelier. If you notice any issues, it may indicate a wiring problem or a defective component that needs to be addressed.
- Confirm stability: Take note of any excessive swinging or shaking of the chandelier. While some slight movement is normal, it should not be excessive. If the chandelier feels unstable, double-check the installation and make any necessary adjustments to ensure its stability.
- Consult a professional if needed: If you encounter any significant problems or concerns during the testing phase, it is advisable to consult a professional electrician or contact the manufacturer for assistance.
By thoroughly testing the chandelier, you can ensure its safety, functionality, and aesthetic appeal. Addressing any potential issues early on will help you enjoy your beautifully hung chandelier with peace of mind.
Congratulations! You have successfully completed all the steps to hang your chandelier from a 20-foot ceiling. Now, take a step back and admire the stunning centerpiece that adds a touch of elegance to your space.
Remember to periodically inspect and maintain your chandelier to ensure it continues to shine bright and enhance the ambiance of your room.
Happy decorating!
Conclusion
Hanging a chandelier from a 20-foot ceiling can be a daunting task, but with the right tools, materials, and steps, it can be achieved safely and successfully. By following this comprehensive guide, you have learned how to hang a chandelier and create a stunning focal point in your high-ceilinged space.
Throughout the process, it is crucial to prioritize safety and attention to detail. Always ensure the power is turned off before working on electrical connections, and consult a professional electrician if you are uncertain about any aspect of the installation.
From gathering the necessary tools and materials to measuring and marking the desired hanging location, installing a support brace for heavy chandeliers, assembling the chandelier, and attaching it to the support brace or ceiling, each step plays a vital role in achieving a secure and visually appealing installation.
Furthermore, don’t forget to test the chandelier once it is hung to confirm its stability and functionality. By checking for any loose connections and observing its operation, you can address any issues or concerns before fully enjoying the breathtaking beauty of your chandelier.
Remember, if you encounter any significant problems or doubts during the installation process, never hesitate to seek the assistance of a professional electrician or contact the manufacturer for guidance.
Now that you have completed the installation of your chandelier, take a moment to step back and admire the stunning transformation it has brought to your space. The captivating glow and luxurious design will undoubtedly elevate the ambiance and leave a lasting impression on all who enter.
So go ahead and enjoy the warm, enchanting light and the sophisticated charm that your beautifully hung chandelier brings to your 20-foot ceiling!
Happy decorating!
Frequently Asked Questions about How To Hang A Chandelier From A 20-Foot Ceiling
Was this page helpful?
At Storables.com, we guarantee accurate and reliable information. Our content, validated by Expert Board Contributors, is crafted following stringent Editorial Policies. We're committed to providing you with well-researched, expert-backed insights for all your informational needs.


0 thoughts on “How To Hang A Chandelier From A 20-Foot Ceiling”