Articles
How To Hang A Kayak From The Ceiling
Modified: August 28, 2024
Learn how to hang a kayak from the ceiling with these helpful articles. Find step-by-step instructions and expert tips for easy storage.
(Many of the links in this article redirect to a specific reviewed product. Your purchase of these products through affiliate links helps to generate commission for Storables.com, at no extra cost. Learn more)
Introduction
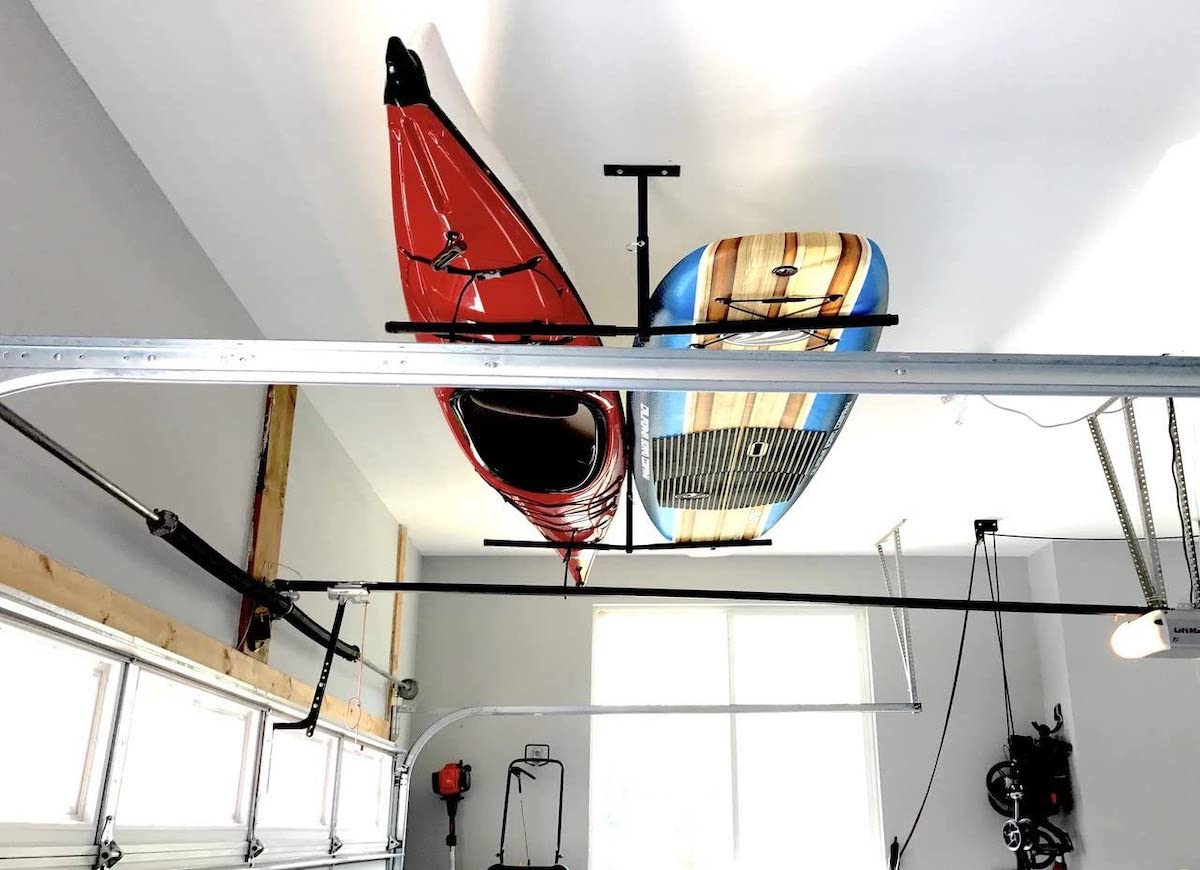
Are you running out of storage space for your kayak? Hanging it from the ceiling is a great solution that not only saves space but also keeps your kayak safe and secure. However, figuring out how to hang a kayak from the ceiling can be a bit daunting, especially if you’re not sure where to start or what materials you need.
In this article, we will guide you through the step-by-step process of hanging a kayak from the ceiling. We’ll cover everything from assessing your ceiling space to installing the necessary hooks or eye bolts and securing the kayak properly. So, let’s get started!
Key Takeaways:
- Save space and keep your kayak secure by hanging it from the ceiling. Assess the space, gather materials, and follow the step-by-step process for a well-hung kayak.
- Ensure stability, accessibility, and proper installation to safely hang your kayak. Hoist it with care and test for stability, creating a clutter-free storage area for your next adventure.
Read more: How To Hang Unistrut From The Ceiling
Step 1: Assessing the Ceiling Space
The first step in hanging your kayak from the ceiling is to assess the available space in your ceiling. This will help you determine the best location to hang your kayak and ensure that you have enough clearance for the kayak to hang without any obstructions.
Start by measuring the length, width, and height of your kayak. This will give you an idea of how much space you will need to hang it. Consider the overall dimensions of your kayak, including any protruding features like handles or rudders.
Next, you’ll need to measure the ceiling height in the area where you plan to hang your kayak. Make sure you have enough vertical space to accommodate the length of your kayak. Ideally, there should be at least a few feet of clearance above the kayak to prevent any accidental collisions with the ceiling or other objects.
It’s also important to assess the structural integrity of your ceiling. Determine if it can support the weight of your kayak. If you’re unsure about the ceiling’s load-bearing capacity, consult with a professional or consider reinforcing the ceiling with additional support beams or brackets.
Take note of any obstacles such as light fixtures, vents, or beams that may interfere with hanging your kayak. You’ll want to avoid these areas or plan accordingly to work around them.
Lastly, consider the accessibility and convenience of the location. Ensure that you can easily reach the kayak when you need to take it down or put it back up. If possible, choose a spot that is close to the entrance or exit to make it more convenient to load and unload your kayak.
By assessing the ceiling space beforehand, you can determine the best location to hang your kayak and ensure that you have enough room for proper installation and maintenance.
Step 2: Gathering the Materials
Once you have assessed the ceiling space and determined the ideal location for hanging your kayak, it’s time to gather the necessary materials. Having the right tools and equipment on hand will make the installation process smoother and ensure that your kayak is securely hung.
Here’s a list of materials you’ll need:
- Ceiling hooks or eye bolts: These will serve as the anchor points for hanging your kayak. Make sure they are of sturdy construction and have a weight capacity that can support your kayak.
- Drill or screwdriver: Depending on the type of ceiling you have, you’ll need a drill or screwdriver to install the ceiling hooks or eye bolts securely.
- Measuring tape: Use a measuring tape to accurately measure the clearance and ensure proper positioning of the hooks or eye bolts.
- Level: A level will help you ensure that the hooks or eye bolts are installed straight and level, preventing any imbalance when hanging your kayak.
- Straps or ropes: These will be used to secure and hang your kayak from the ceiling hooks or eye bolts. Choose straps or ropes that are strong and durable enough to hold the weight of your kayak.
- Padding or foam blocks: To protect your kayak from any scratches or damage, consider using padding or foam blocks between the kayak and the straps or ropes.
- Optional: Pulley system or hoist: If you have a particularly heavy kayak or prefer an easier method for hoisting it to the ceiling, you may consider using a pulley system or hoist for added convenience.
Make sure you have all these materials readily available before you start the installation process. Having everything prepared in advance will save you time and ensure a smooth and successful kayak hanging experience.
Step 3: Finding the Right Spot to Hang the Kayak
Now that you have gathered all the necessary materials, it’s time to find the perfect spot to hang your kayak. Choosing the right location is crucial for both the safety of your kayak and the convenience of accessing it.
Here are some considerations when selecting the spot:
- Stability: Look for a spot that offers a stable and secure attachment point, such as a ceiling joist or beam. Avoid hanging your kayak from weak or unsupported areas that may compromise its stability.
- Clearance: Ensure that there is enough vertical clearance for the kayak to hang without any obstructions. This will prevent accidental collisions with the ceiling or other objects.
- Accessibility: Choose a location that is easily accessible, allowing you to comfortably load and unload your kayak. Consider the proximity to the entrance or exit of your storage area for convenience.
- Visibility: Hanging your kayak in a visible spot can serve as a unique focal point in your storage space. Plus, it will remind you to properly inspect and maintain your kayak regularly.
- Weight distribution: If you plan to hang multiple kayaks, ensure that the weight distribution is even. Hanging them too close together can cause unnecessary strain. Leave enough space between each kayak.
It’s important to take your time in selecting the right spot to hang your kayak. Careful consideration will ensure that it is secure, easily accessible, and visually appealing.
Once you have identified the perfect spot, measure and mark the position on the ceiling for the installation of the hooks or eye bolts.
Step 4: Installing the Ceiling Hooks or Eye Bolts
With the location for hanging your kayak determined, it’s time to install the ceiling hooks or eye bolts. These will serve as the anchor points that will securely hold your kayak.
Here’s a step-by-step guide on how to install the ceiling hooks or eye bolts:
- Begin by marking the precise spots where you will install the hooks or eye bolts. Use a measuring tape and level to ensure accuracy. Make sure the markings align with the desired position for hanging your kayak.
- If you are using ceiling hooks, use a drill with a pilot bit that matches the size of the hooks. Drill pilot holes into the marked spots on the ceiling. Be mindful of any electrical wiring or plumbing that may be hidden in the ceiling.
- Next, screw the ceiling hooks tightly into the pilot holes. Use a screwdriver or drill, depending on the type of ceiling hooks you are using. Ensure that the hooks are firmly in place and securely attached to the ceiling.
- If you are using eye bolts, follow the same process of marking the spots and drilling pilot holes. Then, screw the eye bolts into the pilot holes using a wrench or pliers. Tighten them securely to ensure they can support the weight of your kayak.
- Double-check the stability of the hooks or eye bolts by giving them a firm tug. If they are properly installed, they should be strong and secure.
Remember to follow the manufacturer’s instructions for the specific hooks or eye bolts you are using, as installation methods may vary. If you are unsure about the installation process, consult a professional for assistance.
Once the ceiling hooks or eye bolts are installed, you are ready to move on to the next step of hanging your kayak.
When hanging a kayak from the ceiling, use strong and adjustable straps or ropes to secure it in place. Make sure to distribute the weight evenly to avoid any damage to the kayak.
Read more: How To Hang Surfboard From The Ceiling
Step 5: Securing the Kayak with Straps or Ropes
Now that you have the ceiling hooks or eye bolts in place, it’s time to secure your kayak using straps or ropes. This step is crucial to ensure that your kayak is safely and securely attached to the ceiling.
Follow these steps to properly secure your kayak:
- Measure and cut the straps or ropes to the appropriate length. Ensure that they are long enough to reach from the ceiling hooks or eye bolts to the designated points on your kayak where you want to secure it.
- Wrap the straps or ropes around the kayak, positioning them strategically to provide stability and prevent any shifting.
- If using straps, fasten them securely using the buckles or fasteners according to the manufacturer’s instructions. Make sure the straps are tight enough to hold the kayak firmly in place but not too tight to cause damage.
- If using ropes, tie secure knots such as the square knot or the trucker’s hitch to keep the kayak in place. Make sure the knots are tightened properly and won’t come loose during storage.
- Consider using padding or foam blocks between the kayak and the straps or ropes to prevent any scratches or damage to the kayak’s surface.
Take a moment to double-check the straps or ropes and ensure that they are properly secured and tensioned. Test the stability by gently pulling on the kayak to make sure it is secure and won’t come loose.
Remember, the goal is to securely hold the kayak in place without causing any undue stress on its structure. Properly securing the kayak will give you peace of mind knowing that it’s safe and protected when stored on the ceiling.
Step 6: Hoisting the Kayak to the Ceiling
With the kayak securely strapped or roped, it’s time to hoist it up to the ceiling. This step requires a bit of strength and coordination, so it’s always helpful to have an extra set of hands to assist you.
Follow these steps to hoist your kayak to the ceiling:
- Position yourself and your helper on either side of the kayak.
- Using both hands, lift the kayak upward while maintaining a steady grip on the straps or ropes. Lift gradually and avoid any sudden movements.
- Coordinate with your helper to guide the kayak towards the ceiling hooks or eye bolts.
- Slowly and carefully, hook the straps or ropes onto the ceiling hooks or eye bolts, ensuring they are securely attached.
- Ease the kayak into its final position, keeping it level to prevent any imbalances. Adjust the straps or ropes if needed to ensure the kayak is stable and properly aligned.
Communication and coordination with your helper are crucial throughout this process to prevent any accidents or damage to the kayak. Take your time and be cautious as you hoist the kayak to the ceiling.
If you have a particularly heavy kayak or would prefer an easier method of hoisting, you may consider using a pulley system or hoist. This can make the lifting process more manageable and reduce the strain on your body.
Once the kayak is hoisted and securely in place, step back and admire your work. Take a moment to ensure that the kayak is stable and properly aligned. If any adjustments are necessary, make them now before moving on to the final step.
Step 7: Testing the Stability and Adjusting if Needed
After hoisting your kayak to the ceiling, it’s important to test its stability and make any necessary adjustments. This step ensures that your kayak is securely supported and reduces the risk of it falling or shifting over time.
Here’s what you need to do to test and adjust the stability of your kayak:
- Step back and observe the kayak to ensure it is hanging evenly and there are no signs of imbalance. Look for any areas where the kayak may be tilted or leaning to one side.
- Gently give the kayak a light push or shake to see if it moves or swings excessively. A slight movement is normal, but if it swings excessively, it may indicate that the straps or ropes need to be tightened further.
- Check the alignment of the kayak with the ceiling hooks or eye bolts. Make sure the kayak is parallel to the ground and not at an angle.
- If you notice any stability issues or misalignment, carefully lower the kayak back down and make the necessary adjustments. This may include tightening the straps or ropes, repositioning the kayak, or adjusting the angles of the ceiling hooks or eye bolts.
- Once you have made the adjustments, retest the stability by giving the kayak a gentle push or shake. Ensure that it remains stable and does not swing excessively.
It’s crucial to address any stability issues and make the necessary adjustments before leaving the kayak hanging from the ceiling. This will prevent any accidents or damage to the kayak over time.
Finally, take a moment to appreciate your well-hung kayak. Admire how it contributes to your organized storage space while creating a visually appealing focal point.
Now that you have successfully hung your kayak from the ceiling, you can enjoy the benefits of having extra storage space and keeping your kayak safe and secure until your next adventure.
Conclusion
Congratulations! You have successfully learned how to hang a kayak from the ceiling. By following the step-by-step process outlined in this article, you can now store your kayak safely and efficiently, saving valuable space in your storage area.
Throughout the process, you assessed the ceiling space, gathered the necessary materials, found the ideal spot to hang the kayak, installed the ceiling hooks or eye bolts, secured the kayak with straps or ropes, hoisted it to the ceiling, and tested the stability of the setup.
Remember, it is crucial to assess the ceiling space, ensuring it can support the weight of your kayak. Gathering the right materials, including ceiling hooks or eye bolts, straps or ropes, and padding, is essential for a secure and damage-free hanging system.
Finding the right spot to hang your kayak involves considering stability, clearance, accessibility, visibility, and weight distribution. Taking the time to mark and install the ceiling hooks or eye bolts accurately is paramount for a sturdy setup.
Securing the kayak with straps or ropes and using padding or foam blocks to protect its surface is vital to prevent any damage during storage. The hoisting process requires coordination and caution, ensuring a smooth and safe transition to the ceiling.
Lastly, testing the stability of the setup and making any necessary adjustments guarantees the long-term safety and security of your kayak. Remember to regularly check the stability and condition of the hanging system to ensure its continued effectiveness.
By hanging your kayak from the ceiling, you not only optimize your storage space but also keep your kayak in excellent condition, ready for your next adventure. So, take pride in your well-hung kayak and enjoy the benefits of a clutter-free storage area.
Now, go out and explore the water, confident in the knowledge that your kayak is securely stored and protected thanks to your newfound skills in hanging a kayak from the ceiling!
Frequently Asked Questions about How To Hang A Kayak From The Ceiling
Was this page helpful?
At Storables.com, we guarantee accurate and reliable information. Our content, validated by Expert Board Contributors, is crafted following stringent Editorial Policies. We're committed to providing you with well-researched, expert-backed insights for all your informational needs.


0 thoughts on “How To Hang A Kayak From The Ceiling”