Articles
How To Hang Things From A Drop Ceiling
Modified: October 19, 2024
Learn how to hang articles from a drop ceiling with these simple and effective tips. Maximize your space and create a functional and stylish overhead storage solution.
(Many of the links in this article redirect to a specific reviewed product. Your purchase of these products through affiliate links helps to generate commission for Storables.com, at no extra cost. Learn more)
Introduction
Drop ceilings, also known as suspended ceilings, are a common feature in many buildings, including offices, schools, and commercial spaces. They offer several benefits, such as hiding wiring and pipes, improving acoustics, and providing easy access to the area above the ceiling.
However, if you need to hang objects from a drop ceiling, such as lights, signs, or decorations, it can be a bit more challenging than hanging them from a traditional ceiling. The tiles and grid system of a drop ceiling require careful consideration and the right hardware to ensure stability and safety.
In this article, we will guide you through the process of hanging things from a drop ceiling. From assessing the ceiling to choosing the right hardware and installing it correctly, you’ll learn everything you need to know to safely hang objects and enhance the aesthetic appeal of your space.
Let’s get started with step one: assessing the drop ceiling.
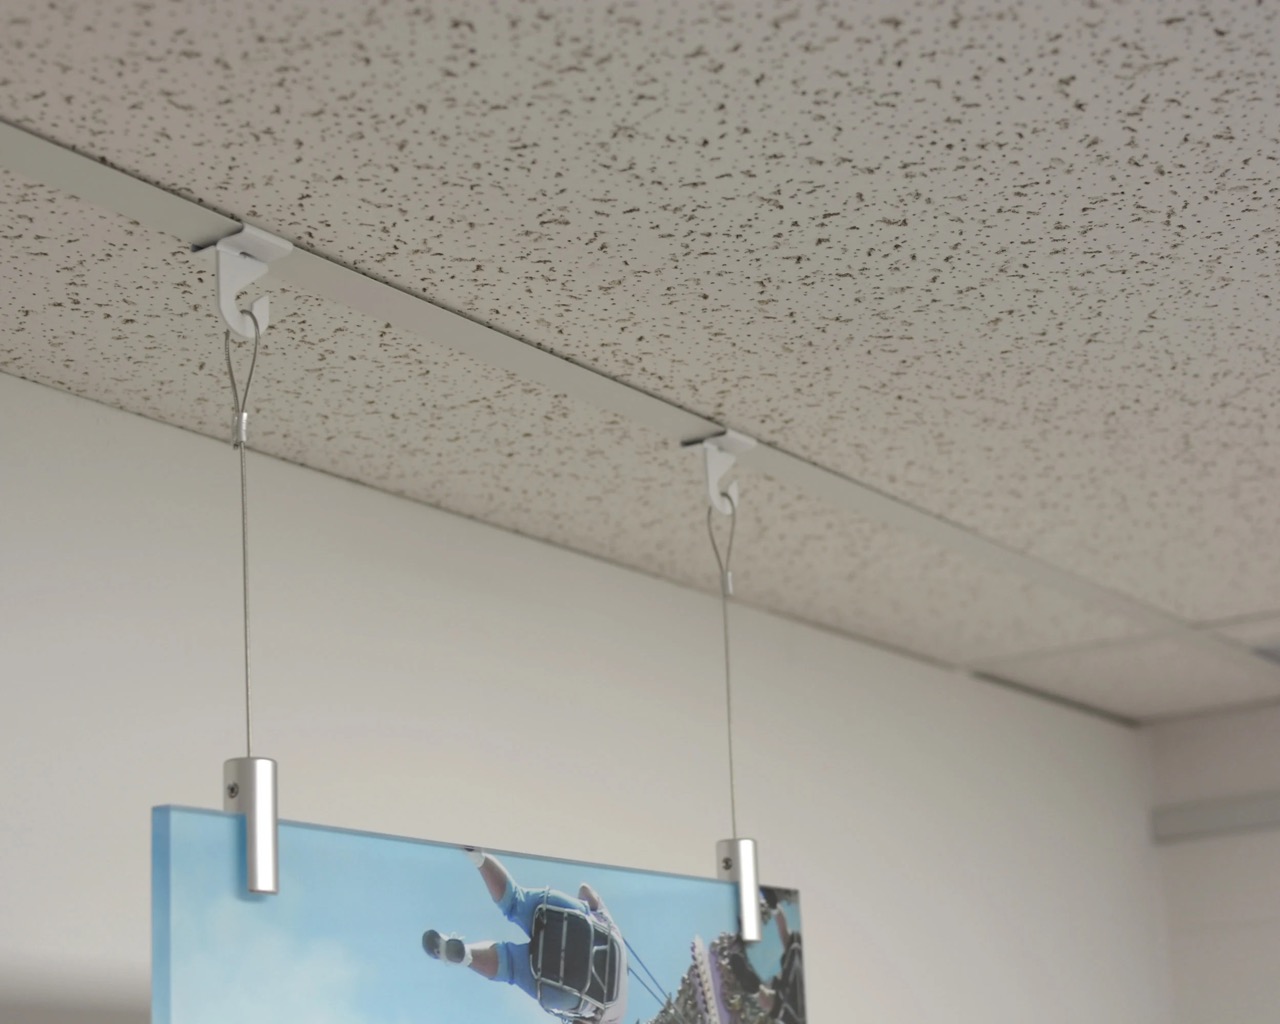
Caption: Hanging objects from a drop ceiling can be challenging but with the right knowledge and techniques, it can be done safely and securely.
Key Takeaways:
- Safely hang objects from a drop ceiling by assessing weight capacity, choosing compatible hardware, and ensuring stability for a visually appealing and functional space.
- Properly prepare, install, and test hanging hardware to securely hang objects from a drop ceiling, enhancing the space while prioritizing safety and stability.
Read more: How To Hang Curtains From Drop Ceiling
Step 1: Assessing the Drop Ceiling
Before you begin hanging anything from a drop ceiling, it’s important to assess the condition and configuration of the ceiling. This will help you determine the best approach and ensure that the ceiling can support the weight of the objects you intend to hang.
Here are a few key factors to consider when assessing the drop ceiling:
- Weight capacity: Drop ceilings are designed to support the weight of the ceiling tiles and the grid system. They are not typically designed to bear heavy loads. Check the manufacturer’s specifications or consult with a professional to determine the weight capacity of the ceiling. This will give you an idea of how much weight you can safely hang from it.
- Location of support beams: Drop ceilings are usually supported by a grid system that is suspended from the structural beams above. Identify the location of these beams to determine where you can safely attach hardware for hanging objects. You can use a stud finder or consult the building plans if available.
- Ceiling tile material: Drop ceiling tiles come in a variety of materials, such as gypsum, fiberglass, or mineral fiber. The material may affect the way you install hardware and the type of hardware you can use. Some materials may require special brackets or anchors for stability.
- Aesthetic considerations: Consider the overall look and feel of the space when planning to hang objects from a drop ceiling. Ensure that the placement of the objects complements the design and does not interfere with the functionality of the space.
By thoroughly assessing the drop ceiling, you will have a better understanding of its limitations and capabilities. This knowledge will guide you in choosing the right hardware and installation method for hanging objects securely.
Caption: Assessing the weight capacity and configuration of the drop ceiling is crucial to ensure the safety and stability of the objects you plan to hang.
Step 2: Choosing the Right Hardware
Once you have assessed the drop ceiling and understand its capabilities, it’s time to choose the right hardware for hanging your objects. Selecting the appropriate hardware is essential to ensure stability, prevent damage to the ceiling, and maintain a secure attachment.
Consider the following factors when choosing the right hardware:
- Weight capacity: Determine the weight of the objects you plan to hang and choose hardware that can safely support that weight. Look for hardware specifically designed for drop ceilings and check the weight capacity ratings provided by the manufacturer.
- Hanging method: Decide how you want to hang your objects. There are various options available, such as hooks, clips, brackets, or hangers. Select the hardware that suits your specific needs and consider the shape and size of the objects you intend to hang.
- Ceiling compatibility: Ensure that the hardware is compatible with the type of drop ceiling you have, taking into consideration the tile material and grid system. Some hardware may require specific brackets or anchors for proper installation and stability.
- Accessibility: Consider how easy it will be to access and adjust the hardware if needed. This is especially important for objects that may require frequent maintenance or adjustment, such as lights or display signage.
Take your time to research and compare different hardware options. Consult with professionals or seek advice from experts if needed. Remember, choosing the right hardware is crucial for the safety and stability of your hanging objects, as well as for the integrity of the drop ceiling itself.
Caption: Choosing the right hardware is essential to ensure the stability and secure attachment of objects to the drop ceiling.
Step 3: Preparing the Ceiling Tiles
Before you can install any hardware or hang objects from a drop ceiling, it’s important to properly prepare the ceiling tiles. This step ensures that the tiles are in good condition and that they can support the weight of the hanging objects without getting damaged.
Follow these steps to prepare the ceiling tiles:
- Inspect the tiles: Carefully examine each tile for any signs of damage, such as cracks, chips, or sagging. Replace any damaged tiles before proceeding with the installation. Damaged tiles can compromise the integrity of the entire ceiling and may not be able to support the weight of the objects you plan to hang.
- Clean the tiles: Use a mild cleaning solution and a soft cloth to gently wipe down the tiles and remove any dust, dirt, or grime. This will ensure a clean surface for the installation and prevent any residue from interfering with the adhesive or hardware.
- Reinforce weak tiles: If you notice any tiles that seem weak or unstable, you can reinforce them by applying a small amount of adhesive or using reinforcing clips. This will provide additional support and prevent the tiles from shifting or sagging when the objects are hung.
By properly preparing the ceiling tiles, you create a solid foundation for the installation of the hanging hardware. This step helps ensure the overall stability and durability of the drop ceiling, as well as the safety and security of the objects you plan to hang.
Caption: Inspect the ceiling tiles for any damage and clean them before proceeding with the installation of hardware.
Step 4: Marking the Hanging Points
Before you start installing the mounting hardware for hanging objects from a drop ceiling, it’s crucial to mark the precise hanging points. This will help ensure that the objects are evenly and securely suspended, providing a balanced and visually appealing arrangement.
Follow these steps to mark the hanging points:
- Measure and plan: Determine the desired placement and spacing of the hanging points based on the size, shape, and weight of the objects you plan to hang. Use a tape measure, level, and pencil to mark the exact spots where the hardware will be installed.
- Consider the grid system: Take into account the layout of the drop ceiling grid system. Ideally, you should install the hardware at the intersections of the grid lines to distribute the weight evenly and utilize the structural stability of the grid system.
- Account for tile spacing: If your drop ceiling has removable tiles, keep in mind the space between the tiles when marking the hanging points. You want to ensure that the hardware is installed in such a way that it doesn’t interfere with the placement or removal of the tiles.
- Double-check the markings: Before proceeding with the installation, double-check the accuracy of your markings. Use the level to ensure that the marks are straight and align with your desired hanging points.
By marking the hanging points accurately, you can ensure that the objects are suspended in a balanced and visually pleasing manner. This step also helps prevent any damage to the drop ceiling tiles or grid system during the installation process.
Caption: Marking the hanging points accurately is crucial for evenly and securely suspending objects from a drop ceiling.
When hanging things from a drop ceiling, use specialized hooks or clips designed for suspended ceilings to avoid damaging the tiles or grid. Always check the weight capacity of the ceiling and use appropriate hardware.
Read more: How To Hang Unistrut From The Ceiling
Step 5: Installing the Mounting Hardware
With the hanging points marked, it’s time to install the mounting hardware that will support the weight of the objects you plan to hang from the drop ceiling. Proper installation is crucial for ensuring stability, safety, and longevity.
Follow these steps to install the mounting hardware:
- Gather the necessary tools: Before you begin, gather all the tools and hardware needed for installation, including screws, anchors, brackets, or hooks. Having everything on hand will make the process more efficient.
- Drill pilot holes: Using a drill with the appropriate size bit, carefully drill pilot holes at the marked hanging points. The pilot holes will help guide the screws and prevent the ceiling tiles from cracking or splitting during installation.
- Install the hardware: Depending on the chosen hardware, follow the manufacturer’s instructions to securely install the brackets, hooks, or other mounting components. Ensure that they are properly aligned with the pilot holes and firmly attached to the drop ceiling.
- Test the stability: After installing the mounting hardware, gently tug on them or give them a small shake to test their stability. If they feel loose or wobbly, readjust or tighten them as needed to ensure a secure and stable attachment.
During the installation process, be mindful of the weight capacity of the drop ceiling and the hardware you are using. Avoid exceeding the weight limits to prevent any damage or compromise to the ceiling structure.
Caption: Installing the mounting hardware properly is crucial for the stability and safety of the objects hanging from the drop ceiling.
Step 6: Hanging Objects from the Drop Ceiling
Now that the mounting hardware is securely installed, it’s time to hang the objects from the drop ceiling. Whether you’re hanging lights, signs, decorations, or other items, it’s important to follow a few key steps to ensure a safe and visually appealing display.
Follow these steps to hang objects from the drop ceiling:
- Attach the objects: Depending on the type of objects you are hanging, use the appropriate method to attach them to the installed hardware. This may involve using hooks, clips, brackets, or other attachment mechanisms. Make sure the attachments are secure and properly aligned with the hardware.
- Distribute the weight: If you are hanging multiple objects, consider their weights and distribute them evenly across the installed hardware. This will help maintain balance and prevent one side from bearing too much weight.
- Adjust the height: Determine the desired height or level of the hanging objects. This may involve adjusting the length of chains, cords, or hooks to achieve the desired positioning. Use a level to ensure that the objects are hanging straight and aligned.
- Test for stability: Give each hanging object a gentle shake to ensure that it is stable and secure. If any objects feel loose or unstable, readjust the attachments or tighten the hardware as necessary to improve stability.
Remember to consider the aesthetics of the space and the intended purpose of the objects when hanging them from the drop ceiling. Ensure that they are positioned in a way that enhances the overall design and functionality of the room.
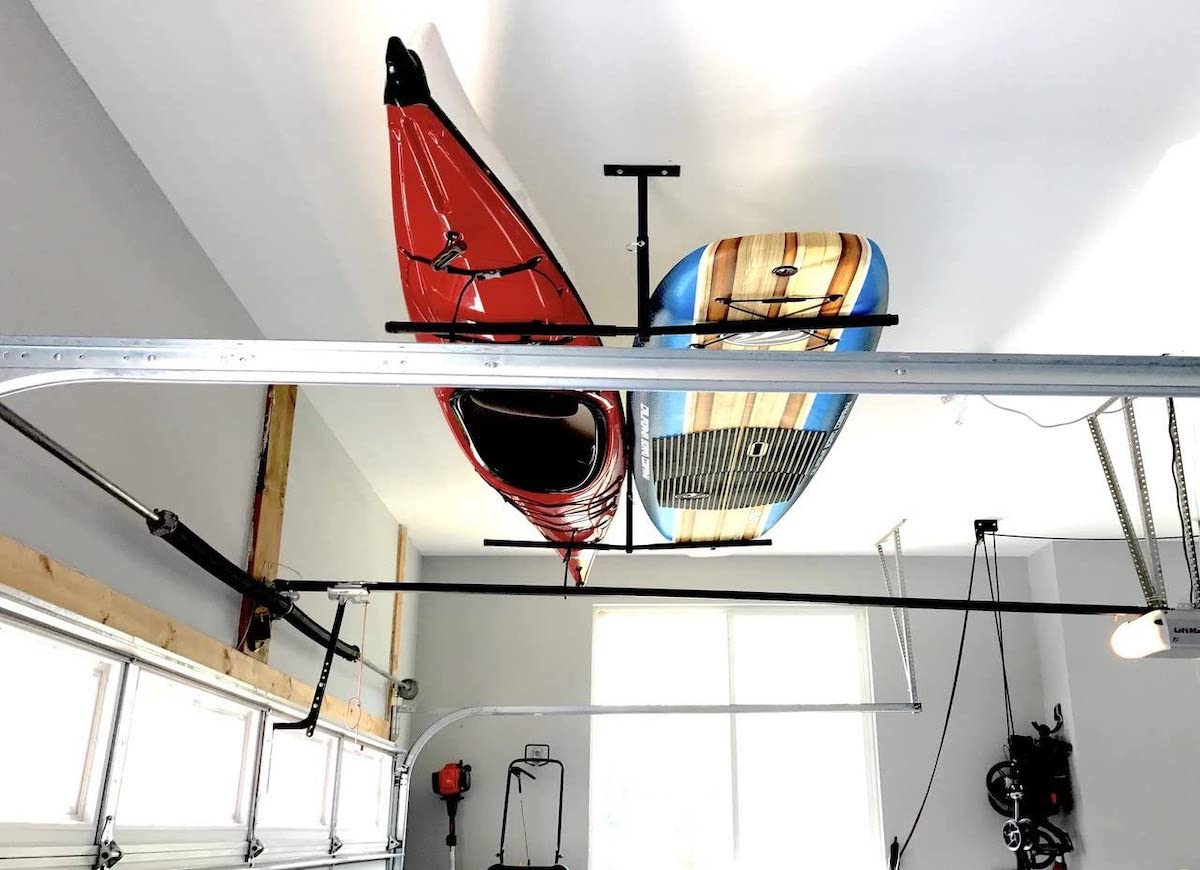
Caption: Hanging objects from the drop ceiling involves securely attaching them to the installed hardware and ensuring their stability.
Step 7: Testing for Stability
Once you have hung the objects from the drop ceiling, it’s important to test their stability to ensure that they are securely attached and will not pose a safety risk. Testing for stability will give you peace of mind and help prevent any accidents or damage caused by objects falling from the ceiling.
Here are the steps to test for stability:
- Give gentle shakes: Gently shake each hanging object to see if it wiggles or moves excessively. Objects should be relatively stable and not swing or sway excessively.
- Observe prolonged shaking: If an object continues to shake or vibrate for an extended period after being gently moved, it may indicate an unstable attachment. Consider reinforcing the attachment point or adjusting the hanging mechanism to improve stability.
- Check for even weight distribution: Verify that the weight is evenly distributed among the various hanging points. Uneven weight distribution can cause one side to sag or the ceiling tiles to become strained. Adjust the positioning of objects or redistribute weight as necessary.
- Inspect attachments: Examine the attachments and hardware for any signs of looseness, wear, or damage. Tighten any loose screws or readjust the attachments if needed. Replace any damaged hardware to ensure a secure and stable installation.
Regularly check the stability of the hanging objects, especially if they are subject to movement or if vibrations occur in the surrounding area. It’s also a good idea to periodically inspect the attachments and hardware to ensure their continued stability over time.
Caption: Testing for stability is crucial to ensure that objects hanging from the drop ceiling are securely attached and pose no safety risks.
Step 8: Removing and Replacing Objects
There may come a time when you need to remove or replace the objects hanging from the drop ceiling. Whether it’s for maintenance, redecoration, or a change in design, it’s important to follow proper procedures to ensure a smooth transition and prevent any damage to the ceiling or the objects themselves.
Here are the steps to efficiently remove and replace objects from the drop ceiling:
- Remove with care: When removing objects, do so gently and with caution. Avoid any sudden movements or tugs that could damage the attachments or cause the objects to fall. Take time to carefully detach each object from the hardware.
- Inspect the attachments: As you remove the objects, inspect the attachments and hardware for any signs of damage or wear. Replace any damaged hardware or make necessary adjustments to ensure the integrity of the hanging points.
- Clean the ceiling: Once the objects are removed, take the opportunity to clean the ceiling tiles and surrounding area. Remove any dust, debris, or residue that may have accumulated during the time the objects were hung.
- Plan for replacement: If you plan to replace the objects with new ones, carefully consider their weight, dimensions, and attachment requirements. Take necessary measurements and make any adjustments to the mounting hardware as needed.
- Hang the new objects: Install the new objects following the same steps as before, ensuring that the mounting hardware is secure and the objects are properly attached. Test for stability and make any necessary adjustments to achieve the desired arrangement.
By following these steps, you can safely remove and replace objects hanging from the drop ceiling without causing any damage or compromising the stability of the ceiling or the objects themselves.
Caption: Properly removing and replacing objects ensures a smooth transition and prevents damage to the drop ceiling and the hanging objects.
Read more: How To Hang Surfboard From The Ceiling
Conclusion
Hanging objects from a drop ceiling can be a challenging task, but with the right knowledge and techniques, it can be done safely and securely. By following the step-by-step guide outlined in this article, you can confidently hang lights, signs, decorations, and other objects without compromising the integrity of the drop ceiling or risking the safety of those in the space.
Remember to assess the drop ceiling and understand its weight capacity before proceeding with the installation. Choose the appropriate hardware that can support the weight of your objects and ensure compatibility with the ceiling tiles and grid system. Take the time to properly prepare the ceiling tiles, clean them, and reinforce any weak spots.
Accurately mark the hanging points, considering the grid system and tile spacing, and install the mounting hardware securely, following the manufacturer’s instructions. Take special care to test for stability, giving gentle shakes to ensure objects are firmly attached.
Regularly inspect the attachments and hardware for any signs of wear or damage, and make necessary adjustments or replacements. When removing or replacing objects, do so with care and clean the ceiling tiles and surrounding area as needed before hanging new objects.
By following these steps, you can create an aesthetically pleasing and functional space by hanging objects from a drop ceiling safely and securely.
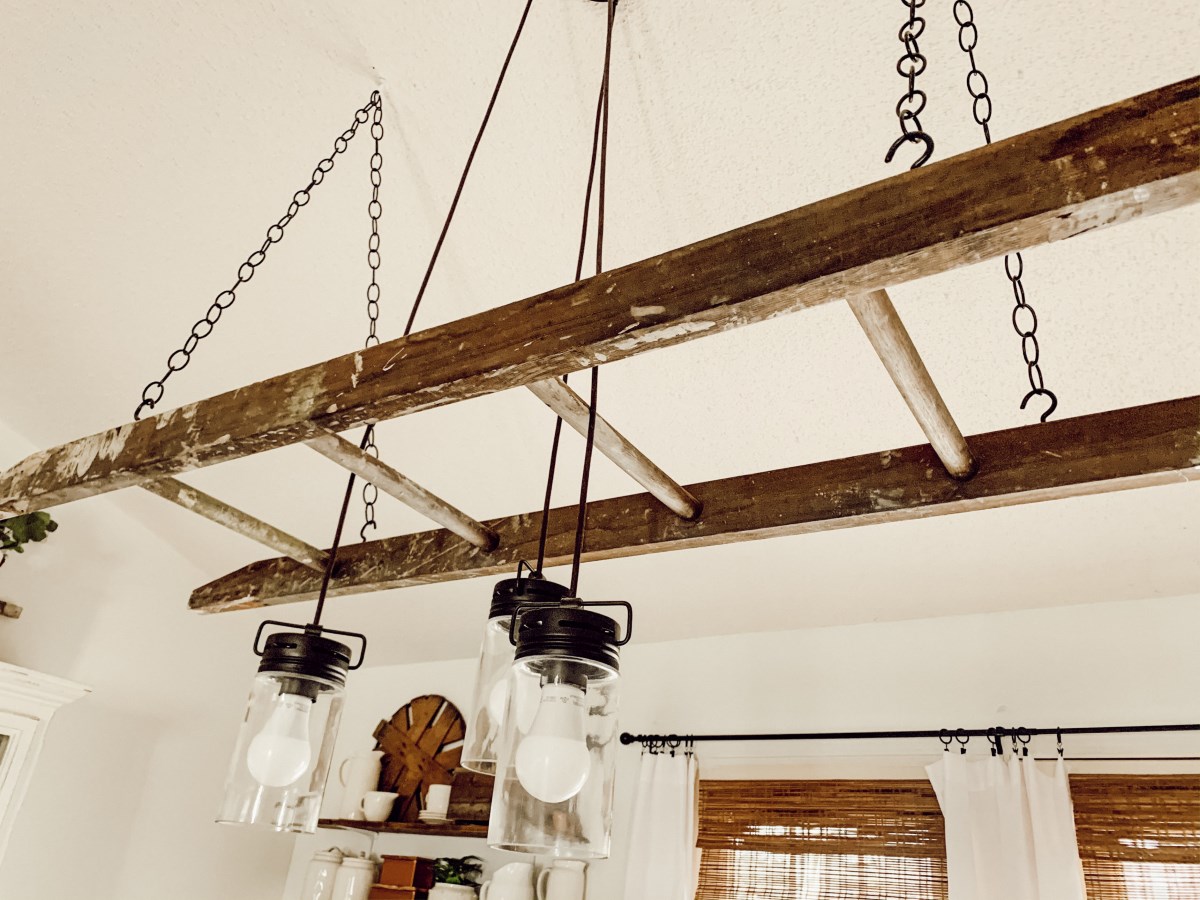
Caption: Hanging objects from a drop ceiling can enhance the aesthetic appeal of your space when done correctly and with proper attention to safety and stability.
Frequently Asked Questions about How To Hang Things From A Drop Ceiling
Was this page helpful?
At Storables.com, we guarantee accurate and reliable information. Our content, validated by Expert Board Contributors, is crafted following stringent Editorial Policies. We're committed to providing you with well-researched, expert-backed insights for all your informational needs.


0 thoughts on “How To Hang Things From A Drop Ceiling”