Articles
How To Install Gas Cooktop On Granite
Modified: August 30, 2024
Learn the step-by-step process of installing a gas cooktop on granite with our informative articles. Get expert advice and tips for a successful installation.
(Many of the links in this article redirect to a specific reviewed product. Your purchase of these products through affiliate links helps to generate commission for Storables.com, at no extra cost. Learn more)
Introduction
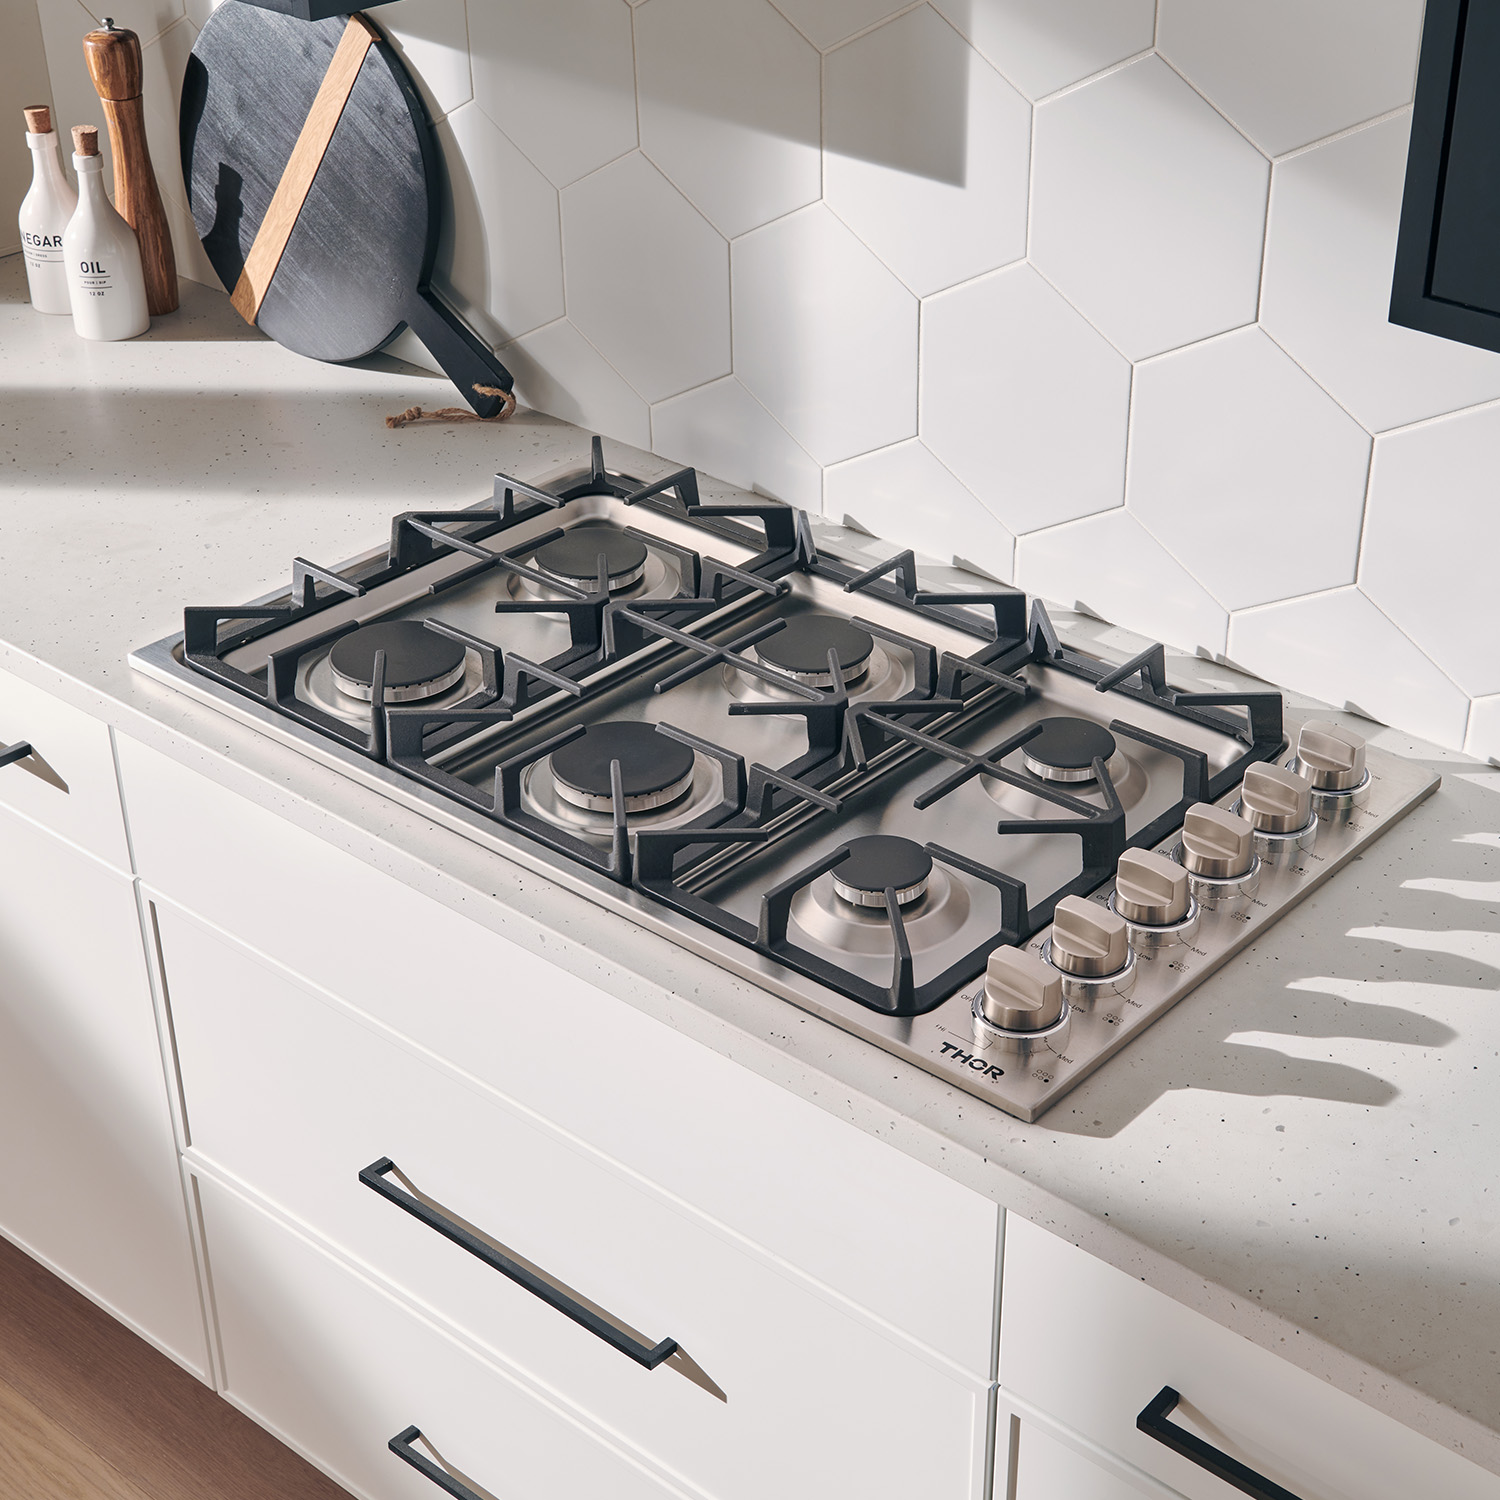
Welcome to our step-by-step guide on how to install a gas cooktop on a granite countertop. Adding a gas cooktop to your kitchen can provide you with a more efficient and precise cooking experience. However, installing a gas cooktop on a granite countertop requires careful planning and execution to ensure a safe and secure installation.
In this article, we will walk you through the process of installing a gas cooktop on a granite countertop, from measuring and marking the placement to connecting the gas supply line. We will also provide you with tips and precautions to ensure a successful installation.
Before we begin, it is important to note that gas installation can be complex and potentially dangerous if not done correctly. We highly recommend consulting a professional if you do not have previous experience with gas plumbing or installation. Safety should always be the top priority when working with gas appliances.
Now, let’s dive into the tools and materials you will need for this installation.
Key Takeaways:
- Elevate your kitchen with a gas cooktop on granite. Follow our step-by-step guide for a safe and successful installation, emphasizing precision, safety, and proper testing for optimal performance.
- Prioritize safety and precision when installing a gas cooktop on granite. From measuring and marking to testing and finishing, each step is crucial for a secure and efficient installation.
Read more: How To Install Cooktop On Granite Countertop
Tools and Materials Needed
Before you start the installation process, gather the necessary tools and materials to ensure a smooth and efficient installation. Here is a list of what you will need:
- Measuring tape: This will be used to accurately measure the placement of the cooktop on the granite countertop.
- Pencil or marker: Use a pencil or marker to mark the measurements and outline on the countertop.
- Power drill: You will need a power drill to create a pilot hole for cutting the opening in the granite.
- Diamond hole saw: This specialized tool is used to cut a hole in the granite countertop for the cooktop.
- Adjustable wrench: An adjustable wrench is essential for securely connecting the gas supply line to the cooktop.
- Pipe wrench: This tool is used to tighten the fittings on the gas supply line.
- Teflon tape: Teflon tape helps create a tight and leak-free seal on threaded connections.
- Screwdriver: A screwdriver may be needed to secure the cooktop to the countertop using mounting brackets.
- Gas shut-off valve: Install a gas shut-off valve if there isn’t one already in place.
- Gas flex line: This flexible metal hose connects the gas supply line to the cooktop.
- Thread sealant: Use thread sealant to seal the connections on the gas flex line.
- Putty knife: A putty knife can be handy for applying thread sealant and removing any excess.
- Clean cloth or towel: Keep a clean cloth or towel nearby for wiping away any spills or debris during the installation process.
Ensure that you have all these tools and materials ready before you start the installation. This will help you work efficiently and minimize any interruptions or delays during the process.
Now that you have everything you need, let’s move on to the first step: measuring and marking the placement of the gas cooktop on the granite countertop.
Step 1: Measure and Mark the Placement of the Gas Cooktop
The first step in installing a gas cooktop on a granite countertop is to accurately measure and mark the placement of the cooktop. This is an important step to ensure that the cooktop fits properly and aligns with the surrounding area of the countertop.
Here’s how you can measure and mark the placement:
- Start by measuring the width and depth of your cooktop. Note down these measurements.
- Using a measuring tape and pencil, identify the desired location for the cooktop on the granite countertop.
- Take into account any clearance requirements specified by the manufacturer. Typically, there should be enough space around the cooktop for proper ventilation.
- Once you have determined the placement, use a pencil or marker to outline the dimensions of the cooktop on the countertop.
- Double-check your measurements and make any necessary adjustments before proceeding to the next step.
It’s important to be precise and accurate with your measurements to ensure a seamless installation. Take your time during this step and make sure that the cooktop will fit perfectly in the designated area.
Once you have measured and marked the placement of the cooktop, you are now ready to move on to the next step: cutting an opening in the granite countertop. We will guide you through this process in the next step.
Step 2: Cut an Opening in the Granite Countertop
Now that you have measured and marked the placement of the gas cooktop on your granite countertop, it’s time to cut an opening in the countertop to accommodate the cooktop. This step requires careful precision to ensure that the cut is accurate and clean.
Follow these steps to cut the opening in the granite countertop:
- Put on safety goggles and gloves to protect yourself during the cutting process.
- Using a power drill equipped with a diamond hole saw, create a pilot hole at one corner of the outlined area on the countertop.
- Slowly begin cutting along the outline of the cooktop, applying even pressure and keeping the drill perpendicular to the countertop surface.
- Work your way around the marked area, following the outline, until the entire opening is cut out. Take your time and be patient to ensure a smooth cut.
- Remove any dust or debris from the cut using a clean cloth or towel. This will help maintain a clean and neat workspace.
It’s important to note that granite is a hard and dense material, so cutting through it may take some time and effort. Make sure to use the appropriate drill bit and take breaks if necessary to prevent overheating the drill.
Once you have successfully cut the opening in the granite countertop, you can move on to the next step: preparing the gas cooktop for installation. We will guide you through this process in the following step.
Step 3: Prepare the Cooktop for Installation
Now that you have cut the opening in your granite countertop, it’s time to prepare the gas cooktop for installation. This step involves ensuring that the cooktop is clean, properly aligned, and ready for the next stages of the installation process.
Follow these steps to prepare the gas cooktop:
- Carefully remove the cooktop from its packaging, taking care not to damage or scratch the surface.
- Inspect the cooktop for any visible defects or damage. If you notice any issues, contact the manufacturer for assistance or to request a replacement.
- Clean the cooktop surface using a non-abrasive cleaner and a soft cloth. Ensure that the cooktop is free from any dust, debris, or residue that may affect its performance or appearance.
- Review the manufacturer’s instructions and guidelines for installation. Familiarize yourself with any specific requirements or recommendations provided.
- Check the cooktop’s alignment with the opening in the granite countertop. Ensure that the cooktop fits securely and evenly in the designated space.
- If necessary, adjust the placement of the cooktop or make minor modifications to the opening in the countertop to ensure a proper fit.
By properly preparing the gas cooktop for installation, you are ensuring that it is in optimal condition and ready for the next steps. Taking the time to clean and assess the cooktop before installation will help ensure a smooth and functional final result.
Next, we will move on to Step 4: connecting the gas supply line. This step is a crucial part of the installation process. Follow the subsequent instructions carefully to ensure safety and proper functionality.
When installing a gas cooktop on granite, make sure to use a silicone sealant to create a watertight seal between the cooktop and the countertop. This will help prevent any potential leaks or damage to the granite.
Read more: How To Clean Gas Cooktop
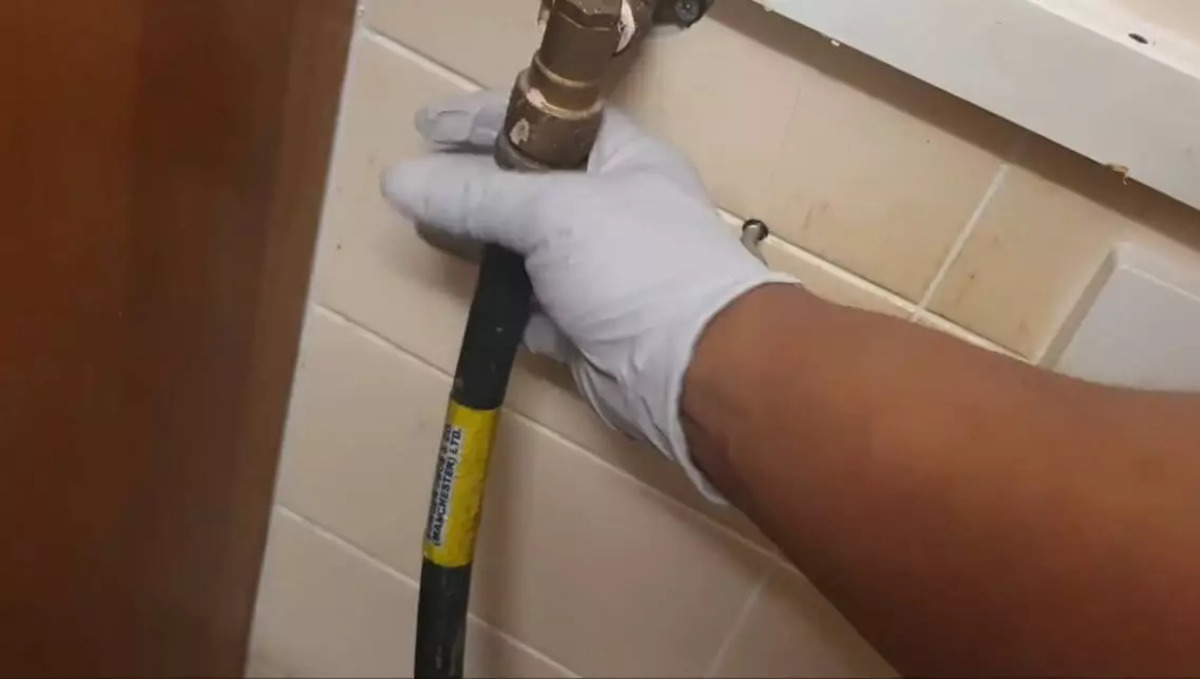
Step 4: Connect the Gas Supply Line
With the gas cooktop prepared and properly aligned, it’s time to connect the gas supply line. This step is crucial for ensuring that the cooktop receives the necessary fuel to function safely and efficiently. Before proceeding, be sure to turn off the gas supply to the area where you’ll be working.
Follow these steps to connect the gas supply line:
- Locate the gas shut-off valve near the cooktop area. If there isn’t one already installed, contact a professional to have one added.
- Apply Teflon tape to the threads of the gas shut-off valve to ensure a tight and secure connection.
- Connect the gas flex line to the gas shut-off valve, making sure to tighten the fittings with an adjustable wrench in a clockwise direction.
- Apply thread sealant to the threads of the gas flex line to prevent any leaks.
- Carefully guide the other end of the gas flex line through the opening in the granite countertop, ensuring that it reaches the back of the cooktop.
- Position the cooktop into the opening, aligning it with the gas flex line.
- Connect the other end of the gas flex line to the cooktop’s gas inlet, again tightening the fittings securely with an adjustable wrench.
It is important to note that the gas supply line should be properly sized and installed in accordance with local building codes and regulations. If you are unsure about the gas line installation, it is highly recommended to seek the assistance of a licensed professional to ensure the safety of the installation.
Once the gas supply line is securely connected, we’re one step closer to completing the installation. In the next step, we will discuss how to secure the gas cooktop to the granite countertop.
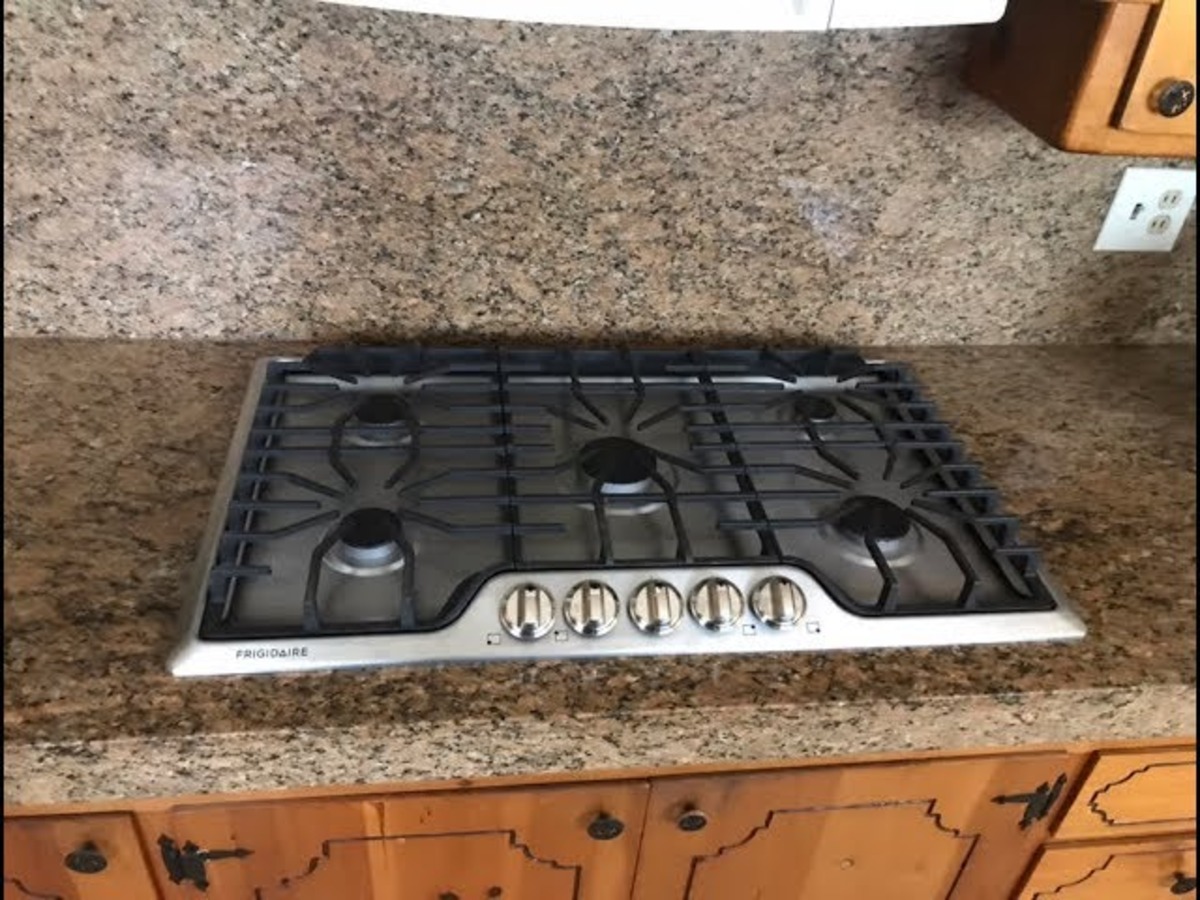
Step 5: Secure the Gas Cooktop to the Granite Countertop
After connecting the gas supply line, the next step is to securely fasten the gas cooktop to the granite countertop. This will ensure stability and prevent any movement or shifting during use. Proper securing of the cooktop is essential for safety and optimal performance.
Follow these steps to secure the gas cooktop to the granite countertop:
- Locate the mounting brackets or clips that came with your gas cooktop. These are usually provided by the manufacturer for secure installation.
- Position the mounting brackets or clips on the underside of the cooktop, aligning them with the pre-drilled holes or designated mounting points.
- Using a screwdriver, tighten the screws provided with the brackets or clips into the pre-drilled holes on the underside of the cooktop.
- Place the cooktop into the opening on the granite countertop, ensuring that it is aligned properly.
- Check for any gaps or unevenness between the cooktop and the countertop. If needed, make any necessary adjustments to ensure a snug fit.
- Tighten the screws on the mounting brackets or clips, securing the cooktop firmly to the granite countertop. Be careful not to overtighten, as it could damage the countertop or the cooktop.
By properly securing the gas cooktop to the granite countertop, you will ensure that it remains stable and in place during use. This step is crucial for the safety of both the cooktop and the individuals using it.
Once the cooktop is securely fastened, we can move on to the next step: testing the gas cooktop for proper functioning.
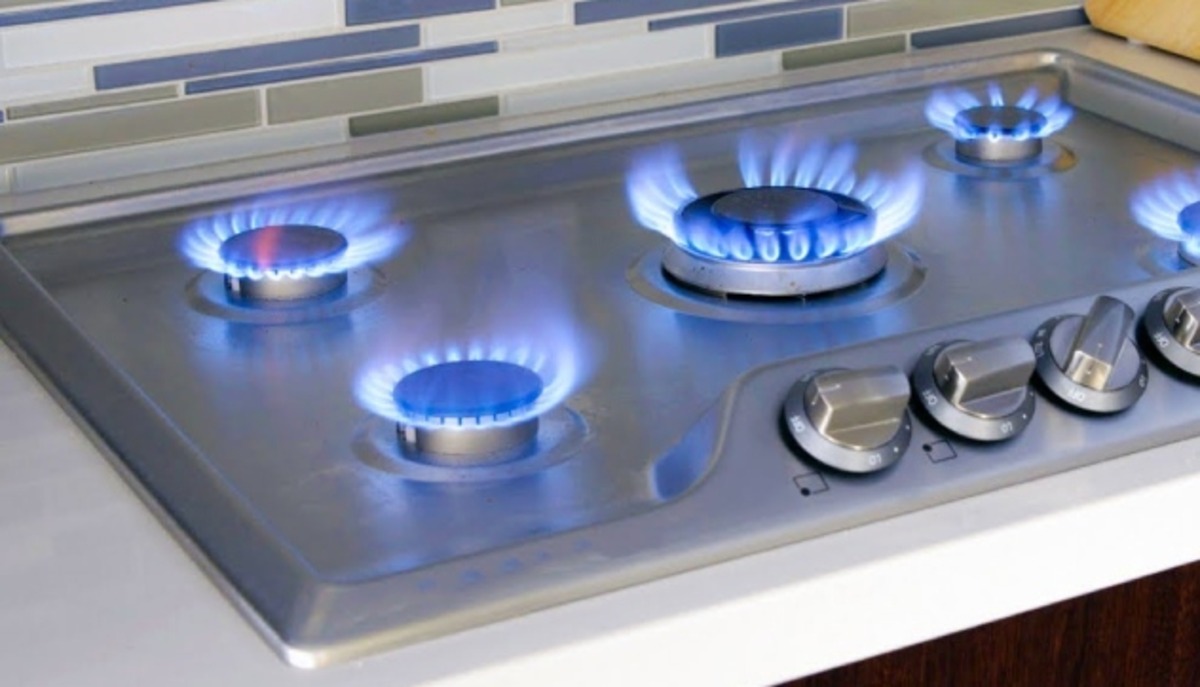
Step 6: Test the Gas Cooktop for Proper Functioning
With the gas cooktop securely installed, it’s important to test it for proper functioning before considering the installation complete. This step is crucial to ensure that the cooktop is working correctly and does not have any leaks or operational issues.
Follow these steps to test the gas cooktop:
- Turn on the gas supply at the shut-off valve.
- Check for any gas leaks by applying a mixture of soap and water to the gas connections. If you see any bubbles forming, there is a leak. In this case, turn off the gas and tighten the fittings as necessary or seek professional assistance.
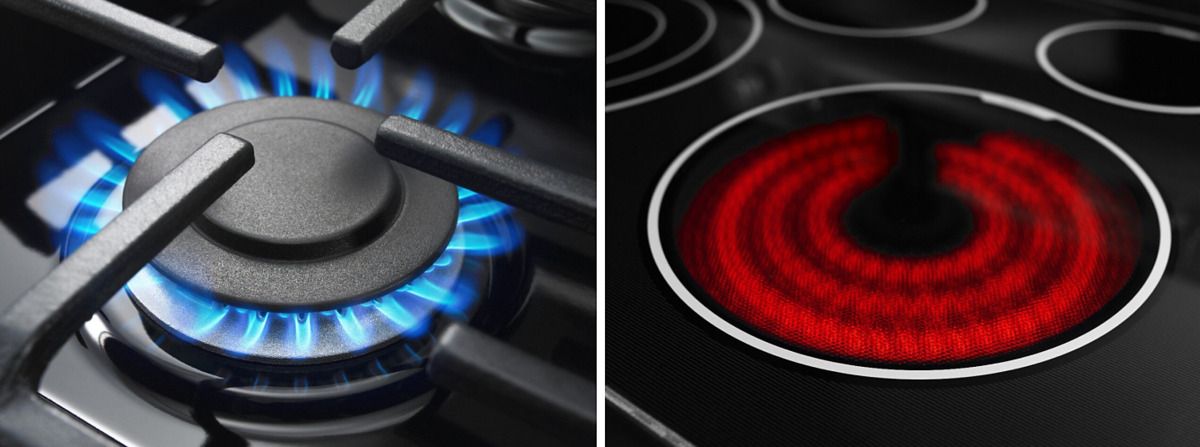
- Turn on the burners one by one and observe the flame. The flame should be blue and steady, without any yellow or orange flickering. A steady blue flame indicates proper combustion.
- Allow each burner to operate for a few minutes to ensure that it heats up properly. Check that the flame is consistent and that there are no unusual odors or sounds.
- Test all the ignition buttons or knobs to ensure that they are working correctly and securely lighting the burners.
- If everything is functioning properly and no issues are detected, turn off the burners and proceed to the final step of the installation process.
It’s crucial to conduct a thorough testing of the gas cooktop to ensure both safety and performance. Any signs of gas leaks, faulty ignition, or irregular flames should be addressed promptly before regular use of the cooktop.
Once you have successfully tested the gas cooktop and confirmed its proper functioning, we move on to the final step: finishing the installation and cleaning up.
Step 7: Finish the Installation and Clean Up
Congratulations! You’re almost done with the installation of your gas cooktop on the granite countertop. The final step involves finishing the installation and ensuring a clean and tidy workspace.
Follow these steps to complete the installation and clean up:
- Double-check all the gas connections to ensure they are secure and leak-free. If you notice any issues, make the necessary adjustments or seek professional assistance.
- Tighten any loose screws or fittings on the cooktop, if needed, to ensure stability.
- Remove any adhesive stickers or protective covering from the cooktop surface, following the manufacturer’s instructions.
- Wipe down the cooktop surface with a clean cloth or towel to remove any fingerprints or smudges.
- Clean the surrounding area of your granite countertop, removing any dust, debris, or excess sealant from the installation process.
- Dispose of any packaging materials or unwanted items properly, following local recycling or waste disposal guidelines.
- Take a moment to admire your newly installed gas cooktop on the beautiful granite countertop!
By completing these final steps, you ensure that the installation is finished with care and attention to detail. A clean and well-maintained cooktop and countertop will not only enhance the appearance of your kitchen but also make it easier to maintain and enjoy your cooking experience.
Now that the installation is complete and the clean-up is done, you can start using your gas cooktop on the granite countertop. Remember to regularly maintain and clean both the cooktop and the countertop to ensure their longevity and continued performance.
Thank you for following our step-by-step guide on how to install a gas cooktop on a granite countertop. Enjoy your new cooking appliance and the delicious meals you’ll create with it!
Please note that this guide is for informational purposes only. It’s always recommended to consult the manufacturer’s instructions and guidelines specific to your gas cooktop model and to follow local building codes and regulations.
Read more: How To Replace A Gas Cooktop
Conclusion
Installing a gas cooktop on a granite countertop can elevate your kitchen’s functionality and aesthetics. While the process may seem complex, following our step-by-step guide can help you successfully complete the installation with ease and confidence.
Throughout the installation process, we emphasized the importance of safety. Gas installation should not be taken lightly, and if you are unsure or uncomfortable with any step, it is always recommended to seek the assistance of a professional.
From measuring and marking the placement of the cooktop to securing it to the granite countertop, each step is crucial for a successful installation. Proper alignment, secure connections, and thorough testing are key factors in ensuring the safety and performance of your gas cooktop.
Completing the installation is not the final step. Regular maintenance and cleaning will contribute to the longevity and optimal performance of your gas cooktop and granite countertop. By adhering to manufacturer’s guidelines and keeping the cooktop and countertop clean, you can enjoy their beauty and functionality for years to come.
We hope that this comprehensive guide has provided you with the necessary knowledge and confidence to install a gas cooktop on your granite countertop. Remember to follow the specific instructions and guidelines provided by the manufacturer of your cooktop model for the best results.
Happy cooking and enjoy your new gas cooktop!
Frequently Asked Questions about How To Install Gas Cooktop On Granite
Was this page helpful?
At Storables.com, we guarantee accurate and reliable information. Our content, validated by Expert Board Contributors, is crafted following stringent Editorial Policies. We're committed to providing you with well-researched, expert-backed insights for all your informational needs.


0 thoughts on “How To Install Gas Cooktop On Granite”