Home>Articles>How To Install A Radio Without A Wiring Harness Adapter
Articles
How To Install A Radio Without A Wiring Harness Adapter
Modified: September 1, 2024
Learn how to install a radio in your car without a wiring harness adapter with our step-by-step articles.
(Many of the links in this article redirect to a specific reviewed product. Your purchase of these products through affiliate links helps to generate commission for Storables.com, at no extra cost. Learn more)
Introduction
Installing a radio without a wiring harness adapter may seem like a daunting task, but with the right knowledge and a few tools, it can be accomplished. Whether you’re installing a new radio in your car or replacing an old one, not having a wiring harness adapter doesn’t mean you’re out of luck. In this article, we will guide you through the steps to successfully install a radio without a wiring harness adapter.
Before we begin, it’s important to note that this method may differ depending on the specific make and model of your car. It’s always recommended to consult the car’s manual or seek professional assistance if you’re unsure about any step of the process.
Now, let’s gather the necessary tools and materials to get started on this radio installation adventure.
Key Takeaways:
- Installing a radio without a wiring harness adapter is achievable with the right tools and knowledge. By identifying, connecting, and securing the car’s wiring to the new radio, you can enjoy an enhanced audio experience in your car.
- Proper preparation, including gathering tools, preparing the radio, and identifying the car’s wiring, is crucial for a successful radio installation without a wiring harness adapter. By following the step-by-step process and testing the installation, you can ensure a seamless and reliable outcome.
Step 1: Gather the necessary tools and materials
Before diving into the installation process, it’s crucial to have all the required tools and materials at hand. This will ensure a smooth and efficient installation. Here are the essential items you’ll need:
1. Screwdriver set: A set of screwdrivers with various sizes and types will come in handy for removing the existing radio and accessing the car’s wiring.
2. Wire strippers/cutters: These tools are essential for removing the insulation from the wires and cutting them to the appropriate length.
3. Electrical tape: Electrical tape is used to secure and insulate the connections between the wires.
4. Butt connectors: Butt connectors are used to join two wires together securely. They provide a reliable and long-lasting connection.
5. Crimping tool: A crimping tool is needed to properly secure the butt connectors onto the wires.
6. Voltage meter: A voltage meter or multimeter is essential for testing the electrical connections and ensuring everything is properly connected.
7. Radio installation kit: Depending on the make and model of your car, you may need a radio installation kit that includes a mounting bracket, trim pieces, and a wiring adapter. Even though we won’t be using the wiring adapter in this article, having the installation kit will help with mounting the new radio.
8. New radio: Of course, you’ll need a new radio to install. Make sure to get a radio that is compatible with your car’s make and model.
Once you have all the necessary tools and materials ready, you’re now prepared to move on to the next step: preparing the radio for installation.
Step 2: Prepare the radio
Before diving into the actual installation process, it’s important to ensure that the radio is ready to be installed in your car. Here are the steps to prepare the radio:
1. Disconnect the negative battery cable: This step is crucial to prevent any electrical mishaps during the installation process. Locate the negative terminal on your car’s battery and use a wrench to loosen and remove the cable.
2. Remove the existing radio: Use the appropriate screwdriver to remove any screws or bolts that are holding the existing radio in place. Carefully pull the radio out from the dashboard, being cautious not to damage any wires behind it.
3. Disconnect the wiring harness: Once the radio is removed, locate the wiring harness at the back of the radio. There may be a plastic clip or connector holding the harness in place. Gently press the clip or release the connector to disconnect the wiring harness from the radio.
4. Remove any mounting brackets: Some radios may have additional mounting brackets or trim pieces attached to them. Remove these items from the radio so that you have a clean and bare unit for the installation.
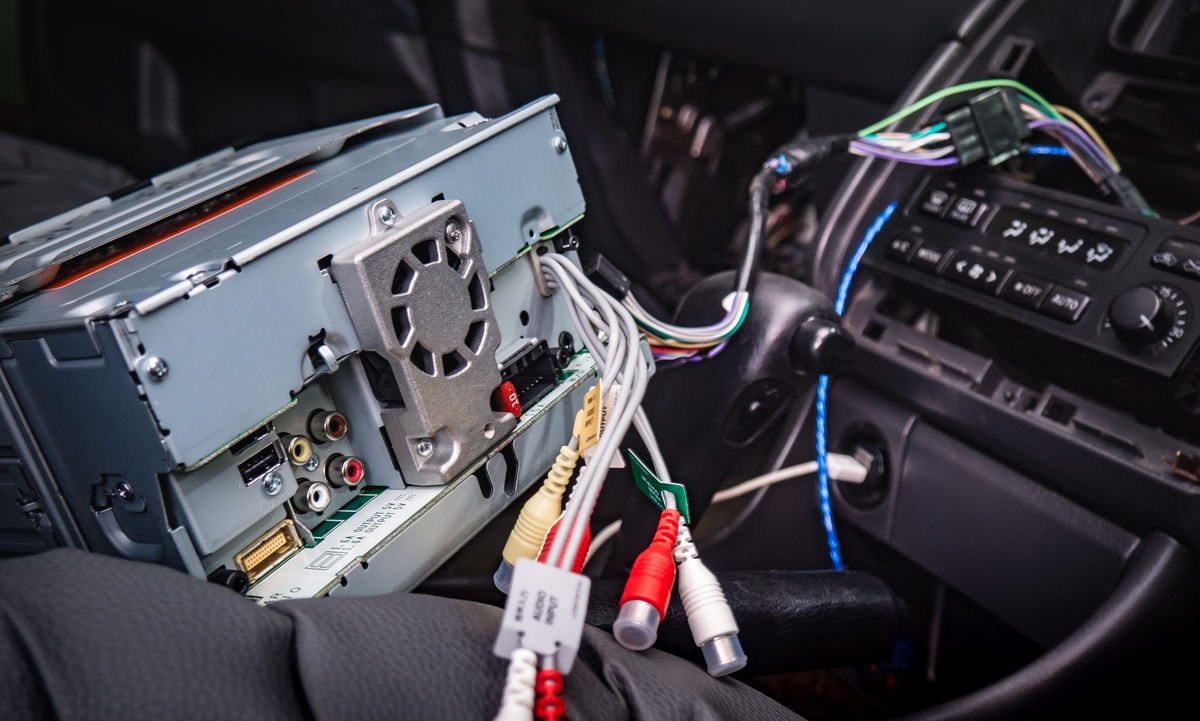
5. Familiarize yourself with the radio’s wiring: Take a moment to familiarize yourself with the wiring on the new radio. Note the color coding of the wires and the specific functions they correspond to. This will be useful during the next steps when connecting the wires to the car’s wiring.
Once you have prepared the radio, you’re now ready to move on to the next step: identifying the car’s wiring.
Step 3: Identify the car’s wiring
In this step, we will identify the different wires in your car’s wiring system that are necessary for connecting the radio. Here’s how to identify the car’s wiring:
1. Consult the car’s manual: It’s always a good idea to consult the car’s manual to get specific information about the wiring configuration. The manual will typically include a diagram or color codes for the different wires.
2. Use a voltage meter: If the car’s manual is not available or lacks detailed information, you can use a voltage meter or multimeter to identify the wires. Set the meter to the DC voltage setting and touch the positive probe to each wire while grounding the negative probe to a metal part of the car. The meter will display a voltage reading when you come across the power wires.
3. Identify the power wires: The power wires are usually color-coded, with the most common being red (positive) and black (negative). Use the voltage meter or manual to identify these wires. The red wire is typically the constant 12V power supply, while the yellow wire is the switched 12V power supply.
4. Find the ground wire: The ground wire is important for the radio’s proper functioning. It is usually black or brown and is connected to the car’s metal chassis. Locate this wire and ensure it is securely connected.
5. Identify the speaker wires: The speaker wires vary in color and are grouped in pairs. Typically, the positive speaker wire is labeled with a stripe or a plus (+) sign. Use the manual or a speaker to test each wire and identify the corresponding speakers.
Remember to take notes or label the wires as you identify them to make the connection process easier. Once you have identified the car’s wiring, you can proceed to the next step: stripping and connecting the wires.
When installing a radio without a wiring harness adapter, make sure to carefully match and connect each wire by function (e.g. power, ground, speakers) to the corresponding wires on the radio. Use electrical tape or wire connectors to secure the connections and prevent shorts. Double check your connections before powering on the radio.
Step 4: Strip and connect the wires
With the car’s wiring identified, it’s time to strip and connect the wires from the car to the radio. Follow these steps to properly strip and connect the wires:
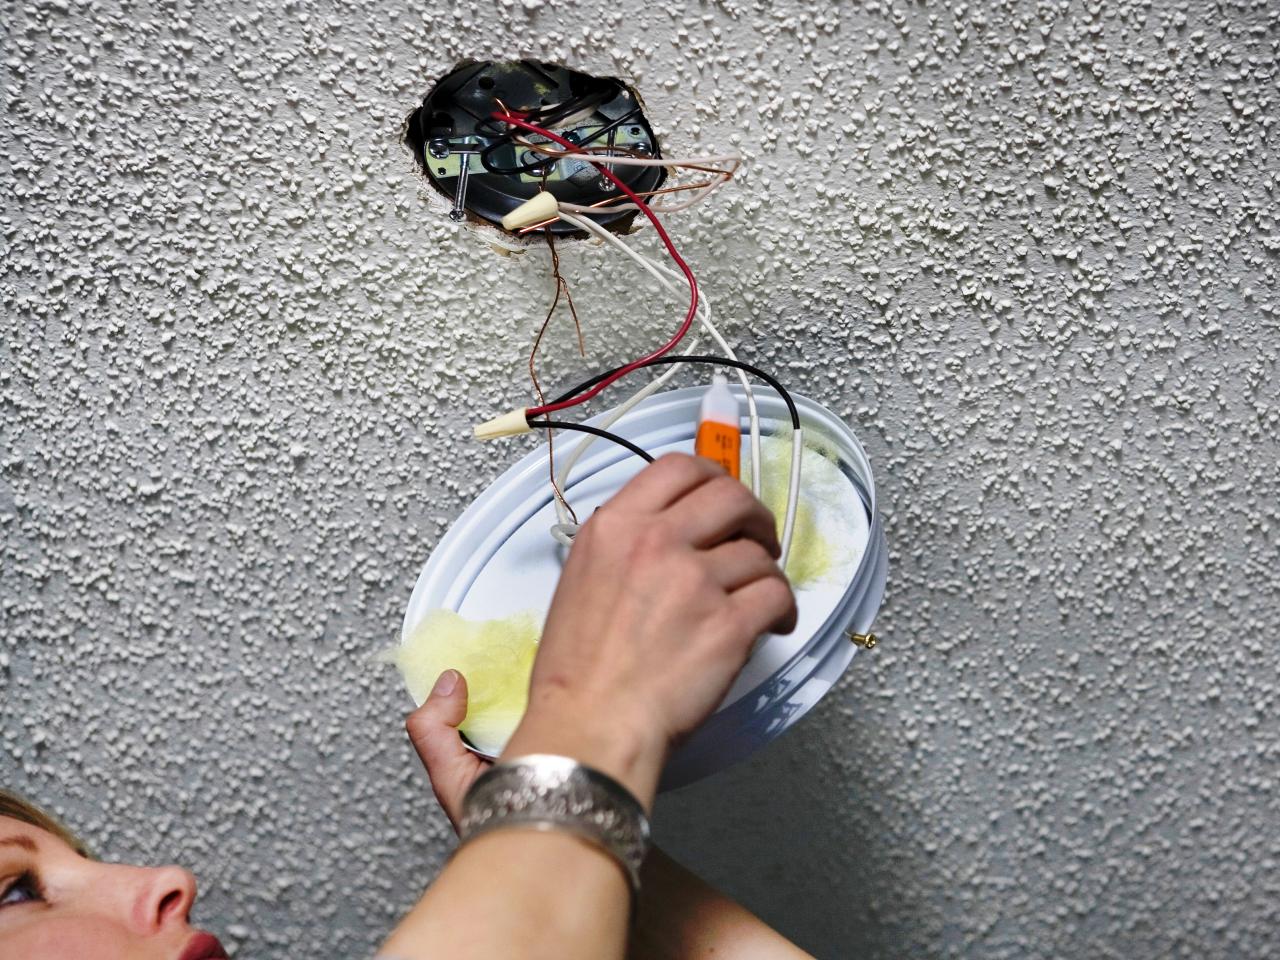
1. Strip the wires: Use wire strippers to remove a small section of insulation from the ends of the wires. This will expose the bare copper wire underneath. Be careful not to strip too much insulation, as it can lead to a poor connection or short circuit.
2. Match the wires: Take the wires from the car and match them to the corresponding wires on the radio. Use the color-coding or notes to properly identify which wire goes where. For example, connect the red wire from the car to the red wire on the radio, and so on.
3. Twist and secure the wires: Twist the exposed copper ends of the car’s wires with the corresponding wires from the radio. Ensure a tight and secure connection. If needed, you can use butt connectors to join the wires together. Insert both wires into the connector and use a crimping tool to crimp the connector, creating a strong bond.
4. Insulate the connections: After making the connections, use electrical tape to wrap around each connection. This will provide insulation and prevent any short circuits.
5. Repeat the process for all connections: Continue the process of stripping, connecting, and insulating the wires for all the necessary connections, including the power, ground, speaker wires, and any additional wires for features like antenna or steering wheel controls.
6. Double-check the connections: Once all the wires are connected, double-check each connection to ensure they are secure and properly insulated. This will minimize the risk of any electrical issues.
By following these steps, you will successfully strip and connect the wires for your radio installation. Now, it’s time to move on to the next step: securing the connections.
Step 5: Secure the connections
Ensuring that the connections between the car’s wiring and the radio are securely fastened is essential for a reliable and long-lasting installation. Follow these steps to secure the connections:
1. Check for loose connections: After connecting the wires, give each connection a gentle tug to check if they are loose. If any connections feel loose or unstable, double-check the wiring and reconnect them if necessary.
2. Use zip ties or cable clips: To keep the wiring organized and prevent any loose wires from interfering with the radio or other components, use zip ties or cable clips to secure the wires together. This will help to prevent any potential damage or short circuits.
3. Secure the radio in the dashboard: Once all the connections are secure, carefully slide the radio back into the dashboard. Ensure that it fits snugly and is held in place securely. Follow the manufacturer’s instructions or use the mounting bracket and screws that came with the radio installation kit, if applicable, to secure the radio in place.
4. Reconnect the battery: With the connections secured and the radio properly mounted, it’s time to reconnect the negative battery cable. Use a wrench to tighten the cable onto the battery’s negative terminal.
5. Test the radio: Turn on the car’s ignition and test the radio to ensure that it powers up and functions correctly. Check all the features and settings, including AM/FM reception, CD player, auxiliary input, and Bluetooth connectivity. Make any necessary adjustments or troubleshoot any issues that may arise.
By properly securing the connections and ensuring a stable installation, you minimize the risk of any electrical problems or damage to the radio. With the connections secure, you’re ready to move on to the final step: testing the installation.
Step 6: Test the installation
After completing the installation process, it’s important to test the radio to ensure that everything is working properly. Follow these steps to test the installation:
1. Turn on the power: Start by turning on the car’s ignition. This will provide power to the radio and allow you to test its functionality.
2. Check for power and display: Verify that the radio receives power by checking if it lights up or displays any information on the screen. If the radio doesn’t receive power, double-check the connections and ensure that the wiring is properly connected.
3. Test the audio: Tune the radio to different AM/FM stations and check the audio output. Adjust the volume to ensure that it works and that you can hear the sound through the car’s speakers. If there is no audio, make sure the speaker wires are connected properly and that there are no loose or damaged connections.
4. Test additional features: If your radio has additional features such as CD player, Bluetooth, or auxiliary input, test them to ensure they function correctly. Insert a CD and check if it plays, connect a Bluetooth device and make sure the audio streams properly, or connect an auxiliary cable and confirm that audio is transmitted.
5. Test steering wheel controls (if applicable): If your car’s steering wheel has integrated radio controls, test them to make sure they are properly synced with the new radio. If they don’t work, refer to the radio’s manual for instructions on programming the controls.
6. Test the antenna: Finally, test the radio’s reception by switching between different AM and FM stations. Make sure the reception is clear, without any interference or static. If the reception is poor, double-check the antenna connection or consider replacing the antenna for better signal quality.
By thoroughly testing the installation and its various functions, you can ensure that the radio is properly installed and functioning as expected. If any issues arise during the testing process, refer to the troubleshooting section of the radio’s manual or consult a professional for assistance.
With the installation successfully tested, you have completed the process of installing a radio without a wiring harness adapter. Enjoy your newly installed radio and the enhanced audio experience it brings to your car!
Conclusion
Installing a radio without a wiring harness adapter may seem like a daunting task, but with the right tools, knowledge, and a little patience, it can be done successfully. In this article, we’ve walked you through the steps to install a radio without a wiring harness adapter.
We started by gathering the necessary tools and materials, such as screwdrivers, wire strippers, electrical tape, and butt connectors. These tools are essential for removing the old radio, identifying the car’s wiring, and connecting the wires to the new radio.
Next, we prepared the radio by disconnecting the negative battery cable, removing the existing radio from the dashboard, and disconnecting the wiring harness. We also took the time to familiarize ourselves with the new radio’s wiring configuration.
After that, we identified the car’s wiring by consulting the car’s manual, using a voltage meter, or relying on color-coded wires. This step allowed us to match the car’s wires to the corresponding wires on the new radio.
Once the wires were identified, we proceeded to strip and connect them. This involved removing insulation from the wires, matching them together, and securing them with butt connectors or electrical tape. We also made sure to insulate the connections properly to prevent any electrical issues.
With the connections secure, we moved on to securing the installation. This included checking for loose connections, using zip ties or cable clips to organize the wiring, and securely mounting the radio in the dashboard. We concluded this step by reconnecting the battery and testing the radio.
Finally, we tested the installation to ensure that the radio received power, the audio played through the speakers, and any additional features such as CD player or Bluetooth worked as intended. We also tested the steering wheel controls and checked the radio’s reception.
By following these steps, you can successfully install a radio without a wiring harness adapter and enjoy the benefits of a new audio experience in your car. Remember to consult your car’s manual and seek professional assistance if needed. With the right tools, knowledge, and attention to detail, you can achieve a seamless and reliable radio installation.
Frequently Asked Questions about How To Install A Radio Without A Wiring Harness Adapter
Was this page helpful?
At Storables.com, we guarantee accurate and reliable information. Our content, validated by Expert Board Contributors, is crafted following stringent Editorial Policies. We're committed to providing you with well-researched, expert-backed insights for all your informational needs.


0 thoughts on “How To Install A Radio Without A Wiring Harness Adapter”