Articles
How To Install Pitless Adapter
Modified: December 7, 2023
Learn how to install a pitless adapter with our informative articles. Find step-by-step instructions and tips for a successful installation.
(Many of the links in this article redirect to a specific reviewed product. Your purchase of these products through affiliate links helps to generate commission for Storables.com, at no extra cost. Learn more)
Introduction
Welcome to our comprehensive guide on how to install a pitless adapter. If you rely on a well for your water supply, then you know how important it is to have a reliable and efficient system. A pitless adapter is an essential component that allows water from your well to be delivered to your home without the need for an above-ground pit.
In this article, we will walk you through the step-by-step process of installing a pitless adapter. Whether you are replacing an old adapter or installing a new one for the first time, this guide will provide you with all the information you need to ensure a successful installation.
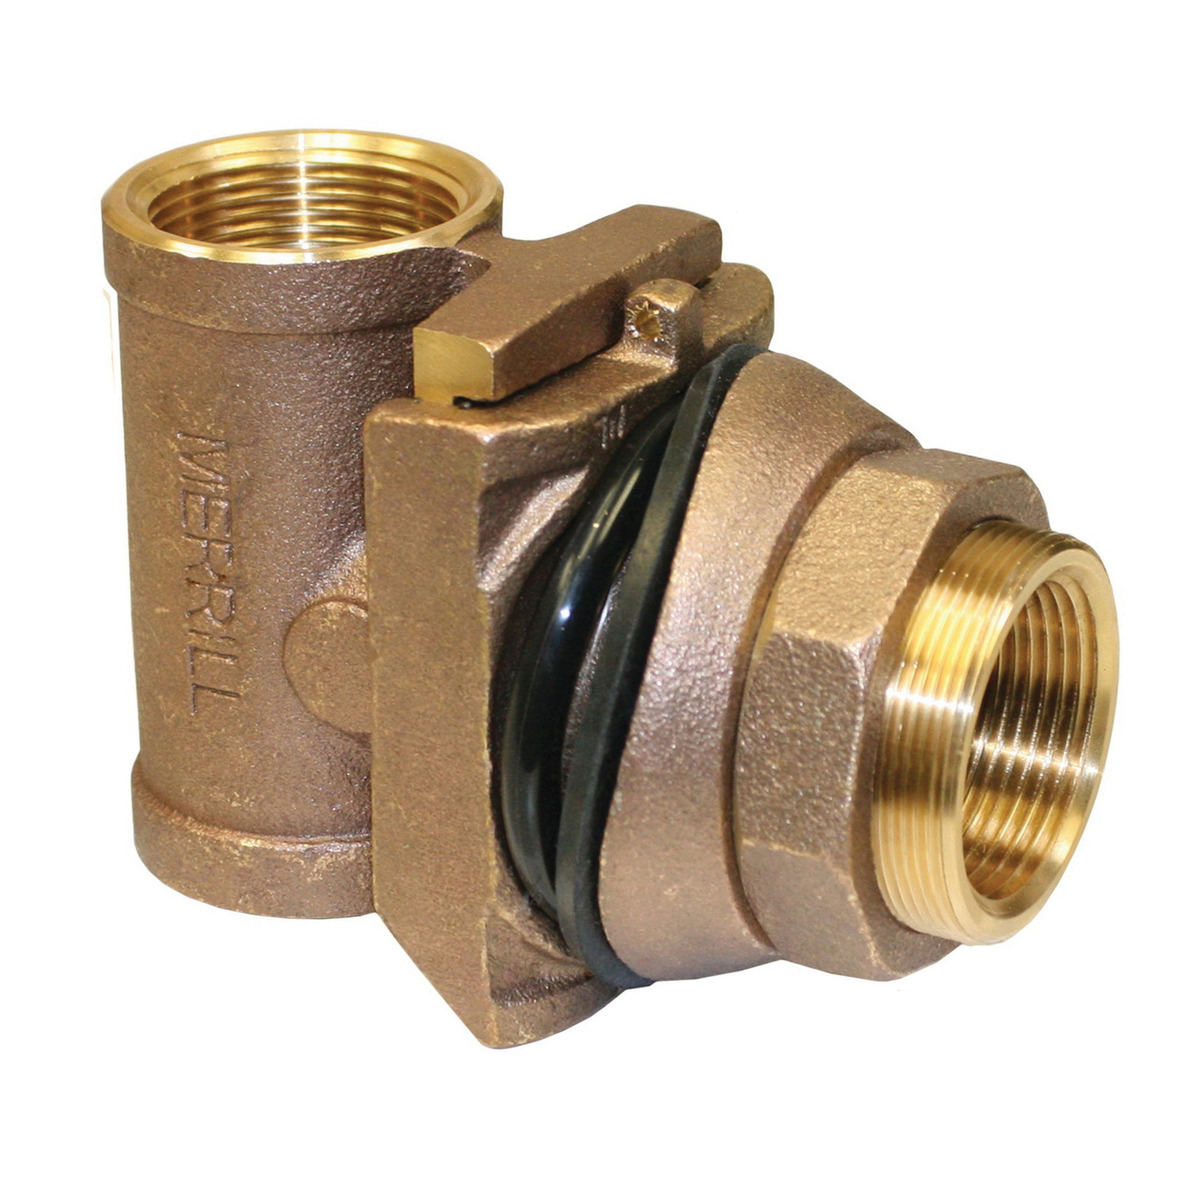
Before we dive into the installation process, let’s clarify what a pitless adapter is and why it is necessary. A pitless adapter is a fitting that connects the water pipe to your well and allows water to be transported underground. It eliminates the need for an exposed pit or well cap, protecting the system from external elements and reducing the risk of contamination.
Installing a pitless adapter offers several benefits. Firstly, it provides a more aesthetically pleasing solution as it eliminates the need for an eyesore pit or protruding pipes. Secondly, it improves the safety of your well system by reducing the risk of accidents or damage. Lastly, it allows for easier access and maintenance of the well system, as there are no obstacles obstructing the area.
Now that you understand the importance of a pitless adapter, let’s get started with the installation process. We will guide you through each step, explaining what tools and materials you’ll need and providing helpful tips along the way. By following this guide and taking the necessary precautions, you’ll be able to successfully install a pitless adapter and ensure the efficient functioning of your well system.
Are you ready? Let’s begin!
Key Takeaways:
- Proper installation of a pitless adapter is crucial for maintaining a reliable well system. Choosing the right adapter, gathering necessary tools, and thorough testing are essential steps for a successful installation.
- Regular maintenance and professional inspections are recommended to ensure the ongoing performance and longevity of a well system. Prioritizing safety and following manufacturer guidelines are key to a successful installation.
Read more: How To Install Netgear Wifi Adapter
Step 1: Gather the Necessary Tools and Materials
Before you begin the installation process, it’s important to gather all the necessary tools and materials. This will ensure that you have everything you need on hand and avoid any unnecessary delays during the installation. Let’s start by discussing how to choose the right pitless adapter and then move on to the tools you’ll need.
Choosing the right pitless adapter
When it comes to choosing a pitless adapter, there are a few factors to consider. Firstly, you need to determine the size of the pitless adapter that is compatible with your well pipe. Measure the diameter of your well pipe to ensure proper sizing.
In addition to size, you’ll also need to consider the material of the pitless adapter. Most pitless adapters are made of durable materials such as brass or stainless steel, which provide resistance to corrosion and ensure long-lasting performance. Choose a pitless adapter that is suitable for the conditions in your area and meets your specific needs.
Gathering the required tools
Now let’s move on to the tools you’ll need for the installation. Here’s a list of commonly used tools:
- Adjustable wrench
- Pipe wrench
- Teflon tape
- Hacksaw or PVC cutter (if working with PVC pipes)
- Screwdriver
- Torch or heat gun (if working with copper pipes)
- Thread sealant
- Measuring tape
- Marker or pencil
- Bucket or container for water drainage
- Flashlight
- Protective gloves and safety glasses
Make sure you have all these tools readily available before you begin the installation process. It’s also a good idea to have a clean and organized workspace to work in, ensuring that you have easy access to all your tools and materials.
Once you have chosen the right pitless adapter and gathered all the necessary tools, you are ready to move on to the next step: locating the well cap.
Step 2: Locate the Well Cap
Before you can start the installation process, you need to locate the well cap. The well cap is the access point that covers the opening to your well. This is where you will find the pitless adapter assembly.
Read more: How To Install Lower Adapter Uppababy
Identifying the well cap
The well cap is usually located above ground and is often made of a durable material such as plastic or metal. It is designed to protect the well and prevent any contaminants from entering the system. The well cap may have a vent or air hole to allow for proper air circulation.
To identify the well cap, look for a slightly raised structure or a capped pipe in your yard. It is typically found near the location of the well itself and may be marked with signs or other indicators. If you are unsure, you can consult a well professional or refer to any well system documentation you may have.
Removing the well cap
Once you have located the well cap, the next step is to remove it to access the pitless adapter assembly. Here’s how to do it:
- Begin by cleaning the area around the well cap to ensure that no debris or dirt falls into the well during the removal process.
- If there are any screws or fasteners securing the well cap in place, use a screwdriver or wrench to remove them.
- Gently lift the well cap upwards, taking care to avoid any damage to the surrounding components. In some cases, you may need to twist or turn the cap to disengage it.
- Set the well cap aside in a safe area where it won’t get damaged.
Once the well cap has been removed, you will have clear access to the pitless adapter assembly and can proceed to the next step: accessing the pitless adapter assembly.
Step 3: Access the Pitless Adapter Assembly
Now that you have removed the well cap, you can proceed to access the pitless adapter assembly. The pitless adapter assembly is the connection point between the well pipe and the water delivery system. Follow these steps to access the assembly:
Locating the pitless adapter assembly
The pitless adapter assembly is typically located just below the well cap. It is a rectangular or cylindrical fitting that connects the well pipe to the water delivery system. You may see a conduit or pipe extending from the well pipe horizontally or at an angle.
Take a moment to locate the pitless adapter assembly and familiarize yourself with its position. This will help you clear any obstructions and ensure an easier installation process.
Read more: How To Install A Wifi Adapter In Pc
Clearing any obstructions around the assembly
Before you can proceed with the installation, it’s important to clear any obstructions around the pitless adapter assembly. This ensures that you have enough space to work and minimizes the risk of damaging any components. Here’s what you need to do:
- Inspect the area around the pitless adapter assembly for any debris, dirt, or vegetation. Remove any loose materials or plants that may be blocking your access.
- Use a damp cloth or brush to clean the surfaces around the assembly, removing any accumulated dirt or grime. This will help ensure a secure and effective installation.
- If there are any large obstructions that cannot be easily removed, consider using tools such as a spade or shovel to clear the area. Exercise caution to avoid damaging any existing pipes or components.
By taking the time to clear any obstructions around the pitless adapter assembly, you will create a clean and accessible workspace. This will make it easier to install the new pitless adapter in the next steps.
With the pitless adapter assembly now accessible and any obstructions cleared, you are ready to move on to the next step: removing the old pitless adapter (if applicable).
Step 4: Remove the Old Pitless Adapter (If Applicable)
Before installing a new pitless adapter, it’s important to assess the condition of the existing one. In some cases, you may need to remove the old pitless adapter before proceeding with the installation. This step will guide you through determining if removal is necessary and how to detach the old pitless adapter from the pipe.
Ensuring the need to remove the old pitless adapter
Inspect the old pitless adapter to determine if it needs to be removed. Some factors to consider include its age, condition, and compatibility with the new pitless adapter you have chosen. If the existing pitless adapter is damaged, corroded, or incompatible, it is recommended to remove it and replace it with a new one.
It’s important to note that not all installations will require the removal of the old pitless adapter. If the existing pitless adapter is in good condition and compatible with the new one, you can proceed with the installation without removing it.
Detaching the old pitless adapter from the pipe
If you have determined that the old pitless adapter needs to be removed, follow these steps to detach it from the pipe:
- Before removing the old pitless adapter, ensure that the water supply to the well is shut off. This will prevent any water from flowing during the removal process.
- Using a pipe wrench or adjustable wrench, loosen the nuts or bolts that secure the old pitless adapter to the well pipe. Turn them counterclockwise to loosen and remove them.
- Gently pull the old pitless adapter away from the well pipe, taking care not to damage any surrounding components or pipes. If there is any resistance, use a light tapping motion with a rubber mallet to help loosen it.
- Inspect the area around the well pipe for any residual debris or buildup. Clean the surface using a damp cloth or brush to ensure a smooth and clean installation of the new pitless adapter.
Once the old pitless adapter has been detached and the area is clean, you can proceed to the next step of preparing and installing the new pitless adapter.
Read more: How To Install Driver For Network Adapter
Step 5: Prepare and Install the New Pitless Adapter
Now that you have removed the old pitless adapter (if necessary), it’s time to prepare and install the new pitless adapter. This step will guide you through inspecting the new pitless adapter, preparing the pipe for installation, and attaching the new pitless adapter to the pipe.
Inspecting the new pitless adapter
Before you begin the installation, carefully inspect the new pitless adapter to ensure it is in good condition and free from any defects. Look for any signs of damage or manufacturing flaws that could impact its performance. Also, double-check that the new pitless adapter is the appropriate size and material for your specific well system.
If you notice any issues with the new pitless adapter, contact the manufacturer or supplier for further assistance or consider obtaining a replacement. It’s important to start the installation with a high-quality and functioning pitless adapter.
Preparing the pipe for installation
Prior to attaching the new pitless adapter to the pipe, it’s important to prepare the pipe to ensure a proper and secure connection. Follow these steps to prepare the pipe:
- Inspect the end of the well pipe to ensure it is clean and free from any debris or obstructions. If necessary, use a clean cloth or brush to wipe away any dirt or residue.
- If you are working with PVC pipes, use a hacksaw or PVC cutter to make a clean and straight cut on the end of the pipe. Ensure that the cut is square and smooth.
- If you are working with copper pipes, use a torch or heat gun to heat the end of the pipe until it is pliable. Once heated, use a clean cloth to remove any oxidation or dirt from the heated area.
- Apply a thin layer of thread sealant or Teflon tape to the threaded portion of the well pipe. This will help create a watertight seal when attaching the new pitless adapter.
Attaching the new pitless adapter to the pipe
With the pipe prepared, you can now proceed to attach the new pitless adapter. Follow these steps:
- Take the new pitless adapter and position it over the prepared end of the well pipe. Ensure that the adapter aligns properly with the pipe and is facing the correct direction.
- Begin by hand-tightening the adapter onto the pipe, turning it clockwise. Once hand-tightened, use an adjustable wrench or pipe wrench to further tighten the connection. Be careful not to overtighten, as this can cause damage to the threads or components.
- Ensure that the new pitless adapter is secure and properly aligned with the well pipe. It should be snug, but not overly tightened.
Congratulations! You have successfully prepared and installed the new pitless adapter. In the next step, we will focus on securing and testing the pitless adapter to ensure its proper functionality.
Step 6: Secure and Test the Pitless Adapter
Now that you have installed the new pitless adapter, it’s important to secure it properly and test its functionality. This step will guide you through tightening the pitless adapter assembly, checking for any leaks or issues, and testing the functionality of the pitless adapter.
Tightening the pitless adapter assembly
Start by ensuring that the pitless adapter assembly is securely tightened to maintain a strong and watertight connection. Here’s what you need to do:
- Using an adjustable wrench or pipe wrench, tighten the nuts or bolts of the pitless adapter assembly. Turn them clockwise to ensure a snug fit. Remember not to overtighten, as this can damage the components.
- Check all the connections within the pitless adapter assembly, including the riser pipe and any other components. Make sure they are properly aligned and tightened.
Ensuring that the pitless adapter assembly is securely tightened will help prevent any potential leaks or issues down the line.
Checking for any leaks or issues
After securing the pitless adapter, it’s crucial to check for any signs of leaks or issues before finalizing the installation. Follow these steps to perform a thorough inspection:
- Turn on the water supply to the well system and observe the pitless adapter assembly closely. Look for any signs of water dripping, pooling, or unusual moisture around the connections.
- Check the surrounding area for any water stains, wet spots, or signs of leakage. If you detect any leaks, tighten the connections further or consult a professional if needed.
- Inspect the entire length of the well pipe, from the pitless adapter to the water delivery system, for any visible leaks, cracks, or damage. Address any issues promptly to ensure the proper functioning of the system.
Checking for leaks or issues is crucial to prevent water loss, system inefficiencies, and potential damage. Address any concerns or problems found during the inspection before proceeding.
Testing the functionality of the pitless adapter
With the pitless adapter securely installed and checked for leaks, it’s time to test its functionality. Here’s what you should do:
- Turn on the water supply to the well system and let the water run for a few moments.
- Observe the water flow and pressure to ensure that it is consistent and uninterrupted.
- Check the water supply in your home to verify that it is functioning as expected.
Testing the functionality of the pitless adapter ensures that water is being properly delivered to your home from the well system. If you notice any irregularities or issues during the testing process, consult a professional for further assistance.
Once you have confirmed that the pitless adapter is securely tightened, free of leaks, and functioning properly, you can move on to the final step of replacing the well cap.
Read more: How To Install A Rain Chain Gutter Adapter
Step 7: Replace the Well Cap
Now that you have installed and tested the pitless adapter, it’s time to replace the well cap. The well cap serves as a protective covering for the opening to your well, helping to prevent debris, contaminants, and unauthorized access. This step will guide you through positioning the new well cap and securely fastening it in place.
Positioning the new well cap
Start by positioning the new well cap over the opening of your well. Follow these steps:
- Inspect the new well cap to ensure it is in good condition and free from any defects.
- Match the size and type of the new well cap with the specifications of your well system.
- Place the new well cap directly over the opening, ensuring that it is centered and aligned correctly.
It’s important to position the new well cap properly to ensure a secure fit and optimal protection for your well system.
Securing the well cap in place
Once the new well cap is positioned correctly, it’s time to secure it in place. Follow these steps:
- If the new well cap has screws or fasteners, use a screwdriver or wrench to attach them. Make sure to tighten them securely but not excessively.
- If the new well cap has latches or clasps, engage them to provide a tight and secure fit.
- If the new well cap requires additional sealing or weatherproofing, follow the manufacturer’s instructions to ensure proper installation.
Securing the well cap properly is essential to maintain the integrity of your well system and prevent any unwanted entry or contamination.
Once the well cap is securely fastened, step back and visually inspect the area to ensure everything is in place, aligned correctly, and visually appealing.
Congratulations! You have successfully replaced the well cap and completed the installation of the pitless adapter. Your well system is now effectively protected and ready to deliver water to your home.
Remember to conduct regular maintenance checks and inspections to ensure the ongoing functionality and longevity of your well system. If you have any concerns or issues, don’t hesitate to reach out to a professional for assistance.
We hope this guide has been helpful in guiding you through the process of installing a pitless adapter and replacing the well cap. Enjoy the benefits of a well-functioning and efficient well system!
Conclusion
Installing a pitless adapter and replacing the well cap is a crucial step in maintaining the efficiency and functionality of your well system. By following the step-by-step guide provided in this article, you have learned how to successfully complete this process and ensure the proper functioning of your well system.
Throughout the installation process, we discussed the importance of choosing the right pitless adapter, gathering the necessary tools and materials, locating the well cap, accessing the pitless adapter assembly, removing the old pitless adapter (if applicable), preparing and installing the new pitless adapter, securing and testing the pitless adapter, and finally, replacing the well cap.
It’s important to always prioritize safety during the installation process, as well as following any specific guidelines provided by the manufacturer of the pitless adapter or your well system. Taking the time to gather the right tools, inspect the components, and ensure a proper fit will go a long way in avoiding potential issues in the future.
Regular maintenance and inspections of your well system are essential to prevent any leaks, malfunctions, or contamination. It’s recommended to schedule professional well inspections at least once a year to ensure the ongoing performance of your well system.
We hope that this comprehensive guide has provided you with the knowledge and confidence to install a pitless adapter and replace the well cap. Remember, if you have any doubts or concerns during the process, it’s always best to consult a professional for guidance.
Thank you for reading, and may your well system continue to provide you with clean, fresh water for years to come!
Frequently Asked Questions about How To Install Pitless Adapter
Was this page helpful?
At Storables.com, we guarantee accurate and reliable information. Our content, validated by Expert Board Contributors, is crafted following stringent Editorial Policies. We're committed to providing you with well-researched, expert-backed insights for all your informational needs.
0 thoughts on “How To Install Pitless Adapter”