Articles
How To Install Lower Adapter Uppababy
Modified: December 7, 2023
Learn how to install the lower adapter for your Uppababy stroller with our helpful articles. Easy step-by-step instructions for a hassle-free installation process.
(Many of the links in this article redirect to a specific reviewed product. Your purchase of these products through affiliate links helps to generate commission for Storables.com, at no extra cost. Learn more)
Introduction
Welcome to this comprehensive guide on how to install a lower adapter on an Uppababy stroller. If you have a growing family or simply desire additional seating options for your little ones, a lower adapter is a fantastic solution. By installing this adapter, you’ll be able to attach a second seat, a bassinet, or even a car seat onto your Uppababy stroller, giving you the flexibility and convenience you need.
Gone are the days of struggling with multiple strollers or bulky double strollers. With the lower adapter, you can easily transform your Uppababy stroller into a versatile ride for two. Whether you’re taking a leisurely stroll around the park or heading out for a family adventure, the lower adapter will provide a safe and comfortable space for your extra passenger.
In this step-by-step guide, we will walk you through the process of installing the lower adapter onto your Uppababy stroller. From gathering the necessary tools to finalizing the installation, we have you covered. So, let’s get started!
Key Takeaways:
- Transform your Uppababy stroller into a versatile ride for two by easily installing a lower adapter for additional seating options, providing flexibility and convenience for your growing family.
- Ensure a safe and stable attachment by following the step-by-step guide, from gathering the necessary tools to securely fastening the lower adapter onto the stroller frame, and enjoy peace of mind on your strolls with your little ones.
Read more: How To Install Pitless Adapter
Step 1: Gather the necessary tools and materials
Before you begin the installation process, it’s important to gather all the tools and materials you will need. Having everything on hand will ensure a smooth and efficient installation. Here’s a list of what you’ll need:
- Lower adapter: Make sure you have the correct lower adapter that is compatible with your Uppababy stroller model. Double-check the model number and ensure that it matches the adapter you have.
- Screwdriver: Depending on the specific Uppababy stroller model, you may need a Phillips head or flathead screwdriver. Check your stroller’s user manual to determine the appropriate type of screwdriver.
- Instruction manual: Read through the instruction manual that comes with the lower adapter. Familiarize yourself with the installation steps and any additional information specific to your adapter model.
By having these tools and materials ready, you’ll be prepared to install the lower adapter with ease and efficiency. Once you have gathered everything, you’re ready to move on to the next step.
Step 2: Remove the existing adapter
Before installing the lower adapter onto your Uppababy stroller, you’ll need to remove any existing adapter that may already be attached. Follow these steps to remove the existing adapter:
- Ensure that your stroller is parked on a flat surface and that the brake is engaged to prevent any movement.
- Locate the release buttons or levers on the sides of the existing adapter. These buttons are usually located near the connection points of the adapter with the stroller frame.
- Press and hold the release buttons/levers simultaneously while gently pulling up on the adapter.
- The existing adapter should detach from the stroller frame. Set it aside for now, as you will no longer need it for this installation.
Once you have successfully removed the existing adapter, you can proceed to the next step of preparing the lower adapter for installation. Removing the existing adapter ensures a clean slate for attaching the lower adapter and ensures a secure and stable connection with the stroller.
Continue reading to learn how to prepare the lower adapter for installation in Step 3.
Step 3: Prepare the lower adapter
Before installing the lower adapter onto your Uppababy stroller, it’s important to properly prepare it to ensure a seamless installation. Follow these steps to prepare the lower adapter:
- Inspect the lower adapter for any visible damage or defects. Ensure that all parts are intact and in good condition. If you notice any damage, contact the manufacturer for further assistance.
- Refer to the instruction manual that came with the lower adapter. Familiarize yourself with any specific assembly or preparation steps outlined in the manual.
- If necessary, attach any additional components or accessories as specified in the manual. This may include attaching brackets, connectors, or straps.
- Double-check that all screws and fasteners on the lower adapter are securely tightened. Use a screwdriver as needed to ensure a snug fit, but be careful not to overtighten and risk damaging the adapter.
Preparing the lower adapter ensures that it is ready for installation and minimizes the chance of encountering any issues during the process. Taking the time to inspect and assemble the adapter correctly will result in a secure and stable connection with your Uppababy stroller.
Once you have prepared the lower adapter, you’re ready to move on to the next step: installing the lower adapter onto the Uppababy stroller. Continue reading to learn how in Step 4.
Step 4: Install the lower adapter onto the Uppababy stroller
Now that you have prepared the lower adapter, it’s time to install it onto your Uppababy stroller. Follow these steps for a successful installation:
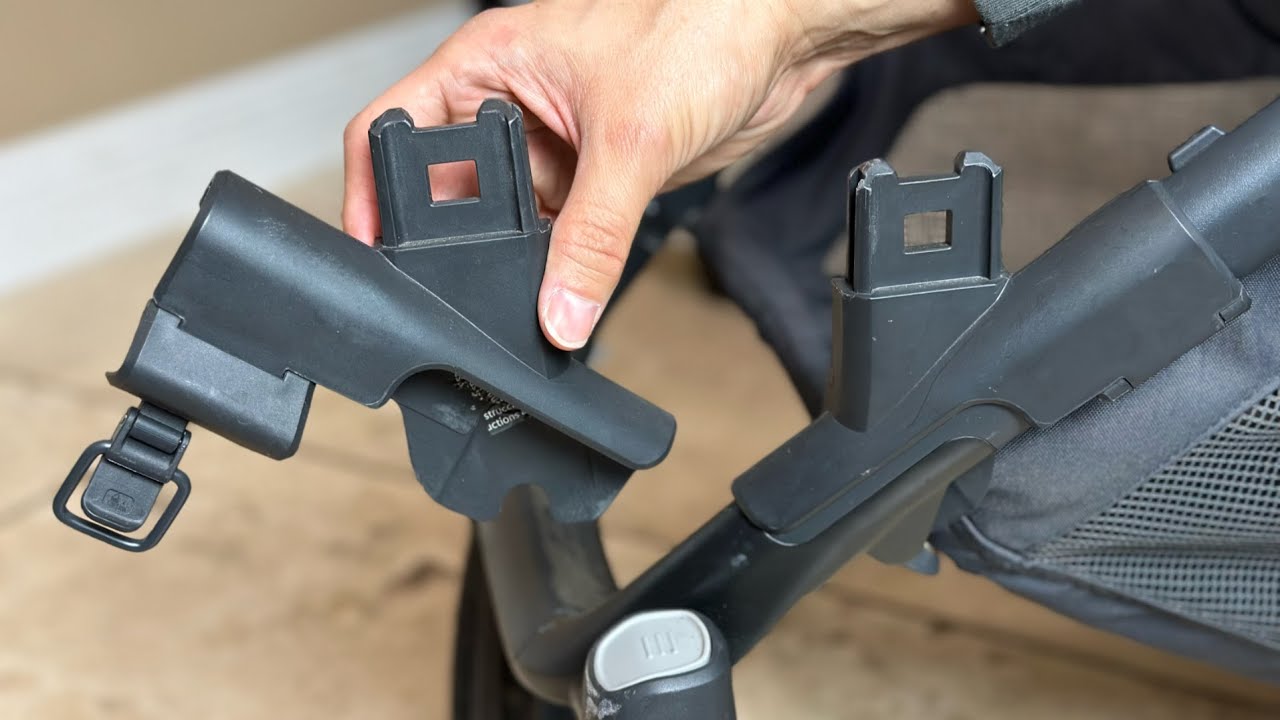
- Position the lower adapter at the desired attachment area on the stroller frame. Refer to the instruction manual for the specific location of the attachment points.
- Align the lower adapter’s connector pins or brackets with the corresponding receiver slots or brackets on the stroller frame. Ensure a proper fit and alignment before proceeding.
- Push the lower adapter downward and inward, applying slight pressure to engage the connector pins or brackets with the receiver slots or brackets on the stroller frame.
- Continue applying pressure and gently wiggle the lower adapter from side to side to help the pins or brackets fully engage with the slots or brackets on the stroller.
- Once the lower adapter is properly aligned and engaged, you should feel a secure connection between the adapter and the stroller frame.
It’s essential to be mindful of the alignment during the installation process. Make sure that the lower adapter is correctly positioned and seated securely in place. This will ensure the stability and safety of your Uppababy stroller when the lower adapter is in use.
With the lower adapter successfully installed onto the Uppababy stroller, you’re one step closer to enjoying the added versatility of your stroller. In the next step, we’ll cover securing the lower adapter in place. Continue reading to learn more in Step 5.
When installing the lower adapter for Uppababy strollers, make sure to securely attach it to the frame according to the manufacturer’s instructions. Double-check that it is properly aligned and locked in place before use.
Read more: How To Install Netgear Wifi Adapter
Step 5: Secure the lower adapter in place
After installing the lower adapter onto your Uppababy stroller, it’s important to ensure that it is securely fastened in place. Follow these steps to properly secure the lower adapter:
- Check for any screws or fasteners on the lower adapter that are designed to secure it to the stroller frame. Refer to the instruction manual to identify these securing mechanisms.
- Using a screwdriver or the appropriate tool, tighten any screws or fasteners on the lower adapter to securely fasten it to the stroller frame. Be cautious not to overtighten, as this may cause damage to the adapter or the stroller.
- Verify that the lower adapter is firmly attached to the stroller by giving it a gentle tug. It should not wobble or move significantly when properly secured.
- Inspect the entire lower adapter assembly, including any additional components or accessories, to ensure that nothing is loose or detached. Tighten any loose parts as necessary.
- Double-check the instruction manual to ensure that all securing steps have been followed correctly. This will help to guarantee the stability and safety of the lower adapter installation.
Securing the lower adapter is crucial for the safe and reliable use of your Uppababy stroller. Taking the time to properly tighten screws and inspect the overall attachment will provide you with peace of mind during your outings with the stroller and the additional seating options it provides.
With the lower adapter securely in place, you’re almost ready to start using it. In the next step, we’ll cover how to test the lower adapter installation. Continue reading to learn more in Step 6.
Step 6: Test the lower adapter installation
After installing and securely fastening the lower adapter onto your Uppababy stroller, it’s essential to test its functionality and stability before actually using it with your child. Follow these steps to test the lower adapter installation:
- Position the second seat, bassinet, or car seat onto the lower adapter attachment points. Align the connectors or brackets on the accessory with the corresponding attachment points on the lower adapter.
- Ease the accessory into place, ensuring that it properly connects to the lower adapter and securely locks in place. Refer to the accessory’s user manual for specific instructions on attachment and securing.
- Gently shake the accessory to gauge its stability. It should not feel loose or wobbly when attached correctly to the lower adapter and stroller frame.
- Move the stroller around, pushing and maneuvering it as you would during everyday use. Observe how the lower adapter and the attached accessory handle the movements and ensure there are no signs of instability.
- Test the functionality of any reclining or adjusting features of the accessory, ensuring they can be utilized smoothly and securely.
By testing the lower adapter installation, you can confirm that the attachment is secure and that the accessory is properly connected. This step ensures that you can safely accommodate an additional passenger or use the lower adapter with other seating options without any concerns about stability or functionality.
With the successful testing of the lower adapter installation, you’re almost finished with the process. In the next step, we’ll cover some final adjustments and considerations. Continue reading to learn more in Step 7.
Step 7: Final adjustments and considerations
As you near the completion of installing the lower adapter on your Uppababy stroller, there are a few final adjustments and considerations to keep in mind:
- Take a moment to review the maximum weight and age limits specified by both the Uppababy stroller and the lower adapter. Ensure that you are adhering to these guidelines to maintain safety and prevent damage to the stroller.
- Double-check that all screws, fasteners, and connections are securely tightened. Periodically inspect and tighten them as needed to maintain the stability of the lower adapter and the attached accessories.
- Refer to the instruction manual for any additional maintenance or care instructions specific to your Uppababy stroller and the lower adapter. Follow the recommended guidelines to prolong their lifespan and ensure optimal performance.
- If you have any concerns or questions about the installation or usage of the lower adapter, don’t hesitate to reach out to the manufacturer’s customer support or consult a certified retailer.
- Lastly, familiarize yourself with the proper folding and unfolding mechanisms of your Uppababy stroller when the lower adapter is installed. Ensure that the adapter does not hinder the stroller’s functionality or compromise the safety of your child.
By following these final adjustments and considerations, you can ensure the ongoing safety, functionality, and longevity of your Uppababy stroller and the lower adapter installation.
Congratulations! You have successfully installed the lower adapter onto your Uppababy stroller. Now you can enjoy the flexibility and convenience of accommodating an extra passenger or using different seating options with ease.
Remember to refer back to this guide or the instruction manual whenever you need to remove or reattach the lower adapter. With proper maintenance and attention, your Uppababy stroller and the lower adapter will continue to bring you and your little ones countless enjoyable outings.
Happy strolling!
Conclusion
Installing a lower adapter onto your Uppababy stroller is a simple yet transformative process that opens up a world of possibilities for accommodating an additional passenger or adding different seating options. By following the steps outlined in this guide, you can confidently install the lower adapter and enjoy the convenience and flexibility it provides.
From gathering the necessary tools and materials to securely fastening the lower adapter onto the stroller frame, each step is crucial in ensuring a safe and stable attachment. By properly preparing and testing the installation, you can enjoy peace of mind knowing that your Uppababy stroller is equipped to meet the needs of your growing family.
Throughout the installation process, it’s important to refer to the instruction manual for your specific Uppababy stroller model and lower adapter. These resources provide valuable information and guidance that can further enhance the installation experience.
Remember to always prioritize safety and adhere to the weight and age limits specified by both the stroller and the lower adapter. Regularly inspect and maintain the installation to ensure its ongoing stability and reliability.
With the lower adapter successfully installed, you’re ready to embark on new adventures with your loved ones. Whether it’s a leisurely stroll in the park, a trip to the zoo, or a family vacation, the versatility of your Uppababy stroller will accommodate all your needs.
Thank you for following this comprehensive installation guide. We hope it has been a helpful resource for you. Now, go out and enjoy the journey with your Uppababy stroller and the new possibilities it brings!
Frequently Asked Questions about How To Install Lower Adapter Uppababy
Was this page helpful?
At Storables.com, we guarantee accurate and reliable information. Our content, validated by Expert Board Contributors, is crafted following stringent Editorial Policies. We're committed to providing you with well-researched, expert-backed insights for all your informational needs.


0 thoughts on “How To Install Lower Adapter Uppababy”