Home>Articles>How To Install Laminate Flooring In Living Room

Articles
How To Install Laminate Flooring In Living Room
Modified: January 23, 2024
Learn how to install laminate flooring in your living room with our informative articles. Find easy step-by-step guides and expert tips for a successful installation.
(Many of the links in this article redirect to a specific reviewed product. Your purchase of these products through affiliate links helps to generate commission for Storables.com, at no extra cost. Learn more)
Introduction
Welcome to our comprehensive guide on how to install laminate flooring in your living room. Laminate flooring is a popular choice for homeowners due to its durability, affordability, and ease of installation. By following the steps outlined in this article, you will be able to transform your living room into a stylish and inviting space.
Installing laminate flooring may seem like a daunting task, but with the right tools, materials, and a little bit of planning, you can achieve professional-looking results. Whether you are a seasoned DIY enthusiast or a beginner, this step-by-step guide will walk you through the entire process, from preparing the room to laying the laminate planks, and everything in between.
Before we dive into the installation process, it’s important to note that laminate flooring comes in a variety of styles, colors, and thicknesses. Take some time to research and choose the laminate flooring that best suits your personal style and matches the overall aesthetic of your living room.
Now, let’s get started on installing your beautiful new laminate flooring in your living room!
Key Takeaways:
- Proper preparation is essential for successful laminate flooring installation. From gathering tools to acclimating the flooring and securing the planks, attention to detail ensures a professional and durable finish.
- Installing laminate flooring transforms a living room into a stylish space. With the right tools, materials, and step-by-step guidance, homeowners can achieve a beautiful and inviting environment.
Read more: How To Install Laminate Flooring
Step 1: Gather the Necessary Tools and Materials
Before you begin installing laminate flooring in your living room, it’s essential to gather all the necessary tools and materials. By having everything on hand, you’ll save time and avoid unnecessary delays during the installation process.
Here’s a list of tools and materials you’ll need:
- Laminate flooring – Make sure to purchase enough to cover the entire living room area, accounting for any waste or extra cuts.
- Underlayment – This is a thin foam or cork layer that goes under the laminate planks to provide support and cushioning.
- Tape measure – Essential for measuring the living room area and ensuring accurate cuts.
- Utility knife – Used for cutting the laminate flooring planks and underlayment.
- Chalk line – Helps in marking straight lines for guidance during installation.
- Circular saw or jigsaw – Used for making cuts, especially for fitting the flooring around corners or obstacles.
- Pry bar – Useful for removing baseboards or any existing flooring that needs to be replaced.
- Hammer – Required for securing the laminate flooring and underlayment.
- Spacers or wooden shims – These are used to create a small gap along the edges of the flooring for expansion.
- Tapping block – Helps to securely lock the laminate planks together.
- Laminate flooring installation kit – Often available as a set, these kits typically include a pull bar and a tapping block.
- Safety glasses and ear protection – It’s important to protect your eyes and ears while working with power tools.
- Vacuum or broom – Necessary for cleaning the living room area before installation.
Take the time to gather all these tools and materials before you start, as it will make the installation process much smoother. Having the right tools on hand will ensure that you can tackle any challenges that arise during the process and achieve a professional finish in your living room.
Step 2: Prepare the Living Room for Installation
Before you can start installing laminate flooring in your living room, it’s crucial to prepare the space properly. By taking the time to prepare the room, you will ensure a smooth and successful installation.
Here are the necessary steps to prepare your living room for laminate flooring:
- Clean the area: Begin by removing any furniture, rugs, or obstacles from the living room. Sweep or vacuum the floor to remove any dust or debris that might interfere with the installation process.
- Check for evenness: Use a level or straightedge to check the subfloor for any uneven areas. If you come across any high spots or low spots, you may need to level the subfloor before proceeding with the installation. This will ensure that your laminate flooring lays flat and avoids any potential problems down the line.
- Remove baseboards: If you plan on reusing your existing baseboards, carefully remove them using a pry bar. Take care not to damage them as you remove them from the walls.
- Inspect the subfloor: Check the subfloor for any damage or moisture issues. If you identify any problems, address them before proceeding with the installation. It’s important to have a solid and dry subfloor for the laminate flooring to adhere to.
- Consider underlayment: Depending on the type of laminate flooring you’ve chosen, you may need to install an underlayment. An underlayment acts as a moisture barrier and provides sound insulation. Follow the manufacturer’s instructions to properly lay down the underlayment, ensuring it covers the entire living room area.
Preparing your living room for laminate flooring installation is a crucial step to ensure a successful and long-lasting result. Taking the time to clean, level, and address any subfloor issues will help create a stable and even surface for the laminate flooring.
Once your living room is properly prepared, you’re ready to move on to the next steps in the installation process.
Step 3: Acclimate the Laminate Flooring
Acclimating the laminate flooring is an important step in the installation process. This allows the flooring to adjust to the temperature and humidity of the living room, ensuring optimal performance and preventing any issues such as warping or buckling later on.
Here’s how to acclimate the laminate flooring:
- Bring the laminate flooring into the living room: Open the boxes of laminate flooring and bring them into the living room where they will be installed. Leave them in the room for at least 48 hours before installation. This allows the flooring to acclimate to the temperature and humidity of the space.
- Keep the flooring flat and protected: Stack the laminate flooring boxes flat on the floor, preferably near the center of the room. Make sure they are protected from any moisture or direct sunlight during the acclimation period.
- Maintain the living room conditions: Throughout the acclimation period, it’s crucial to maintain the typical conditions of the living room. This means keeping the temperature and humidity levels close to what they would be during normal use. This will ensure that the flooring adjusts properly to its new environment.
Acclimating the laminate flooring allows it to expand or contract as necessary before installation. This helps to minimize any issues that may arise due to temperature or humidity changes in the living room.
By following this step, you are setting your laminate flooring up for success and maximizing its longevity and durability in your living room.
Step 4: Prepare the Subfloor
Preparing the subfloor is a crucial step in the installation process as it provides a stable foundation for the laminate flooring. A properly prepared subfloor will help ensure that your laminate flooring looks great and lasts for years to come.
Here’s what you need to do to prepare the subfloor:
- Clean the subfloor: Start by thoroughly cleaning the subfloor to remove any dirt, dust, or debris. Sweep or vacuum the area and use a damp cloth to wipe away any stubborn dirt.
- Repair any damage: Inspect the subfloor for any signs of damage, such as loose boards or cracks. If you find any, make the necessary repairs to ensure a solid and even surface.
- Remove protrusions: Check the subfloor for any protruding nails, staples, or other fasteners. Use a hammer and pry bar to remove them, ensuring the subfloor is smooth and free from any obstacles.
- Level the subfloor: Use a leveling compound to fill in any low spots or uneven areas on the subfloor. Follow the manufacturer’s instructions on how to properly mix and apply the compound. Use a straightedge or level to ensure the subfloor is level and flat.
Preparing the subfloor is essential for a successful laminate flooring installation. A clean and level subfloor will prevent the laminate planks from shifting or creaking and will provide a smooth and even surface for the flooring.
Once you have prepared the subfloor, you’re ready to move on to the next step of installing underlayment.
Read more: How To Install Laminate Flooring In Basement
Step 5: Install Underlayment
Installing underlayment is an important step in the laminate flooring installation process. Underlayment provides insulation, soundproofing, and helps smooth out any minor subfloor imperfections. It also acts as a moisture barrier, protecting the laminate flooring from moisture that may seep in through the subfloor.
Here’s a step-by-step guide on how to install underlayment:
- Measure and cut: Measure the living room area to determine the amount of underlayment you need. Roll out the underlayment parallel to the longest wall of the room, allowing a slight overlap along the edges.
- Secure the underlayment: Use tape or adhesive to secure the underlayment to the subfloor. Make sure it lies flat and does not have any wrinkles or bubbles.
- Seam the underlayment: If you have multiple strips of underlayment, overlap them by a couple of inches and tape them together. This helps create a seamless and continuous moisture barrier beneath the laminate flooring.
- Trim excess underlayment: Use a utility knife to trim any excess underlayment along the edges of the room. Be careful not to cut too close to the walls or leave gaps that may compromise the moisture barrier.
Installing underlayment is an essential step in ensuring the longevity and performance of your laminate flooring. It provides a cushioned and stable surface for the laminate planks and helps to reduce noise transmission between floors.
Once the underlayment is properly installed, you’re ready to move on to the next step of laying the first row of laminate flooring.
Step 6: Lay the First Row of Laminate Flooring
Now that you’ve prepared the subfloor and installed the underlayment, it’s time to start laying the laminate flooring. The first row is crucial as it sets the foundation for the rest of the installation. By following these steps, you’ll ensure that the first row is straight and properly aligned.
Here’s how to lay the first row of laminate flooring:
- Measure and cut: Measure the length of the wall and subtract the expansion gap allowance (usually around ¼ inch) from the measurement. Use a circular saw or jigsaw to make the necessary cuts on the first plank to fit the width of the living room.
- Place spacers: Place spacers along the short edge of the plank, and against the wall, to create the necessary expansion gap. Spacers are typically provided in laminate flooring installation kits or can be purchased separately.
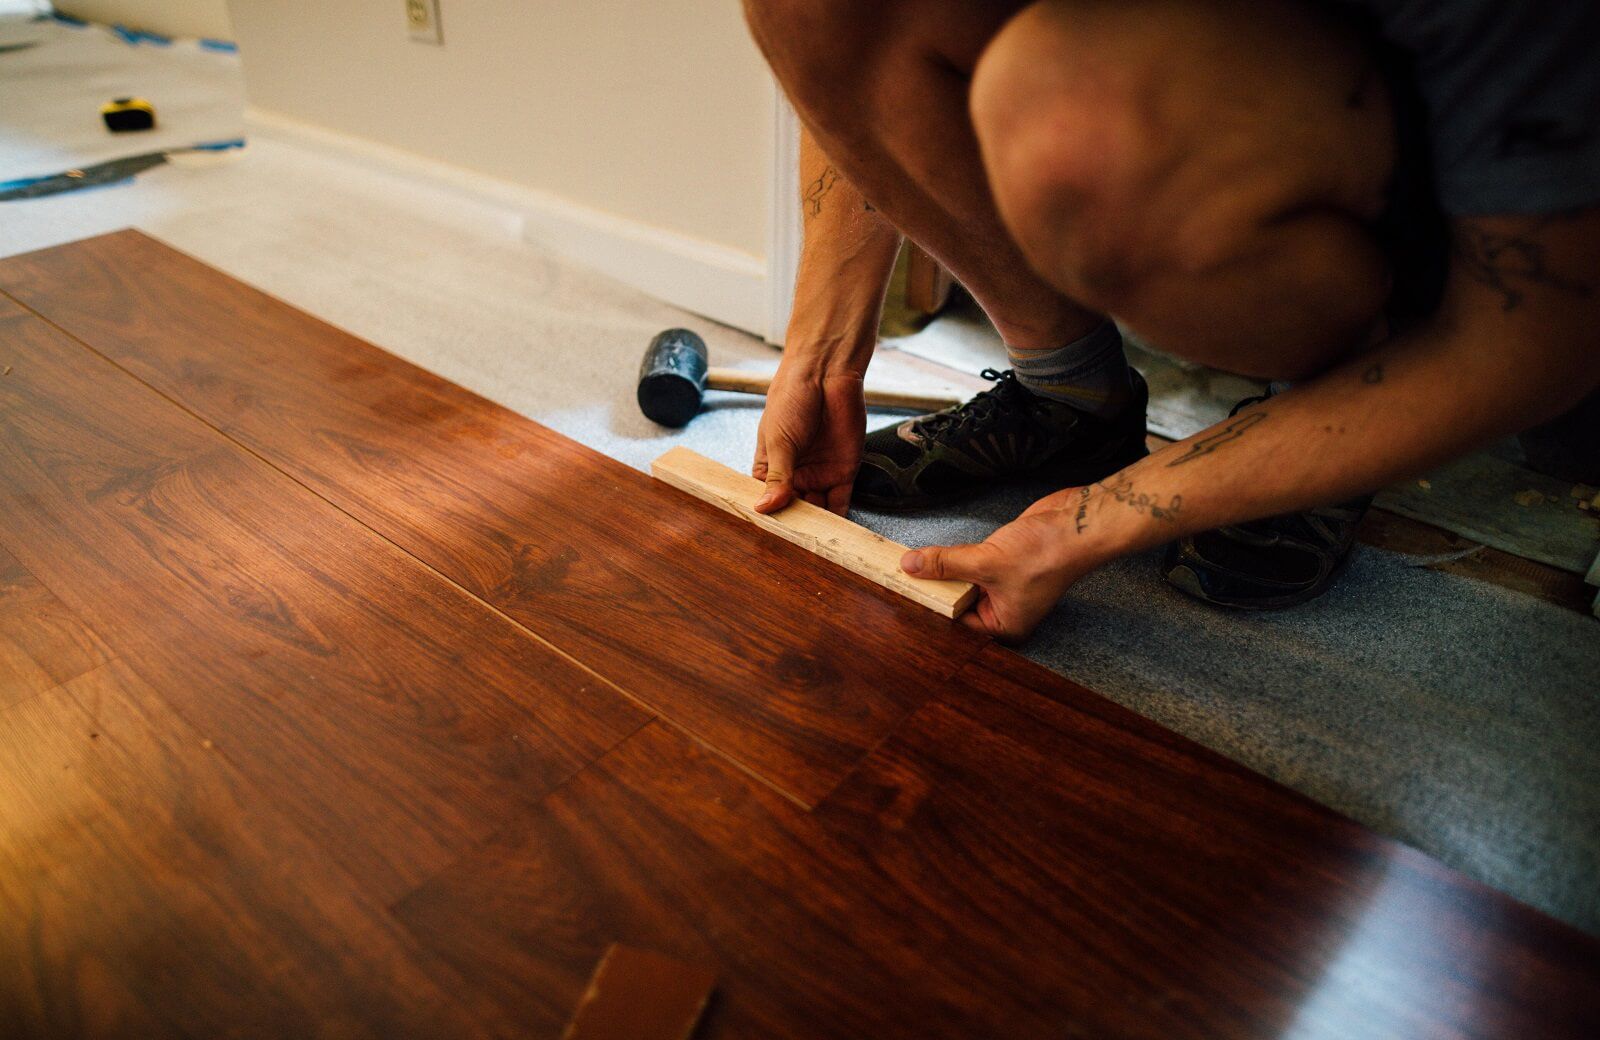
- Insert the first plank: Angle the cut end of the first plank into the groove of the second plank. Carefully lower the plank to the floor, ensuring it is locked in place. Use a tapping block and hammer to gently tap the plank into position if needed.
- Continue laying the first row: Repeat the process of measuring, cutting, inserting, and tapping for the remaining planks of the first row. Ensure each plank is properly aligned and locked together.
During this step, pay attention to the alignment and leveling of the planks. Use a level or straightedge to check that the first row is straight and even. Making adjustments now will prevent any issues as you progress with the installation.
Once the first row is laid, it serves as a guide for the subsequent rows. Take your time during this step to ensure a solid foundation for the entire laminate flooring installation.
With the first row in place, you’re ready to continue installing the remaining rows of laminate flooring in your living room.
Before starting the installation, make sure the subfloor is clean, dry, and level. Use underlayment to provide a smooth surface and reduce noise. And always follow the manufacturer’s instructions for a successful installation.
Step 7: Continue Installing Laminate Flooring Rows
Now that you have successfully laid the first row of laminate flooring, it’s time to continue with the installation by adding additional rows. By following these steps, you’ll achieve a seamless and professional-looking result.
Here’s how to continue installing laminate flooring rows:
- Measure and cut: Measure and cut the first plank of the second row to ensure it is staggered from the first row. The general rule is to make sure the end joint of each plank is at least 6 inches away from the end joint of the adjacent plank in the previous row. This helps to create a stronger and more visually appealing installation.
- Insert and lock the planks: Angle the cut end of the first plank into the groove of the second plank in the first row. Lower the plank to the floor, making sure it is aligned and locked in place. Use a tapping block and hammer to gently tap the plank if needed.
- Continue installing the row: Repeat the process of measuring, cutting, inserting, and tapping for the remaining planks of the second row. Ensure each plank is properly aligned and locked together. Remember to use spacers along the sides and ends to maintain the proper expansion gap.
- Repeat for subsequent rows: Continue laying each row following the same process. Stagger the end joints of the planks in each row, ensuring a random and natural appearance. Use a tapping block and hammer as necessary to fit the planks securely together.
- Check for leveling and alignment: Periodically check the leveling and alignment of the planks using a level or straightedge. Make any necessary adjustments to ensure a flat and even installation.
As you progress with the installation, take care to maintain the proper expansion gap and ensure the planks are tightly locked together. This will prevent any gaps or movement in the flooring once it is fully installed.
Continue installing the rows of laminate flooring until you reach the final row. Remember to regularly check the alignment and leveling to ensure a flawless finished result.
With each row installed, your living room will begin to transform with the beautiful and durable laminate flooring.
Step 8: Trim and Install Flooring Around Obstacles
When installing laminate flooring, you will likely encounter obstacles such as doorways, vents, or pillars. It’s crucial to properly trim and install the flooring around these obstacles for a seamless and professional finish. By following these steps, you’ll be able to navigate around obstacles with ease.
Here’s how to trim and install flooring around obstacles:
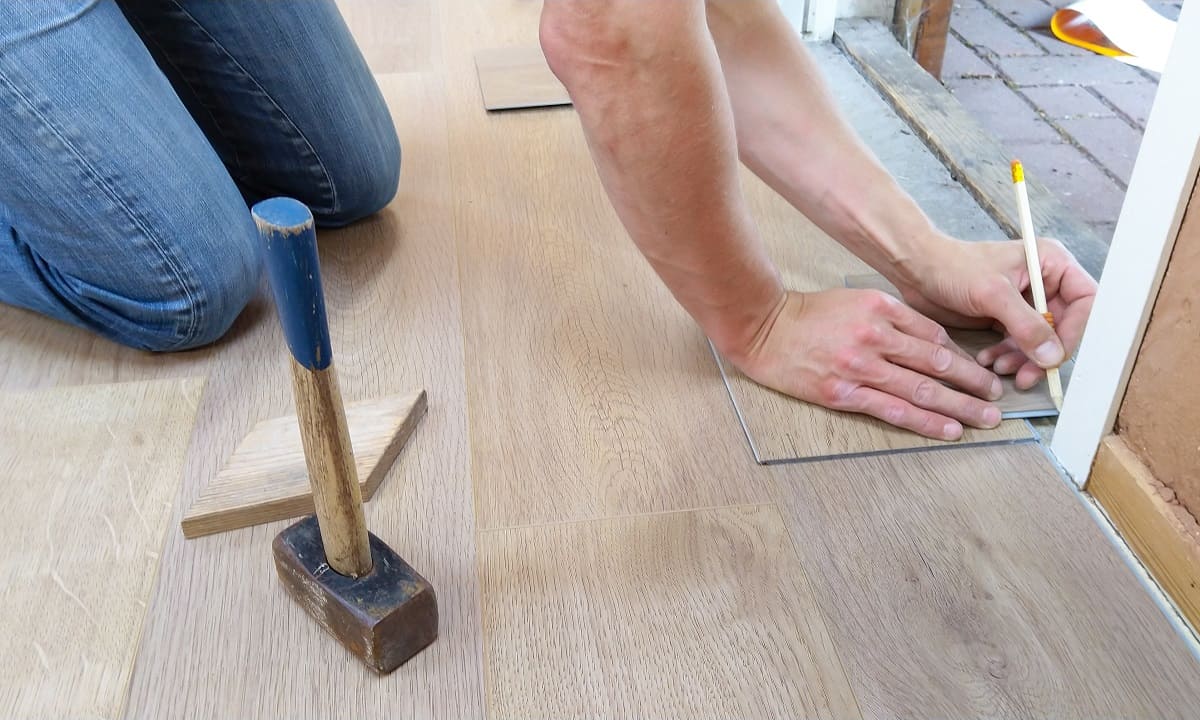
- Measure and mark: Measure the dimensions of the obstacle on the laminate plank. Use a square or straightedge to mark the measurements on the plank. Allow for a slight gap between the obstacle and the flooring to accommodate for expansion.
- Trim the plank: Use a circular saw or jigsaw to carefully cut along the marked lines on the plank. Take your time and make precise cuts to ensure a clean and accurate fit.
- Test the fit: Place the trimmed plank around the obstacle to test the fit. Make any necessary adjustments by carefully trimming or sanding the edges until the plank fits properly.
- Install the trimmed plank: Once you’re satisfied with the fit, apply adhesive or click it into place, depending on the type of laminate flooring you’re installing. Use a tapping block and hammer to ensure a secure and flush connection with the adjacent planks.
- Repeat for other obstacles: Follow the same process for trimming and installing the laminate flooring around any other obstacles in the living room, such as vents or pillars. Take care to maintain consistent spacing and alignment with the rest of the flooring.
Trimming and installing the flooring around obstacles requires precision and attention to detail. Take your time and double-check your measurements before making any cuts. A properly trimmed and installed flooring around obstacles will give your living room a polished and professional look.
With the obstacles successfully addressed, your laminate flooring installation is nearing completion. Continue with the following steps to finish the installation and add the final touches to your living room.
Read more: Laminate Wood Flooring
Step 9: Install Transition Strips
Transition strips are an essential component of a laminate flooring installation as they provide a seamless and smooth transition between different types of flooring or between rooms. By installing transition strips, you’ll achieve a polished and professional look in your living room.
Here’s how to install transition strips:
- Select the appropriate transition strips: Choose transition strips that best suit the transition you need to make. Common types include T-molding, reducer strips, and threshold strips.
- Measure and cut the transition strip: Measure the width of the doorway or the area where the transition strip will be installed. Mark the measurements on the strip and use a saw or utility knife to cut it to the correct size.
- Prepare the subfloor: Ensure that the area where the transition strip will be installed is clean and free from any debris. If necessary, level the subfloor to ensure a stable and even surface.
- Position the transition strip: Place the transition strip in the desired location, ensuring it aligns with the flooring on each side of the transition. Use a pencil or marking tool to mark the positions of any screw holes that may be present on the strip.
- Secure the transition strip: Use screws or adhesive (depending on the type of strip) to secure the transition strip in place. Follow the manufacturer’s instructions for the appropriate fastening method.
- Check for proper fit: Confirm that the transition strip sits securely and snugly in place. It should provide a smooth transition between the different flooring materials or rooms.
Installing transition strips is the final touch to completing your laminate flooring installation. They not only enhance the aesthetic appeal of your living room but also serve a functional purpose by providing a smooth and safe transition.
Once you have installed the transition strips, your laminate flooring installation is almost complete. The final step is to add the finishing touches to your living room by securing the laminate flooring and installing baseboards or quarter round.
Step 10: Secure the Laminate Flooring
Securing the laminate flooring is a crucial step in ensuring its stability and longevity. By properly fastening the flooring, you can prevent any movement, shifting, or creaking over time. This step will give you peace of mind and ensure that your living room floor is safe and secure.
Here’s how to secure the laminate flooring:
- Inspect the flooring: Before securing the laminate flooring, carefully inspect each plank for any visible gaps or issues. Address any loose or damaged planks before proceeding.
- Locate the joists or subfloor: Use a stud finder or knowledge of your home’s construction to identify the location of the joists or subfloor. This will guide you in determining where to secure the laminate flooring.
- Pre-drill holes: Using a drill bit slightly smaller than the diameter of the fasteners (nails or screws), pre-drill holes in the laminate flooring near the edges and ends of each plank. This will prevent the planks from splitting when securing them.
- Screw or nail the flooring: Carefully place the fasteners into the pre-drilled holes and attach them to the joists or subfloor. Use a hammer or drill (depending on the type of fasteners) to securely fasten the laminate flooring in place. Be careful not to over-tighten and damage the plank.
- Repeat for each row: Continue securing the laminate flooring row by row until you have covered the entire living room area. Take your time to ensure that each plank is properly fastened.
Securing the laminate flooring provides stability and prevents any movement or shifting. It is especially important in high-traffic areas or rooms where heavy furniture will be placed on top of the flooring.
Once you have securely fastened the laminate flooring, you are ready to move on to the final step of installing baseboards or quarter round to give your living room a polished and finished look.
Step 11: Install Baseboards or Quarter Round
The final step in completing your laminate flooring installation is to install baseboards or quarter round molding. These finishing touches not only enhance the aesthetic appeal of your living room but also serve a functional purpose by covering the gaps between the flooring and the walls.
Here’s how to install baseboards or quarter round:
- Measure and cut: Measure each section of the wall where the baseboards or quarter round will be installed. Use a miter saw or coping saw to make accurate cuts at a 45-degree angle for the corners.
- Test the fit: Before securing the baseboards or quarter round, place them along the walls to ensure they fit properly. Make any necessary adjustments by trimming the ends or using a coping saw to create a precise fit around corners.
- Apply adhesive: Apply a thin line of adhesive to the backside of the baseboards or quarter round. This will help secure them to the wall and prevent any movement over time. Follow the adhesive manufacturer’s instructions for the proper application and drying time.
- Press the molding into place: Carefully press the baseboards or quarter round onto the wall, ensuring they are aligned and snug. Use a hammer and finishing nails to secure them further, nailing at an angle into the studs or wall surface. Countersink the nails and fill any holes with wood filler for a seamless finish.
- Continue installation: Repeat the process for each section of the wall, ensuring a consistent gap between the molding and the laminate flooring.
Installing baseboards or quarter round is the final step to complete your laminate flooring installation. It provides a clean and finished look, hiding any gaps and providing a smooth transition between the flooring and the walls.
Once you have installed the baseboards or quarter round, step back and admire your beautifully installed laminate flooring. Your living room has now been transformed into a stylish and inviting space.
Congratulations on successfully installing laminate flooring in your living room!
Conclusion
Congratulations on completing the installation of laminate flooring in your living room! By following the step-by-step guide provided in this article, you have successfully transformed your space into a stylish and inviting area.
Throughout the installation process, you have learned how to gather the necessary tools and materials, prepare the living room, acclimate the laminate flooring, prepare the subfloor, install underlayment, lay the first row of laminate flooring, continue installing the remaining rows, trim and install flooring around obstacles, secure the laminate flooring, and finally, install baseboards or quarter round.
Laminate flooring offers durability, affordability, and easy maintenance, making it a popular choice for homeowners. With proper installation, your laminate flooring will provide years of beauty and functionality in your living room.
Remember to follow the manufacturer’s instructions and safety precautions throughout the process. Take your time, double-check your measurements, and pay attention to detail for a flawless finish. Always use protective gear when operating power tools.
Now that your laminate flooring is installed, take the time to enjoy and appreciate your newly transformed living room. Arrange your furniture, add some decorative elements, and make it a space that reflects your personal style and taste.
Should you have any questions or encounter any issues during the installation process, don’t hesitate to consult with professionals or seek assistance. With the right knowledge and guidance, you can overcome any challenges and create a stunning living room with laminate flooring.
Thank you for following this comprehensive guide. We hope you found it helpful and that your experience with installing laminate flooring has been a success. Enjoy your beautiful new living room!
Frequently Asked Questions about How To Install Laminate Flooring In Living Room
Was this page helpful?
At Storables.com, we guarantee accurate and reliable information. Our content, validated by Expert Board Contributors, is crafted following stringent Editorial Policies. We're committed to providing you with well-researched, expert-backed insights for all your informational needs.


0 thoughts on “How To Install Laminate Flooring In Living Room”