Articles
How To Lift Washer On Pedestal
Modified: August 25, 2024
Discover helpful articles on how to lift a washer on a pedestal and make laundry day easier. Learn step-by-step techniques and tips from experts.
(Many of the links in this article redirect to a specific reviewed product. Your purchase of these products through affiliate links helps to generate commission for Storables.com, at no extra cost. Learn more)
Introduction
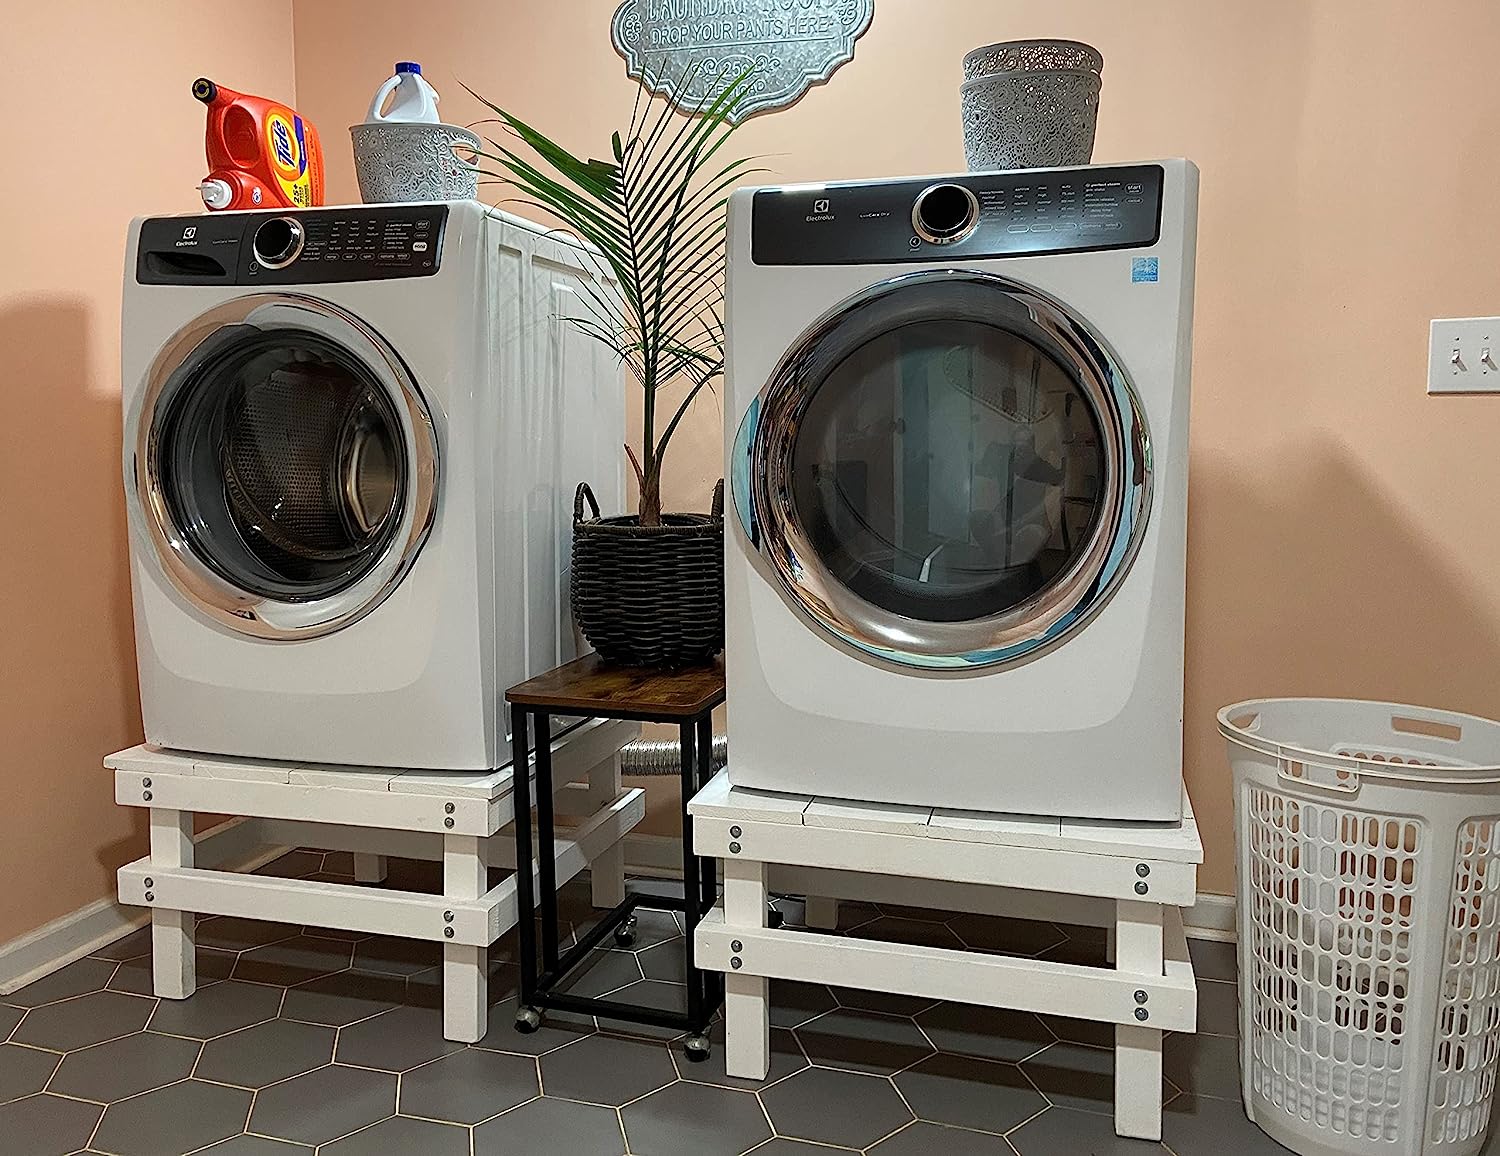
Adding a pedestal to your washing machine can provide numerous benefits, such as increased height for ease of loading and unloading, extra storage space, and improved ergonomic comfort. However, lifting a washer onto a pedestal can be a challenging task if not done correctly. In this article, we will guide you through the step-by-step process of safely and efficiently lifting a washer onto a pedestal.
Before starting this project, it is essential to gather all the necessary tools and equipment. Additionally, make sure you have someone to assist you, as lifting a heavy washer can be difficult and potentially dangerous when done alone.
Follow along with this guide to learn how to lift your washer onto a pedestal safely and avoid any potential injuries or damage to your appliance.
Key Takeaways:
- Elevate your washing machine onto a pedestal with ease by gathering the right tools, securing the area, and safely lifting and reconnecting the appliance. Enjoy added convenience and ergonomic comfort!
- Safely and efficiently lift your washer onto a pedestal with the help of an assistant, proper preparation, and cautious lifting techniques. Enjoy the benefits of extra storage space and improved functionality!
Step 1: Gather Necessary Tools and Equipment
Before you begin the process of lifting your washer onto a pedestal, it’s important to gather all the necessary tools and equipment. Having everything you need on hand will ensure a smoother and more efficient process. Here are the tools and equipment you will need:
- Assistant: Lifting a washer onto a pedestal is a two-person job. Having a reliable assistant to help you with the lifting will make the process much easier and safer.
- Measuring Tape: You will need a measuring tape to ensure the pedestal is the correct size for your washer and to measure the height clearance you need.
- Wrench: A wrench will be necessary to disconnect and reconnect any water and power supply connections.
- Dolly or Hand Truck: Having a dolly or hand truck will be useful for maneuvering the washer and pedestal to the desired location.
- Floor Protection: To avoid scratching or damaging your floors during the process, it’s a good idea to have some floor protection, such as moving blankets or furniture sliders.
Once you have gathered all the necessary tools and equipment, you will be ready to move on to the next step. Ensure that everything is easily accessible and in good working condition before proceeding.
Step 2: Secure the Area
Before attempting to lift the washer onto the pedestal, it is important to secure the area to ensure a safe and stable working environment. Follow these steps to prepare the area:
- Clear the Surrounding Space: Remove any objects or obstacles that may be in the way of the washer and pedestal. This will provide you with ample space to maneuver and lift the appliance.
- Check the Stability of the Floor: Make sure the floor is stable and level. Uneven flooring can affect the stability of the washer and pedestal, potentially causing them to wobble or tip over.
- Secure the Pedestal: If the pedestal has adjustable leveling feet, adjust them to ensure stability. If necessary, use a level to confirm that the pedestal is sitting evenly on the floor. This will prevent any rocking or instability during the lifting process.
By securing the area and ensuring the stability of the pedestal, you reduce the risk of accidents or damage during the lifting process. Taking the time to prepare the area properly will contribute to a smoother and safer installation.
Step 3: Disconnect Water and Power Supply
Before lifting the washer onto the pedestal, it is essential to disconnect the water and power supply to ensure safety and prevent any damage. Follow these steps to disconnect the water and power supply:
- Turn Off the Power: Locate the power outlet or circuit breaker that supplies electricity to the washer. Switch off the power to prevent any electrical accidents during the installation process.
- Turn Off the Water Supply: Locate the water valves behind the washer. Turn them clockwise to shut off the water supply. This step will prevent any leaks or water damage during the lifting process.
- Disconnect the Hoses: Use a wrench to loosen the hose connections at the back of the washer. Carefully disconnect the hoses from both the washer and the water supply. Be prepared for any residual water in the hoses by placing a towel or bucket underneath to catch any drips.
- Disconnect the Power Cord: Unplug the power cord from the outlet and carefully separate it from the washer. Make sure the cord is free from any obstructions or entanglements.
By properly disconnecting the water and power supply, you ensure the safety of both yourself and the appliance. Take the time to double-check that all connections are securely detached before proceeding to the next step.
When lifting a washer on a pedestal, make sure to bend your knees and lift with your legs to avoid straining your back. Use a dolly or have someone help if the washer is too heavy.
Step 4: Prepare the Pedestal
Now that you have disconnected the water and power supply, it’s time to prepare the pedestal for the washer installation. Follow these steps to properly prepare the pedestal:
- Clean the Pedestal: Ensure that the top surface of the pedestal is clean and free from any dirt, dust, or debris. Use a damp cloth to wipe down the surface, removing any stains or residue.
- Check for Compatibility: Ensure that the pedestal is compatible with your washer model. Check the manufacturer’s guidelines or instructions for any specific requirements or recommendations.
- Measure and Align: Carefully measure the dimensions of the washer and pedestal to ensure a proper fit. Adjust the positioning of the pedestal, if necessary, to align it with the washer’s feet or base.
- Secure the Pedestal: Follow the manufacturer’s instructions for securing the washer to the pedestal. This may involve using brackets, screws, or other hardware to secure the appliance firmly in place.
Preparing the pedestal is an important step to ensure stability and prevent any movement of the washer after it has been lifted onto the pedestal. Double-check that you have followed all the necessary steps and that the pedestal is ready for the installation process.
Read more: What Is A Washer Pedestal
Step 5: Lift Washer onto the Pedestal
Now comes the most critical and challenging step — lifting the washer onto the pedestal. This step requires caution, proper technique, and the help of an assistant. Follow these steps to safely lift the washer onto the pedestal:
- Position the Dolly or Hand Truck: If you have a dolly or hand truck, position it next to the washer. Make sure it is stable and ready for use.
- Lift the Washer: Stand on one side of the washer while your assistant stands on the other side. Use your legs and not your back to lift the washer slowly and steadily. Lift in unison with your assistant to maintain balance and prevent strain.
- Place the Washer onto the Pedestal: Carefully place the washer onto the pedestal, ensuring that the feet or base of the washer align with the corresponding slots or brackets on the pedestal.
- Adjust and Level: Once the washer is on the pedestal, check for any unevenness or misalignment. If needed, make slight adjustments to ensure that the washer is level and stable on the pedestal.
Take your time during this step to ensure a safe and secure installation. Communicate clearly with your assistant and maintain a steady pace. If you encounter any difficulties or obstacles, stop and reassess the situation before continuing.
Note: If you do not have a dolly or hand truck, you can lift the washer by gripping the sides firmly and using proper lifting technique. However, extra caution should be exercised to prevent any strain or injury.
Step 6: Reconnect Water and Power Supply
With the washer successfully lifted onto the pedestal, the final step is to reconnect the water and power supply. Follow these steps to safely reconnect the necessary connections:
- Position the Washer: Ensure that the washer is properly aligned on the pedestal and that the feet or base are securely placed in the corresponding slots or brackets.
- Reconnect the Hoses: Take the hoses that were previously disconnected and reconnect them to the appropriate ports on the washer. Use a wrench to tighten the connections, making sure they are secure but not overly tightened.
- Turn On the Water Supply: Slowly turn on the water valves behind the washer to restore the water supply. Check for any leaks and tighten the connections if necessary.
- Plug In the Power Cord: Reconnect the power cord to the outlet. Ensure that the plug is securely inserted and that there are no loose connections.
- Turn On the Power: Restore the power supply to the washer by turning on the respective power outlet or flipping the circuit breaker switch.
After reconnecting the water and power supply, it is important to test the washer to ensure that everything is working properly. Run a short cycle to check for any leaks, unusual noises, or error messages. If everything appears to be normal, you can proceed to enjoy the benefits of having your washer lifted on a pedestal.
Remember to check the washer’s user manual or manufacturer’s guidelines for any specific instructions or recommendations regarding the reconnection of the water and power supply.
Conclusion
Congratulations! You have successfully lifted your washer onto a pedestal, enhancing its functionality and convenience. By following the step-by-step process outlined in this article, you have ensured a safe and efficient installation. Here are the key takeaways:
- Gather all the necessary tools and equipment before starting the process.
- Secure the area by clearing obstacles and ensuring the stability of the floor and pedestal.
- Disconnect the water and power supply to prevent accidents and damage.
- Prepare the pedestal by cleaning it and ensuring compatibility with your washer.
- Lift the washer onto the pedestal with the assistance of another person, using proper lifting techniques.
- Reconnect the water and power supply, checking for any leaks or issues.
By following these steps, you have successfully completed the process of lifting your washer onto a pedestal. Enjoy the added convenience, extra storage space, and improved ergonomic comfort that a pedestal provides.
Remember, safety is paramount throughout the entire installation process. If you encounter any difficulties or feel unsure at any point, consult the manufacturer’s instructions or seek professional assistance.
Now, sit back and appreciate the benefits of having your washer elevated on a pedestal. Happy washing!
Now that you've mastered lifting your washer onto a pedestal, why not dive deeper into related topics to enhance your home efficiency? If you're curious about optimizing your utility area, our guide on creating a functional laundry space is a must-read. For those keen on appliance upkeep, our practical advice on keeping your washer and dryer in top shape will surely help prolong their lifespan. Both articles are packed with tips and insights designed to make your chores simpler and your home more organized.
Frequently Asked Questions about How To Lift Washer On Pedestal
Was this page helpful?
At Storables.com, we guarantee accurate and reliable information. Our content, validated by Expert Board Contributors, is crafted following stringent Editorial Policies. We're committed to providing you with well-researched, expert-backed insights for all your informational needs.


0 thoughts on “How To Lift Washer On Pedestal”