Articles
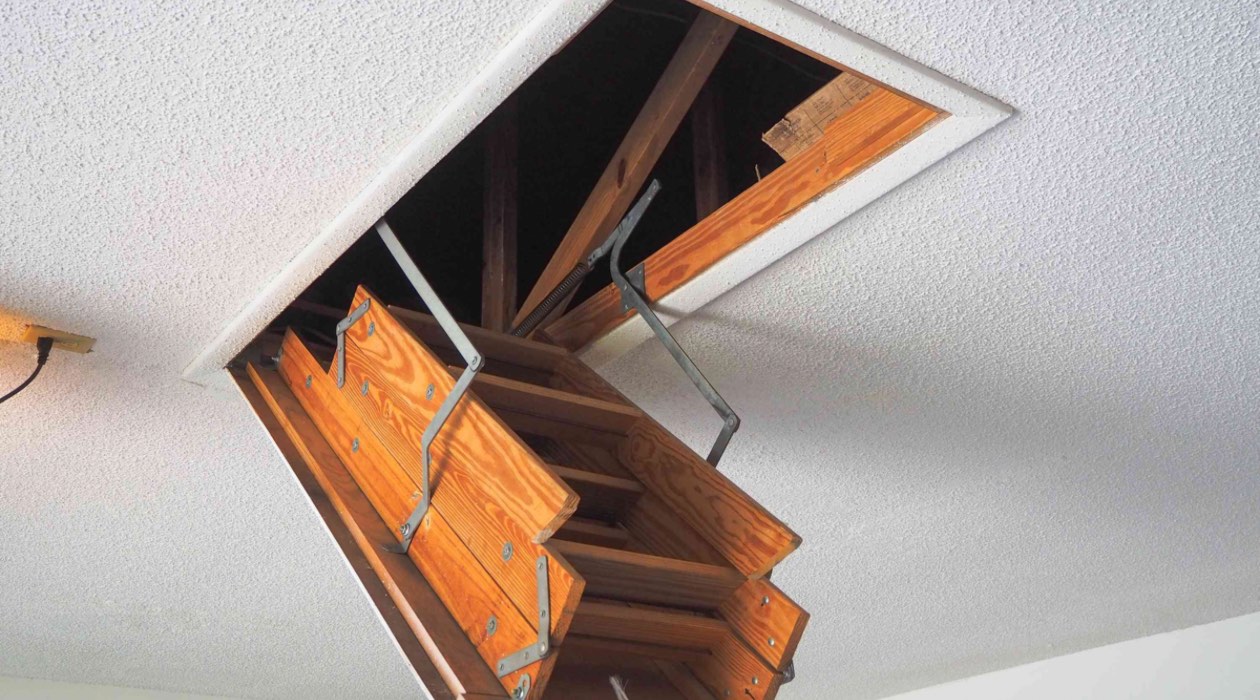
How To Build An Attic Lift
Modified: May 6, 2024
Learn the step-by-step process of building an attic lift with our informative articles. Increase storage space and accessibility in your home effortlessly.
(Many of the links in this article redirect to a specific reviewed product. Your purchase of these products through affiliate links helps to generate commission for Storables.com, at no extra cost. Learn more)
Introduction
Welcome to the world of attic lifts, a convenient and efficient solution for transporting heavy items to and from your attic with ease. Whether you have a small or large attic space, building an attic lift can save you time, effort, and potential strain on your back.
Attics are often used for storage, but accessing them can be a challenge. Carrying heavy boxes, furniture, or other belongings up a narrow staircase can be tiresome and even dangerous. That’s where an attic lift comes in. It is a mechanical system that allows you to lift and lower items to and from your attic using a motorized pulley system.
In this article, we will guide you through the process of building your own attic lift. We’ll cover everything from planning and designing the lift to installing the necessary components and ensuring its safe operation. So, roll up your sleeves and let’s get started!
Before diving into the construction process, it’s important to first gather all the materials and tools you’ll need. This way, you’ll be fully prepared and won’t have to interrupt the project to make additional trips to the hardware store.
Now that you have a general understanding of what an attic lift is and its benefits, let’s move on to the materials needed for this project.
Key Takeaways:
- Building an attic lift offers convenience and safety, reducing the strain of manually carrying heavy items. Careful planning, sturdy construction, and safety features ensure a reliable and efficient solution for accessing attic storage.
- Regular testing, maintenance, and the addition of safety features such as limit switches and emergency stop buttons are essential for ensuring the ongoing safe and efficient operation of an attic lift. Adhering to local building codes and regulations is also crucial for a successful attic lift installation.
Read more: How To Build A Lift Top Coffee Table
Materials Needed
Before embarking on your attic lift project, it’s important to gather all the necessary materials to ensure a smooth construction process. Here’s a list of the essential items you’ll need:
- Plywood or sturdy wooden boards: These will be used to construct the lift platform and support structure. Choose a thickness and size that can accommodate the weight of the items you plan to lift.
- Pulley system: Look for a heavy-duty pulley system that can handle the weight capacity you require. It should include pulleys, ropes, and a lifting mechanism.
- Motor: You’ll need an electric motor to power the attic lift. Consider the weight capacity and speed requirements when selecting the motor.
- Control system: To operate the lift, you’ll need a control system that allows you to raise and lower the platform with ease. This can include switches, buttons, or a remote control.
- Safety features: Depending on your preferences and local regulations, you may want to include safety features such as limit switches, emergency stop buttons, or a backup power supply in case of a power outage.
- Hardware: This includes screws, nails, bolts, washers, and other fasteners required for assembling the frame and pulley system.
- Electrical wiring: If you’re not experienced with electrical work, consult a professional to wire the motor and control system. Ensure you have the necessary wiring and connectors for a safe and reliable electrical setup.
- Safety equipment: Don’t forget personal protective equipment such as goggles, gloves, and a hard hat to ensure your safety while working on the attic lift.
- Measuring tools: A tape measure, level, and square are essential for accurate measurements and ensuring the lift is properly aligned.
- Drill and hand tools: You’ll need a drill or screwdriver, as well as basic hand tools like a hammer, wrench, and pliers, for construction and assembly.
Having these materials readily available will save you time during the construction process, allowing you to focus on building a sturdy and functional attic lift. With everything in hand, you’re now ready to start planning and designing your attic lift.
Step 1: Planning and Designing the Attic Lift
Before you begin building your attic lift, it’s crucial to spend some time planning and designing the layout. This step will determine the size, positioning, and functionality of your lift, ensuring that it meets your specific needs and fits seamlessly into your attic space. Here’s a step-by-step guide to help you plan and design your attic lift:
- Measure your attic space: Start by measuring the height, width, and depth of your attic. This will give you an idea of the dimensions you’ll be working with and help determine the size of the lift platform.
- Determine weight capacity: Consider the types of items you’ll be lifting and their combined weight. Ensure that the materials you choose for the lift’s frame, pulleys, and cables can handle the load safely.
- Create a layout design: Sketch out the desired layout of your attic lift. Identify where the motor, pulley system, and control mechanism will be placed. Take into account any existing obstacles in your attic space and plan around them.
- Consider access points: Determine the location where you’ll load and unload items from the lift. This could be near a staircase or a designated opening in the attic floor. Consider the height and width of this access point when designing the lift platform.
- Account for clearance space: Ensure that there is sufficient clearance above and around the lift platform to avoid any obstructions or potential damage when raising and lowering items.
- Research building codes and regulations: Familiarize yourself with any local building codes or regulations that may apply to attic lifts. These may include safety requirements, weight restrictions, or electrical considerations.
- Review safety guidelines: Before starting construction, understand and follow best practices for attic lift safety. This includes using appropriate safety features, avoiding overloading the lift, and conducting regular maintenance checks.
By planning and designing your attic lift carefully, you’ll have a clear vision of what you want to build and minimize any potential setbacks during the construction process. Once you’ve completed the planning phase, it’s time to gather the necessary tools and safety equipment to bring your attic lift to life.
Step 2: Gathering the Necessary Tools and Safety Equipment
Now that you have finalized the design and layout of your attic lift, it’s time to gather the tools and safety equipment needed to begin the construction process. Having the right tools on hand will ensure that the project goes smoothly and efficiently. Here’s a list of essential tools and safety equipment for building your attic lift:
- Drill: A power drill with various drill bits will be essential for drilling holes and securing the frame and components together.
- Screwdriver: Both a Phillips and a flat-head screwdriver will be necessary for driving screws and fasteners.
- Saw: Depending on the materials you are using, you may need a circular saw or a handsaw to cut the plywood or lumber.
- Tape Measure: Accurate measurements are crucial in constructing a functional attic lift, so a reliable tape measure is a must-have tool.
- Level: Use a level to ensure that the frame and platform of your attic lift are straight and balanced.
- Hammer: A hammer will come in handy for securing nails and more delicate tasks that require a lighter touch.
- Wrench and Pliers: These tools are essential for tightening nuts, bolts, and other fasteners during the assembly process.
- Safety Equipment: Protect yourself during construction by wearing safety goggles, gloves, and a hard hat to prevent injuries.
- Extension Cord: If your workspace is far from an electrical outlet, an extension cord will be necessary to power your tools and equipment.
Remember, safety should always be a top priority. Along with the necessary tools, make sure to have a first aid kit readily available in case of any minor accidents during the construction process.
Once you have gathered all the necessary tools, it’s time to move on to Step 3: Installing the Frame and Pulley System. This is where the structure of your attic lift will begin to take shape.
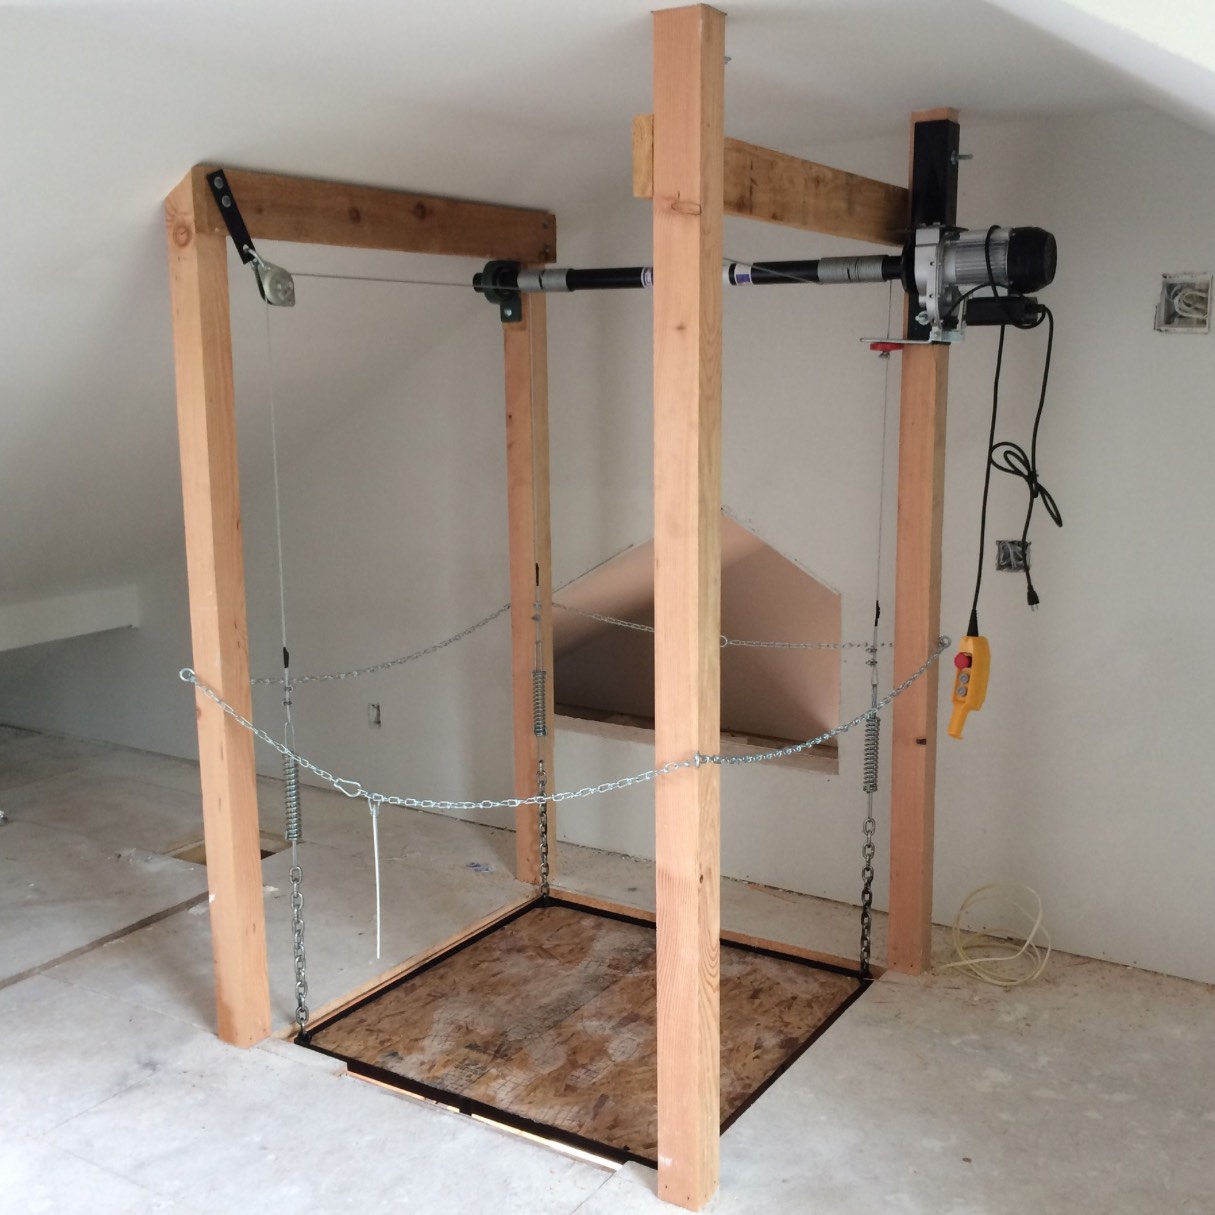
Step 3: Installing the Frame and Pulley System
With your tools and safety equipment at the ready, it’s time to start building the frame and installing the pulley system for your attic lift. The frame provides structural support for the lift, while the pulley system facilitates the raising and lowering of the platform. Follow these steps to ensure a successful installation:
- Measure and mark the dimensions: Use your tape measure and a pencil to mark the dimensions of the frame on the attic walls or floor. This will serve as a guide during the installation process.
- Construct the frame: Cut the wooden boards or plywood according to the measurements you marked. Use a saw to make clean and accurate cuts. Assemble the frame using screws or nails, depending on your preference.
- Secure the frame to the attic walls/floor: Use the appropriate screws or nails to securely attach the frame to the attic walls or floor. Ensure that the frame is level and sturdy, as it will bear the weight of the lift platform and the items being transported.
- Install the pulleys: Determine the appropriate placement for the pulleys, keeping in mind the desired lift height and clearance. Attach the pulleys to the frame using screws or bolts, ensuring that they are properly aligned and can move freely.
- Attach the ropes or cables: Once the pulleys are in place, attach the ropes or cables to them. These will be connected to the lift platform and will enable it to ascend and descend smoothly.
- Test the pulley system: Before moving on to the next step, test the pulley system by manually raising and lowering the lift platform. Ensure that the ropes or cables move with ease and do not snag or bind.
With the frame and pulley system installed, you are one step closer to having a functional attic lift. In Step 4, we will focus on attaching the lift platform, which is where your items will be placed for transportation to and from the attic.
When building an attic lift, make sure to use a sturdy and reliable winch or pulley system to safely lift and lower items. Check the weight capacity and ensure proper installation for smooth operation.
Read more: How To Build Stairs To Attic
Step 4: Attaching the Lift Platform
Now that the frame and pulley system are in place, it’s time to attach the lift platform. This is the component that will hold your items as they are raised and lowered in the attic. Follow these steps to securely attach the platform:
- Measure and cut the platform material: Measure the dimensions of the lift frame and cut the plywood or sturdy wooden boards to fit accordingly. Ensure that the platform is large enough to accommodate the items you plan to transport.
- Reinforce the platform: To provide additional strength and stability, consider adding support beams or braces underneath the platform. Attach these using screws or nails to reinforce the platform and prevent sagging under the weight of heavy objects.
- Position the lift platform: Carefully place the platform onto the frame, aligning it with the pulleys and ensuring that it fits securely. It should be level and stable, with no wobbling or unevenness.
- Secure the platform to the frame: Using screws or nails, securely fasten the platform to the frame to ensure it remains in place during operation. Make sure the screws or nails are countersunk to prevent any potential snags or hazards.
- Test the platform: Before proceeding to the next step, test the lift platform by applying a moderate amount of weight to simulate the items you plan to transport. Check for any signs of weakness or instability and make any necessary adjustments.
By successfully attaching the lift platform, you have achieved a major milestone in building your own attic lift. The sturdy and secure platform will ensure the safe transportation of your belongings to and from the attic. In the next step, we’ll focus on installing the motor and control system, which will power and control the movement of the lift.
Step 5: Installing the Motor and Control System
Now that the lift platform is securely attached, it’s time to install the motor and control system that will power and control the movement of your attic lift. Follow these steps to successfully complete this stage of the installation:
- Select the appropriate motor: Choose a motor that matches the weight capacity and speed requirements of your attic lift. Consider factors such as voltage, horsepower, and compatibility with the control system you’ll be using.
- Position the motor: Identify the ideal location for mounting the motor. Ensure that there is enough clearance for the motor to operate and that it aligns with the pulley system and lift platform.
- Secure the motor: Attach the motor securely to the frame using appropriate screws or bolts. Ensure that the motor is tightly fastened and that there is no excessive movement or vibrations when in operation.
- Connect electrical wiring: If you’re not experienced with electrical work, it’s best to consult a professional to handle this step. Connect the wiring from the motor to a power source, and follow proper safety guidelines and local electrical codes.
- Install the control system: Depending on the type of control system you’ve chosen, follow the manufacturer’s instructions to mount the control panel, switches, buttons, or remote control. Ensure that it is easily accessible and within reach during operation.
- Test the motor and control system: Once the motor is wired and the control system is installed, test the functionality of the lift. Use the control system to raise and lower the lift platform, ensuring that the motor operates smoothly and the platform responds correctly.
By successfully installing the motor and control system, you’ve added the power and control elements to your attic lift. You are now one step closer to enjoying the convenience and efficiency of effortlessly lifting and lowering items in your attic. In the next step, we’ll focus on testing and adjusting the attic lift to ensure its optimal performance.
Step 6: Testing and Adjusting the Attic Lift
With the motor and control system installed, it’s essential to test and adjust your attic lift to ensure its smooth and reliable operation. Follow these steps to ensure that your lift is working efficiently:
- Load the lift platform: Place some weight on the lift platform to simulate the items you plan to transport. This will allow you to test the lift’s performance under a realistic load.
- Operate the lift: Use the control system to raise and lower the lift platform multiple times. Pay close attention to any unusual noises, vibrations, or jerky movements that could indicate issues with the pulley system or motor.
- Check for levelness: Use a level to ensure that the lift platform remains level throughout its movement. If you notice any tilting or imbalance, inspect the frame and platform for any loose screws or connections that may need to be tightened.
- Test the weight capacity: Gradually increase the weight on the lift platform to test its maximum capacity. Ensure that the platform can handle the load without any strain or instability. If necessary, reinforce the platform or consult an expert to ensure its durability.
- Inspect the ropes or cables: Regularly inspect the ropes or cables for signs of wear, fraying, or stretching. If any of these issues are detected, replace the ropes or cables to maintain the safety and effectiveness of the lift.
- Check the safety features: Ensure that any safety features, such as limit switches or emergency stop buttons, are functioning correctly. Test these features to verify that they halt the lift’s movement in the event of an emergency.
- Make necessary adjustments: If you identify any issues during testing, make the necessary adjustments or repairs. This may involve tightening or replacing fasteners, lubricating moving parts, or consulting a professional for guidance.
Regularly testing and adjusting your attic lift will help identify and address any potential problems early on, ensuring its continued safe and efficient operation. Once you are satisfied with the performance of your attic lift, it’s essential to add some safety features to enhance its overall safety. This will be covered in the next step.
Step 7: Adding Safety Features
Safety is of paramount importance when it comes to operating an attic lift. Adding safety features to your lift will provide peace of mind and prevent potential accidents or injuries. Follow these steps to add important safety features:
- Install limit switches: Limit switches are designed to stop the lift’s movement once it reaches a predetermined height. These switches help prevent the lift from overextending and causing damage or injury. Consult the manufacturer’s instructions on how to properly install and adjust the limit switches.
- Add emergency stop buttons: Emergency stop buttons provide a quick and convenient way to halt the lift’s movement in case of an emergency. These buttons should be easily accessible, clearly labeled, and wired to immediately stop the motor when pressed.
- Consider backup power supply: To ensure continuous operation in the event of a power outage, it’s advisable to have a backup power supply for your attic lift. This could include a battery backup system or a generator to provide power to the lift when needed.
- Provide clear safety instructions: Display clear instructions and safety guidelines near the control system for anyone using the lift. This will remind users of proper procedures, weight limits, and any specific safety precautions they should be aware of.
- Regularly inspect and maintain: Create a schedule for regular inspections and maintenance of your attic lift. This includes checking for loose connections, lubricating moving parts, and ensuring that all safety features are functioning correctly. Make it a habit to inspect and maintain your lift to ensure its ongoing safe operation.
- Train users on proper operation: If multiple people will be using the attic lift, ensure that they receive proper training on its safe operation. Train users on how to handle heavy items, properly load and unload the lift platform, and use the control system and safety features effectively.
- Adhere to local building codes and regulations: Familiarize yourself with any local building codes or regulations that may apply to attic lifts. These regulations may specify certain safety requirements, weight limits, or electrical considerations that need to be followed.
By incorporating these safety features and practicing regular maintenance, you can greatly reduce the risk of accidents and ensure the long-term safe use of your attic lift. With the installation and safety measures complete, you can now enjoy the convenience and ease of accessing your attic space.
As a final note, remember to always prioritize safety and follow best practices when operating the attic lift. Regularly inspect and maintain the lift to ensure its ongoing safe operation, and address any issues promptly. Now that you have successfully built and implemented your attic lift, your attic space will become more accessible, organized, and efficient for all your storage needs.
Read more: How To Build An Attic Ladder
Conclusion
Congratulations! You have successfully learned how to build an attic lift, a valuable addition to your home that offers convenience and efficiency when it comes to accessing and storing items in your attic. By following the steps outlined in this guide, you have transformed your attic into a more accessible and organized space, all while reducing the risk of strain and injuries that can come from manually carrying heavy loads up and down a narrow staircase.
Throughout this process, careful planning and design were crucial to ensure that the attic lift meets your specific needs and fits seamlessly into your attic space. By gathering the necessary tools, materials, and safety equipment, you were able to construct a sturdy frame, install an efficient pulley system, and securely attach the lift platform.
With the motor and control system in place, you now have the power and control to effortlessly raise and lower the lift platform, making transportation of items to and from the attic a breeze. The addition of safety features such as limit switches, emergency stop buttons, and backup power supply further enhances the overall safety and reliability of your attic lift.
It is important to regularly test, adjust, and maintain your attic lift to ensure its continued safe and efficient operation. By doing so, you can identify and address any potential issues early on, providing peace of mind and extending the lifespan of your attic lift.
Remember to adhere to local building codes and regulations and always prioritize safety when operating the attic lift. Properly train all users on its safe operation and make sure to provide clear instructions and safety guidelines for reference.
Building an attic lift is not only a practical solution to accessing your attic but also a rewarding DIY project that adds value to your home. With your newly constructed attic lift, you can now enjoy the convenience, efficiency, and safety it brings to your storage needs. So, go ahead and enjoy your newfound accessibility to the attic space!
Now that you've mastered building an attic lift, why not extend that savvy to other areas of your home? For those who yearn for a clutter-free garage, our next feature covers innovative solutions. Offering a range of options from simple shelves to sophisticated systems, this guide on garage storage will transform how you organize and utilize space. Ideal for both seasoned DIY enthusiasts and beginners, these tips ensure your garage becomes as functional as it is tidy. Don't miss out on elevating your storage game!
Frequently Asked Questions about How To Build An Attic Lift
Was this page helpful?
At Storables.com, we guarantee accurate and reliable information. Our content, validated by Expert Board Contributors, is crafted following stringent Editorial Policies. We're committed to providing you with well-researched, expert-backed insights for all your informational needs.


0 thoughts on “How To Build An Attic Lift”