Articles
How To Make A Fireplace Out Of Boxes
Modified: January 20, 2024
Learn how to turn ordinary boxes into a stunning DIY fireplace with our informative articles. Transform your space with this creative project today!
(Many of the links in this article redirect to a specific reviewed product. Your purchase of these products through affiliate links helps to generate commission for Storables.com, at no extra cost. Learn more)
Introduction
Are you looking to add a cozy and inviting touch to your living space? Creating a fireplace out of boxes is a creative and budget-friendly way to achieve that desired ambience. Whether you live in a small apartment, a dorm room, or simply want to add some charm to your home, this do-it-yourself project is perfect for adding a touch of warmth and comfort.
In this article, we will guide you through the step-by-step process of how to make a fireplace out of boxes. With just a few simple materials and some creativity, you can transform an ordinary cardboard box into an eye-catching focal point in your room. So, let’s gather our supplies and get started with this fun and rewarding project!
Key Takeaways:
- Create a cozy ambiance with a DIY cardboard fireplace using simple materials and step-by-step guidance. Enjoy the warmth and charm of a faux fire, perfect for any living space.
- Unleash your creativity and transform cardboard boxes into a stunning focal point. Enjoy the rewarding process of crafting a budget-friendly fireplace, adding warmth and charm to your home.
Read more: What To Make Out Of Cardboard Boxes
Materials needed
Before we dive into the project, let’s gather all the materials we will need to create our DIY cardboard fireplace:
- Large cardboard boxes: You will need at least two large boxes to create the base and the firebox.
- Box cutter or scissors: To cut and shape the cardboard.
- Duct tape or adhesive tape: To secure the cardboard pieces together.
- Ruler or measuring tape: To measure the dimensions of the boxes.
- Markers or paint: To decorate and color the cardboard fireplace.
- Paintbrushes: To apply the paint or other decorative materials.
- Decorative accessories: Optional items such as faux logs, twinkle lights, or felt flames to add a realistic effect to the fireplace.
Once you have gathered all the necessary materials, you are ready to start building your very own cardboard fireplace. Let’s move on to the next step!
Step 1: Gathering the boxes
The first step in creating your cardboard fireplace is to gather the boxes you will need. Look for large boxes that are sturdy enough to hold the shape of the fireplace. You can repurpose old shipping boxes or check with local stores or supermarkets for spare boxes.
Make sure you have at least two large boxes of different sizes for the base and the firebox. The size of the boxes will depend on the dimensions you want for your cardboard fireplace. Measure the available space where you plan to place the fireplace and choose boxes accordingly.
Ensure that the boxes are clean and free from any stickers or labels. You may want to remove any tape or reinforcements from the boxes as well.
Once you have your boxes ready, it’s time to move on to the next step and start shaping them into a fireplace. Let’s get creative!
Step 2: Measuring and cutting the boxes
Now that you have your boxes gathered, it’s time to measure and cut them to create the desired shape for your cardboard fireplace.
Start with the larger box that will serve as the base of the fireplace. Measure the dimensions of the space where you plan to place the fireplace and use a ruler or measuring tape to mark the appropriate size on the box. You can create a rectangular shape or add some curves to make it more visually appealing.
Once you have marked the dimensions, carefully cut the box using a box cutter or scissors. Be sure to follow the marked lines for accuracy and keep your hands away from the cutting edge to prevent any accidents. If needed, ask for assistance from a friend or family member.
After cutting the base box, move on to the smaller box that will be the firebox. Measure and cut it accordingly, keeping in mind the dimensions you want for the depth and height of the firebox.
When cutting the boxes, take care to make smooth and clean cuts, as this will make it easier to assemble and decorate the cardboard fireplace later on. Double-check the dimensions and make any necessary adjustments before moving to the next step.
Now that you have measured and cut the boxes, it’s time to move on to the exciting part of assembling the base! Let’s continue with the next step.
Step 3: Assembling the base
With the cardboard boxes measured and cut to the desired shape, it’s time to assemble the base of your cardboard fireplace.
Start by positioning the larger box, which will serve as the base, in the desired location. Ensure that it is stable and secure.
Next, take the smaller box, which will be the firebox, and place it on top of the base box. Adjust its position until you are satisfied with the overall look and placement.
Use duct tape or adhesive tape to secure the smaller box to the base box. Apply the tape along the edges and corners, ensuring that the two boxes are firmly connected. This will provide stability to your cardboard fireplace.
If desired, you can reinforce the connection between the boxes by cutting strips of cardboard from the excess material and taping them along the inside corners of the fireplace.
Once the base is securely assembled, double-check its stability by gently pushing on the sides. If the boxes wobble or feel unsteady, reinforce the connections with more tape or add additional support from the inside with extra pieces of cardboard.
Now that the base is assembled, it’s time to move on to the next step of creating the firebox. Let’s proceed to step 4!
When making a fireplace out of boxes, be sure to use sturdy, fire-resistant materials such as metal or ceramic tiles to line the inside of the box. This will help prevent the risk of fire hazards.Read more: How To Make Small Boxes Out Of Paper
Step 4: Creating the firebox
Now that the base of your cardboard fireplace is assembled, it’s time to create the firebox where the “fire” will be displayed.
Start by measuring the dimensions of the top opening of the smaller box (the firebox) that is sitting on the base. This will determine the size of the opening where the faux fire will be placed.
Using a ruler or measuring tape, mark the dimensions on the top of the firebox. Make sure the opening is centered and symmetrical for a visually appealing result.
Next, carefully cut along the marked lines to create the opening on the top of the firebox. Use a box cutter or scissors and make clean, straight cuts.
Once the opening is cut, check if the size is suitable for your desired faux fire arrangement. Adjust the dimensions if needed by trimming the edges with scissors or a box cutter.
After creating the opening, you can choose to add a decorative border or frame around it using additional pieces of cardboard. Cut strips of cardboard to the desired width and length, and attach them around the opening using tape or adhesive. This will enhance the visual appeal of your firebox.
Now that the firebox is created, it’s time to proceed to the next step of adding the chimney. Let’s continue to step 5!
Step 5: Adding the chimney
Adding a chimney to your cardboard fireplace will give it a more realistic and authentic look. Let’s dive into the fifth step of our DIY project!
Start by measuring and cutting a rectangular piece of cardboard that will serve as the chimney. The size of the chimney will depend on the overall dimensions of your fireplace, but a typical size would be around 6 to 8 inches in width and height.
Once you have cut the chimney piece, position it at the back of the fireplace, near the top. Make sure it is centered and aligned with the opening you created for the firebox.
Use duct tape or adhesive tape to secure the chimney piece to the back of the fireplace. Apply the tape along the edges of the chimney, ensuring that it is firmly attached and does not wobble.
If desired, you can add more stability to the chimney by cutting two additional pieces of cardboard in a triangular shape. Attach these pieces to the sides of the chimney, creating a support structure. Tape them firmly to the chimney and the back of the fireplace.
Now that the chimney is securely attached, you can further enhance its appearance by using markers or paint to add brick or stone details. This will give your cardboard fireplace a more realistic and textured look.
With the chimney in place, we are almost there! It’s time to move on to the next step and add some color and design to our fireplace. Let’s proceed to step 6!
Step 6: Painting and decorating the fireplace
Now that the structure of your cardboard fireplace is complete, it’s time to make it visually appealing by adding paint and decorative elements. Let’s dive into the exciting process of painting and decorating!
Start by preparing the surface of the cardboard fireplace for paint. You can lightly sand any rough edges or uneven surfaces to create a smoother finish. Remove any dust or debris with a clean, dry cloth.
Choose a paint color that suits your style and complements the decor of the room. Acrylic paint or spray paint works well for cardboard surfaces. Apply the paint using a paintbrush or spray can, covering the entire fireplace with an even coat. Let it dry according to the instructions on the paint container.
Once the base coat is dry, you can get creative with additional designs and details. Use different colors of paint to add brick or stone textures to the surface of the fireplace. You can also experiment with stencils or freehand painting to create patterns or designs that mimic the look of a real fireplace.
After the paint has dried completely, you can move on to adding decorative elements to the fireplace. This is where you can let your creativity shine!
Consider adding faux logs, twinkle lights, or felt flames to create a realistic fire effect. Arrange the faux logs inside the firebox, placing them strategically to create a natural-looking arrangement. String twinkle lights around the logs to simulate the flickering glow of a fire. Cut out flame shapes from felt or colored paper and attach them inside the firebox to complete the visual effect.
Additionally, you can personalize your cardboard fireplace with other decorative accessories such as garlands, stockings, or small ornaments. Let your imagination run wild and make it unique to your style and taste.
With the painting and decorating complete, our cardboard fireplace is truly beginning to take shape! Let’s move on to the final step and bring the fire to life. Move on to step 7!
Step 7: Placing the faux fire inside
Now that your cardboard fireplace is painted, decorated, and ready to go, it’s time to bring the fire to life with a faux fire arrangement. Let’s delve into the final step of our DIY project!
Start by arranging the faux logs inside the firebox. Place them strategically to create a natural and realistic look. You can stack them in a pyramid shape or arrange them in a more random pattern, depending on your preference.
Once the logs are in place, it’s time to add the twinkle lights to simulate the flickering glow of a real fire. Carefully intertwine the lights among the faux logs, ensuring that the bulbs are evenly distributed. Plug in the lights and adjust the intensity or settings if available, until you achieve the desired fire-like effect.
If you have cut out flame shapes from felt or colored paper in the previous step, now is the time to attach them to the twinkle lights or the back of the firebox. This will add an extra dimension and visual appeal to the faux fire.
Take a step back and admire your creation! Turn off the room’s main lights and enjoy the cozy and warm ambiance that your DIY cardboard fireplace brings.
Remember to exercise caution when operating the twinkle lights and always follow the manufacturer’s instructions. Keep an eye on the fireplace to ensure that the lights do not become overheated or pose a fire hazard.
Now that you have successfully completed all the steps, your cardboard fireplace is ready to enhance the atmosphere of any room. Take some time to sit back, relax, and enjoy the warmth and coziness it brings.
Keep in mind that cardboard fireplaces are not meant to generate actual heat or contain real fires. They are solely for decorative purposes and should be used responsibly and with caution.
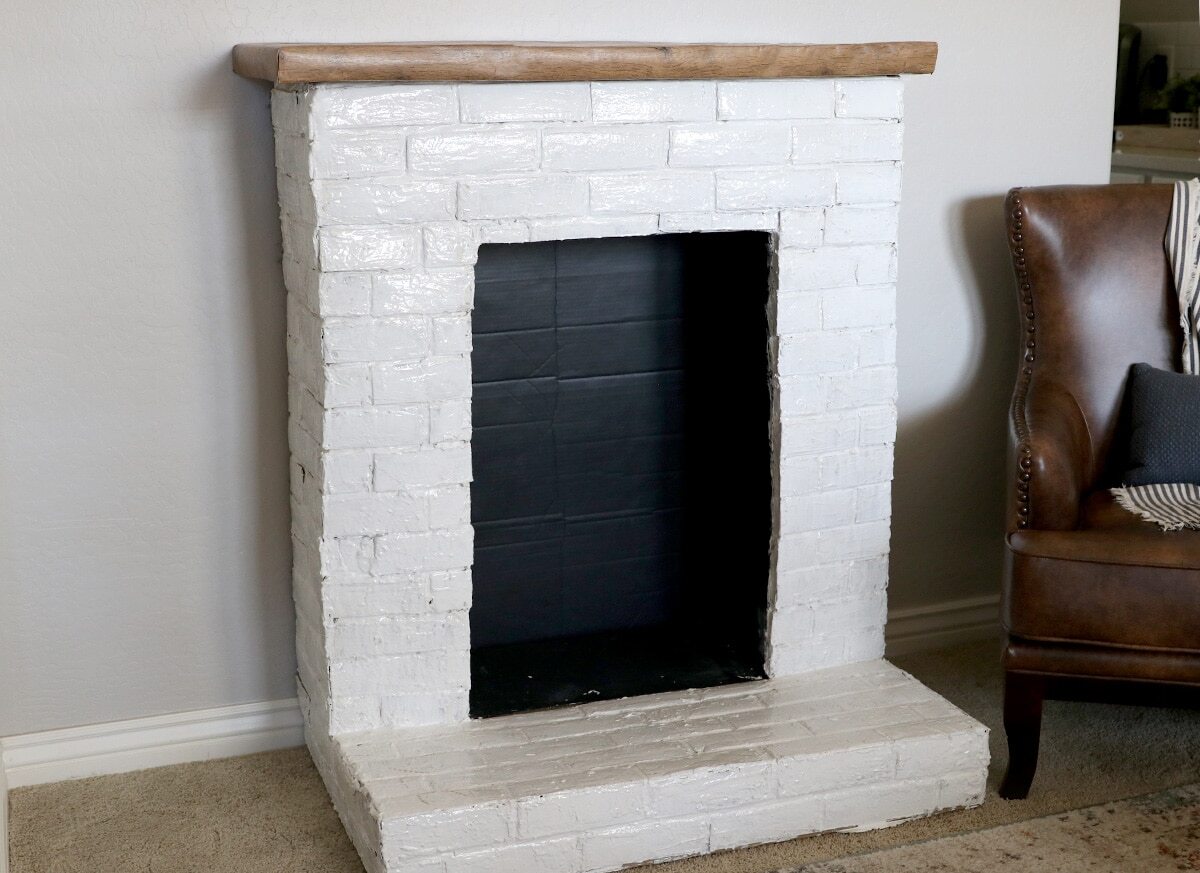
Congratulations on completing your DIY cardboard fireplace! It’s a creative and budget-friendly way to add a touch of warmth and charm to your living space. You can now bask in the comforting glow of your very own fireplace, made out of boxes!
Conclusion
Creating a fireplace out of boxes is a fun and creative project that adds a cozy and inviting touch to any living space. With just a few simple materials and some imagination, you can transform an ordinary cardboard box into a stunning focal point that exudes warmth and charm.
In this article, we have provided a step-by-step guide on how to make a cardboard fireplace. From gathering the boxes to painting and decorating, each step has been carefully outlined to ensure a smooth and enjoyable DIY experience.
By utilizing materials such as large cardboard boxes, box cutters, tape, paint, and decorative accessories, you can bring your cardboard fireplace to life. Whether you live in a small apartment, a dorm room, or simply want to add a touch of coziness to your home, this project is easily customizable to suit your style and space.
The finished product will not only serve as a decorative element but also create a warm and inviting ambiance. Imagine curling up on a cold winter evening, snuggled by the glow of your faux fire, and enjoying the comforting atmosphere it provides.
Remember, safety should always be a priority. Be cautious when dealing with electrical components, ensure proper ventilation, and never leave the lights unattended. Furthermore, cardboard fireplaces are not designed for real fires or to generate heat, so exercise caution and responsible usage.
So why not unleash your creativity and embark on this DIY project? Whether it’s for a special occasion or to add a cozy touch to your everyday life, a cardboard fireplace made with love and care will undoubtedly become a beautiful centerpiece in your home.
With a little ingenuity and resourcefulness, you can turn humble cardboard boxes into a stunning and functional piece of decor. Let your imagination run wild, gather your materials, and embark on the adventure of creating your very own cardboard fireplace.
Enjoy the process, embrace your creativity, and revel in the warmth and charm your DIY fireplace brings. Happy crafting!
Frequently Asked Questions about How To Make A Fireplace Out Of Boxes
Was this page helpful?
At Storables.com, we guarantee accurate and reliable information. Our content, validated by Expert Board Contributors, is crafted following stringent Editorial Policies. We're committed to providing you with well-researched, expert-backed insights for all your informational needs.

0 thoughts on “How To Make A Fireplace Out Of Boxes”